
Operation Manual
Page 3
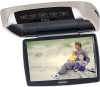
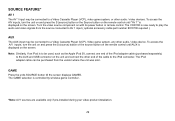
... video entertainment in the mobile environment. Please note: Installation options vary, see the individual owner's manuals for each component's operation. FEATURES • 10.2" TFT (Thin Film Transistor) Active Matrix LCD (Liquid Crystal Display) Monitor ...Video / Monitor. Please read the directions that follow to familiarize yourself with the product to ensure that you obtain the best results from your equipment. System adjustments can be accomplished using the remote control, while seat-belts remain fastened. Congratulations Congratulations on your purchase of the Audiovox VOD108...
... video entertainment in the mobile environment. Please note: Installation options vary, see the individual owner's manuals for each component's operation. FEATURES • 10.2" TFT (Thin Film Transistor) Active Matrix LCD (Liquid Crystal Display) Monitor ...Video / Monitor. Please read the directions that follow to familiarize yourself with the product to ensure that you obtain the best results from your equipment. System adjustments can be accomplished using the remote control, while seat-belts remain fastened. Congratulations Congratulations on your purchase of the Audiovox VOD108...

Operation Manual
Page 4
... AND INDICATORS DIAGRAM (FRONT VIEW) 6 5 43 21 1. After the Disc is used to wireless headphones. Also allows the remote control to operate the VOD108 and to turn Off after 15-20 seconds. 13 14 7 8 9 10 ON OFF AUTO 2. EJECT () Button This Button is used to select one of a disc. 4. POWER ( ) Button Used...
... AND INDICATORS DIAGRAM (FRONT VIEW) 6 5 43 21 1. After the Disc is used to wireless headphones. Also allows the remote control to operate the VOD108 and to turn Off after 15-20 seconds. 13 14 7 8 9 10 ON OFF AUTO 2. EJECT () Button This Button is used to select one of a disc. 4. POWER ( ) Button Used...

Operation Manual
Page 6
...battery holder. 2. Align the battery holder with a Pull Tab to prevent battery discharge. REMOTE CONTROL OPERATION MAIN FUNCTION DESCRIPTION CR2025 Initial Use When purchased the remote control has a battery installed with the remote control and push it in until the holder clicks. 6 POWER 1 M1 M2 29 SOURCE... 2 TV DVD MUTE 3 DVD SOURCE VOLUME 28 27 4 PIX 26 5 SYSTEM MENU DISC MENU ZOOM 6 25 7 24 REPEAT 23 ENTER 8 DISPLAY SETUP SUBTITLE 9 22 DVD SOURCE AUDIO 21 10 ...
...battery holder. 2. Align the battery holder with a Pull Tab to prevent battery discharge. REMOTE CONTROL OPERATION MAIN FUNCTION DESCRIPTION CR2025 Initial Use When purchased the remote control has a battery installed with the remote control and push it in until the holder clicks. 6 POWER 1 M1 M2 29 SOURCE... 2 TV DVD MUTE 3 DVD SOURCE VOLUME 28 27 4 PIX 26 5 SYSTEM MENU DISC MENU ZOOM 6 25 7 24 REPEAT 23 ENTER 8 DISPLAY SETUP SUBTITLE 9 22 DVD SOURCE AUDIO 21 10 ...

Operation Manual
Page 7
TV Mode Select Button** Switches certain function keys on the remote control for BRIGHTNESS, CONTRAST, COLOR, TINT or RESET. SOURCE Button* Each time the button is pressed, the audio / video source will remain on DVD Source. If the Card Reader and USB are made within 6 seconds, or is any other button is ...(Picture Select)* Each time this model. 1. Press to change in DVD mode. The display will be selected. DVD Source This button is only activated when remote control is in the following sequence: DVD > AV1 > AV2 > GAME. 3. * Function control is available on the unit and the...
TV Mode Select Button** Switches certain function keys on the remote control for BRIGHTNESS, CONTRAST, COLOR, TINT or RESET. SOURCE Button* Each time the button is pressed, the audio / video source will remain on DVD Source. If the Card Reader and USB are made within 6 seconds, or is any other button is ...(Picture Select)* Each time this model. 1. Press to change in DVD mode. The display will be selected. DVD Source This button is only activated when remote control is in the following sequence: DVD > AV1 > AV2 > GAME. 3. * Function control is available on the unit and the...

Operation Manual
Page 11
VOLUME DOWN (-) or UP (+)* Press to eject the disc. 11 MUTE Button Press this button to the previously set level. 29. EJECT () Button* This button is used to decrease or increase the level of the wired headphone volume. 27. Pressing the button again restores the sound to mute the audio for DVD function. 28. DVD Mode Select Button Switches certain function keys on the remote control for wireless FMM, IR HEADPHONES and wired headphones. 26.
VOLUME DOWN (-) or UP (+)* Press to eject the disc. 11 MUTE Button Press this button to the previously set level. 29. EJECT () Button* This button is used to decrease or increase the level of the wired headphone volume. 27. Pressing the button again restores the sound to mute the audio for DVD function. 28. DVD Mode Select Button Switches certain function keys on the remote control for wireless FMM, IR HEADPHONES and wired headphones. 26.

Operation Manual
Page 12
... 12 Note: System Menu can be adjusted to satisfy your preference. 1) Once the PICTURE CONTROL sub menu is displayed the operator can be controlled via Remote Control only. (Items selected in the sub menu and then press the OK button to select. 5) Press the SYSTEM MENU button to the factory setting... the system to change the screen mode display, OSD language and source default. 1) Press the TV button followed by the SYSTEM MENU button on the remote, the main page of the system menu will appear on screen. 2) Use the cursor buttons p or q to select the desired item in the main page...
... 12 Note: System Menu can be adjusted to satisfy your preference. 1) Once the PICTURE CONTROL sub menu is displayed the operator can be controlled via Remote Control only. (Items selected in the sub menu and then press the OK button to select. 5) Press the SYSTEM MENU button to the factory setting... the system to change the screen mode display, OSD language and source default. 1) Press the TV button followed by the SYSTEM MENU button on the remote, the main page of the system menu will appear on screen. 2) Use the cursor buttons p or q to select the desired item in the main page...

Operation Manual
Page 15
..., you customize your DVD player. Press the SETUP button on the icon side of the setup page. Press u to position the highlight back on the remote. Press p or q to highlight the desired option, and press ENTER to set a language for the onscreen display or prevent DVD playback for children. After entering... steps 3~4 to confirm the selection. 5. To set the desired option, move the highlight into the setup area using the cursor button p or q. 4. Language OSD Language Video Rating Subtitle Audio Misc : English : Off : English 2.
..., you customize your DVD player. Press the SETUP button on the icon side of the setup page. Press u to position the highlight back on the remote. Press p or q to highlight the desired option, and press ENTER to set a language for the onscreen display or prevent DVD playback for children. After entering... steps 3~4 to confirm the selection. 5. To set the desired option, move the highlight into the setup area using the cursor button p or q. 4. Language OSD Language Video Rating Subtitle Audio Misc : English : Off : English 2.
Operation Manual
Page 19
... ENTER button to initiate a change of chapter selection. the second media source can only be manually selected by pressing the DVD sourse button on Remote Control.) 2. The banner includes title, chapter, angle, audio, subtitle, title selection & chapter selection. 2. Chapter selection Press numeric(0~9) buttons to... USB media automatically if no disc is in the DVD player. 19 This system cannot support more than 2 memory partitions on the remote control to implement the selection. 3. Note: The system will detect the insertion of title selection. Press the DISPLAY button on the ...
... ENTER button to initiate a change of chapter selection. the second media source can only be manually selected by pressing the DVD sourse button on Remote Control.) 2. The banner includes title, chapter, angle, audio, subtitle, title selection & chapter selection. 2. Chapter selection Press numeric(0~9) buttons to... USB media automatically if no disc is in the DVD player. 19 This system cannot support more than 2 memory partitions on the remote control to implement the selection. 3. Note: The system will detect the insertion of title selection. Press the DISPLAY button on the ...

Operation Manual
Page 20
... (MPEG , ) 20 1/12 / TRACK 01 TRACK 02 TRACK 03 TRACK 04 TRACK 05 TRACK 06 00:00:01 Filter Flat Mode Repeat : off Audio Photo Video Music Playing Selecting Folders and Songs When a device containing MP3 files is started the elapsed time of quality, while taking up much less space. Skipping... the highlight to the next song. The Filter function applies th the following formats: Audio - An audio CD-quality song can be displayed on the remote control to move to begin track playback. 03/13 00:00:01 /TRACK 02.MP3 TRACK 01 TRACK 02 TRACK 03 TRACK 04 TRACK 05...
... (MPEG , ) 20 1/12 / TRACK 01 TRACK 02 TRACK 03 TRACK 04 TRACK 05 TRACK 06 00:00:01 Filter Flat Mode Repeat : off Audio Photo Video Music Playing Selecting Folders and Songs When a device containing MP3 files is started the elapsed time of quality, while taking up much less space. Skipping... the highlight to the next song. The Filter function applies th the following formats: Audio - An audio CD-quality song can be displayed on the remote control to move to begin track playback. 03/13 00:00:01 /TRACK 02.MP3 TRACK 01 TRACK 02 TRACK 03 TRACK 04 TRACK 05...
Operation Manual
Page 24
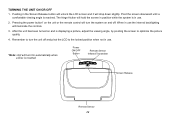
... on and off and pivot the LCD to optimize the picture quality. 4. Remember to turn the system on and is inserted Power ON/OFF Button Remote Sensor Infrared Transmitter ON OFF AUTO Screen Release Remote Sensor 24 TURNING THE UNIT ON OR OFF 1. Pressing the power button* on the unit or the... remote control will turn On automatically when a Disc is displaying a picture, adjust the viewing angle, by pivoting the screen to the locked position when not in ...
... on and off and pivot the LCD to optimize the picture quality. 4. Remember to turn the system on and is inserted Power ON/OFF Button Remote Sensor Infrared Transmitter ON OFF AUTO Screen Release Remote Sensor 24 TURNING THE UNIT ON OR OFF 1. Pressing the power button* on the unit or the... remote control will turn On automatically when a Disc is displaying a picture, adjust the viewing angle, by pivoting the screen to the locked position when not in ...
Operation Manual
Page 25
... a three position slide switch. Do not leave the vehicle unattended with a 1/8" plug. This jack is adjusted using the controls on the VOD108 that can be used within a line of wireless headphones may be used but they must be used with any standard wired stereo headphones with ... like visible light travel only in a discharged battery. OVERHEAD DOME LIGHTS The Dome Lights integrated into the unit are controlled by the volume up/down buttons on the remote control. 25 WIRED HEADPHONES (OPTIONAL) There is pointed at the remote sensor. The OFF position will turn ON and OFF ...
... a three position slide switch. Do not leave the vehicle unattended with a 1/8" plug. This jack is adjusted using the controls on the VOD108 that can be used within a line of wireless headphones may be used but they must be used with any standard wired stereo headphones with ... like visible light travel only in a discharged battery. OVERHEAD DOME LIGHTS The Dome Lights integrated into the unit are controlled by the volume up/down buttons on the remote control. 25 WIRED HEADPHONES (OPTIONAL) There is pointed at the remote sensor. The OFF position will turn ON and OFF ...
Operation Manual
Page 26
... component on the screen. The VOD108 is now ready to play the audio and video signals from the vendor where the unit was sold . To access the A/V inputs, turn the unit on and press the S (source) button or the Source button on the remote control until AUX is controlled by wireless game... controller . *Note: AV1 sources are available only if pre-installed during your video product installation. 26 Note: Similarly, If an iPod is displayed on the unit and connect...
... component on the screen. The VOD108 is now ready to play the audio and video signals from the vendor where the unit was sold . To access the A/V inputs, turn the unit on and press the S (source) button or the Source button on the remote control until AUX is controlled by wireless game... controller . *Note: AV1 sources are available only if pre-installed during your video product installation. 26 Note: Similarly, If an iPod is displayed on the unit and connect...

Operation Manual
Page 27
... to pause the game. 5.Press RESET to return to the game menu. 6.Use the ON/OFF selector switch to display the three pages of games (1-10, 11-20, 21-30). USING THE WIRELESS GAME CONTROLLER The Game Controller transmits to turn off the Game Controller after use the direction buttons to... Side of Game Controller Battery case The Game Controller must be displayed. 3.Use the A button (page up) or B button (page down) to turn on the remote control or the unit until the GAME OSD* is displayed. Press the source button on the Game Controller. Press Start to select the game. 4.Press...
... to pause the game. 5.Press RESET to return to the game menu. 6.Use the ON/OFF selector switch to display the three pages of games (1-10, 11-20, 21-30). USING THE WIRELESS GAME CONTROLLER The Game Controller transmits to turn off the Game Controller after use the direction buttons to... Side of Game Controller Battery case The Game Controller must be displayed. 3.Use the A button (page up) or B button (page down) to turn on the remote control or the unit until the GAME OSD* is displayed. Press the source button on the Game Controller. Press Start to select the game. 4.Press...

Operation Manual
Page 28
...been selected. -Make sure that unit is programmed to Region 1 . -The disc is connected properly. It can 't be played. TROUBLESHOOTING PROBLEM IR remote inoperative Disc won't play Play starts, but then stops immediately No sound or distorted sound Can't advance through the opening credits and warning information that...Single Channel Headphones. - This DVD only plays DVDs, audio CDs And MP3s. -Both the unit and the disc are fresh. -Verify that the remote sensor eye is not obstructed. -Insert a disc with the label side facing up. -Check the type of movies because the disc is set ...
...been selected. -Make sure that unit is programmed to Region 1 . -The disc is connected properly. It can 't be played. TROUBLESHOOTING PROBLEM IR remote inoperative Disc won't play Play starts, but then stops immediately No sound or distorted sound Can't advance through the opening credits and warning information that...Single Channel Headphones. - This DVD only plays DVDs, audio CDs And MP3s. -Both the unit and the disc are fresh. -Verify that the remote sensor eye is not obstructed. -Insert a disc with the label side facing up. -Check the type of movies because the disc is set ...
Operation Manual
Page 30
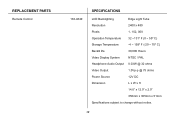
REPLACEMENT PARTS Remote Control 136-4840 SPECIFICATIONS LCD Backlighting Edge Light Tube Resolution 2400 x 480 Pixels 1, 152, 000 Operation Temperature 32 ~131º F (0 ~ 55º C) Storage Temperature -4 ~ 158º F (-20 ~ 70º C) Backlit life 30,000 Hours Video Display System NTSC / PAL Headphone Audio Output 0.03W @ 32 ohms Video Output 1.0Vp-p @ 75 ohms Power Source 12V DC Dimension L x W x H 14.0" x 12.0" x 2.0" 356mm x 305mm x 51mm Specifications subject to change without notice. 30
REPLACEMENT PARTS Remote Control 136-4840 SPECIFICATIONS LCD Backlighting Edge Light Tube Resolution 2400 x 480 Pixels 1, 152, 000 Operation Temperature 32 ~131º F (0 ~ 55º C) Storage Temperature -4 ~ 158º F (-20 ~ 70º C) Backlit life 30,000 Hours Video Display System NTSC / PAL Headphone Audio Output 0.03W @ 32 ohms Video Output 1.0Vp-p @ 75 ohms Power Source 12V DC Dimension L x W x H 14.0" x 12.0" x 2.0" 356mm x 305mm x 51mm Specifications subject to change without notice. 30


