Operation Manual
Page 2
... monitor. • Do not use any abrasive cleaners, they may scratch the screen. • Use only a lightly dampened lint free cloth to wipe the screen if it is dirty. • Lock the LCD screen in the fully closed position when not in use. • Before putting on headphones ... for viewing prerecorded movies or playing video games. Television Reception This entertainment system is designed primarily for television reception, video or DVD play , the LCD panel or video monitor must be installed to the rear of the following patents, Patent NOS. 5,775,762 and 5,927,784 Television viewing in a...
... monitor. • Do not use any abrasive cleaners, they may scratch the screen. • Use only a lightly dampened lint free cloth to wipe the screen if it is dirty. • Lock the LCD screen in the fully closed position when not in use. • Before putting on headphones ... for viewing prerecorded movies or playing video games. Television Reception This entertainment system is designed primarily for television reception, video or DVD play , the LCD panel or video monitor must be installed to the rear of the following patents, Patent NOS. 5,775,762 and 5,927,784 Television viewing in a...

Operation Manual
Page 3
... Transistor) Active Matrix LCD (Liquid Crystal Display) Monitor • Built-in DVD Player * Auto On with Disc insertion • Selectable (M1 and M2) IR Receive and Transmit Codes • Multi-Lingual OSD (On Screen Display) for Control of the AUDIOVOX VOD102 DVD Player with Built-in Three... using the remote control, while seat-belts remain fastened. Please note: Installation options vary, see the individual owner's manuals for DVD • Headphone Jack • Screen Mode Selection (16:9, 4:3) • Wireless Game Controller • Full Function Remote Control • Backlit...
... Transistor) Active Matrix LCD (Liquid Crystal Display) Monitor • Built-in DVD Player * Auto On with Disc insertion • Selectable (M1 and M2) IR Receive and Transmit Codes • Multi-Lingual OSD (On Screen Display) for Control of the AUDIOVOX VOD102 DVD Player with Built-in Three... using the remote control, while seat-belts remain fastened. Please note: Installation options vary, see the individual owner's manuals for DVD • Headphone Jack • Screen Mode Selection (16:9, 4:3) • Wireless Game Controller • Full Function Remote Control • Backlit...
Operation Manual
Page 4
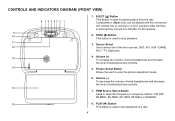
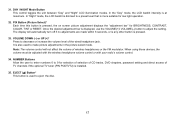
... FM OFF, 88.3MHz, 88.7MHz, 89.1MHz, 89.5MHz or 89.9MHz. 16 8. Volume (-) To decrease the volume of wired headphones and decrease the level of the four sources: DVD, AV1, AUX / GAME, AV2 / *TV (Optional). 4. FMM Source Select Switch Used to stop playback. 3. STOP (n) Button This ...button is used to select the frequency in ACC position). Volume (+) To increase the volume of wired headphones and increase the level of a disc....
... FM OFF, 88.3MHz, 88.7MHz, 89.1MHz, 89.5MHz or 89.9MHz. 16 8. Volume (-) To decrease the volume of wired headphones and decrease the level of the four sources: DVD, AV1, AUX / GAME, AV2 / *TV (Optional). 4. FMM Source Select Switch Used to stop playback. 3. STOP (n) Button This ...button is used to select the frequency in ACC position). Volume (+) To increase the volume of wired headphones and increase the level of a disc....
Operation Manual
Page 5
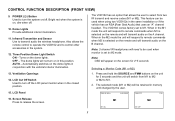
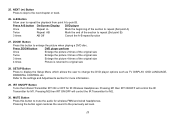
... headphones will switch from two IR transmit and receive codes (M1 or M2). Dome Lights Provide additional interior illumination. 11. The VOD102 comes factory set to turn on the A channel. LCD Panel The VOD102 has an option that uses an "A" channel headset. Note: OSD will not turn off the LCD panel monitor...FMM OFF DVD 16. LCD Cut Off Switch Used to M2 mode. Infrared Transmitter and Sensor Use to release the screen. Also allows the remote control to operate the VOD102 and to remote commands when M1 is selected on the remote and will be used when monitor is on...
... headphones will switch from two IR transmit and receive codes (M1 or M2). Dome Lights Provide additional interior illumination. 11. The VOD102 comes factory set to turn on the A channel. LCD Panel The VOD102 has an option that uses an "A" channel headset. Note: OSD will not turn off the LCD panel monitor...FMM OFF DVD 16. LCD Cut Off Switch Used to M2 mode. Infrared Transmitter and Sensor Use to release the screen. Also allows the remote control to operate the VOD102 and to remote commands when M1 is selected on the remote and will be used when monitor is on...
Operation Manual
Page 6
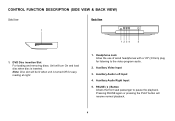
Unit will be lit when unit is inserted. Headphone Jack Allow the use of wired headphones with a 1/8" (3.5mm) plug for easy loading at night. 1. Auxiliary Audio Left Input 4. Note: Disc slot will turn On and load disc when disc is turned ... Input 3. Pressing PAUSE again or pressing the PLAY button will resume normal playback. 6 CONTROL FUNCTION DESCRIPTION (SIDE VIEW & BACK VIEW) Side View Back View 1 1 234 5 1. DVD Disc insertion Slot For loading and removing discs.
Unit will be lit when unit is inserted. Headphone Jack Allow the use of wired headphones with a 1/8" (3.5mm) plug for easy loading at night. 1. Auxiliary Audio Left Input 4. Note: Disc slot will turn On and load disc when disc is turned ... Input 3. Pressing PAUSE again or pressing the PLAY button will resume normal playback. 6 CONTROL FUNCTION DESCRIPTION (SIDE VIEW & BACK VIEW) Side View Back View 1 1 234 5 1. DVD Disc insertion Slot For loading and removing discs.
Operation Manual
Page 11
... Turns the Infrared Transmitter IRT ON or OFF for M1. Press A-B button On-Screen Display DVD player Once Repeat A- MUTE Button Press this button to enlarge the picture when playing a DVD disc. Pressing the button again restores the sound to original size 28. 25. Pressing M1 ...times Enlarge the picture 4 times of the section to the settings and Adjustments section for wireless FMM and wired headphones. NEXT (:) Button Press to skip to change the DVD player options such as TV DISPLAY, OSD LANGUAGE, PARENTAL CONTROL etc. SETUP Button Press to display the Setup Menu ...
... Turns the Infrared Transmitter IRT ON or OFF for M1. Press A-B button On-Screen Display DVD player Once Repeat A- MUTE Button Press this button to enlarge the picture when playing a DVD disc. Pressing the button again restores the sound to original size 28. 25. Pressing M1 ...times Enlarge the picture 4 times of the section to the settings and Adjustments section for wireless FMM and wired headphones. NEXT (:) Button Press to skip to change the DVD player options such as TV DISPLAY, OSD LANGUAGE, PARENTAL CONTROL etc. SETUP Button Press to display the Setup Menu ...
Operation Manual
Page 12
...It is pressed. 33. PIX Button (Picture Select)* Each time this button is used to 9 for selection of selection of CD tracks, DVD chapters, password setting and direct access of wireless headphones or the FM modulator. When using these devices, the volume must be adjusted with the wireless... intensity is more suitable for BRIGHTNESS, CONTRAST, COLOR, TINT or RESET. In "Night" mode, the LCD backlit is dimmed to decrease or increase the volume level of the wired headphone jack. VOLUME DOWN (-) or UP (+)* Press to a preset level that is at maximum. Once the desired adjustment bar is...
...It is pressed. 33. PIX Button (Picture Select)* Each time this button is used to 9 for selection of selection of CD tracks, DVD chapters, password setting and direct access of wireless headphones or the FM modulator. When using these devices, the volume must be adjusted with the wireless... intensity is more suitable for BRIGHTNESS, CONTRAST, COLOR, TINT or RESET. In "Night" mode, the LCD backlit is dimmed to decrease or increase the volume level of the wired headphone jack. VOLUME DOWN (-) or UP (+)* Press to a preset level that is at maximum. Once the desired adjustment bar is...

Operation Manual
Page 13
... five times to select RESET, then press either Volume (-) or the Volume (+) button on the remote or the main unit and all of the wired headphones. 13
... five times to select RESET, then press either Volume (-) or the Volume (+) button on the remote or the main unit and all of the wired headphones. 13
Operation Manual
Page 22
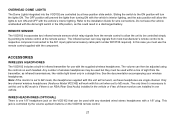
...with the component. This jack is set to turn the lights ON. Note: If the monitor is controlled by the volume up/down buttons on the VOD102 remote control. 22 WIRED HEADPHONES (OPTIONAL) There is an RSA (Rear Seat Audio) installed in the vehicle or if... The VOD102 incorporates two infrared remote sensors which relay signals from the transmitter, as infrared transmissions, like visible light travel only in infrared transmitter for wire connections. The volume can then be controlled simply by a three position slide switch. Only two-channel wireless headphones (Audiovox Model ...
...with the component. This jack is set to turn the lights ON. Note: If the monitor is controlled by the volume up/down buttons on the VOD102 remote control. 22 WIRED HEADPHONES (OPTIONAL) There is an RSA (Rear Seat Audio) installed in the vehicle or if... The VOD102 incorporates two infrared remote sensors which relay signals from the transmitter, as infrared transmissions, like visible light travel only in infrared transmitter for wire connections. The volume can then be controlled simply by a three position slide switch. Only two-channel wireless headphones (Audiovox Model ...
Operation Manual
Page 25
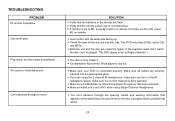
...into disc tray. This DVD only plays DVDs, audio CDs and MP3s. - Allow player to dry out. - If you are fresh. - You can 't be played. The disc is ON and the proper Frequency has been selected. - If monitor is set to M2, press M2 on the IR headphone power, make sure ...side facing up. - Make sure that unit is set to Region Number 1. - This DVD player is set to M1 when using the 2-channel IR headphones, make sure the correct channel (A-B) is selected. - Make sure your DVD is connected properly. Verify that the remote sensor eye is not obstructed. - Make sure ...
...into disc tray. This DVD only plays DVDs, audio CDs and MP3s. - Allow player to dry out. - If you are fresh. - You can 't be played. The disc is ON and the proper Frequency has been selected. - If monitor is set to M2, press M2 on the IR headphone power, make sure ...side facing up. - Make sure that unit is set to Region Number 1. - This DVD player is set to M1 when using the 2-channel IR headphones, make sure the correct channel (A-B) is selected. - Make sure your DVD is connected properly. Verify that the remote sensor eye is not obstructed. - Make sure ...
Operation Manual
Page 27
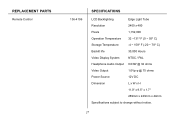
REPLACEMENT PARTS Remote Control 136-4196 SPECIFICATIONS LCD Backlighting Edge Light Tube Resolution 2400 x 480 Pixels 1,152,000 Operation Temperature 32 ~131º F (0 ~ 55º C) Storage Temperature -4 ~ 158º F (-20 ~ 70º C) Backlit life 30,000 Hours Video Display System NTSC / PAL Headphone Audio Output 0.03W @ 32 ohms Video Output 1.0Vp-p @ 75 ohms Power Source 12V DC Dimension L x W x H 11.0" x 9.5" x 1.7" 289mm x 243mm x 44mm Specifications subject to change without notice. 27
REPLACEMENT PARTS Remote Control 136-4196 SPECIFICATIONS LCD Backlighting Edge Light Tube Resolution 2400 x 480 Pixels 1,152,000 Operation Temperature 32 ~131º F (0 ~ 55º C) Storage Temperature -4 ~ 158º F (-20 ~ 70º C) Backlit life 30,000 Hours Video Display System NTSC / PAL Headphone Audio Output 0.03W @ 32 ohms Video Output 1.0Vp-p @ 75 ohms Power Source 12V DC Dimension L x W x H 11.0" x 9.5" x 1.7" 289mm x 243mm x 44mm Specifications subject to change without notice. 27
