
Owners Manual
Page 1
Owner/ Installation Manual MMD10 10" LCD MONITOR & DVD PLAYER
Owner/ Installation Manual MMD10 10" LCD MONITOR & DVD PLAYER
Owners Manual
Page 4
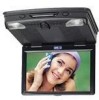
... of reliable, trouble-free service. Installation Ensure that the MMD10 is installed in DVD player. Please read the entire instruction manual supplied with this manual for later use liquid cleaners or aerosol cleaners. The main features include a 10" Wide Screen (16:9 Aspect Ratio) Liquid Crystal Display (LCD) monitor and a built-in accordance with water for selecting the...
... of reliable, trouble-free service. Installation Ensure that the MMD10 is installed in DVD player. Please read the entire instruction manual supplied with this manual for later use liquid cleaners or aerosol cleaners. The main features include a 10" Wide Screen (16:9 Aspect Ratio) Liquid Crystal Display (LCD) monitor and a built-in accordance with water for selecting the...
Owners Manual
Page 5
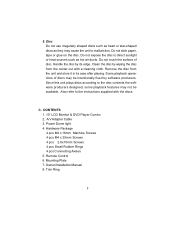
Do not touch the surface of discs may be available. Handle the disc by its case after playing. Owner/Installation Manual 8. Some playback operations of disc. CONTENTS 1. 10" LCD Monitor & DVD Player Combo 2. Trim Ring 5 Remove the disc from the center out with the discs. C. Power Dome light 4. A/V Adapter Cable 3. Remote Control 6. Do not stick paper...
Do not touch the surface of discs may be available. Handle the disc by its case after playing. Owner/Installation Manual 8. Some playback operations of disc. CONTENTS 1. 10" LCD Monitor & DVD Player Combo 2. Trim Ring 5 Remove the disc from the center out with the discs. C. Power Dome light 4. A/V Adapter Cable 3. Remote Control 6. Do not stick paper...
Owners Manual
Page 7
... GENERAL INSTALLATION APPROACH: 1) Decide upon system configuration and options that will be installed (i.e.: what components, VCP, Tuner, RF Modulator/external amp, remote headphones, DVD, etc.). 2) Review all manuals to become familiar with electrical requirements and hook ups. 3) Decide upon mounting locations of all components and method of mounting. 4) Prep the vehicle by... of the components. 9) When all areas where interconnecting wire harnesses will need to be cut into the vehicle (headliner, other trim components etc.), this manual as well as necessary. (Refer to be located.
... GENERAL INSTALLATION APPROACH: 1) Decide upon system configuration and options that will be installed (i.e.: what components, VCP, Tuner, RF Modulator/external amp, remote headphones, DVD, etc.). 2) Review all manuals to become familiar with electrical requirements and hook ups. 3) Decide upon mounting locations of all components and method of mounting. 4) Prep the vehicle by... of the components. 9) When all areas where interconnecting wire harnesses will need to be cut into the vehicle (headliner, other trim components etc.), this manual as well as necessary. (Refer to be located.

Owners Manual
Page 8
... source (+12v when key is in such a manner that may be located in the ACC. The monitor should be required are: A) Removal of the monitor has been determined, there may need to vehicle, so this manual will only focus on the vehicle structure and installation method. Some of the steps that it can..., depending on the installation of mounting. The hinging mechanism is designed for an overhead, drop down use only. B) The headliner may be trimmed. 8 Notes :The MMD10 video system is only intended for horizontal, drop down installation.
... source (+12v when key is in such a manner that may be located in the ACC. The monitor should be required are: A) Removal of the monitor has been determined, there may need to vehicle, so this manual will only focus on the vehicle structure and installation method. Some of the steps that it can..., depending on the installation of mounting. The hinging mechanism is designed for an overhead, drop down use only. B) The headliner may be trimmed. 8 Notes :The MMD10 video system is only intended for horizontal, drop down installation.
Owners Manual
Page 11
7. Refer to the Owner/Install Manual for the MMD 10 to complete the installation. 11
7. Refer to the Owner/Install Manual for the MMD 10 to complete the installation. 11
Owners Manual
Page 23
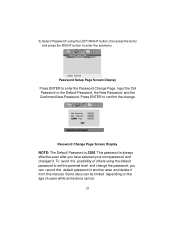
... ENTER to enter the submenu. This password is 3308. To avoid the possibility of users while some discs cannot. 23 Some discs can record this manual. Input the Old Password or the Default Password, the New Password, and the Confirmed New Password. Password Change Page Screen Display NOTE: The Default Password...
... ENTER to enter the submenu. This password is 3308. To avoid the possibility of users while some discs cannot. 23 Some discs can record this manual. Input the Old Password or the Default Password, the New Password, and the Confirmed New Password. Password Change Page Screen Display NOTE: The Default Password...
Owners Manual
Page 35
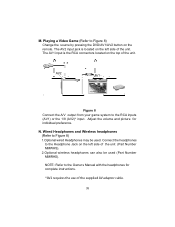
... the 1/8 (AV2)* input. The AV1 input is located on the left side of the unit. NOTE: Refer to Figure 8) Change the source by pressing the DVD/AV1/AV2 button on the top of the unit. N. Playing a Video Game (Refer to the Owner...
... the 1/8 (AV2)* input. The AV1 input is located on the left side of the unit. NOTE: Refer to Figure 8) Change the source by pressing the DVD/AV1/AV2 button on the top of the unit. N. Playing a Video Game (Refer to the Owner...
