Operation Manual
Page 1
FOR ASSISTANCE CALL 1-800-619-3848 OR VISIT US AT WWW.AUDIOVOX.COM. 128-8036 FPE4707HR LCD TV Operating Manual Before connecting, operating or adjusting this manual for future reference. Please keep this product, please read the manual completely.
FOR ASSISTANCE CALL 1-800-619-3848 OR VISIT US AT WWW.AUDIOVOX.COM. 128-8036 FPE4707HR LCD TV Operating Manual Before connecting, operating or adjusting this manual for future reference. Please keep this product, please read the manual completely.
Operation Manual
Page 3
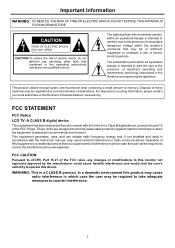
... accompanying the appliance. For disposal or recycling information, please contact your local authorities or the Electronic Industries Alliance: www.eia.org FCC STATEMENT FCC Notice LCD TV: A CLASS B digital device This equipment has been tested and found to do so. These limits are qualified to comply with arrowhead symbol, within the product...
... accompanying the appliance. For disposal or recycling information, please contact your local authorities or the Electronic Industries Alliance: www.eia.org FCC STATEMENT FCC Notice LCD TV: A CLASS B digital device This equipment has been tested and found to do so. These limits are qualified to comply with arrowhead symbol, within the product...

Operation Manual
Page 4
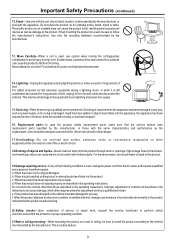
... in accordance with one wider than the other apparatus (including amplifiers) that produce heat. 9.Grounding or Polarization---Do not defeat the safety purpose of your LCD TV product, please read and understood before the product is provided or the manufacturer's instructions are designed for cleaning. 7. This product is used as radiators, heat...
... in accordance with one wider than the other apparatus (including amplifiers) that produce heat. 9.Grounding or Polarization---Do not defeat the safety purpose of your LCD TV product, please read and understood before the product is provided or the manufacturer's instructions are designed for cleaning. 7. This product is used as radiators, heat...
Operation Manual
Page 5
This will prevent damage to the equipment due to move the TV unless the AC power cord has been disconnected. 14. Servicing is used, use caution when moving the cart/apparatus combination to avoid injury from the ...
This will prevent damage to the equipment due to move the TV unless the AC power cord has been disconnected. 14. Servicing is used, use caution when moving the cart/apparatus combination to avoid injury from the ...
Operation Manual
Page 7
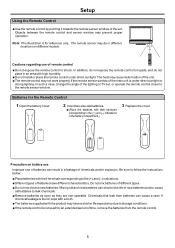
Setup Using the Remote Control
Setup Using the Remote Control
Operation Manual
Page 8
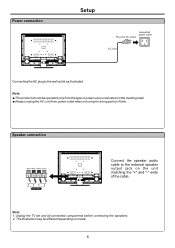
Note: AC cord Connecting the AC plug to the wall outlet as illustrated. Power connection Setup Household power outlet Plug into AC outlet.
Note: AC cord Connecting the AC plug to the wall outlet as illustrated. Power connection Setup Household power outlet Plug into AC outlet.
Operation Manual
Page 9
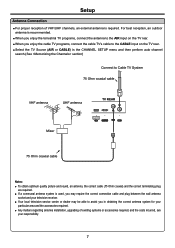
... the correct terminating plug are your responsibility. 7 If a communal antenna system is used, you enjoy the cable TV programs, connect the cable TV's cable to the AIR input on the TV rear. ! When you in obtaining the correct antenna system for software update only RS-232 75 Ohm coaxial cable... Notes: ! Setup ! Select the TV Source (AIR or CABLE) in the CHANNEL SETUP menu and then perform auto channel search.(See section) Connect to assist you enjoy the terrestrial TV programs, connect the antenna to the CABLE input on the...
... the correct terminating plug are your responsibility. 7 If a communal antenna system is used, you enjoy the cable TV programs, connect the cable TV's cable to the AIR input on the TV rear. ! When you in obtaining the correct antenna system for software update only RS-232 75 Ohm coaxial cable... Notes: ! Setup ! Select the TV Source (AIR or CABLE) in the CHANNEL SETUP menu and then perform auto channel search.(See section) Connect to assist you enjoy the terrestrial TV programs, connect the antenna to the CABLE input on the...
Operation Manual
Page 11
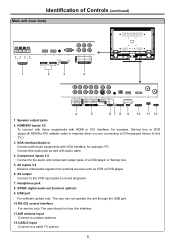
... 2. Connect the audio jack as VCR or DVD player. 6. AV output Connect to the VCR input jacks to a cable TV system. 9 S/PDIF digital audio out terminal (optical) 9. The user should not use this TV.) 3. AV inputs 1/2 Receive video/audio signals from external sources such as well with VGA interface, for example, PC...
... 2. Connect the audio jack as VCR or DVD player. 6. AV output Connect to the VCR input jacks to a cable TV system. 9 S/PDIF digital audio out terminal (optical) 9. The user should not use this TV.) 3. AV inputs 1/2 Receive video/audio signals from external sources such as well with VGA interface, for example, PC...
Operation Manual
Page 12
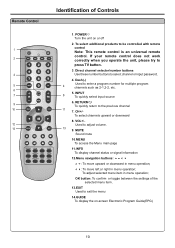
..., please try to select channel or input password. 4. INPUT 7 8 To quickly select input source 6. Direct channel selector/number buttons 3 Use these number buttons to press TV button. 3. Remote Control Identification of the selected menu item. 13.EXIT Used to exit the menu 14.GUIDE To display the on or off 2. To...
..., please try to select channel or input password. 4. INPUT 7 8 To quickly select input source 6. Direct channel selector/number buttons 3 Use these number buttons to press TV button. 3. Remote Control Identification of the selected menu item. 13.EXIT Used to exit the menu 14.GUIDE To display the on or off 2. To...
Operation Manual
Page 13
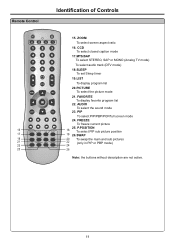
... To select PIP/PBP/POP/full screen mode 24. CCD To select closed caption mode 17.MTS/SAP To select STEREO, SAP or MONO (Analog TV mode) To select audio track (DTV mode) 18.SLEEP To set Sleep timer 19.LIST To display program list 20.PICTURE To select the picture...
... To select PIP/PBP/POP/full screen mode 24. CCD To select closed caption mode 17.MTS/SAP To select STEREO, SAP or MONO (Analog TV mode) To select audio track (DTV mode) 18.SLEEP To set Sleep timer 19.LIST To display program list 20.PICTURE To select the picture...
Operation Manual
Page 14
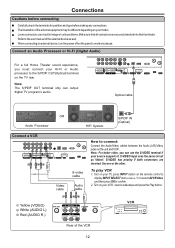
Connect an Audio Processor or Hi-Fi (Digital Audio) For a full Home Theater sound experience, you can output digital TV program's audio. Note: For better video, you must connect your model. Use one or the other. To play VCR 1. Turn on the remote control to ...display INPUT SELECT menu, use5/6to select AV1/SVideo and then press OK to confirm. 2. Refer to the S/PDIF OUT(Optical) terminal on the TV rear. Y WR Y Yellow (VIDEO) W White (AUDIO L) R Red (AUDIO R ) AV OUT ANT OUT VIDEO L AUDIO R S-VIDEO ANT IN AV IN VIDEO L AUDIO R VCR Rear of the...
Connect an Audio Processor or Hi-Fi (Digital Audio) For a full Home Theater sound experience, you can output digital TV program's audio. Note: For better video, you must connect your model. Use one or the other. To play VCR 1. Turn on the remote control to ...display INPUT SELECT menu, use5/6to select AV1/SVideo and then press OK to confirm. 2. Refer to the S/PDIF OUT(Optical) terminal on the TV rear. Y WR Y Yellow (VIDEO) W White (AUDIO L) R Red (AUDIO R ) AV OUT ANT OUT VIDEO L AUDIO R S-VIDEO ANT IN AV IN VIDEO L AUDIO R VCR Rear of the...
Operation Manual
Page 15
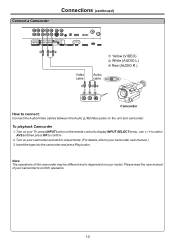
... and is dependant on your camcorder to confirm operation. 13 Turn on your camcorder and set it to output mode. (For details, refer to your TV, press INPUT button on the remote control to display INPUT SELECT menu, use 5/6to select AV2 and then press OK to connect: Connect the Audio...
... and is dependant on your camcorder to confirm operation. 13 Turn on your camcorder and set it to output mode. (For details, refer to your TV, press INPUT button on the remote control to display INPUT SELECT menu, use 5/6to select AV2 and then press OK to connect: Connect the Audio...
Operation Manual
Page 16
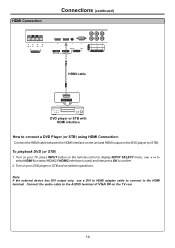
... to connect a DVD Player (or STB) using HDMI Connection: Connect the HDMI cable between the HDMI interface on the unit and HDMI output on the TV rear. 14 To playback DVD (or STB) 1. Turn on the remote control to display INPUT SELECT menu, use a DVI to HDMI adapter cable to connect...
... to connect a DVD Player (or STB) using HDMI Connection: Connect the HDMI cable between the HDMI interface on the unit and HDMI output on the TV rear. 14 To playback DVD (or STB) 1. Turn on the remote control to display INPUT SELECT menu, use a DVI to HDMI adapter cable to connect...

Operation Manual
Page 17
... (Y) B Blue (Pb) Video cable Audio cable G BR R W COMPONENT Pr Pb Y AUDIO L AUDIOR AV OUT S-VIDEO R AUDIOL VIDEO DVI DVD player, STB, etc. Turn on your TV, press INPUT button on your DVD or STB and do relative operations. 15
... (Y) B Blue (Pb) Video cable Audio cable G BR R W COMPONENT Pr Pb Y AUDIO L AUDIOR AV OUT S-VIDEO R AUDIOL VIDEO DVI DVD player, STB, etc. Turn on your TV, press INPUT button on your DVD or STB and do relative operations. 15
Operation Manual
Page 18
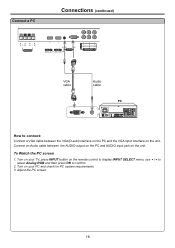
Turn on the remote control to display INPUT SELECT menu, use 5/6to select Analog RGB and then press OK to connect: Connect a VGA cable between the AUDIO output on the PC and AUDIO input jack on the unit. To Watch the PC screen 1. Turn on your TV, press INPUT button on your PC and check for PC system requirements. 3. Connect a PC Connections (continued) HDMI 2 DVI 2 IN HDMI 1 DVI 1 IN VGA cable Audio cable How to confirm. 2. Connect an Audio cable between the VGA(D-sub) interface on the PC and the VGA input interface on the unit. Adjust the PC screen. 16
Turn on the remote control to display INPUT SELECT menu, use 5/6to select Analog RGB and then press OK to connect: Connect a VGA cable between the AUDIO output on the PC and AUDIO input jack on the unit. To Watch the PC screen 1. Turn on your TV, press INPUT button on your PC and check for PC system requirements. 3. Connect a PC Connections (continued) HDMI 2 DVI 2 IN HDMI 1 DVI 1 IN VGA cable Audio cable How to confirm. 2. Connect an Audio cable between the VGA(D-sub) interface on the PC and the VGA input interface on the unit. Adjust the PC screen. 16
Operation Manual
Page 19
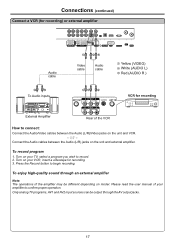
... cables between the Audio (L/R)/Video jacks on your VCR, insert a videotape for recording. 3. Turn on the unit and VCR. - Only analog TV programs, AV1 and AV2 input sources can be different depending on model. or - Please read the user manual of the amplifier may be output through...IN VIDEO L AUDIO R Rear of the VCR VCR for recording How to connect: Connect the Audio/Video cables between the Audio (L/R) jacks on your TV, select a program you wish to record. 2. Press the Record button to confirm proper operation. To record program 1. To enjoy high-quality sound through...
... cables between the Audio (L/R)/Video jacks on your VCR, insert a videotape for recording. 3. Turn on the unit and VCR. - Only analog TV programs, AV1 and AV2 input sources can be different depending on model. or - Please read the user manual of the amplifier may be output through...IN VIDEO L AUDIO R Rear of the VCR VCR for recording How to connect: Connect the Audio/Video cables between the Audio (L/R) jacks on your TV, select a program you wish to record. 2. Press the Record button to confirm proper operation. To record program 1. To enjoy high-quality sound through...
Operation Manual
Page 20
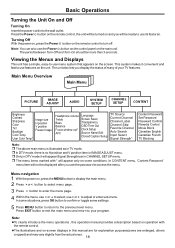
...4 Within the menu, use 6or 5to select, use3or4 to use the Power button on the control panel on the remote control to your TV features. Viewing the Menus and Displays This unit has a simple, easy-to the previous level menu. Main Menu Overview Main Menu PICTURE ...volume Treble Bass Balance Focus window out* AVC Language Screen Saver Transparency OSD Time Out Clock Setup Source Name Edit Closed Caption Setup TV Source Current Channel Channel Label Channel Skip Favorite Channel Auto Search Input Select Signal Strength* Content Password Set Password Password Confirm Parental Control...
...4 Within the menu, use 6or 5to select, use3or4 to use the Power button on the control panel on the remote control to your TV features. Viewing the Menus and Displays This unit has a simple, easy-to the previous level menu. Main Menu Overview Main Menu PICTURE ...volume Treble Bass Balance Focus window out* AVC Language Screen Saver Transparency OSD Time Out Clock Setup Source Name Edit Closed Caption Setup TV Source Current Channel Channel Label Channel Skip Favorite Channel Auto Search Input Select Signal Strength* Content Password Set Password Password Confirm Parental Control...

Operation Manual
Page 21
... programs' information banner may also make use 4or3 to display SYSTEM SETUP menu page, press 6 to "System Setup" section). TV --------Select TV signal. Component1------Select signal from HDMI1 input interface. In DTV mode, it will display current status information such as channel number or... preference (refer to enter. HDMI2-------Select signal from COMPONENT INPUT2 terminals. Component2------Select signal from HDMI2 input interface. INPUT SELECT TV AV1/SVideo AV2 Component1 Component2 Analog RGB HDMI1 HDMI2 Up/Down:Change OK:Select Input:Exit Note: You may not ...
... programs' information banner may also make use 4or3 to display SYSTEM SETUP menu page, press 6 to "System Setup" section). TV --------Select TV signal. Component1------Select signal from HDMI1 input interface. In DTV mode, it will display current status information such as channel number or... preference (refer to enter. HDMI2-------Select signal from COMPONENT INPUT2 terminals. Component2------Select signal from HDMI2 input interface. INPUT SELECT TV AV1/SVideo AV2 Component1 Component2 Analog RGB HDMI1 HDMI2 Up/Down:Change OK:Select Input:Exit Note: You may not ...

Operation Manual
Page 22
... MENU to display the main menu. 2 Press 4or3 to display CHANNEL SETUP menu page, press 6 to enter. 3 Press 6or 5 to select TV Source item, press 3or4 to CABLE: highlight Auto Search in memory. Channel Skip After setting channels into memory, you want to watch are selected with... Channel up . CHANNEL SETUP TV Source Current Channel Channel Label Channel Skip Favorite Channel Auto Search Input Select Signal Strength AIR 2-1 WGBHON OFF > > > > > > 4 If you can...
... MENU to display the main menu. 2 Press 4or3 to display CHANNEL SETUP menu page, press 6 to enter. 3 Press 6or 5 to select TV Source item, press 3or4 to CABLE: highlight Auto Search in memory. Channel Skip After setting channels into memory, you want to watch are selected with... Channel up . CHANNEL SETUP TV Source Current Channel Channel Label Channel Skip Favorite Channel Auto Search Input Select Signal Strength AIR 2-1 WGBHON OFF > > > > > > 4 If you can...

Operation Manual
Page 23
... 3 Press EXIT button to return to select character. Note: the names of digital broadcasting channels are to experience picture degradation. CHANNEL SETUP TV Source Current Channel Channel Label Channel Skip Favorite Channel Auto Search Input Select Signal Strength AIR 2-1 ABCDOFF OFF > > > > > ... Favorite Channel Setup You can create a favorite channel list into channel label editing mode. Use 3/4 to move the cursor, use 5/6 to TV viewing. Memorizing the Channels (continued) DTV Signal Strength You can make use of it to quickly select your favorite channel. Press FAVORITE button ...
... 3 Press EXIT button to return to select character. Note: the names of digital broadcasting channels are to experience picture degradation. CHANNEL SETUP TV Source Current Channel Channel Label Channel Skip Favorite Channel Auto Search Input Select Signal Strength AIR 2-1 ABCDOFF OFF > > > > > ... Favorite Channel Setup You can create a favorite channel list into channel label editing mode. Use 3/4 to move the cursor, use 5/6 to TV viewing. Memorizing the Channels (continued) DTV Signal Strength You can make use of it to quickly select your favorite channel. Press FAVORITE button ...


