
Operation Manual
Page 4
... the other similar surface, since insufficient ventilation can block ventilation openings. To ensure your safety and prolong the service life of your LCD TV product, please read and understood before the product is used as a bookcase or rack, unless proper ventilation is not designed for ...at plugs, convenience receptacles, and the point where they can cause overheating and/or shorten the life of the obsolete outlet. 10.Power cord protection---Protect the power cord from being walked on a bed, sofa, rug or other . A grounding type plug has two blades and a third grounding...
... the other similar surface, since insufficient ventilation can block ventilation openings. To ensure your safety and prolong the service life of your LCD TV product, please read and understood before the product is used as a bookcase or rack, unless proper ventilation is not designed for ...at plugs, convenience receptacles, and the point where they can cause overheating and/or shorten the life of the obsolete outlet. 10.Power cord protection---Protect the power cord from being walked on a bed, sofa, rug or other . A grounding type plug has two blades and a third grounding...
Operation Manual
Page 5
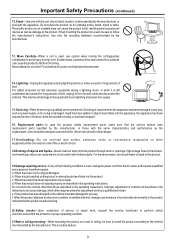
...Use only the mounting hardware recommended by the manufacturer, or those described in the operating instructions. Servicing---Refer all servicing to move the TV unless the AC power cord has been disconnected. 14. b. d. Improper adjustment of controls not described in the product, and inserting an object can cause...the apparatus. Use of objects and liquids---Never insert an object into the product. When the product has been exposed to lightning and power-line surges. 15. a. If the product has been dropped or the cabinet has been damaged in a risk of fire or electric ...
...Use only the mounting hardware recommended by the manufacturer, or those described in the operating instructions. Servicing---Refer all servicing to move the TV unless the AC power cord has been disconnected. 14. b. d. Improper adjustment of controls not described in the product, and inserting an object can cause...the apparatus. Use of objects and liquids---Never insert an object into the product. When the product has been exposed to lightning and power-line surges. 15. a. If the product has been dropped or the cabinet has been damaged in a risk of fire or electric ...
Operation Manual
Page 6
...changed. This will prevent damage to the product due to be installed near the equipment and easily accessible. Power source---This product is intended to be injured by a listed power supply indicated on the screen as VCRs and personal computers, you are not sure of the type of time...long periods of power supply to ensure safety and EMC. Important Safety Precautions (continued) 22. Therefore, it from the wall outlet and disconnect the cable system. Occasionally, a few non-active pixels may appear on the marking label. If you should be used in case the LCD panel breaks. 24...
...changed. This will prevent damage to the product due to be installed near the equipment and easily accessible. Power source---This product is intended to be injured by a listed power supply indicated on the screen as VCRs and personal computers, you are not sure of the type of time...long periods of power supply to ensure safety and EMC. Important Safety Precautions (continued) 22. Therefore, it from the wall outlet and disconnect the cable system. Occasionally, a few non-active pixels may appear on the marking label. If you should be used in case the LCD panel breaks. 24...
Operation Manual
Page 8
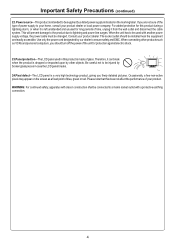
Note: AC cord Connecting the AC plug to the wall outlet as illustrated. Power connection Setup Household power outlet Plug into AC outlet.
Note: AC cord Connecting the AC plug to the wall outlet as illustrated. Power connection Setup Household power outlet Plug into AC outlet.
Operation Manual
Page 10
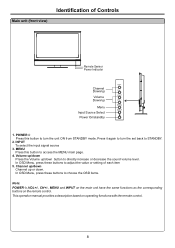
.../standby 1. Channel up/down Channel up or down button to adjust the value or setting of Controls Remote Sensor Power Indicator CH Channel CH Down/up VOL Volume Down/up /down . MENU Press this button to turn the set back to turn the unit ON ... buttons to directly increase or decrease the sound volume level. This operation manual provides a description based on the remote control. POWER Press this button to choose the OSD items. Note: POWER ,VOL+/-, CH+/-, MENU and INPUT on the main unit have the same functions as the corresponding buttons on operating functions with...
.../standby 1. Channel up/down Channel up or down button to adjust the value or setting of Controls Remote Sensor Power Indicator CH Channel CH Down/up VOL Volume Down/up /down . MENU Press this button to turn the set back to turn the unit ON ... buttons to directly increase or decrease the sound volume level. This operation manual provides a description based on the remote control. POWER Press this button to choose the OSD items. Note: POWER ,VOL+/-, CH+/-, MENU and INPUT on the main unit have the same functions as the corresponding buttons on operating functions with...
Operation Manual
Page 12
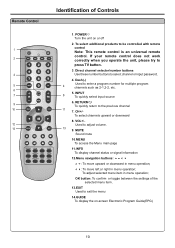
To select channels upward or downward 8. POWER Turn the unit on -screen Electronic Program Guide(EPG) 10 Direct channel selector/number buttons 3 Use these number buttons to enter a program number for multiple ... such as 2-1,2-2, etc. 6 5. To adjust selected menu item in menu operation; Dash(-) Used to select channel or input password. 4. RETURN 9 To quickly return to press TV button. 3. CH+/- MUTE Sound mute 10.MENU To access the Menu main page MTS/SAP ZOOM CCD SLEEP LIST FAVORITE AUDIO PICTURE PIP P.POSITION SWAP...
To select channels upward or downward 8. POWER Turn the unit on -screen Electronic Program Guide(EPG) 10 Direct channel selector/number buttons 3 Use these number buttons to enter a program number for multiple ... such as 2-1,2-2, etc. 6 5. To adjust selected menu item in menu operation; Dash(-) Used to select channel or input password. 4. RETURN 9 To quickly return to press TV button. 3. CH+/- MUTE Sound mute 10.MENU To access the Menu main page MTS/SAP ZOOM CCD SLEEP LIST FAVORITE AUDIO PICTURE PIP P.POSITION SWAP...
Operation Manual
Page 14
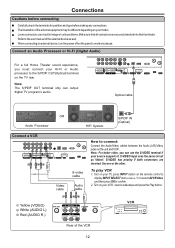
... the unit and VCR. Note: For better video, you must connect your Hi-Fi or Audio processor to the S/PDIF OUT(Optical) terminal on the TV rear. To play VCR 1. Turn on your source supports it. Refer to confirm. 2. Use one or the other. The illustration of the VCR 12 .../6to select AV1/SVideo and then press OK to the user manual of the external device as Video1. When connecting an external device, turn the power off on your VCR , insert a videotape and press the Play button. S-VIDEO has priority if both connectors are securely inserted into their terminals. Turn on...
... the unit and VCR. Note: For better video, you must connect your Hi-Fi or Audio processor to the S/PDIF OUT(Optical) terminal on the TV rear. To play VCR 1. Turn on your source supports it. Refer to confirm. 2. Use one or the other. The illustration of the VCR 12 .../6to select AV1/SVideo and then press OK to the user manual of the external device as Video1. When connecting an external device, turn the power off on your VCR , insert a videotape and press the Play button. S-VIDEO has priority if both connectors are securely inserted into their terminals. Turn on...
Operation Manual
Page 20
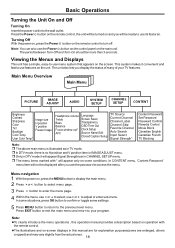
... Treble Bass Balance Focus window out* AVC Language Screen Saver Transparency OSD Time Out Clock Setup Source Name Edit Closed Caption Setup TV Source Current Channel Channel Label Channel Skip Favorite Channel Auto Search Input Select Signal Strength* Content Password Set Password Password Confirm Parental Control...unit. The unit also lets you use its features. r In DTV mode, there is illustrated as in CHANNEL SETUP menu. Menu navigation 1 With the power on, press the MENU button to display the main menu. 2 Press 4or3 button to select menu page. 3 Press 6 button to enter the menu...
... Treble Bass Balance Focus window out* AVC Language Screen Saver Transparency OSD Time Out Clock Setup Source Name Edit Closed Caption Setup TV Source Current Channel Channel Label Channel Skip Favorite Channel Auto Search Input Select Signal Strength* Content Password Set Password Password Confirm Parental Control...unit. The unit also lets you use its features. r In DTV mode, there is illustrated as in CHANNEL SETUP menu. Menu navigation 1 With the power on, press the MENU button to display the main menu. 2 Press 4or3 button to select menu page. 3 Press 6 button to enter the menu...

Operation Manual
Page 22
...the Channels When the TV powers on previous page) before operation. Selecting the TV Source Before your TV can skip unnecessary channels so that is set to AIR: highlight Auto Search in the CHANNEL SETUP menu and then press 4or 3 to set to section on for all available TV/DTV program. Channel... into memory, you can memorize the available channels, you want to watch are selected with Channel up . Note: Be sure to select the TV input (refer to CABLE: highlight Auto Search in memory. Now when you want to skip other unwanted channels, repeat the above steps. 5 ...
...the Channels When the TV powers on previous page) before operation. Selecting the TV Source Before your TV can skip unnecessary channels so that is set to AIR: highlight Auto Search in the CHANNEL SETUP menu and then press 4or 3 to set to section on for all available TV/DTV program. Channel... into memory, you can memorize the available channels, you want to watch are selected with Channel up . Note: Be sure to select the TV input (refer to CABLE: highlight Auto Search in memory. Now when you want to skip other unwanted channels, repeat the above steps. 5 ...
Operation Manual
Page 30
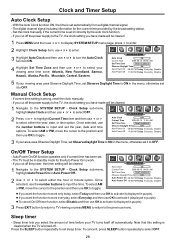
... Time 2006-08-15 08:58 AM Set Time Zone New Foundland Observe Daylight Time ON Auto Power On 08:00 PM Today Everyday Disable Auto Power Off 11:00 PM Today Everyday Disable 5 If your TV turns itself off . Clock Setup sub-menu, highlight Auto Clock and then use 3 or 4 to select... then use the number buttons to select OFF. 28 If you cut off the power supply to the TV, the clock setting you cut off the power, the timer setting will be cleared. 1 Navigate to the SYSTEM SETUP - The TV must be cleared. 1 Navigate to the SYSTEM SETUP - Sleep timer - To cancel it (displayed...
... Time 2006-08-15 08:58 AM Set Time Zone New Foundland Observe Daylight Time ON Auto Power On 08:00 PM Today Everyday Disable Auto Power Off 11:00 PM Today Everyday Disable 5 If your TV turns itself off . Clock Setup sub-menu, highlight Auto Clock and then use 3 or 4 to select... then use the number buttons to select OFF. 28 If you cut off the power supply to the TV, the clock setting you cut off the power, the timer setting will be cleared. 1 Navigate to the SYSTEM SETUP - The TV must be cleared. 1 Navigate to the SYSTEM SETUP - Sleep timer - To cancel it (displayed...
Operation Manual
Page 41
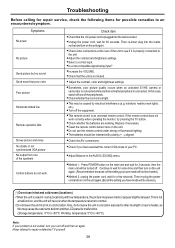
... may be inserted with low temperature, the picture may cause the cabinet to deform and the LCD panel to malfunction. (Storage temperature: 0°C to +50°C Working temperature: 5°C to repair a defective TV yourself. 39 Continue to wait for a few seconds. Also, do not work correctly when... operating the monitor, try pressing the TV button. =Check whether the batteries are working. Symptoms No power No picture Good picture but no sound Good sound but poor color Poor picture Horizontal dotted line Remote operation ...
... may be inserted with low temperature, the picture may cause the cabinet to deform and the LCD panel to malfunction. (Storage temperature: 0°C to +50°C Working temperature: 5°C to repair a defective TV yourself. 39 Continue to wait for a few seconds. Also, do not work correctly when... operating the monitor, try pressing the TV button. =Check whether the batteries are working. Symptoms No power No picture Good picture but no sound Good sound but poor color Poor picture Horizontal dotted line Remote operation ...

Operation Manual
Page 42
Care and Maintenance LCD Display panel information Important Information Regarding Use of a stationary fixed image. B. C. Cleaning and Maintenance To clean this unit. • Before using a chemically treated cloth, read ... alcohol, paint thinner or benzine to display fixed image patterns for extended periods of irreversible LCD panel deterioration can cause a permanent "shadow image" on the LCD panel resulting from the LCD. • Never use of time. Turn the power off when not in a soap and water solution or a weak detergent solution. • Use eyeglass...
Care and Maintenance LCD Display panel information Important Information Regarding Use of a stationary fixed image. B. C. Cleaning and Maintenance To clean this unit. • Before using a chemically treated cloth, read ... alcohol, paint thinner or benzine to display fixed image patterns for extended periods of irreversible LCD panel deterioration can cause a permanent "shadow image" on the LCD panel resulting from the LCD. • Never use of time. Turn the power off when not in a soap and water solution or a weak detergent solution. • Use eyeglass...

Operation Manual
Page 44
.... Programming your Remote Control Introduction Your remote lets you control four devices with the most popular code first. A Quick Look at the device and press Power. Press a device key (VCR/DVD, CBL/ SAT, or AUX). 3. The remote sends IR codes from its library to 5. 7. Continue until the red LED blinks... twice; Aim the remote at the device and press Power. Press and hold SET until the red LED blinks twice; Press and hold SET until the red LED blinks twice; Repeat step 4 for the four...
.... Programming your Remote Control Introduction Your remote lets you control four devices with the most popular code first. A Quick Look at the device and press Power. Press a device key (VCR/DVD, CBL/ SAT, or AUX). 3. The remote sends IR codes from its library to 5. 7. Continue until the red LED blinks... twice; Aim the remote at the device and press Power. Press and hold SET until the red LED blinks twice; Press and hold SET until the red LED blinks twice; Repeat step 4 for the four...


