
Owners Manual
Page 2
... ON OR NEAR THIS UNIT. • SHOULDANY TROUBLE OCCUR, DISCONNECT THE AC POWER CORD AND REFER SERVICING TO A QUALIFIED TECHNICIAN. REPLACE ONLY WITH THE SAME OR EQUIVALENT TYPE. • TO PREVENT ELECTRIC SHOCK, MATCH WIDE BLADE OF PLUG TO WIDE SLOT OF WALL OUTLET, THEN FULLY INSERT. • USE OF CONTROLS OR ADJUSTMENTS OR PERFORMANCE OF PROCEDURES OTHER THAN THOSE SPECIFIED...
... ON OR NEAR THIS UNIT. • SHOULDANY TROUBLE OCCUR, DISCONNECT THE AC POWER CORD AND REFER SERVICING TO A QUALIFIED TECHNICIAN. REPLACE ONLY WITH THE SAME OR EQUIVALENT TYPE. • TO PREVENT ELECTRIC SHOCK, MATCH WIDE BLADE OF PLUG TO WIDE SLOT OF WALL OUTLET, THEN FULLY INSERT. • USE OF CONTROLS OR ADJUSTMENTS OR PERFORMANCE OF PROCEDURES OTHER THAN THOSE SPECIFIED...
Owners Manual
Page 3
... not operate normally, or has been dropped. The wide blade or the third prong is damaged, liquid has been spilled or objects have fallen into your wall outlet, consult an electrician for replacement of time. 14)Refer all instructions. 5) Do not use attachments / accessories specified by the manufacturer. 12)Use only with the cart, stand, tripod, bracket, or table specified...
... not operate normally, or has been dropped. The wide blade or the third prong is damaged, liquid has been spilled or objects have fallen into your wall outlet, consult an electrician for replacement of time. 14)Refer all instructions. 5) Do not use attachments / accessories specified by the manufacturer. 12)Use only with the cart, stand, tripod, bracket, or table specified...
Owners Manual
Page 4
...CONNECTIONS ...8 - 12 Connecting a TV Antenna / Cable / Satellite 8 Connecting an A / V Device ...8 Connecting Devices with a Composite (Yellow RCA-Type) Video Output 9 Connecting Devices with a Composite (Yellow RCA-Type) Video Input 9 Connecting a High Definition (HD) Source 10 Connecting a PC ...10 Connecting HDMI ...11 Connecting an Audio Amplifier ...11 Connecting the AC Power Cord 12 USING HEADPHONES ...12 INSTALLATION ...13 Removing the Base Stand ...13 Mounting on the Wall ...13 TV SETUP ...14 - 19 Video Menu ...14 Audio Menu ...15 TV Menu ...16 Setup Menu ...17 - 18 Parental Menu...
...CONNECTIONS ...8 - 12 Connecting a TV Antenna / Cable / Satellite 8 Connecting an A / V Device ...8 Connecting Devices with a Composite (Yellow RCA-Type) Video Output 9 Connecting Devices with a Composite (Yellow RCA-Type) Video Input 9 Connecting a High Definition (HD) Source 10 Connecting a PC ...10 Connecting HDMI ...11 Connecting an Audio Amplifier ...11 Connecting the AC Power Cord 12 USING HEADPHONES ...12 INSTALLATION ...13 Removing the Base Stand ...13 Mounting on the Wall ...13 TV SETUP ...14 - 19 Video Menu ...14 Audio Menu ...15 TV Menu ...16 Setup Menu ...17 - 18 Parental Menu...
Owners Manual
Page 5
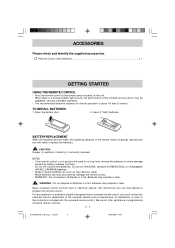
... or problems related to programming a universal remote control, you must contact the customer service department of the universal remote control manufacturer for assistance, or refer to the instructions included with batteries x 1 GETTING STARTED USING THE REMOTE CONTROL • Point the remote control at the remote sensor located on the unit. • When there is a strong ambient light source, the performance of batteries in a fire. Insert 2 "AAA" batteries. + __ + BATTERY REPLACEMENT When...
... or problems related to programming a universal remote control, you must contact the customer service department of the universal remote control manufacturer for assistance, or refer to the instructions included with batteries x 1 GETTING STARTED USING THE REMOTE CONTROL • Point the remote control at the remote sensor located on the unit. • When there is a strong ambient light source, the performance of batteries in a fire. Insert 2 "AAA" batteries. + __ + BATTERY REPLACEMENT When...

Owners Manual
Page 6
... TV SET UP menu and return directly to TV mode. FORMAT Button Press to YUV (component) inputs and HDMI 1 / HDMI 2 inputs. FUNCTION button Press to match the type of show you are watching. (Personal / Soft / Movie / Standard / Dynamic) 17. SOUND button Press to select from preset screen display settings to switch between TV / AV 1 / AV 2 / YUV in / HDMI 1 / HDMI 2 / PC in STANDBY (OFF) mode. 2. HD button Press to switch to source connected to select the picture format. CONTROL REFERENCE GUIDE REMOTE CONTROL 1.
... TV SET UP menu and return directly to TV mode. FORMAT Button Press to YUV (component) inputs and HDMI 1 / HDMI 2 inputs. FUNCTION button Press to match the type of show you are watching. (Personal / Soft / Movie / Standard / Dynamic) 17. SOUND button Press to select from preset screen display settings to switch between TV / AV 1 / AV 2 / YUV in / HDMI 1 / HDMI 2 / PC in STANDBY (OFF) mode. 2. HD button Press to switch to source connected to select the picture format. CONTROL REFERENCE GUIDE REMOTE CONTROL 1.

Owners Manual
Page 7
Removable stand 7. CH buttons Confirms selections on and off. 2. STD.BY / ON button Turns the unit on the TV menu screen and changes the TV channels. 5. - VOL + controls Adjusts the volume level. 6. Remote sensor Receives the remote control signal. FUNCTION button Selects TV / AV 1 / AV 2 / YUV in / HDMI 1 / HDMI 2 / PC in. 4. Color LCD screen 8. MENU button Enters the on-screen TV menu. 3. CONTROL REFERENCE GUIDE FRONT & SIDE VIEWS 7 1 2 3 4 5 8 9 6 1. Speaker PLV36320CS11_IB_Eng_1-13.pmd 6 E - 6 13/09/2007, 17:27 Standby indicator 9.
Removable stand 7. CH buttons Confirms selections on and off. 2. STD.BY / ON button Turns the unit on the TV menu screen and changes the TV channels. 5. - VOL + controls Adjusts the volume level. 6. Remote sensor Receives the remote control signal. FUNCTION button Selects TV / AV 1 / AV 2 / YUV in / HDMI 1 / HDMI 2 / PC in. 4. Color LCD screen 8. MENU button Enters the on-screen TV menu. 3. CONTROL REFERENCE GUIDE FRONT & SIDE VIEWS 7 1 2 3 4 5 8 9 6 1. Speaker PLV36320CS11_IB_Eng_1-13.pmd 6 E - 6 13/09/2007, 17:27 Standby indicator 9.
Owners Manual
Page 9
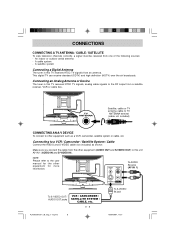
...:27 CONNECTIONS CONNECTING A TV ANTENNA / CABLE / SATELLITE To view television channels correctly, a signal must be received from a satellite receiver, VCR or cable box. A satellite system Connecting a Digital Antenna The tuner in this TV receives NTSC TV signals, analog cable signals or the RF output from one of the following sources: - Connecting to a VCR / Camcorder / Satellite System / Cable Connect the AUDIO and S-VIDEO cable (not included) as a VCR, camcorder, satellite system or cable, etc. TV ANTENNA Satellite, cable or TV antenna cable to TV ANTENNA terminal (cable...
...:27 CONNECTIONS CONNECTING A TV ANTENNA / CABLE / SATELLITE To view television channels correctly, a signal must be received from a satellite receiver, VCR or cable box. A satellite system Connecting a Digital Antenna The tuner in this TV receives NTSC TV signals, analog cable signals or the RF output from one of the following sources: - Connecting to a VCR / Camcorder / Satellite System / Cable Connect the AUDIO and S-VIDEO cable (not included) as a VCR, camcorder, satellite system or cable, etc. TV ANTENNA Satellite, cable or TV antenna cable to TV ANTENNA terminal (cable...
Owners Manual
Page 10
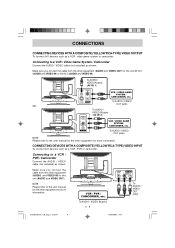
... 1 To AUDIO / VIDEO OUT jacks OR AUDIO IN To AUDIO / VIDEO IN jacks (AV IN 2) VIDEO IN VCR / VIDEO GAME SYSTEM / CAMCORDER, etc. NOTE Please refer to the user manual for the other equipment for more information. VCR / PVR / CAMCORDER, etc. CONNECTING DEVICES WITH A COMPOSITE (YELLOW RCA-TYPE) VIDEO INPUT To connect A/V devices such as a VCR, PVR or camcorder: Connecting to a VCR / PVR / Camcorder Connect the AUDIO / VIDEO cable (not...
... 1 To AUDIO / VIDEO OUT jacks OR AUDIO IN To AUDIO / VIDEO IN jacks (AV IN 2) VIDEO IN VCR / VIDEO GAME SYSTEM / CAMCORDER, etc. NOTE Please refer to the user manual for the other equipment for more information. VCR / PVR / CAMCORDER, etc. CONNECTING DEVICES WITH A COMPOSITE (YELLOW RCA-TYPE) VIDEO INPUT To connect A/V devices such as a VCR, PVR or camcorder: Connecting to a VCR / PVR / Camcorder Connect the AUDIO / VIDEO cable (not...
Owners Manual
Page 11
... you connect the component video cable and audio cable from your cable/ satellite service provider for receiving HD channels. To AUDIO IN jacks (YUV IN) HD SOURCE With component video output (Digital Cable Box*, Satellite Receiver*, or external over-the-air HD-Tuner). Make sure you connect the cable from 480i to 1080i, and this unit can support DVD players up to this unit using a monitor cable and audio cable (not included) as shown. Check with component video output must be connected to the television, the picture resolution...
... you connect the component video cable and audio cable from your cable/ satellite service provider for receiving HD channels. To AUDIO IN jacks (YUV IN) HD SOURCE With component video output (Digital Cable Box*, Satellite Receiver*, or external over-the-air HD-Tuner). Make sure you connect the cable from 480i to 1080i, and this unit can support DVD players up to this unit using a monitor cable and audio cable (not included) as shown. Check with component video output must be connected to the television, the picture resolution...
Owners Manual
Page 12
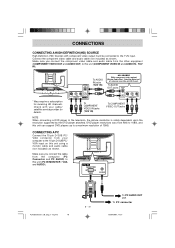
... the video source output quality. Press the HD button to multichannel surround-sound audio. HDMI HDMI To HDMI OUT jack To HDMI IN jack CONNECTING AN AUDIO AMPLIFIER This connection allows you to use with HDTV signals), one connector (instead of up to 2.2 gigabytes per second (with DVD players, DTV, set-top boxes and other equipment (AUDIO IN) to this unit (AUDIO OUT). PLV36320CS11_IB_Eng_1-13.pmd 11 To AUDIO OUT jacks AUDIO AMPLIFIER / EXTERNAL SPEAKERS To AUDIO...
... the video source output quality. Press the HD button to multichannel surround-sound audio. HDMI HDMI To HDMI OUT jack To HDMI IN jack CONNECTING AN AUDIO AMPLIFIER This connection allows you to use with HDTV signals), one connector (instead of up to 2.2 gigabytes per second (with DVD players, DTV, set-top boxes and other equipment (AUDIO IN) to this unit (AUDIO OUT). PLV36320CS11_IB_Eng_1-13.pmd 11 To AUDIO OUT jacks AUDIO AMPLIFIER / EXTERNAL SPEAKERS To AUDIO...

Owners Manual
Page 13
... the main power, even when the power is turned off. • Be sure the AC power cord is disconnected and all functions are off before connecting headphones to the unit, then adjust the volume to your desired level. • When headphones are not going to use the remote control to you are connected, no sound will come from the front speakers. BY / ON button on...
... the main power, even when the power is turned off. • Be sure the AC power cord is disconnected and all functions are off before connecting headphones to the unit, then adjust the volume to your desired level. • When headphones are not going to use the remote control to you are connected, no sound will come from the front speakers. BY / ON button on...

Owners Manual
Page 14
... WALL This unit is VESA-compliant, and is designed to the directions included with a VESA-compliant 7 7/8" x 7 7/8" (200mm x 200mm) mounting kit designed for flat-panel TVs (sold separately). NOTE Remove the base stand before mounting the unit on a flat surface, so the back side is facing up, making sure to the unit. 2. Remove the 8 screws and then remove the BASE STAND from the unit. Disconnect any cables or cords connected...
... WALL This unit is VESA-compliant, and is designed to the directions included with a VESA-compliant 7 7/8" x 7 7/8" (200mm x 200mm) mounting kit designed for flat-panel TVs (sold separately). NOTE Remove the base stand before mounting the unit on a flat surface, so the back side is facing up, making sure to the unit. 2. Remove the 8 screws and then remove the BASE STAND from the unit. Disconnect any cables or cords connected...
Owners Manual
Page 15
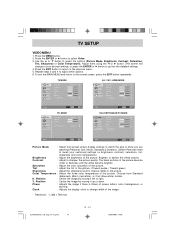
... picture. Saturation : Adjust the color saturation of the image. - Position 50 Setup Phase 3 Clock 127 Parental Best definition 1,366 768 Video Select EXIT Exit VGA Select EXIT Return Picture Mode : Select from Standard (balanced), Warm (red white), or Cool (blue white) modes. Color Temperature : Adjust the three color temperature of the picture become brighter. The black portions of the picture. Adjust them using the or button (The screen will change width of the picture. TV SETUP VIDEO MENU...
... picture. Saturation : Adjust the color saturation of the image. - Position 50 Setup Phase 3 Clock 127 Parental Best definition 1,366 768 Video Select EXIT Exit VGA Select EXIT Return Picture Mode : Select from Standard (balanced), Warm (red white), or Cool (blue white) modes. Color Temperature : Adjust the three color temperature of the picture become brighter. The black portions of the picture. Adjust them using the or button (The screen will change width of the picture. TV SETUP VIDEO MENU...
Owners Manual
Page 16
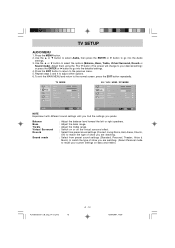
... match the type of show you are watching. (Select Personal mode to adjust other options. 6. Adjust them using the or button (The screen will change to the normal screen, press the EXIT button repeatedly. Press the MENU button. 2. Use the or button to select Audio, then press the ENTER or button to go into the detailed settings. 4. TV MODE AV / YUV / HDMI / PC MODE NOTE Experiment with different sound settings until you...
... match the type of show you are watching. (Select Personal mode to adjust other options. 6. Adjust them using the or button (The screen will change to the normal screen, press the EXIT button repeatedly. Press the MENU button. 2. Use the or button to select Audio, then press the ENTER or button to go into the detailed settings. 4. TV MODE AV / YUV / HDMI / PC MODE NOTE Experiment with different sound settings until you...
Owners Manual
Page 17
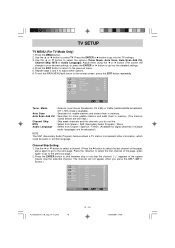
... SAP (Secondary Audio Program) feature allows a TV station to go into the detailed settings. 4. Channel Skip Setting: 1. Press the ENTER button to go into the TV settings. 3. Press the ENTER or button to shift between skip or not skip the channel. (" " appears in another language. Video Audio TV Setup Parental Tuner Mode Auto Scan Auto Scan Add CH Channel Skip MTS Audio Language Cable Stereo English TV Select EXIT Exit Tuner Mode : Antenna (over-the...
... SAP (Secondary Audio Program) feature allows a TV station to go into the detailed settings. 4. Channel Skip Setting: 1. Press the ENTER button to go into the TV settings. 3. Press the ENTER or button to shift between skip or not skip the channel. (" " appears in another language. Video Audio TV Setup Parental Tuner Mode Auto Scan Auto Scan Add CH Channel Skip MTS Audio Language Cable Stereo English TV Select EXIT Exit Tuner Mode : Antenna (over-the...

Owners Manual
Page 18
...:59 Use the or button to input time. Adjust them using the or button (The screen will be shown: Time Update :Select On/Off to input power off . Power Off Time :Press the or button to locate the position, and press the number buttons to activate the following manual settings; Video Audio TV TV MODE OSD Language Time Setup Caption Restore setting English Video Audio Setup AV / YUV MODE OSD Language Time Setup Caption Restore setting English Setup Parental Parental Setup Select EXIT Exit HDMI / PC MODE Video Audio Setup Parental OSD Language Time Setup Restore setting...
...:59 Use the or button to input time. Adjust them using the or button (The screen will be shown: Time Update :Select On/Off to input power off . Power Off Time :Press the or button to locate the position, and press the number buttons to activate the following manual settings; Video Audio TV TV MODE OSD Language Time Setup Caption Restore setting English Video Audio Setup AV / YUV MODE OSD Language Time Setup Caption Restore setting English Setup Parental Parental Setup Select EXIT Exit HDMI / PC MODE Video Audio Setup Parental OSD Language Time Setup Restore setting...
Owners Manual
Page 19
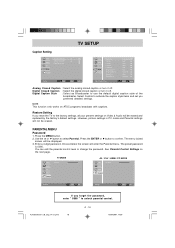
... works on the next page. TV MODE Video Audio TV Setup Parental Password AV / YUV / HDMI / PC MODE Video Audio Setup Parental Password Parental Select EXIT Exit Parental Select EXIT Exit If you reset the TV to unlock parental control. Digital Closed Caption : Select the digital closed caption or turn it off . Select Custom to select Parental. The preset password is 0000. Once entered, the screen will be erased. Press the MENU button. 2. TV SETUP Caption Setting Video Analog Closed Caption Off Digital Closed Caption Off Audio Digital Caption Style TV Setup...
... works on the next page. TV MODE Video Audio TV Setup Parental Password AV / YUV / HDMI / PC MODE Video Audio Setup Parental Password Parental Select EXIT Exit Parental Select EXIT Exit If you reset the TV to unlock parental control. Digital Closed Caption : Select the digital closed caption or turn it off . Select Custom to select Parental. The preset password is 0000. Once entered, the screen will be erased. Press the MENU button. 2. TV SETUP Caption Setting Video Analog Closed Caption Off Digital Closed Caption Off Audio Digital Caption Style TV Setup...

Owners Manual
Page 20
TV SETUP Parental Control Setting 1. Press the ENTER button to adjust other options. 5. Repeat steps 1 - 3 to change the mode between Blocked and Allowed. 3. TV Ratings U.S. Some material may be inappropriate for children under 13. : RESTRICTED, Under 17 requires accompanying parent or adult guardian for all ages. : PARENTAL GUIDANCE SUGGESTED - Use the , , and buttons to select various Parental settings. Video Audio Setup Parental Program Block Change Password Clean All Video Rating Enable On Audio U.S.TV...
TV SETUP Parental Control Setting 1. Press the ENTER button to adjust other options. 5. Repeat steps 1 - 3 to change the mode between Blocked and Allowed. 3. TV Ratings U.S. Some material may be inappropriate for children under 13. : RESTRICTED, Under 17 requires accompanying parent or adult guardian for all ages. : PARENTAL GUIDANCE SUGGESTED - Use the , , and buttons to select various Parental settings. Video Audio Setup Parental Program Block Change Password Clean All Video Rating Enable On Audio U.S.TV...
Owners Manual
Page 21
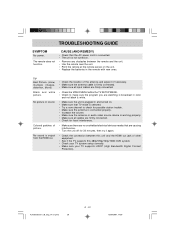
... power cord is connected. • The unit is not turned on the unit. • Replace the batteries in the remote with new ones. PLV36320CS11_IB_Eng_14-21.pmd 20 E - 20 13/09/2007, 14:59 TROUBLESHOOTING GUIDE SYMPTOM No power. No sound is working properly. • Make sure all input cables are firmly connected. • Check the VIDEO MENU within the TV SETUP MENU. • Check to make sure the program...
... power cord is connected. • The unit is not turned on the unit. • Replace the batteries in the remote with new ones. PLV36320CS11_IB_Eng_14-21.pmd 20 E - 20 13/09/2007, 14:59 TROUBLESHOOTING GUIDE SYMPTOM No power. No sound is working properly. • Make sure all input cables are firmly connected. • Check the VIDEO MENU within the TV SETUP MENU. • Check to make sure the program...

Owners Manual
Page 22
Unit : INCH PLV36320CS11_IB_Eng_14-21.pmd 21 E - 21 Print in China 811-363291W010 13/09/2007, 14:59
Unit : INCH PLV36320CS11_IB_Eng_14-21.pmd 21 E - 21 Print in China 811-363291W010 13/09/2007, 14:59


