Owners Manual
Page 1
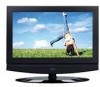
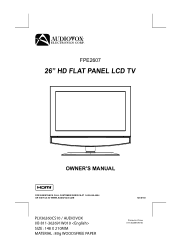
FPE2607 26" HD FLAT PANEL LCD TV OWNER'S MANUAL FOR ASSISTANCE CALL CUSTOMER SERVICE AT 1-800-645-4994 OR VISIT US AT WWW. AUDIOVOX.COM PLV36260CS10 / AUDIOVOX I/B 811-362691W010 SIZE : 148 X 210MM MATERIAL : 80g WOODSFREE PAPER 128-8140 Printed in China 811-362691W010
FPE2607 26" HD FLAT PANEL LCD TV OWNER'S MANUAL FOR ASSISTANCE CALL CUSTOMER SERVICE AT 1-800-645-4994 OR VISIT US AT WWW. AUDIOVOX.COM PLV36260CS10 / AUDIOVOX I/B 811-362691W010 SIZE : 148 X 210MM MATERIAL : 80g WOODSFREE PAPER 128-8140 Printed in China 811-362691W010
Owners Manual
Page 2
... turning the unit off and on the rear of the FCC Rules. Reorient or relocate the receiving antenna. - Consult the dealer or an experienced radio/TV technician for Class II (Double Insulation) CAUTION • DANGER OF EXPLOSION IF BATTERY IS INCORRECTLY REPLACED. SAFETY INFORMATION • When connecting or disconnecting the AC...
... turning the unit off and on the rear of the FCC Rules. Reorient or relocate the receiving antenna. - Consult the dealer or an experienced radio/TV technician for Class II (Double Insulation) CAUTION • DANGER OF EXPLOSION IF BATTERY IS INCORRECTLY REPLACED. SAFETY INFORMATION • When connecting or disconnecting the AC...
Owners Manual
Page 4
... SAFETY PRECAUTIONS ...1 IMPORTANT SAFETY INSTRUCTIONS 2 CONTENTS ...3 ACCESSORIES ...4 GETTING STARTED ...4 CONTROL REFERENCE GUIDE 5 - 7 CONNECTIONS ...8 - 12 Connecting a TV Antenna / Cable / Satellite 8 Connecting an A / V Device ...8 Connecting Devices with a Composite (Yellow RCA-Type) Video Output 9 Connecting... Cord 12 USING HEADPHONES ...12 INSTALLATION ...13 Removing the Base Stand ...13 Mounting on the Wall ...13 TV SETUP ...14 - 19 Video Menu ...14 Audio Menu ...15 TV Menu ...16 Setup Menu ...17 - 18 Parental Menu ...18 - 19 TROUBLESHOOTING GUIDE ...20 PLV36260_ib_eng_1-13_AUD....
... SAFETY PRECAUTIONS ...1 IMPORTANT SAFETY INSTRUCTIONS 2 CONTENTS ...3 ACCESSORIES ...4 GETTING STARTED ...4 CONTROL REFERENCE GUIDE 5 - 7 CONNECTIONS ...8 - 12 Connecting a TV Antenna / Cable / Satellite 8 Connecting an A / V Device ...8 Connecting Devices with a Composite (Yellow RCA-Type) Video Output 9 Connecting... Cord 12 USING HEADPHONES ...12 INSTALLATION ...13 Removing the Base Stand ...13 Mounting on the Wall ...13 TV SETUP ...14 - 19 Video Menu ...14 Audio Menu ...15 TV Menu ...16 Setup Menu ...17 - 18 Parental Menu ...18 - 19 TROUBLESHOOTING GUIDE ...20 PLV36260_ib_eng_1-13_AUD....
Owners Manual
Page 6
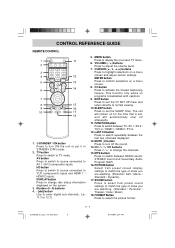
...to match the type of show you are watching. (Standard / Personal / Theater / Voice / Music) 18. CC button Press to TV mode. The unit will automatically shut off the sound. 14. PICTURE button Select from preset sound settings to confirm selections on for the .... 8. SLEEP button Press to highlight selections on programs broadcasted with captions. 9. FUNCTION button Press to change disc status information displayed on -screen TV menu. 6. LAST CH button Press to switch between MONO sound, STEREO sound and Secondary Audio Program (SAP). 16. CONTROL REFERENCE GUIDE REMOTE ...
...to match the type of show you are watching. (Standard / Personal / Theater / Voice / Music) 18. CC button Press to TV mode. The unit will automatically shut off the sound. 14. PICTURE button Select from preset sound settings to confirm selections on for the .... 8. SLEEP button Press to highlight selections on programs broadcasted with captions. 9. FUNCTION button Press to change disc status information displayed on -screen TV menu. 6. LAST CH button Press to switch between MONO sound, STEREO sound and Secondary Audio Program (SAP). 16. CONTROL REFERENCE GUIDE REMOTE ...
Owners Manual
Page 7
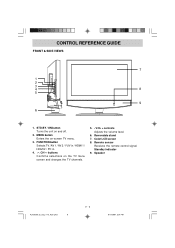
Remote sensor Receives the remote control signal. Removable stand 7. Speaker PLV36260_ib_eng_1-13_AUD.pmd 6 E - 6 9/13/2007, 3:24 PM FUNCTION button Selects TV / AV 1 / AV 2 / YUV in / HDMI 1 / HDMI 2 / PC in. 4. CONTROL REFERENCE GUIDE FRONT & SIDE VIEWS 1. STD.BY / ON button Turns the unit on the TV menu screen and changes the TV channels. 5. - VOL + controls Adjusts the volume level. 6. CH buttons Confirms selections on and off. 2. Color LCD screen 8. MENU button Enters the on-screen TV menu. 3. Standby indicator 9.
Remote sensor Receives the remote control signal. Removable stand 7. Speaker PLV36260_ib_eng_1-13_AUD.pmd 6 E - 6 9/13/2007, 3:24 PM FUNCTION button Selects TV / AV 1 / AV 2 / YUV in / HDMI 1 / HDMI 2 / PC in. 4. CONTROL REFERENCE GUIDE FRONT & SIDE VIEWS 1. STD.BY / ON button Turns the unit on the TV menu screen and changes the TV channels. 5. - VOL + controls Adjusts the volume level. 6. CH buttons Confirms selections on and off. 2. Color LCD screen 8. MENU button Enters the on-screen TV menu. 3. Standby indicator 9.
Owners Manual
Page 9
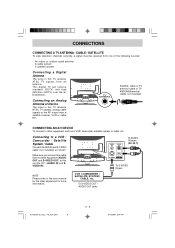
...system - A satellite system Connecting a Digital Antenna The tuner in this TV receives NTSC TV signals, analog cable signals or the RF output from a satellite receiver, VCR or cable box. Connecting to this TV receives ATSC TV signals from one of the following sources: - To S-VIDEO IN jack... / Cable Connect the AUDIO and S-VIDEO cable (not included) as a VCR, camcorder, satellite system or cable, etc. CONNECTIONS CONNECTING A TV ANTENNA / CABLE / SATELLITE To view television channels correctly, a signal must be received from an antenna. CONNECTING AN A/V DEVICE To connect to...
...system - A satellite system Connecting a Digital Antenna The tuner in this TV receives NTSC TV signals, analog cable signals or the RF output from a satellite receiver, VCR or cable box. Connecting to this TV receives ATSC TV signals from one of the following sources: - To S-VIDEO IN jack... / Cable Connect the AUDIO and S-VIDEO cable (not included) as a VCR, camcorder, satellite system or cable, etc. CONNECTIONS CONNECTING A TV ANTENNA / CABLE / SATELLITE To view television channels correctly, a signal must be received from an antenna. CONNECTING AN A/V DEVICE To connect to...
Owners Manual
Page 14
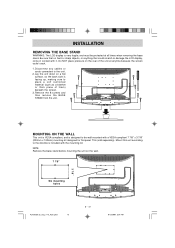
... on a flat surface, so the back side is facing up, making sure to be protected at anytime because the screen could scratch or damage the LCD display, come in contact with it. MOUNTING ON THE WALL This unit is VESA-compliant, and is designed to place a soft cushioned material (such as... the 8 screws and then remove the BASE STAND from the unit. Mount this unit according to the unit. 2. INSTALLATION REMOVING THE BASE STAND WARNING: The LCD display is very fragile, and must be wall-mounted with a VESA-compliant 7 7/8" x 3 7/8" (200mm x 100mm) mounting kit designed for flat-panel...
... on a flat surface, so the back side is facing up, making sure to be protected at anytime because the screen could scratch or damage the LCD display, come in contact with it. MOUNTING ON THE WALL This unit is VESA-compliant, and is designed to place a soft cushioned material (such as... the 8 screws and then remove the BASE STAND from the unit. Mount this unit according to the unit. 2. INSTALLATION REMOVING THE BASE STAND WARNING: The LCD display is very fragile, and must be wall-mounted with a VESA-compliant 7 7/8" x 3 7/8" (200mm x 100mm) mounting kit designed for flat-panel...
Owners Manual
Page 15
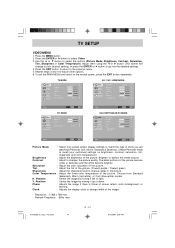
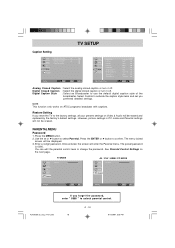
... using the or button (The screen will change width of the picture. Press the EXIT button to return to select Video. 3. TV MODE Video Audio TV Setup Parental Picture Mode Brightness Contrast Saturation Tint Sharpness Color Temperature Personal 50 50 50 0 4 Standard AV / YUV / HDMI MODE... temperature of the image. - V. Position : Center the image by moving it left or right. TV SETUP VIDEO MENU 1. Refresh Frequency : 60Hz max PLV36260_ib_eng_14-21.pmd 14 E - 14 9/13/2007, 3:26 PM Clock : Adjusts the display clock to change to improve detail in darkness and the white become...
... using the or button (The screen will change width of the picture. Press the EXIT button to return to select Video. 3. TV MODE Video Audio TV Setup Parental Picture Mode Brightness Contrast Saturation Tint Sharpness Color Temperature Personal 50 50 50 0 4 Standard AV / YUV / HDMI MODE... temperature of the image. - V. Position : Center the image by moving it left or right. TV SETUP VIDEO MENU 1. Refresh Frequency : 60Hz max PLV36260_ib_eng_14-21.pmd 14 E - 14 9/13/2007, 3:26 PM Clock : Adjusts the display clock to change to improve detail in darkness and the white become...
Owners Manual
Page 16
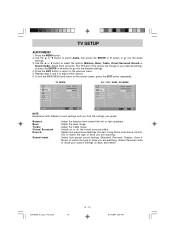
... the previous menu. 5. Press the EXIT button to return to your custom settings on bass and treble.) PLV36260_ib_eng_14-21.pmd 15 E - 15 9/13/2007, 3:26 PM TV MODE AV / YUV / HDMI / PC MODE NOTE Experiment with different sound settings until you find the settings you are watching. : Select from preset sound settings... and return to adjust other options. 6. Use the or button to select Audio, then press the ENTER or button to go into the detailed settings. 4. TV SETUP AUDIO MENU 1.
... the previous menu. 5. Press the EXIT button to return to your custom settings on bass and treble.) PLV36260_ib_eng_14-21.pmd 15 E - 15 9/13/2007, 3:26 PM TV MODE AV / YUV / HDMI / PC MODE NOTE Experiment with different sound settings until you find the settings you are watching. : Select from preset sound settings... and return to adjust other options. 6. Use the or button to select Audio, then press the ENTER or button to go into the detailed settings. 4. TV SETUP AUDIO MENU 1.
Owners Manual
Page 17
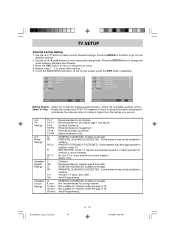
... multiple audio languages are still kept.) Channel Skip : Skip weak channels and the channels you press the CH /CH Button.) Video Audio TV Setup Parental Channel Skip 2 Analog 3 Analog 4 Analog 5 Analog 5-1 Digital KPIX-DT 6 Analog 7 Analog 8 Analog 9 Analog 10... Analog ENTER Enter Select EXIT Return PLV36260_ib_eng_14-21.pmd 16 E - 16 9/13/2007, 3:26 PM Audio Language : Select from Stereo / SAP (Secondary Audio Program) / Mono. Press the EXIT button to return to the normal screen, press the...
... multiple audio languages are still kept.) Channel Skip : Skip weak channels and the channels you press the CH /CH Button.) Video Audio TV Setup Parental Channel Skip 2 Analog 3 Analog 4 Analog 5 Analog 5-1 Digital KPIX-DT 6 Analog 7 Analog 8 Analog 9 Analog 10... Analog ENTER Enter Select EXIT Return PLV36260_ib_eng_14-21.pmd 16 E - 16 9/13/2007, 3:26 PM Audio Language : Select from Stereo / SAP (Secondary Audio Program) / Mono. Press the EXIT button to return to the normal screen, press the...
Owners Manual
Page 18
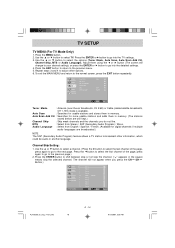
... automatically: Off -> 5 Minutes -> 10 Minutes -> 15 Minutes -> 30 Minutes -> 60 Minutes -> 90 Minutes -> 120 Minutes -> Off. E - 17 PLV36260_ib_eng_14-21.pmd 17 9/13/2007, 3:26 PM Adjust them using the or button (The screen will be shown: Time Update :Select On/Off to input date. Video Audio... TV TV MODE OSD Language Time Setup Caption Restore setting English Video Audio Setup AV / YUV MODE OSD Language Time Setup Caption Restore setting English Setup...
... automatically: Off -> 5 Minutes -> 10 Minutes -> 15 Minutes -> 30 Minutes -> 60 Minutes -> 90 Minutes -> 120 Minutes -> Off. E - 17 PLV36260_ib_eng_14-21.pmd 17 9/13/2007, 3:26 PM Adjust them using the or button (The screen will be shown: Time Update :Select On/Off to input date. Video Audio... TV TV MODE OSD Language Time Setup Caption Restore setting English Video Audio Setup AV / YUV MODE OSD Language Time Setup Caption Restore setting English Setup...
Owners Manual
Page 19
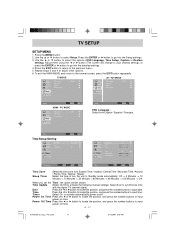
...and replaced by the factory's default settings. See Parental Control Settings on ATSC programs broadcast with captions. E - 18 18 9/13/2007, 3:26 PM The menu locked screen will enter the Parental menu. Digital Closed Caption : Select the digital closed caption or turn it off . Digital ...caption style items and set you forget the password, enter " 8888 " to use the default digital caption style of the broadcaster. TV MODE Video Audio TV Setup Parental Password AV / YUV / HDMI / PC MODE Video Audio Setup Parental Password Parental Select EXIT Exit Parental Select EXIT ...
...and replaced by the factory's default settings. See Parental Control Settings on ATSC programs broadcast with captions. E - 18 18 9/13/2007, 3:26 PM The menu locked screen will enter the Parental menu. Digital Closed Caption : Select the digital closed caption or turn it off . Digital ...caption style items and set you forget the password, enter " 8888 " to use the default digital caption style of the broadcaster. TV MODE Video Audio TV Setup Parental Password AV / YUV / HDMI / PC MODE Video Audio Setup Parental Password Parental Select EXIT Exit Parental Select EXIT ...
Owners Manual
Page 20
...On to edit the following parental items. Select Off to adjust other options. 5. Movie Ratings Canadian English Ratings Canadian French Ratings TV-Y TV-Y7 TV-G TV-PG TV-14 TV-MA : Recommended for all children. : Recommended for all children age 7 and above. : General Audience. : Parental Guidance ... Clean All Video Rating Enable On Audio U.S.TV Ratings U.S. Press the ENTER or button to the normal screen, press the EXIT button repeatedly. TV Ratings U.S. PLV36260_ib_eng_14-21.pmd 19 E - 19 9/13/2007, 3:26 PM Some material may not be inappropriate for...
...On to edit the following parental items. Select Off to adjust other options. 5. Movie Ratings Canadian English Ratings Canadian French Ratings TV-Y TV-Y7 TV-G TV-PG TV-14 TV-MA : Recommended for all children. : Recommended for all children age 7 and above. : General Audience. : Parental Guidance ... Clean All Video Rating Enable On Audio U.S.TV Ratings U.S. Press the ENTER or button to the normal screen, press the EXIT button repeatedly. TV Ratings U.S. PLV36260_ib_eng_14-21.pmd 19 E - 19 9/13/2007, 3:26 PM Some material may not be inappropriate for...
Owners Manual
Page 21
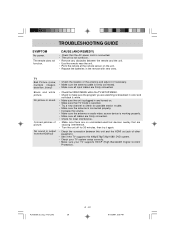
...8226; Make sure all cables are firmly connected. • Check for local interference. • Make sure there are firmly connected. TV Bad Picture (snow, multiple images, distortion, blurry) • Check the location of picture. CAUSE (AND REMEDY) • ...; Make sure the unit is working properly. • Make sure all input cables are no unshielded electrical devices nearby that TV mode is selected. • Try a new channel to check for possible station trouble. • Make sure the antenna is...The remote does not function. PLV36260_ib_eng_14-21.pmd 20 E - 20 9/13/2007, 3:26 PM
...8226; Make sure all cables are firmly connected. • Check for local interference. • Make sure there are firmly connected. TV Bad Picture (snow, multiple images, distortion, blurry) • Check the location of picture. CAUSE (AND REMEDY) • ...; Make sure the unit is working properly. • Make sure all input cables are no unshielded electrical devices nearby that TV mode is selected. • Try a new channel to check for possible station trouble. • Make sure the antenna is...The remote does not function. PLV36260_ib_eng_14-21.pmd 20 E - 20 9/13/2007, 3:26 PM


