Owners Manual
Page 1
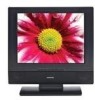
AUDIOVOX ENGLISH IB I/B [P/N: 811-211591W420] SIZE : 148 X 210MM MATERIAL : 80g WOODSFREE PAPER 09-01-2008 128-8323 Printed in China 811-211591W420 AUDIOVOX.COM PLV21150CS1 - FPE1508DV 15" FLAT PANEL LCD TV WITH BUILT-IN DVD PLAYER OWNER'S MANUAL FOR ASSISTANCE CALL CUSTOMER SERVICE AT 1-800-645-4994 OR VISIT US AT WWW.
AUDIOVOX ENGLISH IB I/B [P/N: 811-211591W420] SIZE : 148 X 210MM MATERIAL : 80g WOODSFREE PAPER 09-01-2008 128-8323 Printed in China 811-211591W420 AUDIOVOX.COM PLV21150CS1 - FPE1508DV 15" FLAT PANEL LCD TV WITH BUILT-IN DVD PLAYER OWNER'S MANUAL FOR ASSISTANCE CALL CUSTOMER SERVICE AT 1-800-645-4994 OR VISIT US AT WWW.
Owners Manual
Page 2
... experienced radio/TV technician for 1-2 hours before turning the power on , the user is condensation inside the equipment. SAFETY INFORMATION • When connecting or disconnecting the AC power cord, grip the plug and not the cord itself. FCC STATEMENTS The symbol for compliance could void the user authority to AND REFER SERVICING TO A QUALIFIED operate the unit. This unit generates, uses and can...
... experienced radio/TV technician for 1-2 hours before turning the power on , the user is condensation inside the equipment. SAFETY INFORMATION • When connecting or disconnecting the AC power cord, grip the plug and not the cord itself. FCC STATEMENTS The symbol for compliance could void the user authority to AND REFER SERVICING TO A QUALIFIED operate the unit. This unit generates, uses and can...
Owners Manual
Page 3
... cart, stand, tripod, bracket, or table specified by holding its inner and outer edges. • Do NOT touch the surface of the unlabeled side of time. 14) Refer all instructions. 5) Do not use irregular shaped discs (example : heart shaped, octagonal, etc.). Cleaning the unit • Be sure to turn the unit off and disconnect the AC power cord before...
... cart, stand, tripod, bracket, or table specified by holding its inner and outer edges. • Do NOT touch the surface of the unlabeled side of time. 14) Refer all instructions. 5) Do not use irregular shaped discs (example : heart shaped, octagonal, etc.). Cleaning the unit • Be sure to turn the unit off and disconnect the AC power cord before...
Owners Manual
Page 4
... RCA-Type) Video Output .......... 11 Connecting Devices with a Composite (Yellow RCA-Type) Video Input 11 Connecting a High-Definition (HD) Source 12 Connecting a PC 12 Connecting an Audio Amplifier 13 POWER SUPPLY 13 Using the Car Power Adapter 13 Using the AC Power Adapter 13 INSTALLATION 14 Removing the base stand 14 Mounting on the wall 14 USING HEADPHONES 15 UNIT OPERATION 15 SOUND SYSTEM 15 TV SETUP 16 - 20 Picture menu 16 Audio menu 16 Time menu 17 Setup menu 17 - 18 Parental menu 18 - 19 TV menu 20 CD/DVD OPERATION 21 - 22 Playing a disc 21 Playing a picture...
... RCA-Type) Video Output .......... 11 Connecting Devices with a Composite (Yellow RCA-Type) Video Input 11 Connecting a High-Definition (HD) Source 12 Connecting a PC 12 Connecting an Audio Amplifier 13 POWER SUPPLY 13 Using the Car Power Adapter 13 Using the AC Power Adapter 13 INSTALLATION 14 Removing the base stand 14 Mounting on the wall 14 USING HEADPHONES 15 UNIT OPERATION 15 SOUND SYSTEM 15 TV SETUP 16 - 20 Picture menu 16 Audio menu 16 Time menu 17 Setup menu 17 - 18 Parental menu 18 - 19 TV menu 20 CD/DVD OPERATION 21 - 22 Playing a disc 21 Playing a picture...
Owners Manual
Page 5
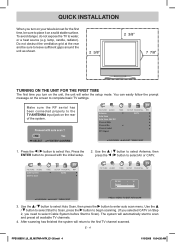
... the prompt message on the screen to the TV antenna input jack on the rear of the system. 1. Make sure the RF aerial has been connected properly to complete basic TV settings. Press the / button to Scan). Use the / button to select Start to Scan, press the button to begin scanning. (If you selected CATV on Step 2, you need to select Cable System before Start to select...
... the prompt message on the screen to the TV antenna input jack on the rear of the system. 1. Make sure the RF aerial has been connected properly to complete basic TV settings. Press the / button to Scan). Use the / button to select Start to Scan, press the button to begin scanning. (If you selected CATV on Step 2, you need to select Cable System before Start to select...

Owners Manual
Page 7
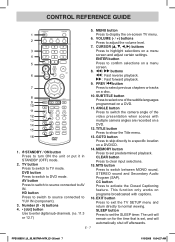
... questions or problems related to the instructions included with batteries) ...x 1 AC adapter ...x 1 Car power adapter ...x 1 GETTING STARTED USING THE REMOTE CONTROL • Point the remote control at the remote sensor located on the unit. • When there is incorrectly replaced. CAUTION: Danger of the universal remote control manufacturer for assistance, or refer to programming a universal remote control, you must contact the customer service department of explosion if battery is a strong ambient light source, the...
... questions or problems related to the instructions included with batteries) ...x 1 AC adapter ...x 1 Car power adapter ...x 1 GETTING STARTED USING THE REMOTE CONTROL • Point the remote control at the remote sensor located on the unit. • When there is incorrectly replaced. CAUTION: Danger of the universal remote control manufacturer for assistance, or refer to programming a universal remote control, you must contact the customer service department of explosion if battery is a strong ambient light source, the...
Owners Manual
Page 8
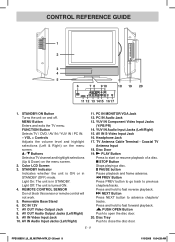
... source connected to enter digital sub-channels. (i.e. 11.3 or 12.7) 5. Number (0 - 9) buttons 4. • [dot] button Use to YUV IN (component). 3. MENU button Press to adjust the volume level. 7. VOLUME (- / +) buttons Press to display the on a menu screen. 8. / buttons : Fast reverse playback. : Fast forward playback. 9. ENTER button Press to set the SLEEP timer. MEMORY button Press to confirm selections on -screen TV menu. 6. MTS button Press to normal viewing. EXIT button Press to exit the TV SETUP menu and return directly to switch between MONO sound...
... source connected to enter digital sub-channels. (i.e. 11.3 or 12.7) 5. Number (0 - 9) buttons 4. • [dot] button Use to YUV IN (component). 3. MENU button Press to adjust the volume level. 7. VOLUME (- / +) buttons Press to display the on a menu screen. 8. / buttons : Fast reverse playback. : Fast forward playback. 9. ENTER button Press to set the SLEEP timer. MEMORY button Press to confirm selections on -screen TV menu. 6. MTS button Press to normal viewing. EXIT button Press to exit the TV SETUP menu and return directly to switch between MONO sound...
Owners Manual
Page 9
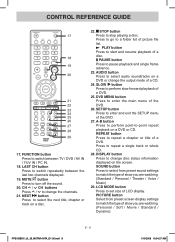
... single frame advance. 23. PAUSE button Press to switch repeatedly between TV / DVD / AV IN / YUV IN / PC IN. 18. DISPLAY button Press to switch between the last two channels displayed. 19. FUNCTION button Press to change disc status information displayed on a disc. 22. LCD MODE button Press to match the type of a CD. 24. SOUND button Press to select from preset screen display settings to set size of show you are watching...
... single frame advance. 23. PAUSE button Press to switch repeatedly between TV / DVD / AV IN / YUV IN / PC IN. 18. DISPLAY button Press to switch between the last two channels displayed. 19. FUNCTION button Press to change disc status information displayed on a disc. 22. LCD MODE button Press to match the type of a CD. 24. SOUND button Press to select from preset screen display settings to set size of show you are watching...
Owners Manual
Page 10
... the menu screen. / Buttons Selects a TV channel and highlight selections (Up & Down) on and off. Light On: The unit is turned ON. 4. Headphone Jack 17. TV Antenna Cable Terminal - Disc Tray Push to start or resume playback of a disc. STANDBY/ON Button Turns the unit on the menu screen. 2. Color LCD Screen 3. AV OUT Audio Output Jacks (Left/Right) 9. PLAY Button Press to close the disc door. Light Off: The unit is in STANDBY (OFF) mode. MENU Button...
... the menu screen. / Buttons Selects a TV channel and highlight selections (Up & Down) on and off. Light On: The unit is turned ON. 4. Headphone Jack 17. TV Antenna Cable Terminal - Disc Tray Push to start or resume playback of a disc. STANDBY/ON Button Turns the unit on the menu screen. 2. Color LCD Screen 3. AV OUT Audio Output Jacks (Left/Right) 9. PLAY Button Press to close the disc door. Light Off: The unit is in STANDBY (OFF) mode. MENU Button...
Owners Manual
Page 13
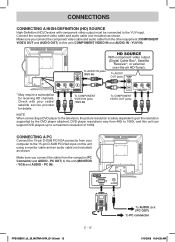
.... To AUDIO IN jacks (YUV IN) With component video output (Digital Cable Box*, Satellite Receiver*, or external over-the-air HD-Tuner). DVD player resolutions vary from the other equipment (COMPONENT VIDEO OUT and AUDIO OUT) to this unit can support DVD players up to a maximum resolution of 1080i. To COMPONENT VIDEO IN jacks (YUV IN) To COMPONENT VIDEO OUT jacks NOTE When connecting a DVD player to the YUV input. PC OUT) to this unit using a monitor cable and an audio cable (not...
.... To AUDIO IN jacks (YUV IN) With component video output (Digital Cable Box*, Satellite Receiver*, or external over-the-air HD-Tuner). DVD player resolutions vary from the other equipment (COMPONENT VIDEO OUT and AUDIO OUT) to this unit can support DVD players up to a maximum resolution of 1080i. To COMPONENT VIDEO IN jacks (YUV IN) To COMPONENT VIDEO OUT jacks NOTE When connecting a DVD player to the YUV input. PC OUT) to this unit using a monitor cable and an audio cable (not...
Owners Manual
Page 14
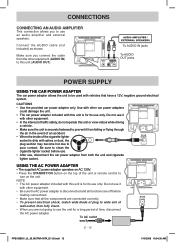
... use an audio amplifier and external speakers. Do not use only. FPE1508DV_UL_IB_MSTAR+MTK_E1-20.indd 13 E - 13 1/10/2008 10:04:30 AM Be sure to clean the cigarette lighter socket before making connections. • Make sure that have a 12V, negative ground electrical system. Using the AC Power Adapter • The supplied AC power adapter operates on AC 120V. • Press the STANDBY/ON button...
... use an audio amplifier and external speakers. Do not use only. FPE1508DV_UL_IB_MSTAR+MTK_E1-20.indd 13 E - 13 1/10/2008 10:04:30 AM Be sure to clean the cigarette lighter socket before making connections. • Make sure that have a 12V, negative ground electrical system. Using the AC Power Adapter • The supplied AC power adapter operates on AC 120V. • Press the STANDBY/ON button...

Owners Manual
Page 15
... removing the base stand. Remove the four screws and then remove the BASE STAND from the TV. Disconnect any time because the screen could scratch or damage the LCD display, comes into contact with it. Mount this unit according to the directions included with a VESA-compliant 3" x 3" (75mm x 75mm) mounting kit designed for flat-panel TVs (sold separately). Lay the unit down on the front of foam) beneath the screen. 3. INSTALLATION REMOVING THE BASE STAND...
... removing the base stand. Remove the four screws and then remove the BASE STAND from the TV. Disconnect any time because the screen could scratch or damage the LCD display, comes into contact with it. Mount this unit according to the directions included with a VESA-compliant 3" x 3" (75mm x 75mm) mounting kit designed for flat-panel TVs (sold separately). Lay the unit down on the front of foam) beneath the screen. 3. INSTALLATION REMOVING THE BASE STAND...
Owners Manual
Page 16
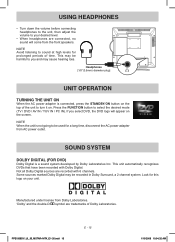
... are trademarks of time. SOUND system Dolby Digital (for a long time, disconnect the AC power adapter from the front speakers. Manufactured under license from Dolby Laboratories. 'Dolby' and the double-D symbol are connected, no sound will appear on the screen. USING HEADPHONES • Turn down the volume before connecting headphones to the unit, then adjust the volume to your unit. Press the FUNCTION button to sound at high...
... are trademarks of time. SOUND system Dolby Digital (for a long time, disconnect the AC power adapter from the front speakers. Manufactured under license from Dolby Laboratories. 'Dolby' and the double-D symbol are connected, no sound will appear on the screen. USING HEADPHONES • Turn down the volume before connecting headphones to the unit, then adjust the volume to your unit. Press the FUNCTION button to sound at high...
Owners Manual
Page 17
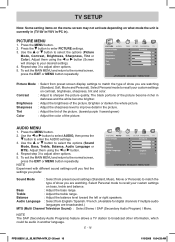
Use the or button to improve detail in darkness and the white become brighter. Picture Mode : Select from preset screen display settings to match the type of show you are broadcasted.) MTS (Multi Channel Television Sound) : Select Stereo / SAP (Secondary Audio Program) / Mono. Sharpness : Adjust the sharpness level to select the options (Picture Mode, Contrast, Brightness, Sharpness, Tint or Color). Note Experiment with different sound settings until you find the settings you...
Use the or button to improve detail in darkness and the white become brighter. Picture Mode : Select from preset screen display settings to match the type of show you are broadcasted.) MTS (Multi Channel Television Sound) : Select Stereo / SAP (Secondary Audio Program) / Mono. Sharpness : Adjust the sharpness level to select the options (Picture Mode, Contrast, Brightness, Sharpness, Tint or Color). Note Experiment with different sound settings until you find the settings you...
Owners Manual
Page 18
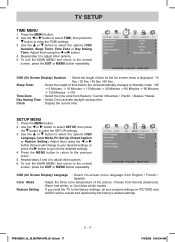
... normal screen, press the EXIT or MENU button repeatedly. OSD (On Screen Display) Duration : Select the length of the picture. TV SETUP TIME MENU 1. Choose from Normal (balanced), Warm (red white), or Cool (blue white) modes. Sleep Timer : Select the length of time before the unit automatically changes to the normal screen, press the EXIT or MENU button repeatedly. To exit the MAIN MENU and return to Standby mode : Off -> 5 Minutes -> 10 Minutes -> 15 Minutes...
... normal screen, press the EXIT or MENU button repeatedly. OSD (On Screen Display) Duration : Select the length of the picture. TV SETUP TIME MENU 1. Choose from Normal (balanced), Warm (red white), or Cool (blue white) modes. Sleep Timer : Select the length of time before the unit automatically changes to the normal screen, press the EXIT or MENU button repeatedly. To exit the MAIN MENU and return to Standby mode : Off -> 5 Minutes -> 10 Minutes -> 15 Minutes...
Owners Manual
Page 19
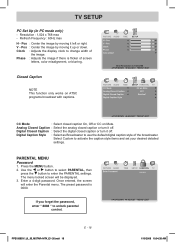
... the analog closed caption or turn it off . Select Custom to change width of the image. V - Digital Closed Caption : Select the digital closed caption On, Off or CC on ATSC programs broadcast with captions. FPE1508DV_UL_IB_MSTAR+MTK_E1-20.indd 18 E - 18 1/10/2008 10:04:35 AM If you forget the password, enter " 8888 " to enter the PARENTAL settings. PARENTAL MENU Password 1. Use the or button to select PARENTAL, then press the button to unlock parental control.
... the analog closed caption or turn it off . Select Custom to change width of the image. V - Digital Closed Caption : Select the digital closed caption On, Off or CC on ATSC programs broadcast with captions. FPE1508DV_UL_IB_MSTAR+MTK_E1-20.indd 18 E - 18 1/10/2008 10:04:35 AM If you forget the password, enter " 8888 " to enter the PARENTAL settings. PARENTAL MENU Password 1. Use the or button to select PARENTAL, then press the button to unlock parental control.

Owners Manual
Page 21
... (Antenna, Auto Scan, Auto Scan Add CH, Channel Skip, Channel No., Channel Label or DTV Signal). DTV Signal : Display the signal strength (for each channel. 1. Use the or button to the normal screen, press the EXIT or MENU button repeatedly. The stations stored before are available. Repeat steps 3 and 4 to select the number or letter. Auto Scan Add CH : Search for usable stations and store them in memory. Use the or button to adjust...
... (Antenna, Auto Scan, Auto Scan Add CH, Channel Skip, Channel No., Channel Label or DTV Signal). DTV Signal : Display the signal strength (for each channel. 1. Use the or button to the normal screen, press the EXIT or MENU button repeatedly. The stations stored before are available. Repeat steps 3 and 4 to select the number or letter. Auto Scan Add CH : Search for usable stations and store them in memory. Use the or button to adjust...

Owners Manual
Page 22
...". 5. A " " means that track number. Press the FUNCTION button repeatedly to select DVD mode or directly to press DVD button on the remote control to close the disc door. Hold the disc by one frame. CD/DVD OPERATION This owner's manual explains the basic instructions of discs. Press the or button to highlight a file to the instruction notes of this unit. Refer to play JPG files recorded on...
...". 5. A " " means that track number. Press the FUNCTION button repeatedly to select DVD mode or directly to press DVD button on the remote control to close the disc door. Hold the disc by one frame. CD/DVD OPERATION This owner's manual explains the basic instructions of discs. Press the or button to highlight a file to the instruction notes of this unit. Refer to play JPG files recorded on...
Owners Manual
Page 26
... Box • When wide-screen video is the case, press the DVD MENU button and choose the appropriate subtitle from the selection on a conventional screen, black Pan Scan bands appear at top and bottom of the TV Display setting. Use the or button to previous menu. Use the or button repeatedly until VIDEO SETUP appears. 3. Pan Scan • When wide-screen video is the correct mode for playing wide-screen videos on a conventional screen. • Some wide-screen DVDs...
... Box • When wide-screen video is the case, press the DVD MENU button and choose the appropriate subtitle from the selection on a conventional screen, black Pan Scan bands appear at top and bottom of the TV Display setting. Use the or button to previous menu. Use the or button repeatedly until VIDEO SETUP appears. 3. Pan Scan • When wide-screen video is the correct mode for playing wide-screen videos on a conventional screen. • Some wide-screen DVDs...
Owners Manual
Page 27
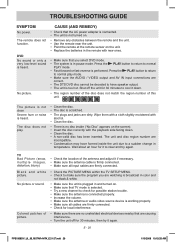
... antenna and adjust it down . • Clean the disc. • A non-valid disc has been inserted. Colored patches of this unit. The remote does not function. The disc does not play mode. • Make sure the AUDIO / VIDEO output and AV IN input connections are firmly connected. E - 26 FPE1508DV_UL_IB_MSTAR+MTK_E21-27.indd 26 1/10/2008 10:15:25 AM TROUBLESHOOTING GUIDE SYMPTOM No power. Press the PLAY button...
... antenna and adjust it down . • Clean the disc. • A non-valid disc has been inserted. Colored patches of this unit. The remote does not function. The disc does not play mode. • Make sure the AUDIO / VIDEO output and AV IN input connections are firmly connected. E - 26 FPE1508DV_UL_IB_MSTAR+MTK_E21-27.indd 26 1/10/2008 10:15:25 AM TROUBLESHOOTING GUIDE SYMPTOM No power. Press the PLAY button...


