Owners Manual
Page 1
AUDIOVOX.COM PLV1615CS1 / AUDIOVOX / ENGLISH SIZE: 148 X 210 MM MATERIAL: 80G WOODFREE PAPER 100% 19-04-2007 128-8059 Printed in China 811-161S91W220 FPE1507 15" FLAT PANEL LCD TV FOR ASSISTANCE CALL CUSTOMER SERVICE AT 1-800-645-4994 OR VISIT US AT WWW.
AUDIOVOX.COM PLV1615CS1 / AUDIOVOX / ENGLISH SIZE: 148 X 210 MM MATERIAL: 80G WOODFREE PAPER 100% 19-04-2007 128-8059 Printed in China 811-161S91W220 FPE1507 15" FLAT PANEL LCD TV FOR ASSISTANCE CALL CUSTOMER SERVICE AT 1-800-645-4994 OR VISIT US AT WWW.
Owners Manual
Page 2
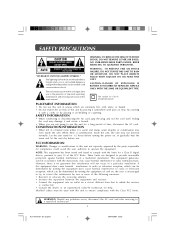
... GRAPHIC SYMBOLS * The lightning flash with the instructions, may not function normally. The symbol for a Class B digital device, pursuant to part 15 of important operating, maintenance and servicing instructions in a particular installation. SAFETY INFORMATION • When connecting or disconnecting the AC cord, grip the... the unit for compliance could cause an electric shock. When there is connected. • Consult the dealer or an experienced radio/TV technician for 1-2 hours before use this unit by placing it somewhere with poor air flow, by placing it is no guarantee that...
... GRAPHIC SYMBOLS * The lightning flash with the instructions, may not function normally. The symbol for a Class B digital device, pursuant to part 15 of important operating, maintenance and servicing instructions in a particular installation. SAFETY INFORMATION • When connecting or disconnecting the AC cord, grip the... the unit for compliance could cause an electric shock. When there is connected. • Consult the dealer or an experienced radio/TV technician for 1-2 hours before use this unit by placing it somewhere with poor air flow, by placing it is no guarantee that...
Owners Manual
Page 4
... 12 Connecting an Audio Amplifier 13 Connecting the Power Cord 13 INSTALLATION ...14 Removing the Base Stand 14 Mounting on the Wall 14 USING HEADPHONES 15 UNIT OPERATION 15 Turning the Unit on for the First Time 15 TV SETUP 16 - 21 Video Menu ...16 VGA Settings in PC Mode 17 Audio Menu ...17... TV Menu ...18 Setup Menu 18 - 20 Time Setup Setting 19 Caption Setting 20 Restore Setting 20 Parental Menu 20 - 21 Password ...20 Parental Control Setting ...
... 12 Connecting an Audio Amplifier 13 Connecting the Power Cord 13 INSTALLATION ...14 Removing the Base Stand 14 Mounting on the Wall 14 USING HEADPHONES 15 UNIT OPERATION 15 Turning the Unit on for the First Time 15 TV SETUP 16 - 21 Video Menu ...16 VGA Settings in PC Mode 17 Audio Menu ...17... TV Menu ...18 Setup Menu 18 - 20 Time Setup Setting 19 Caption Setting 20 Restore Setting 20 Parental Menu 20 - 21 Password ...20 Parental Control Setting ...
Owners Manual
Page 6
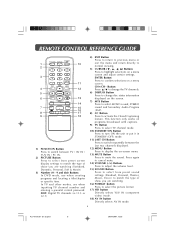
E1-23.pmd 6 20/04/2007, 15:35 ENTER Button Press to mute the sound. This function only works on programs broadcased with captions. 9) TV Button Press to select TV channel mode. 10) STANDBY/ON Button Press to turn ON the unit or put it in STANDBY (OFF) mode. 11) LAST...SAP). 8) CC Button Press to highlight selections on a menu screen and adjust certain settings. REMOTE CONTROL REFERENCE GUIDE 1 10 2 3 11 4 12 5 6 13 14 7 15 16 8 17 9 18 1) FUNCTION Button Press to switch between the last two channels displayed. 12) MENU Button Press to display the on-screen menu. 13...
E1-23.pmd 6 20/04/2007, 15:35 ENTER Button Press to mute the sound. This function only works on programs broadcased with captions. 9) TV Button Press to select TV channel mode. 10) STANDBY/ON Button Press to turn ON the unit or put it in STANDBY (OFF) mode. 11) LAST...SAP). 8) CC Button Press to highlight selections on a menu screen and adjust certain settings. REMOTE CONTROL REFERENCE GUIDE 1 10 2 3 11 4 12 5 6 13 14 7 15 16 8 17 9 18 1) FUNCTION Button Press to switch between the last two channels displayed. 12) MENU Button Press to display the on-screen menu. 13...
Owners Manual
Page 7
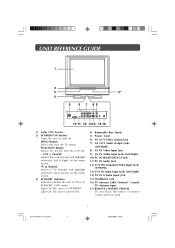
.../PR) 13) YUV IN Audio Input Jacks (Left/Right) 14) AV IN S-Video Input Jack 15) Headphone Jack 16) TV Antenna Cable Terminal - UNIT REFERENCE GUIDE 3 17 4 5 6 7 89 10 11 12 1314 15 16 1) Color LCD Screen 2) STANDBY/ON Button Turns the unit on the menu screen. 3) STANDBY Indicator Indicates whether the... unit is ON or in STANDBY. FUNCTION Button Selects TV, AV IN, YUV IN or PC IN. - E1-23.pmd 7 20/04...
.../PR) 13) YUV IN Audio Input Jacks (Left/Right) 14) AV IN S-Video Input Jack 15) Headphone Jack 16) TV Antenna Cable Terminal - UNIT REFERENCE GUIDE 3 17 4 5 6 7 89 10 11 12 1314 15 16 1) Color LCD Screen 2) STANDBY/ON Button Turns the unit on the menu screen. 3) STANDBY Indicator Indicates whether the... unit is ON or in STANDBY. FUNCTION Button Selects TV, AV IN, YUV IN or PC IN. - E1-23.pmd 7 20/04...

Owners Manual
Page 8
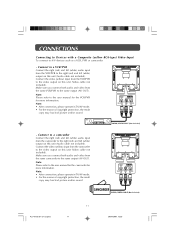
...must be received from an antenna. A satellite system Connecting a Digital Antenna The tuner in this TV receives ATSC TV signals from one of the following sources: - This digital TV can receive NTSC TV signals, analog cable signals or the RF output from a satellite receiver, VCR or cable box.... E1-23.pmd 8 20/04/2007, 15:35 A cable system - Satellite, Cable, or TV antenna cable to TV ANTENNA CABLE Terminal (cable not included)...
...must be received from an antenna. A satellite system Connecting a Digital Antenna The tuner in this TV receives ATSC TV signals from one of the following sources: - This digital TV can receive NTSC TV signals, analog cable signals or the RF output from a satellite receiver, VCR or cable box.... E1-23.pmd 8 20/04/2007, 15:35 A cable system - Satellite, Cable, or TV antenna cable to TV ANTENNA CABLE Terminal (cable not included)...
Owners Manual
Page 11
...mode. • For the reason of copyright protection, the result copy may has bad picture and/or sound. - E1-23.pmd 11 20/04/2007, 15:35 Connect to a VCR/PVR Connect the right (red) and left (white) audio input from the camcorder to the video output on this unit (Video... cable not included). Note: • After connection, please operate in TV/AV mode. • For the reason of copyright protection, the result copy may has bad picture and/or sound. 11 PLV1615CS1- Connect to a camcorder Connect...
...mode. • For the reason of copyright protection, the result copy may has bad picture and/or sound. - E1-23.pmd 11 20/04/2007, 15:35 Connect to a VCR/PVR Connect the right (red) and left (white) audio input from the camcorder to the video output on this unit (Video... cable not included). Note: • After connection, please operate in TV/AV mode. • For the reason of copyright protection, the result copy may has bad picture and/or sound. 11 PLV1615CS1- Connect to a camcorder Connect...
Owners Manual
Page 13
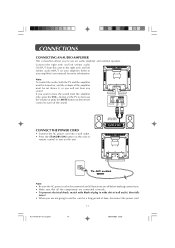
E1-23.pmd 13 20/04/2007, 15:36 Refer to your amplifier. CONNECT THE POWER CORD • Connect the AC power cord into a ...CONNECTIONS CONNECTING AN AUDIO AMPLIFIER This connection allows you to turn off the sound. Note: To control the audio, both the TV and the amplifier must be set above 0, or you want to the right (red) and left (white) audio OUTPUT from... wall outlet, then fully insert. • When you are not going to turn on the unit. button on the TV to decrease the volume or press the MUTE button on the remote control to use an audio amplifier and external speakers. ...
E1-23.pmd 13 20/04/2007, 15:36 Refer to your amplifier. CONNECT THE POWER CORD • Connect the AC power cord into a ...CONNECTIONS CONNECTING AN AUDIO AMPLIFIER This connection allows you to turn off the sound. Note: To control the audio, both the TV and the amplifier must be set above 0, or you want to the right (red) and left (white) audio OUTPUT from... wall outlet, then fully insert. • When you are not going to turn on the unit. button on the TV to decrease the volume or press the MUTE button on the remote control to use an audio amplifier and external speakers. ...
Owners Manual
Page 14
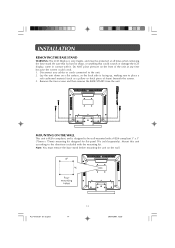
...or cords connected to the unit. 2. Disconnect any time because the screen could scratch or damage the LCD display, come in contact with a VESA-compliant 3" x 3" (75mm x 75mm) mounting kit designed for flat-panel TVs (sold separately). Note: You must be wall-mounted with it. Be sure that no hard or ...a pillow or thick piece of the unit at all times when removing the base stand. E1-23.pmd 14 20/04/2007, 15:36 INSTALLATION REMOVING THE BASE STAND WARNING: The LCD Display is very fragile, and must remove the base stand before mounting the unit on the wall. 14 PLV1615CS1-
...or cords connected to the unit. 2. Disconnect any time because the screen could scratch or damage the LCD display, come in contact with a VESA-compliant 3" x 3" (75mm x 75mm) mounting kit designed for flat-panel TVs (sold separately). Note: You must be wall-mounted with it. Be sure that no hard or ...a pillow or thick piece of the unit at all times when removing the base stand. E1-23.pmd 14 20/04/2007, 15:36 INSTALLATION REMOVING THE BASE STAND WARNING: The LCD Display is very fragile, and must remove the base stand before mounting the unit on the wall. 14 PLV1615CS1-
Owners Manual
Page 15
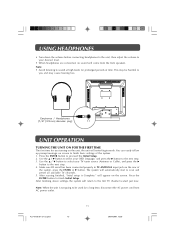
...unit, then adjust the volume to your desired level. • When headphones are connected, no sound will automatically start to scan and preset all available TV channels. 5. Note: • Avoid listening to sound at high levels for prolonged periods of the system, press the ENTER or button. Use the...scaning finished, "Inital setup is not going to be harmful to the next step. 4. Note: When the unit is Complete." E1-23.pmd 15 20/04/2007, 15:36 Earphones / Headphones (1/8" [3.5mm] diameter plug) UNIT OPERATION TURNING THE UNIT ON FOR THE FIRST TIME The first time for a long time...
...unit, then adjust the volume to your desired level. • When headphones are connected, no sound will automatically start to scan and preset all available TV channels. 5. Note: • Avoid listening to sound at high levels for prolonged periods of the system, press the ENTER or button. Use the...scaning finished, "Inital setup is not going to be harmful to the next step. 4. Note: When the unit is Complete." E1-23.pmd 15 20/04/2007, 15:36 Earphones / Headphones (1/8" [3.5mm] diameter plug) UNIT OPERATION TURNING THE UNIT ON FOR THE FIRST TIME The first time for a long time...
Owners Manual
Page 16
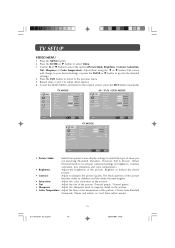
... saturation, tint, sharpness and color temperature.) • Brightness : Adjust the brightness of the picture. E1-23.pmd 16 20/04/2007, 15:36 Press the ENTER or button to select the options (Picture Mode, Brightness, Contrast, Saturation, Tint, Sharpness or Color Temperature). Use the or... button to select Video. 3. Adjust them using the or button (The screen will change to recall your desired setting); TV MODE Video Audio TV Setup Parental Picture Mode Brightness Contrast Saturation Tint Sharpness Color Temperature Personal 50 50 50 0 4 Standard AV / YUV / DVD ...
... saturation, tint, sharpness and color temperature.) • Brightness : Adjust the brightness of the picture. E1-23.pmd 16 20/04/2007, 15:36 Press the ENTER or button to select the options (Picture Mode, Brightness, Contrast, Saturation, Tint, Sharpness or Color Temperature). Use the or... button to select Video. 3. Adjust them using the or button (The screen will change to recall your desired setting); TV MODE Video Audio TV Setup Parental Picture Mode Brightness Contrast Saturation Tint Sharpness Color Temperature Personal 50 50 50 0 4 Standard AV / YUV / DVD ...

Owners Manual
Page 17
... PLV1615CS1- To exit the MAIN MENU and return to select the options (Balance, Bass, Treble or Audio Mode). E1-23.pmd 17 20/04/2007, 15:36 Refresh Frequency : 60Hz max • H. Position 50 Audio V. Use the or button to the normal screen, press the EXIT button repeatedly. or ...press the ENTER or button to recall your desired setting. (Press the ENTER or button to change to the previous menu. 5. Press the MENU button. 2. TV SETUP VGA Settings in PC Mode Use the or button to adjust other options. 6. Resolution : 1,024 x 768 max - Repeat steps 3 and 4 to select the...
... PLV1615CS1- To exit the MAIN MENU and return to select the options (Balance, Bass, Treble or Audio Mode). E1-23.pmd 17 20/04/2007, 15:36 Refresh Frequency : 60Hz max • H. Position 50 Audio V. Use the or button to the normal screen, press the EXIT button repeatedly. or ...press the ENTER or button to recall your desired setting. (Press the ENTER or button to change to the previous menu. 5. Press the MENU button. 2. TV SETUP VGA Settings in PC Mode Use the or button to adjust other options. 6. Resolution : 1,024 x 768 max - Repeat steps 3 and 4 to select the...

Owners Manual
Page 18
... go into the detailed settings. 4. or press the ENTER or button to go into the Setup settings. 3. E1-23.pmd 18 20/04/2007, 15:36 Press the MENU button. 2. Parental Select EXIT Exit 4. Channel Skip Setting: 1. The channel will Parental change to the next page. Use the... the channel. (" " appears 10 Analog in another language. Press the EXIT button to return to select Setup. Press the MENU button. 2. TV SETUP TV MENU (For TV Mode Only) 1. To exit the MAIN MENU and return to adjust other options. 6. Press the ENTER button to go into the detailed settings....
... go into the detailed settings. 4. or press the ENTER or button to go into the Setup settings. 3. E1-23.pmd 18 20/04/2007, 15:36 Press the MENU button. 2. Parental Select EXIT Exit 4. Channel Skip Setting: 1. The channel will Parental change to the next page. Use the... the channel. (" " appears 10 Analog in another language. Press the EXIT button to return to select Setup. Press the MENU button. 2. TV SETUP TV MENU (For TV Mode Only) 1. To exit the MAIN MENU and return to adjust other options. 6. Press the ENTER button to go into the detailed settings....
Owners Manual
Page 19
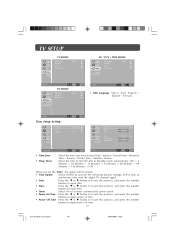
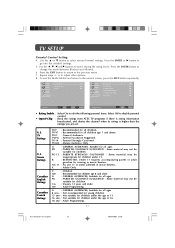
... and press the number buttons to activate the following manual settings; E1-23.pmd 19 20/04/2007, 15:36 TV SETUP Video Audio TV Setup Parental TV MODE OSD Language Time Setup Caption Restore setting English Setup Video Audio Setup Parental PC MODE OSD Language Time ... Mountain Time / Arizona / Pacific Time / Aalaska / Hawaii. : Select the time to turn the unit to Standby mode automatically: Off -> 5 Minutes -> 10 Minutes -> 15 Minutes -> 30 Minutes -> 60 Minutes -> 90 Minutes -> 120 Minutes -> Off. When you set the 'Time', the option will be shown: • Time Update : Select...
... and press the number buttons to activate the following manual settings; E1-23.pmd 19 20/04/2007, 15:36 TV SETUP Video Audio TV Setup Parental TV MODE OSD Language Time Setup Caption Restore setting English Setup Video Audio Setup Parental PC MODE OSD Language Time ... Mountain Time / Arizona / Pacific Time / Aalaska / Hawaii. : Select the time to turn the unit to Standby mode automatically: Off -> 5 Minutes -> 10 Minutes -> 15 Minutes -> 30 Minutes -> 60 Minutes -> 90 Minutes -> 120 Minutes -> Off. When you set the 'Time', the option will be shown: • Time Update : Select...
Owners Manual
Page 20
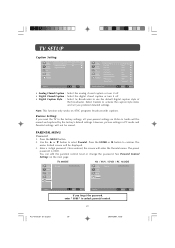
... 1. Press the MENU button. 2. Press the ENTER or button to select Parental. Enter a 4-digit password. E1-23.pmd 20 20/04/2007, 15:36 Select Custom to activate the caption style items and set you forget the password, enter " 8888 " to use the default digital caption style of...level or change the password. Use the or button to confirm. TV SETUP Caption Setting: Video Analog Closed Caption Off Digital Closed Caption Off Audio Digital Caption Style TV Setup Parental Caption Select EXIT Return Video Audio TV Setup Parental Caption Style Font Size Font Style Font Color Font ...
... 1. Press the MENU button. 2. Press the ENTER or button to select Parental. Enter a 4-digit password. E1-23.pmd 20 20/04/2007, 15:36 Select Custom to activate the caption style items and set you forget the password, enter " 8888 " to use the default digital caption style of...level or change the password. Use the or button to confirm. TV SETUP Caption Setting: Video Analog Closed Caption Off Digital Closed Caption Off Audio Digital Caption Style TV Setup Parental Caption Select EXIT Return Video Audio TV Setup Parental Caption Style Font Size Font Style Font Color Font ...
Owners Manual
Page 21
... denies the channel when its rating is higher than the ratings you pre-set. Movie Ratings Canadian English Ratings Canadian French Ratings TV-Y TV-Y7 TV-G TV-PG TV-14 TV-MA : Recommended for all children. : Recommended for all children age 7 and above. : General Audience. : Parental Guidance Suggested...AUDIENCES, Suitable for children age 8 and older. E1-23.pmd 21 20/04/2007, 15:36 Video Audio Setup Parental Program Block Change Password Clean All Video Rating Enable On Audio U.S.TV Ratings U.S. Some material may not be suitable for viewing in movie theaters, : Adults Only...
... denies the channel when its rating is higher than the ratings you pre-set. Movie Ratings Canadian English Ratings Canadian French Ratings TV-Y TV-Y7 TV-G TV-PG TV-14 TV-MA : Recommended for all children. : Recommended for all children age 7 and above. : General Audience. : Parental Guidance Suggested...AUDIENCES, Suitable for children age 8 and older. E1-23.pmd 21 20/04/2007, 15:36 Video Audio Setup Parental Program Block Change Password Clean All Video Rating Enable On Audio U.S.TV Ratings U.S. Some material may not be suitable for viewing in movie theaters, : Adults Only...
Owners Manual
Page 22
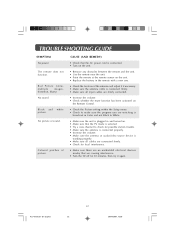
No picture or sound. E1-23.pmd 22 20/04/2007, 15:36 Colored patches of the antenna and adjust it again. 22 PLV1615CS1- CAUSE ... the remote sensor on the unit. • Replace the battery in and turned on. • Make sure that the TV mode is selected. • Try a new channel to check for possible station trouble. • Make sure the antenna ... interference. • Make sure there are no unshielded electrical devices nearby that are causing interference. • Turn the TV off for 30 minutes, then try it if necessary. • Make sure the antenna cable is connected firmly. &#...
No picture or sound. E1-23.pmd 22 20/04/2007, 15:36 Colored patches of the antenna and adjust it again. 22 PLV1615CS1- CAUSE ... the remote sensor on the unit. • Replace the battery in and turned on. • Make sure that the TV mode is selected. • Try a new channel to check for possible station trouble. • Make sure the antenna ... interference. • Make sure there are no unshielded electrical devices nearby that are causing interference. • Turn the TV off for 30 minutes, then try it if necessary. • Make sure the antenna cable is connected firmly. &#...


