
P4PE2-X User Manual
Page 4
Safeguards Contents 2.1.4 Using ASUS EZ Flash to update the BIOS 2-5 2.1.5 Recovering the BIOS with CrashFree BIOS 2 ....... 2-6 2.2 BIOS Setup program 2-8 2.2.1 BIOS menu screen 2-9 2.2.2 Menu bar 2-9 2.2.3 Navigation keys 2-9 2.2.4 Menu items 2-10 2.2.5 Sub-menu items 2-10 2.2.6 Configuration fields 2-10 2.2.7 Pop-up window 2-10 2.2.8 Scroll bar 2-10 2.2.9 General help 2-10 2.3 Main menu 2-11 2.3.1 System Time 2-11 2.3.2 System Date 2-11 2.3.3 Legacy Diskette A 2-11...
Safeguards Contents 2.1.4 Using ASUS EZ Flash to update the BIOS 2-5 2.1.5 Recovering the BIOS with CrashFree BIOS 2 ....... 2-6 2.2 BIOS Setup program 2-8 2.2.1 BIOS menu screen 2-9 2.2.2 Menu bar 2-9 2.2.3 Navigation keys 2-9 2.2.4 Menu items 2-10 2.2.5 Sub-menu items 2-10 2.2.6 Configuration fields 2-10 2.2.7 Pop-up window 2-10 2.2.8 Scroll bar 2-10 2.2.9 General help 2-10 2.3 Main menu 2-11 2.3.1 System Time 2-11 2.3.2 System Date 2-11 2.3.3 Legacy Diskette A 2-11...
P4PE2-X User Manual
Page 17
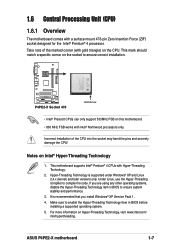
... Force (ZIF) socket designed for the Intel® Pentium® 4 processor. Make sure to ensure correct installation. ASUS P4PE2-X motherboard 1-7 If you install Windows® XP Service Pack 1. 4. Incorrect installation of the marked corner (with Intel® Northwood processors only. Notes ...Technology. 2. Hyper-Threading Technology is recommended that you are using any other operating systems, disable the Hyper-Threading Technology item in BIOS before installing a supported operating system. 5. For more information on this motherboard. • 800 MHz FSB works with gold ...
... Force (ZIF) socket designed for the Intel® Pentium® 4 processor. Make sure to ensure correct installation. ASUS P4PE2-X motherboard 1-7 If you install Windows® XP Service Pack 1. 4. Incorrect installation of the marked corner (with Intel® Northwood processors only. Notes ...Technology. 2. Hyper-Threading Technology is recommended that you are using any other operating systems, disable the Hyper-Threading Technology item in BIOS before installing a supported operating system. 5. For more information on this motherboard. • 800 MHz FSB works with gold ...
P4PE2-X User Manual
Page 34
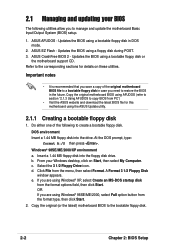
... a bootable floppy disk 1. Updates the BIOS using Windows® 98SE/ME/2000, select Full option button from PC") • Visit the ASUS website and download the latest BIOS file for details on Start, then select My Computer. ASUS CrashFree BIOS 2 - Do either one of the original motherboard BIOS file to restore the BIOS in DOS mode. 2. Insert a 1.44...
... a bootable floppy disk 1. Updates the BIOS using Windows® 98SE/ME/2000, select Full option button from PC") • Visit the ASUS website and download the latest BIOS file for details on Start, then select My Computer. ASUS CrashFree BIOS 2 - Do either one of the original motherboard BIOS file to restore the BIOS in DOS mode. 2. Insert a 1.44...

P4PE2-X User Manual
Page 42
...fields show the values for that menu. A configurable field is enclosed in ] [English] :[ST320413A] :[ASUS CD-S340] :[Not Detected] :[Not Detected] The other items on any menu screen is a brief ...is not user-configurable. To change the value of the selected item. 2-10 Chapter 2: BIOS Setup Press Up/ Down arrow keys or PageUp/PageDown keys to display the other items (Advanced...triangle before the item. Change Option F1 General Help F10 Save and Exit ESC Exit Pop-up window with a sub-menu on the screen. 2.2.9 General help Primary Graphics Adapter Search for that ...
...fields show the values for that menu. A configurable field is enclosed in ] [English] :[ST320413A] :[ASUS CD-S340] :[Not Detected] :[Not Detected] The other items on any menu screen is a brief ...is not user-configurable. To change the value of the selected item. 2-10 Chapter 2: BIOS Setup Press Up/ Down arrow keys or PageUp/PageDown keys to display the other items (Advanced...triangle before the item. Change Option F1 General Help F10 Save and Exit ESC Exit Pop-up window with a sub-menu on the screen. 2.2.9 General help Primary Graphics Adapter Search for that ...

P4PE2-X User Manual
Page 60
...the values to load the default values for each of the options from this option or if you press , a confirmation window appears. After selecting this option, a confirmation window appears. Select OK to save the changes while exiting. Select OK to load default values. Select OK to save changes...off. 2.7 Exit menu The Exit menu items allow you to load the optimal or failsafe default values for the BIOS items, and save or discard your changes to the BIOS items. Exit Options Exit & Save Changes Exit & Discard Changes Discard Changes Load Setup Defaults Pressing does not immediately...
...the values to load the default values for each of the options from this option or if you press , a confirmation window appears. After selecting this option, a confirmation window appears. Select OK to save the changes while exiting. Select OK to load default values. Select OK to save changes...off. 2.7 Exit menu The Exit menu items allow you to load the optimal or failsafe default values for the BIOS items, and save or discard your changes to the BIOS items. Exit Options Exit & Save Changes Exit & Discard Changes Discard Changes Load Setup Defaults Pressing does not immediately...


