
User Guide
Page 4
... Notifications...22 Personalizing your Home screen 23 Widgets ...23 Wallpapers...24 Easy Mode...25 Kids Mode...28 Setting up the date and time...30 Setting up your ringtone and alert sounds 30 Lock Screen...31 Customizing your lock screen...31 Customizing the quick access buttons 32 Fingerprint ID sensor 33 Starting your ASUS phone for the first time 33 Setting up fingerprint ID from Settings 34 ZenUI Keyboard...35 Resizing your ZenUI keyboard...35 Editing texts...35 3 Work hard, play...
... Notifications...22 Personalizing your Home screen 23 Widgets ...23 Wallpapers...24 Easy Mode...25 Kids Mode...28 Setting up the date and time...30 Setting up your ringtone and alert sounds 30 Lock Screen...31 Customizing your lock screen...31 Customizing the quick access buttons 32 Fingerprint ID sensor 33 Starting your ASUS phone for the first time 33 Setting up fingerprint ID from Settings 34 ZenUI Keyboard...35 Resizing your ZenUI keyboard...35 Editing texts...35 3 Work hard, play...
User Guide
Page 5
... Viewing files from your social network or cloud storage 65 Viewing the photo location...66 Sharing files from the Gallery...67 Deleting files from the Gallery...67 Editing images...67 7 Staying connected Mobile network...68 Enabling the mobile network...68 Wi-Fi...68 Enabling Wi-Fi...68 Connecting to a Wi-Fi network...69 Disabling Wi-Fi...69 Bluetooth® ...69 Enabling Bluetooth®...69 Pairing your ASUS Phone to a Bluetooth® device 70 Unpairing your ASUS Phone from the Bluetooth® device...
... Viewing files from your social network or cloud storage 65 Viewing the photo location...66 Sharing files from the Gallery...67 Deleting files from the Gallery...67 Editing images...67 7 Staying connected Mobile network...68 Enabling the mobile network...68 Wi-Fi...68 Enabling Wi-Fi...68 Connecting to a Wi-Fi network...69 Disabling Wi-Fi...69 Bluetooth® ...69 Enabling Bluetooth®...69 Pairing your ASUS Phone to a Bluetooth® device 70 Unpairing your ASUS Phone from the Bluetooth® device...

User Guide
Page 8
Receiver Proximity sensor Front camera Nano SIM x2/ micro SD card slot Eject hole Rear cameras Camera flash Laser focus 2X ZOOM Touch screen display Volume key Power key Audio jack Fingerprint sensor / Home key Recent apps key Back key Speaker USB Type-C port NFC detection area WARNING! • To avoid network connection and battery issues: • DO NOT place a metallic sticker on the antenna area. • DO NOT use a metallic protective frame/case on your ASUS Phone. •...
Receiver Proximity sensor Front camera Nano SIM x2/ micro SD card slot Eject hole Rear cameras Camera flash Laser focus 2X ZOOM Touch screen display Volume key Power key Audio jack Fingerprint sensor / Home key Recent apps key Back key Speaker USB Type-C port NFC detection area WARNING! • To avoid network connection and battery issues: • DO NOT place a metallic sticker on the antenna area. • DO NOT use a metallic protective frame/case on your ASUS Phone. •...
User Guide
Page 9
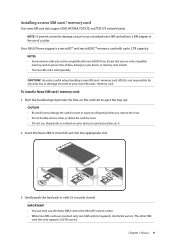
... memory card, or both. • The microSD card is not responsible for any data loss or damage incurred to your device to avoid scratches on the card slot to eject the tray out. Be extra careful when handling a nano SIM card / memory card. The other SIM card slot only supports 2G/3G service. To install a Nano SIM card / memory card: 1. Insert the Nano SIM or microSD card into the hole on it 's securely...
... memory card, or both. • The microSD card is not responsible for any data loss or damage incurred to your device to avoid scratches on the card slot to eject the tray out. Be extra careful when handling a nano SIM card / memory card. The other SIM card slot only supports 2G/3G service. To install a Nano SIM card / memory card: 1. Insert the Nano SIM or microSD card into the hole on it 's securely...

User Guide
Page 12
... accessible. • When charging your ASUS Phone through your computer, ensure that you plug the USB Type-C cable to your computer's USB 2.0 / USB 3.0 port. • Avoid charging your ASUS Phone in an environment with ambient temperature of above 35oC (95oF). • Charge your ASUS Phone for eight (8) hours before unplugging the AC power adapter from your ASUS Phone first before using it may take longer to fully charge the device...
... accessible. • When charging your ASUS Phone through your computer, ensure that you plug the USB Type-C cable to your computer's USB 2.0 / USB 3.0 port. • Avoid charging your ASUS Phone in an environment with ambient temperature of above 35oC (95oF). • Charge your ASUS Phone for eight (8) hours before unplugging the AC power adapter from your ASUS Phone first before using it may take longer to fully charge the device...
User Guide
Page 15
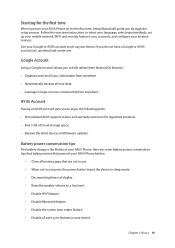
..., set up your mobile network, Wi-Fi and security features, sync accounts, and configure your location services. Close all your data. • Leverage Google services conveniently from anywhere. Disable Wi-Fi feature. - Chapter 1: Basics 15 Disable Bluetooth feature. - Disable the screen auto-rotate feature. - Decrease brightness of display. - Starting for the first time When you turn your ASUS Phone on for registered products. • Free 5 GB of Cloud storage space. • Receive the latest device and firmware updates.
..., set up your mobile network, Wi-Fi and security features, sync accounts, and configure your location services. Close all your data. • Leverage Google services conveniently from anywhere. Disable Wi-Fi feature. - Chapter 1: Basics 15 Disable Bluetooth feature. - Disable the screen auto-rotate feature. - Decrease brightness of display. - Starting for the first time When you turn your ASUS Phone on for registered products. • Free 5 GB of Cloud storage space. • Receive the latest device and firmware updates.

User Guide
Page 30
... time zone to use the 24-hour format, if you tap on your Home screen automatically syncs with your phone ringtone, notifications such as text messages, emails, and event alerts. Scroll down the Settings screen and select Sound & Vibration. 3. NOTE: See also Clock. Launch the Settings screen by doing any of the following : •• Launch Quick Settings then tap . •• Tap > Settings. 2. Setting up the date and time By default, the date and time displayed...
... time zone to use the 24-hour format, if you tap on your Home screen automatically syncs with your phone ringtone, notifications such as text messages, emails, and event alerts. Scroll down the Settings screen and select Sound & Vibration. 3. NOTE: See also Clock. Launch the Settings screen by doing any of the following : •• Launch Quick Settings then tap . •• Tap > Settings. 2. Setting up the date and time By default, the date and time displayed...

User Guide
Page 31
Lock Screen By default, the lock screen appears after turning on your touch screen panel. Launch Quick Settings then tap . 2. Customizing your lock screen If you want to change your lock screen settings from sleep mode. NOTE: For more details, see Securing your mobile data and apps. Your device's lock screen can proceed to use. Scroll down the Settings screen and select Security. 3. In the next screen, tap Screen lock. 4. Tap the screen lock option you can also be customized to regulate access to the...
Lock Screen By default, the lock screen appears after turning on your touch screen panel. Launch Quick Settings then tap . 2. Customizing your lock screen If you want to change your lock screen settings from sleep mode. NOTE: For more details, see Securing your mobile data and apps. Your device's lock screen can proceed to use. Scroll down the Settings screen and select Security. 3. In the next screen, tap Screen lock. 4. Tap the screen lock option you can also be customized to regulate access to the...

User Guide
Page 33
Starting your ASUS phone for the first time To set up your fingerprint ID when using your ASUS phone without your permission. Tap Next to unlock your device, access your phone calls and data. You can use your fingerprint to complete the setup. Ensure that the fingerprint identification module and your screen lock method for device startup. Fingerprint ID sensor Fingerprint ID sensor prevents others from using your ASUS Phone for the first...
Starting your ASUS phone for the first time To set up your fingerprint ID when using your ASUS phone without your permission. Tap Next to unlock your device, access your phone calls and data. You can use your fingerprint to complete the setup. Ensure that the fingerprint identification module and your screen lock method for device startup. Fingerprint ID sensor Fingerprint ID sensor prevents others from using your ASUS Phone for the first...
User Guide
Page 44
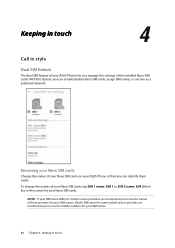
... different mobile service providers, we recommend you can identify them easily. With this feature, you to use the mobile numbers for your SIM names. 44 Chapter 4: Keeping in style Dual SIM feature The dual SIM feature of your ASUS Phone lets you manage the settings of your Nano SIM cards on your ASUS Phone so that you can enable/disable Nano SIM cards, assign SIM names, or set one as a preferred network.
... different mobile service providers, we recommend you can identify them easily. With this feature, you to use the mobile numbers for your SIM names. 44 Chapter 4: Keeping in style Dual SIM feature The dual SIM feature of your ASUS Phone lets you manage the settings of your Nano SIM cards on your ASUS Phone so that you can enable/disable Nano SIM cards, assign SIM names, or set one as a preferred network.

User Guide
Page 45
... only use . Assigning a preferred SIM card Assign a SIM card as your preferred SIM for data service, tap Data service network then select from SIM 1 or SIM 2. IMPORTANT! SIM card for SMS messages To assign a SIM card for voice calls When you make a call from SIM 1 or SIM 2. Chapter 4: Keeping in touch 45 SIM card for data service To assign a SIM card for voice calls, SMS messages, and data services. SIM card for SMS messages, tap SMS messages then select from your ASUS Phone automatically uses the preferred SIM card to use this feature if you make a call , your contacts list...
... only use . Assigning a preferred SIM card Assign a SIM card as your preferred SIM for data service, tap Data service network then select from SIM 1 or SIM 2. IMPORTANT! SIM card for SMS messages To assign a SIM card for voice calls When you make a call from SIM 1 or SIM 2. Chapter 4: Keeping in touch 45 SIM card for data service To assign a SIM card for voice calls, SMS messages, and data services. SIM card for SMS messages, tap SMS messages then select from your ASUS Phone automatically uses the preferred SIM card to use this feature if you make a call , your contacts list...

User Guide
Page 50
... information. 1. Managing multiple calls Your ASUS Phone provides you the convenience of another call While you are talking on your ASUS Phone, you can hear a beeping sound, indicating of making or taking two calls. This icon appears on an active call. Call a contact or dial a number. 2. Tap to view the recorded conversation. 50 Chapter 4: Keeping in touch IMPORTANT! Swipe down from the other party or parties. 3. To stop recording, tap . Answering another incoming call .
... information. 1. Managing multiple calls Your ASUS Phone provides you the convenience of another call While you are talking on your ASUS Phone, you can hear a beeping sound, indicating of making or taking two calls. This icon appears on an active call. Call a contact or dial a number. 2. Tap to view the recorded conversation. 50 Chapter 4: Keeping in touch IMPORTANT! Swipe down from the other party or parties. 3. To stop recording, tap . Answering another incoming call .

User Guide
Page 51
... set up your info such as mobile or home number. To set up my profile or ME. Group your contacts as Favorites to keep in touch with them, or group them via calls, SMS messages, emails, or social networks. When you would want to quickly get notified about any upcoming events, missed calls, or unread messages. Launch the Contacts app then tap Set up your Google account on your ASUS Phone...
... set up your info such as mobile or home number. To set up my profile or ME. Group your contacts as Favorites to keep in touch with them, or group them via calls, SMS messages, emails, or social networks. When you would want to quickly get notified about any upcoming events, missed calls, or unread messages. Launch the Contacts app then tap Set up your Google account on your ASUS Phone...

User Guide
Page 52
... as mobile or home number, email address, or group where you want to put the contact in touch NOTES: • You can add a contact's extension number to skip the voice prompts when making a call. 1. When dialing the contact number, you'll be a short pause before the extension number is dialed automatically. If you want to add more . 1. Adding contacts Add contacts to your SIM card or an email account. • If you don't have an email account, tap Add account...
... as mobile or home number, email address, or group where you want to put the contact in touch NOTES: • You can add a contact's extension number to skip the voice prompts when making a call. 1. When dialing the contact number, you'll be a short pause before the extension number is dialed automatically. If you want to add more . 1. Adding contacts Add contacts to your SIM card or an email account. • If you don't have an email account, tap Add account...
User Guide
Page 62
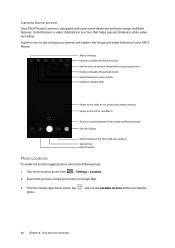
...Turn on the location access from > Settings > Location. 2. Camera home screen Your ASUS Phone's camera is equipped with auto-scene detection and auto-image stabilizer features. Ensure that helps prevent shakiness while video recording. Tap the icons to Google Map. 3. From the Camera app's home screen, tap photo. and activate Location services before capturing photos Enable or disable the portrait mode Switch between screen modes Enable or disable HDR Swipe to the right to use advanced camera settings Swipe to the left to use effects Touch to switch between Auto mode and Manual mode...
...Turn on the location access from > Settings > Location. 2. Camera home screen Your ASUS Phone's camera is equipped with auto-scene detection and auto-image stabilizer features. Ensure that helps prevent shakiness while video recording. Tap the icons to Google Map. 3. From the Camera app's home screen, tap photo. and activate Location services before capturing photos Enable or disable the portrait mode Switch between screen modes Enable or disable HDR Swipe to the right to use advanced camera settings Swipe to the left to use effects Touch to switch between Auto mode and Manual mode...
User Guide
Page 68
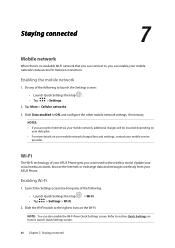
... other mobile network settings, if necessary. NOTES: • If you can enable your mobile network's data access for Internet connection. Update your social media accounts, browse the Internet, or exchange data and messages wirelessly from Quick Settings screen. NOTE: You can also enable the Wi-Fi from your ASUS Phone gets you connected to the wireless world. Enabling Wi-Fi 1. Slide the Wi-Fi switch to the right to turn on how to launch Quick Settings screen. 68 Chapter 7: Staying connected Refer...
... other mobile network settings, if necessary. NOTES: • If you can enable your mobile network's data access for Internet connection. Update your social media accounts, browse the Internet, or exchange data and messages wirelessly from Quick Settings screen. NOTE: You can also enable the Wi-Fi from your ASUS Phone gets you connected to the wireless world. Enabling Wi-Fi 1. Slide the Wi-Fi switch to the right to turn on how to launch Quick Settings screen. 68 Chapter 7: Staying connected Refer...

User Guide
Page 71
Most mobile service providers may be able to help save battery power. NOTES: • Internet access via tethering may require a data plan for you to be slower than the standard Wi-Fi or mobile connection. • Only a limited number of mobile devices can use your ASUS Phone as a modem or turn it to use the tethering function. Do any of this data plan. Wi-Fi Hotspot Turn your ASUS Phone into a Wi-Fi hotspot...
Most mobile service providers may be able to help save battery power. NOTES: • Internet access via tethering may require a data plan for you to be slower than the standard Wi-Fi or mobile connection. • Only a limited number of mobile devices can use your ASUS Phone as a modem or turn it to use the tethering function. Do any of this data plan. Wi-Fi Hotspot Turn your ASUS Phone into a Wi-Fi hotspot...

User Guide
Page 83
... save your backup. •• Automatic restore: This feature facilitates restoration of the System update window. You need an internet connection to transfer or download your files on an online storage. Backup and reset Back up data, Wi-Fi passwords, and other settings to Google servers using your system 1. NOTE: You can preview the last time your ASUS Phone's system was updated at the Last update check: of backed up settings and data when you reinstall an app. •• Factory data reset: Erases...
... save your backup. •• Automatic restore: This feature facilitates restoration of the System update window. You need an internet connection to transfer or download your files on an online storage. Backup and reset Back up data, Wi-Fi passwords, and other settings to Google servers using your system 1. NOTE: You can preview the last time your ASUS Phone's system was updated at the Last update check: of backed up settings and data when you reinstall an app. •• Factory data reset: Erases...

User Guide
Page 95
... - answering 48 - launching the Phone app 46 - receiving 48 - recording 50 - clearing the browser cache 38 - launching 37 - see Smart Dialing 47 Camera 61 - setting up 30 Dual SIM feature 44 - confirmation prompt 46 - Starting your favorite contacts 48 - installing 9 - calling your ASUS phone for the first time 33 - see Multiple calls 50 - Camera home screen...
... - answering 48 - launching the Phone app 46 - receiving 48 - recording 50 - clearing the browser cache 38 - launching 37 - see Smart Dialing 47 Camera 61 - setting up 30 Dual SIM feature 44 - confirmation prompt 46 - Starting your favorite contacts 48 - installing 9 - calling your ASUS phone for the first time 33 - see Multiple calls 50 - Camera home screen...

User Guide
Page 96
... - Editing or removing events 40 - -deleting files 67 - Creating events 40 - notification icons 20 - see also Wallpapers 24, 28 K Kids Mode 28 - customizing the quick access buttons 32 - see also Securing your ASUS phone 84 M Managing your call 50 P PowerMaster 82 Q Quick settings 21 - Installing a Micro SIM card 9 Micro SIM cards 44 - adding or removing buttons 21 R Ringtone 30 - setting...
... - Editing or removing events 40 - -deleting files 67 - Creating events 40 - notification icons 20 - see also Wallpapers 24, 28 K Kids Mode 28 - customizing the quick access buttons 32 - see also Securing your ASUS phone 84 M Managing your call 50 P PowerMaster 82 Q Quick settings 21 - Installing a Micro SIM card 9 Micro SIM cards 44 - adding or removing buttons 21 R Ringtone 30 - setting...


