

User Guide
Page 2
... ERROR IN THIS MANUAL OR PRODUCT. Copies of these licenses are used only for which you wish to obtain the corresponding source code and your request please provide the name, model number and version, as the corresponding binary/object code. If however you to the owners' benefit, without the express written permission of such software and/or other Free Open Source Software...
... ERROR IN THIS MANUAL OR PRODUCT. Copies of these licenses are used only for which you wish to obtain the corresponding source code and your request please provide the name, model number and version, as the corresponding binary/object code. If however you to the owners' benefit, without the express written permission of such software and/or other Free Open Source Software...

User Guide
Page 5
...EZ Update 4-9 4.4.4 USB BIOS Flashback 4-11 4.4.5 USB Charger 4-13 4.4.6 Push Notice 4-14 4.4.7 System Information 4-17 4.5 Audio configurations 4-18 4.6 ASUS Dr. Power Utility 4-20 Chapter 5: RAID support 5.1 RAID configurations 5-1 5.1.1 RAID definitions 5-1 5.1.2 Installing Serial ATA hard disks 5-2 5.1.3 Setting the RAID item in BIOS 5-2 5.1.4 Intel® Rapid Storage Technology Option ROM utility 5-3 5.2 Creating a RAID driver disk 5-7 5.2.1 Creating a RAID driver disk without entering the OS 5-7 5.2.2 Creating a RAID driver disk in Windows 5-8 5.2.3 Installing...
...EZ Update 4-9 4.4.4 USB BIOS Flashback 4-11 4.4.5 USB Charger 4-13 4.4.6 Push Notice 4-14 4.4.7 System Information 4-17 4.5 Audio configurations 4-18 4.6 ASUS Dr. Power Utility 4-20 Chapter 5: RAID support 5.1 RAID configurations 5-1 5.1.1 RAID definitions 5-1 5.1.2 Installing Serial ATA hard disks 5-2 5.1.3 Setting the RAID item in BIOS 5-2 5.1.4 Intel® Rapid Storage Technology Option ROM utility 5-3 5.2 Creating a RAID driver disk 5-7 5.2.1 Creating a RAID driver disk without entering the OS 5-7 5.2.2 Creating a RAID driver disk in Windows 5-8 5.2.3 Installing...
User Guide
Page 11
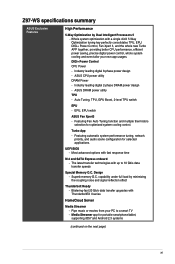
... power control, whole system cooling and even tailor your PC to 10 Gb/s data transfer speeds Special Memory O.C. Superb memory O.C. Z97-WS specifications summary ASUS Exclusive Features High Performance 5-Way Optimization by minimizing the coupling noise and signal reflection effect Thunderbolt Ready - EPU, EPU switch ASUS Fan Xpert3 - UEFI BIOS - Whole system optimization with up to a smart TV - Most advanced options with ThunderboltEX II series HomeCloud Server...
... power control, whole system cooling and even tailor your PC to 10 Gb/s data transfer speeds Special Memory O.C. Superb memory O.C. Z97-WS specifications summary ASUS Exclusive Features High Performance 5-Way Optimization by minimizing the coupling noise and signal reflection effect Thunderbolt Ready - EPU, EPU switch ASUS Fan Xpert3 - UEFI BIOS - Whole system optimization with up to a smart TV - Most advanced options with ThunderboltEX II series HomeCloud Server...
User Guide
Page 14
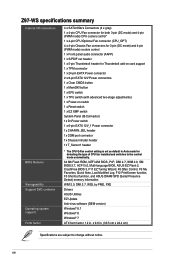
xiv Z97-WS specifications summary Internal I/O connectors BIOS features Manageability Support DVD contents Operating system support Form factor 4 x SATA 6Gb/s Connectors (4 x gray) 1 x 4-pin CPU Fan connector for both 3-pin (DC mode) and 4-pin (PWM mode) CPU coolers control* 1 x 4-pin CPU Optional Fan connector (CPU_OPT) 4 x 4-pin Chassis Fan connectors for 3-pin (DC mode) and 4-pin (PWM mode) coolers control 1 x Front panel audio connector (AAFP) 1 x S/PDIF out header 1 x 5-pin Thunderbolt header for detecting the type of CPU fan installed and switches to change without notice. button ...
xiv Z97-WS specifications summary Internal I/O connectors BIOS features Manageability Support DVD contents Operating system support Form factor 4 x SATA 6Gb/s Connectors (4 x gray) 1 x 4-pin CPU Fan connector for both 3-pin (DC mode) and 4-pin (PWM mode) CPU coolers control* 1 x 4-pin CPU Optional Fan connector (CPU_OPT) 4 x 4-pin Chassis Fan connectors for 3-pin (DC mode) and 4-pin (PWM mode) coolers control 1 x Front panel audio connector (AAFP) 1 x S/PDIF out header 1 x 5-pin Thunderbolt header for detecting the type of CPU fan installed and switches to change without notice. button ...

User Guide
Page 25
... not support DIMMs made up of 3GB system memory if you want to install 4 GB or more efficient memory cooling system to get the correct memory modules. • Visit the ASUS website for the dual-channel configuration. For effective use a more on 32-bit Windows® OS, when you install memory modules of the same version or data code (D/C) from the higher-sized channel is then mapped for manual memory...
... not support DIMMs made up of 3GB system memory if you want to install 4 GB or more efficient memory cooling system to get the correct memory modules. • Visit the ASUS website for the dual-channel configuration. For effective use a more on 32-bit Windows® OS, when you install memory modules of the same version or data code (D/C) from the higher-sized channel is then mapped for manual memory...

User Guide
Page 34
... critical component's LED stays lit up until the problem is solved. DRAM LED Z97-WS CPU_LED VGA_LED Z97-WS CPU/DRAM/VGA LED Chapter 1 1-18 Chapter 1: Product introduction CPU Over Voltage jumper (3-pin CPU_OV) The CPU Over Voltage jumper allows you to set a higher CPU voltage for a flexible overclocking system, depending on the type of these key components during POST (Power-On-Self Test): CPU, memory modules, VGA card, and hard disk drives. 1.2.7 Jumpers 1. POST State LEDs The POST State LEDs provide the status of the installed CPU.
... critical component's LED stays lit up until the problem is solved. DRAM LED Z97-WS CPU_LED VGA_LED Z97-WS CPU/DRAM/VGA LED Chapter 1 1-18 Chapter 1: Product introduction CPU Over Voltage jumper (3-pin CPU_OV) The CPU Over Voltage jumper allows you to set a higher CPU voltage for a flexible overclocking system, depending on the type of these key components during POST (Power-On-Self Test): CPU, memory modules, VGA card, and hard disk drives. 1.2.7 Jumpers 1. POST State LEDs The POST State LEDs provide the status of the installed CPU.

User Guide
Page 40
... Devices are found Invalid password Error loading Boot Option (LoadImage returned error) Boot Option is failed (StartImage returned error) Flash update is failed Reset protocol is started SCSI Reset SCSI Detect SCSI Enable Setup Verifying Password Start of Setup Reserved for ASL (see ASL Status Codes section below) Setup Input Wait Reserved for ASL (see ASL Status Codes section below) Ready To Boot event Legacy Boot event Exit Boot Services event Runtime Set Virtual Address MAP Begin Runtime Set Virtual Address MAP End Legacy Option ROM Initialization System Reset USB hot plug PCI bus hot...
... Devices are found Invalid password Error loading Boot Option (LoadImage returned error) Boot Option is failed (StartImage returned error) Flash update is failed Reset protocol is started SCSI Reset SCSI Detect SCSI Enable Setup Verifying Password Start of Setup Reserved for ASL (see ASL Status Codes section below) Setup Input Wait Reserved for ASL (see ASL Status Codes section below) Ready To Boot event Legacy Boot event Exit Boot Services event Runtime Set Virtual Address MAP Begin Runtime Set Virtual Address MAP End Legacy Option ROM Initialization System Reset USB hot plug PCI bus hot...

User Guide
Page 46
...+ PIN 1 Vbus IntA_P1_SSRXIntA_P1_SSRX+ GND IntA_P1_SSTXIntA_P1_SSTX+ GND IntA_P1_DIntA_P1_D+ ID Z97-WS USB3.0 connectors The USB 3.0 module is purchased separately. • These connectors are based on the operating system's setting. • These USB 3.0 ports only support Turbo Mode when using USB 3.0 Boost feature. USB 3.0 connectors (20-1 pin USB3_E12, USB3_E34) These connectors allow you to fully use the USB 3.0 ports under Windows® 7. • The plugged USB 3.0 device may run on xHCI or EHCI mode depending on xHCI specification. 8.
...+ PIN 1 Vbus IntA_P1_SSRXIntA_P1_SSRX+ GND IntA_P1_SSTXIntA_P1_SSTX+ GND IntA_P1_DIntA_P1_D+ ID Z97-WS USB3.0 connectors The USB 3.0 module is purchased separately. • These connectors are based on the operating system's setting. • These USB 3.0 ports only support Turbo Mode when using USB 3.0 Boost feature. USB 3.0 connectors (20-1 pin USB3_E12, USB3_E34) These connectors allow you to fully use the USB 3.0 ports under Windows® 7. • The plugged USB 3.0 device may run on xHCI or EHCI mode depending on xHCI specification. 8.

User Guide
Page 66
... seconds until the light goes out, indicating that the BIOS updating process is damaged during the process and results to the system's failure to automatically store the Q-Code event logs. This may have risks. Press the Q-Code Logger button at the rear panel for three seconds to boot up, please contact your local ASUS Service Center. In case of the USB storage device and filename/file format error.
... seconds until the light goes out, indicating that the BIOS updating process is damaged during the process and results to the system's failure to automatically store the Q-Code event logs. This may have risks. Press the Q-Code Logger button at the rear panel for three seconds to boot up, please contact your local ASUS Service Center. In case of the USB storage device and filename/file format error.

User Guide
Page 73
... requests you change the BIOS settings only with the help of a trained service personnel. Chapter 3 Z97-WS 3-1 Chapter 3: BIOS setup BIOS setup 3.1 Knowing BIOS 3 The new ASUS UEFI BIOS is a Unified Extensible Interface that complies with the same smoothness as your operating system. The term "BIOS" in the motherboard CMOS. Inappropriate BIOS settings may result to ensure optimal performance. When downloading or updating the BIOS file, rename it as storage device configuration, overclocking settings, advanced power management, and boot device configuration that goes...
... requests you change the BIOS settings only with the help of a trained service personnel. Chapter 3 Z97-WS 3-1 Chapter 3: BIOS setup BIOS setup 3.1 Knowing BIOS 3 The new ASUS UEFI BIOS is a Unified Extensible Interface that complies with the same smoothness as your operating system. The term "BIOS" in the motherboard CMOS. Inappropriate BIOS settings may result to ensure optimal performance. When downloading or updating the BIOS file, rename it as storage device configuration, overclocking settings, advanced power management, and boot device configuration that goes...

User Guide
Page 90
.... Configuration options: [Disabled] [Enabled] DRAM Timing Control The subitems in its minimum power consumption settings. Select the auto mode to adjust the value. The configurable options vary with the BCLK (base clock) frequency setting. The ratio may cause the system to set the memory operating frequency. EPU Power Saving Mode [Disabled] The ASUS EPU (Energy Processing Unit) sets the CPU in this item to become unstable! Chapter 3 3-18 Chapter 3: BIOS setup Configuration...
.... Configuration options: [Disabled] [Enabled] DRAM Timing Control The subitems in its minimum power consumption settings. Select the auto mode to adjust the value. The configurable options vary with the BCLK (base clock) frequency setting. The ratio may cause the system to set the memory operating frequency. EPU Power Saving Mode [Disabled] The ASUS EPU (Energy Processing Unit) sets the CPU in this item to become unstable! Chapter 3 3-18 Chapter 3: BIOS setup Configuration...

User Guide
Page 100
.... You can use the or keys to [Enabled] when overclocking your system. Total Adaptive Mode CPU Cache Voltage [Auto] This item sums up the voltages of the installed CPU. Increase the voltage to 0.999 V with a 0.001 V interval. SVID Support [Auto] Set this item takes the standard value of the installed CPU. Chapter 3 3-28 Chapter 3: BIOS setup By default, this item to adjust the value. Configuration options: [Auto] [Disabled] [Enabled] The following...
.... You can use the or keys to [Enabled] when overclocking your system. Total Adaptive Mode CPU Cache Voltage [Auto] This item sums up the voltages of the installed CPU. Increase the voltage to 0.999 V with a 0.001 V interval. SVID Support [Auto] Set this item takes the standard value of the installed CPU. Chapter 3 3-28 Chapter 3: BIOS setup By default, this item to adjust the value. Configuration options: [Auto] [Disabled] [Enabled] The following...

User Guide
Page 105
... manage and configure the CPU's power. Turbo Mode [Enabled] This item allows you to prefetch adjacent cache lines, reducing the DRAM loading time and improves the system performance. Configuration options: [Enabled] [Disabled] Chapter 3 Z97-WS 3-33 Configuration options: [Disabled] [Enabled] Boot Performance Mode [Max on CPU configuration. The CPU runs at its default speed. [Enabled] The system controls the CPU speed. Enhanced Intel SpeedStep Technology [Enabled] This item allows your system to prefetch commands and data in decreased power consumption and heat...
... manage and configure the CPU's power. Turbo Mode [Enabled] This item allows you to prefetch adjacent cache lines, reducing the DRAM loading time and improves the system performance. Configuration options: [Enabled] [Disabled] Chapter 3 Z97-WS 3-33 Configuration options: [Disabled] [Enabled] Boot Performance Mode [Max on CPU configuration. The CPU runs at its default speed. [Enabled] The system controls the CPU speed. Enhanced Intel SpeedStep Technology [Enabled] This item allows your system to prefetch commands and data in decreased power consumption and heat...

User Guide
Page 112
...] [Floppy] [Forced FDD] [Hard Disk] [CD-ROM] USB Single Port Control This item allows you to configure the platform-related features. EHCI Hand-off [Disabled] [Enabled] Enables the support for the location of the USB ports. 3.6.6 Platform Misc Configuration The items in the operating system. [Smart Auto] Upon detection, the xHCI driver supports the USB 3.0 mode during both POST and operating system. [Enabled] Enables the xHCI controller. [Disabled] Disables the xHCI controller. Chapter 3 3-40 Chapter 3: BIOS setup Intel xHCI Mode [Smart Auto] [Auto] The...
...] [Floppy] [Forced FDD] [Hard Disk] [CD-ROM] USB Single Port Control This item allows you to configure the platform-related features. EHCI Hand-off [Disabled] [Enabled] Enables the support for the location of the USB ports. 3.6.6 Platform Misc Configuration The items in the operating system. [Smart Auto] Upon detection, the xHCI driver supports the USB 3.0 mode during both POST and operating system. [Enabled] Enables the xHCI controller. [Disabled] Disables the xHCI controller. Chapter 3 3-40 Chapter 3: BIOS setup Intel xHCI Mode [Smart Auto] [Auto] The...

User Guide
Page 132
... BIOS using a USB flash drive. 3. ASUS BIOS Updater: Updates the BIOS in DOS environment using the current version of this user guide for this chapter to update the motherboard BIOS in Windows® environment. • EZ Update requires an Internet connection either through a network or an ISP (Internet Service Provider). • This utility is available in Windows® environment. 2. ASUS EZ Flash 2: Updates the BIOS using the motherboard support DVD or a USB flash drive when the BIOS file fails or gets corrupted. 4. 3.11 Updating BIOS The ASUS website publishes the latest BIOS...
... BIOS using a USB flash drive. 3. ASUS BIOS Updater: Updates the BIOS in DOS environment using the current version of this user guide for this chapter to update the motherboard BIOS in Windows® environment. • EZ Update requires an Internet connection either through a network or an ISP (Internet Service Provider). • This utility is available in Windows® environment. 2. ASUS EZ Flash 2: Updates the BIOS using the motherboard support DVD or a USB flash drive when the BIOS file fails or gets corrupted. 4. 3.11 Updating BIOS The ASUS website publishes the latest BIOS...

User Guide
Page 140
Install the necessary drivers to display DVD/motherboard information Chapter 4 4-2 Chapter 4: Software support The Utilities menu shows the applications and other software that the motherboard supports. The Manual menu contains the list of the user guide. The AHCI/RAID Driver menu contains the RAID/AHCI driver disk. Click or tap an icon to use the devices. Click or tap an item to display the ASUS contact information. Support DVD main menu The Drivers menu shows the available device drivers if the system detects installed devices. Click or tap...
Install the necessary drivers to display DVD/motherboard information Chapter 4 4-2 Chapter 4: Software support The Utilities menu shows the applications and other software that the motherboard supports. The Manual menu contains the list of the user guide. The AHCI/RAID Driver menu contains the RAID/AHCI driver disk. Click or tap an icon to use the devices. Click or tap an item to display the ASUS contact information. Support DVD main menu The Drivers menu shows the available device drivers if the system detects installed devices. Click or tap...

User Guide
Page 161
... to install a Windows® operating system to create a RAID driver disk and load the RAID driver during OS installation. RAID 10 is required for this setup. RAID 1 (Data mirroring) copies and maintains an identical image of data from one drive fails, the disk array management software directs all the benefits of RAID 5 configuration include better HDD performance, fault tolerance, and higher storage capacity. Refer to the entire system. Chapter 5: RAID support RAID support 5 5.1 RAID configurations The motherboard supports Intel® Rapid Storage Technology with RAID 0, RAID...
... to install a Windows® operating system to create a RAID driver disk and load the RAID driver during OS installation. RAID 10 is required for this setup. RAID 1 (Data mirroring) copies and maintains an identical image of data from one drive fails, the disk array management software directs all the benefits of RAID 5 configuration include better HDD performance, fault tolerance, and higher storage capacity. Refer to the entire system. Chapter 5: RAID support RAID support 5 5.1 RAID configurations The motherboard supports Intel® Rapid Storage Technology with RAID 0, RAID...

User Guide
Page 162
... sets using SATA HDDs. To install the SATA hard disks for details on each drive. 5.1.3 Setting the RAID item in BIOS You must enable the RAID function in BIOS: 1. Save your changes, and then exit the BIOS Setup. Chapter 5 5-2 Chapter 5: RAID configurations Refer to Chapter 3 for a RAID configuration: 1. Set the SATA Mode item to RAID mode, all SATA ports run at RAID mode together. To set to [RAID Mode]. 4. Enter the BIOS Setup during POST. 2. Connect the SATA signal cables. 3. 5.1.2 Installing Serial ATA hard disks The motherboard supports Serial ATA hard disk drives...
... sets using SATA HDDs. To install the SATA hard disks for details on each drive. 5.1.3 Setting the RAID item in BIOS You must enable the RAID function in BIOS: 1. Save your changes, and then exit the BIOS Setup. Chapter 5 5-2 Chapter 5: RAID configurations Refer to Chapter 3 for a RAID configuration: 1. Set the SATA Mode item to RAID mode, all SATA ports run at RAID mode together. To set to [RAID Mode]. 4. Enter the BIOS Setup during POST. 2. Connect the SATA signal cables. 3. 5.1.2 Installing Serial ATA hard disks The motherboard supports Serial ATA hard disk drives...

User Guide
Page 163
... keys at the bottom of the screen allow you to display the utility main menu. The RAID BIOS setup screens shown in this section are for RAID configuration. 5.1.4 Intel® Rapid Storage Technology Option ROM utility To enter the Intel® Rapid Storage Technology Option ROM utility: 1. Chapter 5 Z97-WS 5-3 Turn on your screen. During POST, press + to move through the menus and select the menu options. The utility supports maximum four hard disk drives...
... keys at the bottom of the screen allow you to display the utility main menu. The RAID BIOS setup screens shown in this section are for RAID configuration. 5.1.4 Intel® Rapid Storage Technology Option ROM utility To enter the Intel® Rapid Storage Technology Option ROM utility: 1. Chapter 5 Z97-WS 5-3 Turn on your screen. During POST, press + to move through the menus and select the menu options. The utility supports maximum four hard disk drives...

User Guide
Page 168
... the installation media containing the RAID driver. 2. Insert the USB flash drive with RAID driver into the USB port or the support DVD into the optical drive. 4. Start Windows®. 2. 5.2.2 Creating a RAID driver disk in Windows® To create a RAID driver disk in Windows®: 1. Write-protect the floppy disk to load the UEFI driver for your USB floppy disk drive. Click the name of your optical drive. Follow the succeeding screen instructions to open the RAID driver folder. 5. To set up a Windows® UEFI operating system under RAID mode...
... the installation media containing the RAID driver. 2. Insert the USB flash drive with RAID driver into the USB port or the support DVD into the optical drive. 4. Start Windows®. 2. 5.2.2 Creating a RAID driver disk in Windows® To create a RAID driver disk in Windows®: 1. Write-protect the floppy disk to load the UEFI driver for your USB floppy disk drive. Click the name of your optical drive. Follow the succeeding screen instructions to open the RAID driver folder. 5. To set up a Windows® UEFI operating system under RAID mode...


