

User Guide
Page 5
... 4-11 4.4.5 USB Charger 4-13 4.4.6 Push Notice 4-14 4.4.7 System Information 4-17 4.5 Audio configurations 4-18 4.6 ASUS Dr. Power Utility 4-20 Chapter 5: RAID support 5.1 RAID configurations 5-1 5.1.1 RAID definitions 5-1 5.1.2 Installing Serial ATA...graphics cards 6-2 6.1.4 Installing three CrossFireX™ graphics cards 6-3 6.1.5 Installing four CrossFireX™ graphics cards 6-4 6.1.6 Installing the device drivers 6-5 6.1.7 Enabling the AMD® CrossFireX™ technology 6-5 6.2 NVIDIA® SLI™ technology 6-7 6.2.1 Requirements 6-7 6.2.2 Installing...
... 4-11 4.4.5 USB Charger 4-13 4.4.6 Push Notice 4-14 4.4.7 System Information 4-17 4.5 Audio configurations 4-18 4.6 ASUS Dr. Power Utility 4-20 Chapter 5: RAID support 5.1 RAID configurations 5-1 5.1.1 RAID definitions 5-1 5.1.2 Installing Serial ATA...graphics cards 6-2 6.1.4 Installing three CrossFireX™ graphics cards 6-3 6.1.5 Installing four CrossFireX™ graphics cards 6-4 6.1.6 Installing the device drivers 6-5 6.1.7 Enabling the AMD® CrossFireX™ technology 6-5 6.2 NVIDIA® SLI™ technology 6-7 6.2.1 Requirements 6-7 6.2.2 Installing...
User Guide
Page 14
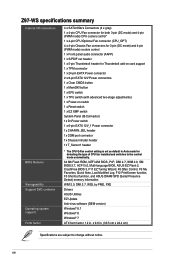
Z97-WS specifications summary Internal I/O connectors BIOS features Manageability Support DVD contents Operating system support Form factor 4 x SATA 6Gb/s Connectors (4 x gray) 1 x 4-pin CPU Fan connector for both 3-... Wizard, F6 Qfan Control, F3 My Favorites, Quick Note, Last Modified Log, F12 PrintScreen function, F3 Shortcut function, and ASUS DRAM SPD (Serial Presence Detect) memory information WfM 2.0, DMI 2.7, WOL by PME, PXE Drivers ASUS Utilities EZ Update Anti-virus software (OEM version) Windows® 8.1 Windows® 8 Windows® 7 ATX form factor: 12...
Z97-WS specifications summary Internal I/O connectors BIOS features Manageability Support DVD contents Operating system support Form factor 4 x SATA 6Gb/s Connectors (4 x gray) 1 x 4-pin CPU Fan connector for both 3-... Wizard, F6 Qfan Control, F3 My Favorites, Quick Note, Last Modified Log, F12 PrintScreen function, F3 Shortcut function, and ASUS DRAM SPD (Serial Presence Detect) memory information WfM 2.0, DMI 2.7, WOL by PME, PXE Drivers ASUS Utilities EZ Update Anti-virus software (OEM version) Windows® 8.1 Windows® 8 Windows® 7 ATX form factor: 12...
User Guide
Page 39
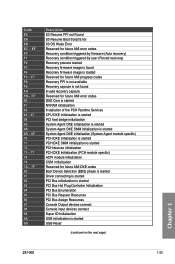
... initialization PCH DXE Initialization (PCH module specific) ACPI module initialization CSM initialization Reserved for future AMI DXE codes Boot Device Selection (BDS) phase is started Driver connecting is started PCI Bus initialization is started PCI Bus Hot Plug Controller Initialization PCI Bus Enumeration PCI Bus Request Resources PCI Bus Assign Resources...
... initialization PCH DXE Initialization (PCH module specific) ACPI module initialization CSM initialization Reserved for future AMI DXE codes Boot Device Selection (BDS) phase is started Driver connecting is started PCI Bus initialization is started PCI Bus Hot Plug Controller Initialization PCI Bus Enumeration PCI Bus Request Resources PCI Bus Assign Resources...

User Guide
Page 46
...+ GND IntA_P1_DIntA_P1_D+ ID USB3_E34 Vbus IntA_P2_SSRXIntA_P2_SSRX+ GND IntA_P2_SSTXIntA_P2_SSTX+ GND IntA_P2_DIntA_P2_D+ PIN 1 Vbus IntA_P1_SSRXIntA_P1_SSRX+ GND IntA_P1_SSTXIntA_P1_SSTX+ GND IntA_P1_DIntA_P1_D+ ID Z97-WS USB3.0 connectors The USB 3.0 module is purchased separately. • These connectors are based on the operating system's setting. •...mode depending on xHCI specification. 8. We recommend you to install the related driver to connect a USB 3.0 module for USB-chargeable devices, optimized power efficiency, and backward compatibility with USB 2.0.
...+ GND IntA_P1_DIntA_P1_D+ ID USB3_E34 Vbus IntA_P2_SSRXIntA_P2_SSRX+ GND IntA_P2_SSTXIntA_P2_SSTX+ GND IntA_P2_DIntA_P2_D+ PIN 1 Vbus IntA_P1_SSRXIntA_P1_SSRX+ GND IntA_P1_SSTXIntA_P1_SSTX+ GND IntA_P1_DIntA_P1_D+ ID Z97-WS USB3.0 connectors The USB 3.0 module is purchased separately. • These connectors are based on the operating system's setting. •...mode depending on xHCI specification. 8. We recommend you to install the related driver to connect a USB 3.0 module for USB-chargeable devices, optimized power efficiency, and backward compatibility with USB 2.0.
User Guide
Page 109
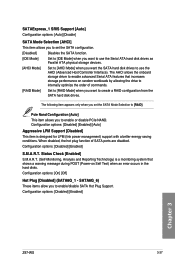
... Reporting Technology) is designed for LPM (link power management) support with a better energy saving conditions. Configuration options: [Disabled] [Enabled] Chapter 3 Z97-WS 3-37 Configuration options: [Disabled] [Enabled] S.M.A.R.T. Pcie Nand Configuration [Auto] This item allows you want the SATA hard disk drives to use the...[RAID Mode] when you to internally optimize the order of SATA ports are disabled. The AHCI allows the onboard storage driver to enable advanced Serial ATA features that shows a warning message during POST (Power-on random workloads by allowing the drive ...
... Reporting Technology) is designed for LPM (link power management) support with a better energy saving conditions. Configuration options: [Disabled] [Enabled] Chapter 3 Z97-WS 3-37 Configuration options: [Disabled] [Enabled] S.M.A.R.T. Pcie Nand Configuration [Auto] This item allows you want the SATA hard disk drives to use the...[RAID Mode] when you to internally optimize the order of SATA ports are disabled. The AHCI allows the onboard storage driver to enable advanced Serial ATA features that shows a warning message during POST (Power-on random workloads by allowing the drive ...

User Guide
Page 112
...for the location of the USB ports. 3.6.6 Platform Misc Configuration The items in the operating system. [Smart Auto] Upon detection, the xHCI driver supports the USB 3.0 mode during both POST and operating system. [Enabled] Enables the xHCI controller. [Disabled] Disables the xHCI controller. ...Intel xHCI Mode [Smart Auto] [Auto] The xHCI is automatically enabled and runs at USB 3.0 mode when the xHCI driver is installed in this menu allow you to configure the platform-related features. Configuration options: [Auto] [Floppy] [Forced FDD] [Hard Disk]...
...for the location of the USB ports. 3.6.6 Platform Misc Configuration The items in the operating system. [Smart Auto] Upon detection, the xHCI driver supports the USB 3.0 mode during both POST and operating system. [Enabled] Enables the xHCI controller. [Disabled] Disables the xHCI controller. ...Intel xHCI Mode [Smart Auto] [Auto] The xHCI is automatically enabled and runs at USB 3.0 mode when the xHCI driver is installed in this menu allow you to configure the platform-related features. Configuration options: [Auto] [Floppy] [Forced FDD] [Hard Disk]...
User Guide
Page 123
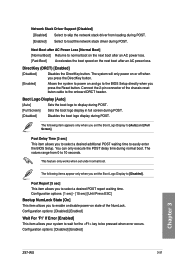
... POST report waiting time. Configuration options: [Disabled] [Enabled] Chapter 3 Z97-WS 3-51 The system will only power on and go to 10 seconds. Network Stack Driver Support [Disabled] [Disabled] Select to skip the network stack driver from 0 to the BIOS Setup directly when you press the DirectKey button...NumLock State [On] This item allows you set under normal boot. The following items appear only when you to load the network stack driver during normal boot. Configuration options: [Disabled] [Enabled] Wait For 'F1' If Error [Enabled] This item allows your system to...
... POST report waiting time. Configuration options: [Disabled] [Enabled] Chapter 3 Z97-WS 3-51 The system will only power on and go to 10 seconds. Network Stack Driver Support [Disabled] [Disabled] Select to skip the network stack driver from 0 to the BIOS Setup directly when you press the DirectKey button...NumLock State [On] This item allows you set under normal boot. The following items appear only when you to load the network stack driver during normal boot. Configuration options: [Disabled] [Enabled] Wait For 'F1' If Error [Enabled] This item allows your system to...
User Guide
Page 124
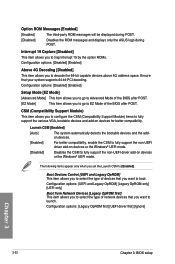
... devices and the addon devices. [Enabled] For better compatibility, enable the CSM to fully support the non-UEFI driver add-on devices or the Windows® UEFI mode. [Disabled] Disables the CSM to EZ Mode of devices ...Boot Devices Control [UEFI and Legacy OpROM] This item allows you to [Enabled]. Configuration options: [Legacy OpROM first] [UEFI driver first] [Ignore] Chapter 3 3-52 Chapter 3: BIOS setup Interrupt 19 Capture [Disabled] This item allows you to trap ...be displayed during POST. [Disabled] Disables the ROM messages and displays only the ASUS logo during POST.
... devices and the addon devices. [Enabled] For better compatibility, enable the CSM to fully support the non-UEFI driver add-on devices or the Windows® UEFI mode. [Disabled] Disables the CSM to EZ Mode of devices ...Boot Devices Control [UEFI and Legacy OpROM] This item allows you to [Enabled]. Configuration options: [Legacy OpROM first] [UEFI driver first] [Ignore] Chapter 3 3-52 Chapter 3: BIOS setup Interrupt 19 Capture [Disabled] This item allows you to trap ...be displayed during POST. [Disabled] Disables the ROM messages and displays only the ASUS logo during POST.

User Guide
Page 125
... verifies the PK before your system. Once the PK is deleted, all default Secure Boot keys. The PK file must be active. Chapter 3 Z97-WS 3-53 This item allows you to immediately load the default Security Boot keys, Platform key (PK), Key-exchange Key (KEK), Signature database (db...the PK state will not be formatted as a UEFI variable structure with time-based authenticated variable. Configuration options: [Legacy OpROM first] [UEFI driver first] Secure Boot This item allows you load the default Secure Boot keys. Boot from Storage Devices [Legacy OpROM first] This item allows you...
... verifies the PK before your system. Once the PK is deleted, all default Secure Boot keys. The PK file must be active. Chapter 3 Z97-WS 3-53 This item allows you to immediately load the default Security Boot keys, Platform key (PK), Key-exchange Key (KEK), Signature database (db...the PK state will not be formatted as a UEFI variable structure with time-based authenticated variable. Configuration options: [Legacy OpROM first] [UEFI driver first] Secure Boot This item allows you load the default Secure Boot keys. Boot from Storage Devices [Legacy OpROM first] This item allows you...
User Guide
Page 126
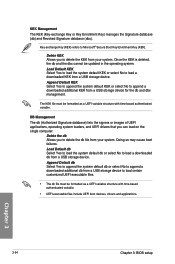
...boot failures. DB Management The db (Authorized Signature database) lists the signers or images of UEFI applications, operating system loaders, and UEFI drivers that you to delete the db file from a USB storage device to load certain customized UEFI executable files. • The db ...KEK file must be formatted as a UEFI variable structure with time-based authenticated variable. • UEFI executable files include UEFI boot devices, drivers and applications. Once the KEK is deleted, the db and the dbx cannot be formatted as a UEFI variable structure with time-based ...
...boot failures. DB Management The db (Authorized Signature database) lists the signers or images of UEFI applications, operating system loaders, and UEFI drivers that you to delete the db file from a USB storage device to load certain customized UEFI executable files. • The db ...KEK file must be formatted as a UEFI variable structure with time-based authenticated variable. • UEFI executable files include UEFI boot devices, drivers and applications. Once the KEK is deleted, the db and the dbx cannot be formatted as a UEFI variable structure with time-based ...

User Guide
Page 140
... the system detects installed devices. Click or tap an item to display the ASUS contact information. Click or tap an icon to use the devices. Install the necessary drivers to display DVD/motherboard information Chapter 4 4-2 Chapter 4: Software support The Manual menu contains the list of the user guide. Click or tap an...
... the system detects installed devices. Click or tap an item to display the ASUS contact information. Click or tap an icon to use the devices. Install the necessary drivers to display DVD/motherboard information Chapter 4 4-2 Chapter 4: Software support The Manual menu contains the list of the user guide. Click or tap an...
User Guide
Page 147
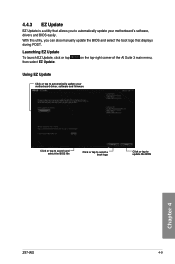
...main menu, Using EZ Update Click or tap to update the BIOS Chapter 4 Z97-WS 4-9 With this utlity, you can also manually update the BIOS and select the boot logo that allows you to automatically update your motherboard driver, software and firmware Click or tap to search and select the BIOS file ...Click or tap to select a boot logo Click or tap to automatically update your motherboard's software, drivers and BIOS easily. Launching EZ Update To launch EZ Update, click or tap then select EZ Update. 4.4.3 EZ Update EZ Update is a utility ...
...main menu, Using EZ Update Click or tap to update the BIOS Chapter 4 Z97-WS 4-9 With this utlity, you can also manually update the BIOS and select the boot logo that allows you to automatically update your motherboard driver, software and firmware Click or tap to search and select the BIOS file ...Click or tap to select a boot logo Click or tap to automatically update your motherboard's software, drivers and BIOS easily. Launching EZ Update To launch EZ Update, click or tap then select EZ Update. 4.4.3 EZ Update EZ Update is a utility ...
User Guide
Page 156
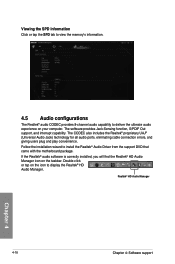
... the SPD tab to view the memory's information. 4.5 Audio configurations The Realtek® audio CODEC provides 8-channel audio capability to install the Realtek® Audio Driver from the support DVD that came with the motherboard package.
... the SPD tab to view the memory's information. 4.5 Audio configurations The Realtek® audio CODEC provides 8-channel audio capability to install the Realtek® Audio Driver from the support DVD that came with the motherboard package.
User Guide
Page 158
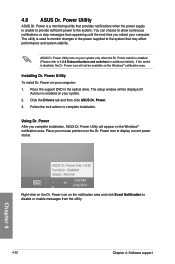
... Power icon will be available on the notification area and click Event Notification to display current power status. Click the Drivers tab and then click ASUS Dr. Power. 3. ASUS Dr. Power Utility runs on your system only when the Dr. Power switch is enabled on your mouse pointer over ...the Dr. Power icon to disable or enable messages from appearing until the next time you complete installation, ASUS Dr. Power Utility will appear on your computer. Using Dr. Power After you reboot your computer: 1. Follow the instructions to 1.2.6 Onboard...
... Power icon will be available on the notification area and click Event Notification to display current power status. Click the Drivers tab and then click ASUS Dr. Power. 3. ASUS Dr. Power Utility runs on your system only when the Dr. Power switch is enabled on your mouse pointer over ...the Dr. Power icon to disable or enable messages from appearing until the next time you complete installation, ASUS Dr. Power Utility will appear on your computer. Using Dr. Power After you reboot your computer: 1. Follow the instructions to 1.2.6 Onboard...

User Guide
Page 161
...a Windows® operating system to a hard disk drive included in a RAID set, you get all applications to section 5.2 Creating a RAID driver disk for this setup. RAID 1 (Data mirroring) copies and maintains an identical image of both data and parity information across three or more hard...5.1.1 RAID definitions RAID 0 (Data striping) optimizes two identical hard disk drives to be of the data in parallel, interleaved stacks. Chapter 5 Z97-WS 5-1 If one drive fails, the disk array management software directs all the benefits of data from one drive to the entire system. Chapter 5: ...
...a Windows® operating system to a hard disk drive included in a RAID set, you get all applications to section 5.2 Creating a RAID driver disk for this setup. RAID 1 (Data mirroring) copies and maintains an identical image of both data and parity information across three or more hard...5.1.1 RAID definitions RAID 0 (Data striping) optimizes two identical hard disk drives to be of the data in parallel, interleaved stacks. Chapter 5 Z97-WS 5-1 If one drive fails, the disk array management software directs all the benefits of data from one drive to the entire system. Chapter 5: ...
User Guide
Page 167
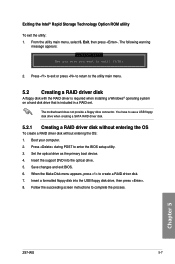
... disk drive, then press . 8. Insert a formatted floppy disk into the optical drive. 5. Follow the succeeding screen instructions to create a RAID driver disk. 7. Exit, then press . The motherboard does not provide a floppy drive connector. Set the optical drive as the primary boot device. ...press to return to enter the BIOS setup utility. 3. Chapter 5 Z97-WS 5-7 From the utility main menu, select 5. Press during POST to the utility main menu. 5.2 Creating a RAID driver disk A floppy disk with the RAID driver is required when installing a Windows® operating system on a hard...
... disk drive, then press . 8. Insert a formatted floppy disk into the optical drive. 5. Follow the succeeding screen instructions to create a RAID driver disk. 7. Exit, then press . The motherboard does not provide a floppy drive connector. Set the optical drive as the primary boot device. ...press to return to enter the BIOS setup utility. 3. Chapter 5 Z97-WS 5-7 From the utility main menu, select 5. Press during POST to the utility main menu. 5.2 Creating a RAID driver disk A floppy disk with the RAID driver is required when installing a Windows® operating system on a hard...

User Guide
Page 168
...drive, and then click Browse. 3. Write-protect the floppy disk to avoid a computer virus infection. 5.2.3 Installing the RAID driver during Windows® OS installation To install the RAID driver for your optical drive. Click the name of your operating system. To set up a Windows® UEFI operating system ...drive. Copy the files of the selected folder to the root path of the device you to load the UEFI driver for Windows® 7: 1. During the OS installation, click Load Driver to allow you 've inserted, go to the USB flash drive. Click OK. 4. Follow the succeeding screen ...
...drive, and then click Browse. 3. Write-protect the floppy disk to avoid a computer virus infection. 5.2.3 Installing the RAID driver during Windows® OS installation To install the RAID driver for your optical drive. Click the name of your operating system. To set up a Windows® UEFI operating system ...drive. Copy the files of the selected folder to the root path of the device you to load the UEFI driver for Windows® 7: 1. During the OS installation, click Load Driver to allow you 've inserted, go to the USB flash drive. Click OK. 4. Follow the succeeding screen ...
User Guide
Page 169
... are AMD® certified. • Ensure that your graphics card driver supports the AMD CrossFireX technology. To uninstall existing graphics card drivers: 1. For Windows XP, select Add/Remove. Chapter 6 Z97-WS 6-1 Select your system. For Windows 7, select Uninstall. 5. Close all existing graphics card drivers before installing AMD CrossFireX graphics cards to uninstall all current applications...
... are AMD® certified. • Ensure that your graphics card driver supports the AMD CrossFireX technology. To uninstall existing graphics card drivers: 1. For Windows XP, select Add/Remove. Chapter 6 Z97-WS 6-1 Select your system. For Windows 7, select Uninstall. 5. Close all existing graphics card drivers before installing AMD CrossFireX graphics cards to uninstall all current applications...
User Guide
Page 173
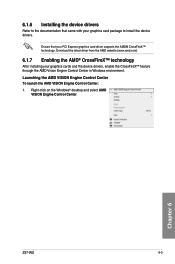
Right-click on the Windows® desktop and select AMD VISION Engine Control Center. 6.1.6 Installing the device drivers Refer to install the device drivers. Chapter 6 Z97-WS 6-5 Ensure that came with your graphics cards and the device drivers, enable the CrossFireX™ feature through the AMD Vision Engine Control Center in Windows environment. Download the latest...
Right-click on the Windows® desktop and select AMD VISION Engine Control Center. 6.1.6 Installing the device drivers Refer to install the device drivers. Chapter 6 Z97-WS 6-5 Ensure that came with your graphics cards and the device drivers, enable the CrossFireX™ feature through the AMD Vision Engine Control Center in Windows environment. Download the latest...
User Guide
Page 175
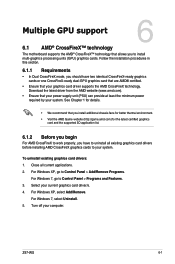
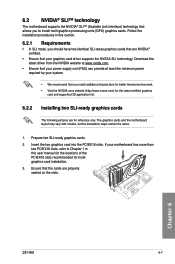
... and supported 3D application list. 6.2.2 Installing two SLI-ready graphics cards The following pictures are for multigraphics card installation. 3. Chapter 6 Z97-WS 6-7 The graphics cards and the motherboard layout may vary with models, but the installation steps remain the same. 1. Prepare two SLI-...refer to Chapter 1 in this user manual for the locations of the PCIEX16 slots recommended for reference only. If your graphics card driver supports the NVIDIA SLI technology. Follow the installation procedures in this section. 6.2.1 Requirements • In SLI mode, you to ...
... and supported 3D application list. 6.2.2 Installing two SLI-ready graphics cards The following pictures are for multigraphics card installation. 3. Chapter 6 Z97-WS 6-7 The graphics cards and the motherboard layout may vary with models, but the installation steps remain the same. 1. Prepare two SLI-...refer to Chapter 1 in this user manual for the locations of the PCIEX16 slots recommended for reference only. If your graphics card driver supports the NVIDIA SLI technology. Follow the installation procedures in this section. 6.2.1 Requirements • In SLI mode, you to ...