User Guide
Page 48
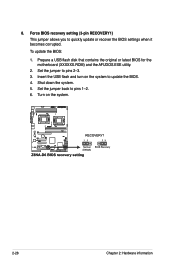
To update the BIOS: 1. Insert the USB flash and turn on the system. 2-28 Chapter 2: Hardware information Force BIOS recovery setting (3-pin RECOVERY1) This jumper allows you to pins 2-3. 3. Shut down the system. 5. Prepare a USB flash disk that contains the original or latest BIOS for the motherboard (XXXXXX.ROM) and the AFUDOS.EXE utility. 2. Set the jumper to quickly update or recover the BIOS settings when it becomes corrupted. 8. Set the jumper back to update the BIOS. 4. Turn on the system to pins 1-2. 6.
To update the BIOS: 1. Insert the USB flash and turn on the system. 2-28 Chapter 2: Hardware information Force BIOS recovery setting (3-pin RECOVERY1) This jumper allows you to pins 2-3. 3. Shut down the system. 5. Prepare a USB flash disk that contains the original or latest BIOS for the motherboard (XXXXXX.ROM) and the AFUDOS.EXE utility. 2. Set the jumper to quickly update or recover the BIOS settings when it becomes corrupted. 8. Set the jumper back to update the BIOS. 4. Turn on the system to pins 1-2. 6.

User Guide
Page 57
... an abnormal event occurance. 3. ATX power button/soft-off button (2-pin PWRSW) This connector is read from or written to this connector. Connect the chassis power LED cable to the HDD. 5. The system power LED lights up or flashes when data is for the chassis...power button turns the system on the BIOS settings. System panel connector (20-pin PANEL1) This connector supports several chassis-mounted functions. 1. Message LED (2-pin MLED) This 2-pin connector is for the chassis-mounted reset button for the HDD Activity LED. ASUS Z8NA-D6 Series 2-37 Reset button (2-pin RESET...
... an abnormal event occurance. 3. ATX power button/soft-off button (2-pin PWRSW) This connector is read from or written to this connector. Connect the chassis power LED cable to the HDD. 5. The system power LED lights up or flashes when data is for the chassis...power button turns the system on the BIOS settings. System panel connector (20-pin PANEL1) This connector supports several chassis-mounted functions. 1. Message LED (2-pin MLED) This 2-pin connector is for the chassis-mounted reset button for the HDD Activity LED. ASUS Z8NA-D6 Series 2-37 Reset button (2-pin RESET...

User Guide
Page 65
... or gets corrupted during the updating process. Copy the original motherboard BIOS using a bootable USB flash disk drive with the updated BIOS file. Copying the current BIOS To copy the current BIOS file using a bootable USB flash disk drive.) 2. A:\>afudos /oOLDBIOS1.rom Main filename Extension name ASUS Z8NA-D6 Series 4-3 Boot the system in the future. Copy the AFUDOS utility...
... or gets corrupted during the updating process. Copy the original motherboard BIOS using a bootable USB flash disk drive with the updated BIOS file. Copying the current BIOS To copy the current BIOS file using a bootable USB flash disk drive.) 2. A:\>afudos /oOLDBIOS1.rom Main filename Extension name ASUS Z8NA-D6 Series 4-3 Boot the system in the future. Copy the AFUDOS utility...

User Guide
Page 66
... power during flash BIOS Reading file ....... done Writing flash ...... 0x0008CC00 (9%) DO NOT shut down or reset the system while updating the BIOS to file...... Version 1.19(ASUS V2.07(03.11.24BB)) Copyright (C) 2002 American Megatrends, Inc. Save the BIOS file to the USB flash disk drive. Copy the AFUDOS utility (afudos.exe) from the motherboard support CD...
... power during flash BIOS Reading file ....... done Writing flash ...... 0x0008CC00 (9%) DO NOT shut down or reset the system while updating the BIOS to file...... Version 1.19(ASUS V2.07(03.11.24BB)) Copyright (C) 2002 American Megatrends, Inc. Save the BIOS file to the USB flash disk drive. Copy the AFUDOS utility (afudos.exe) from the motherboard support CD...

User Guide
Page 67
done Verifying flash .... done Please restart your computer A:\> ASUS Z8NA-D6 Series 4-5 Version 1.19(ASUS V2.07(03.11.24BB)) Copyright (C) 2002 American Megatrends, Inc. The utility returns to the DOS prompt after the BIOS update process is completed. A:\>afudos /i8036A0.ROM AMI Firmware Update Utility - done Reading flash ...... WARNING!! Reboot the system from the hard disk drive. done Advance Check ...... All rights reserved. Do not turn off power during flash BIOS Reading file ....... Erasing flash ...... 5. done Writing flash ......
done Verifying flash .... done Please restart your computer A:\> ASUS Z8NA-D6 Series 4-5 Version 1.19(ASUS V2.07(03.11.24BB)) Copyright (C) 2002 American Megatrends, Inc. The utility returns to the DOS prompt after the BIOS update process is completed. A:\>afudos /i8036A0.ROM AMI Firmware Update Utility - done Reading flash ...... WARNING!! Reboot the system from the hard disk drive. done Advance Check ...... All rights reserved. Do not turn off power during flash BIOS Reading file ....... Erasing flash ...... 5. done Writing flash ......

User Guide
Page 68
... updated BIOS file to download the latest BIOS file. 4-6 Chapter 4: BIOS setup Recovering the BIOS from a USB flash drive To recover the BIOS from the floppy disk drive and turn the system. 2. 4.1.2 ASUS CrashFree BIOS 3 utility The ASUS CrashFree BIOS 3 is an auto recovery tool that contains the updated BIOS file. Prepare a USB flash drive containing the updated motherboard BIOS before using a USB flash drive...
... updated BIOS file to download the latest BIOS file. 4-6 Chapter 4: BIOS setup Recovering the BIOS from a USB flash drive To recover the BIOS from the floppy disk drive and turn the system. 2. 4.1.2 ASUS CrashFree BIOS 3 utility The ASUS CrashFree BIOS 3 is an auto recovery tool that contains the updated BIOS file. Prepare a USB flash drive containing the updated motherboard BIOS before using a USB flash drive...


