
User Guide
Page 6
...consistency 5-19 5.2.6 Deleting a RAID configuration 5-22 5.2.7 Selecting the boot drive from a RAID set 5-23 5.2.8 Enabling WriteCache 5-24 5.3 Intel® Matrix Storage Manager Option ROM Utility 5-25 5.3.1 Creating a RAID set 5-26 5.3.2 Creating a Recovery set 5-27 5.3.3 Deleting a RAID set 5-29 5.3.4 Resetting disks to Non-RAID 5-30 5.3.5 5.3.6...support DVD 6-26 6.5.2 Drivers menu 6-26 6.5.3 Utilities menu 6-27 6.5.4 Make disk menu 6-27 6.5.5 Contact information 6-27 Appendix: Reference information A.1 Z8NA-D6 block diagram A-3 A.2 Z8NA-D6C block diagram A-4 vi
...consistency 5-19 5.2.6 Deleting a RAID configuration 5-22 5.2.7 Selecting the boot drive from a RAID set 5-23 5.2.8 Enabling WriteCache 5-24 5.3 Intel® Matrix Storage Manager Option ROM Utility 5-25 5.3.1 Creating a RAID set 5-26 5.3.2 Creating a Recovery set 5-27 5.3.3 Deleting a RAID set 5-29 5.3.4 Resetting disks to Non-RAID 5-30 5.3.5 5.3.6...support DVD 6-26 6.5.2 Drivers menu 6-26 6.5.3 Utilities menu 6-27 6.5.4 Make disk menu 6-27 6.5.5 Contact information 6-27 Appendix: Reference information A.1 Z8NA-D6 block diagram A-3 A.2 Z8NA-D6C block diagram A-4 vi
User Guide
Page 48
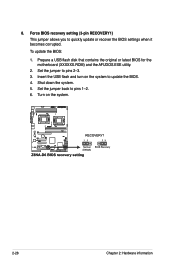
Insert the USB flash and turn on the system. 2-28 Chapter 2: Hardware information Turn on the system to pins 1-2. 6. Prepare a USB flash disk that contains the original or latest BIOS for the motherboard (XXXXXX.ROM) and the AFUDOS.EXE utility. 2. Set the jumper back to update the BIOS. 4. To update the BIOS: 1. Set the jumper to quickly update or recover the BIOS settings when it becomes corrupted. 8. Force BIOS recovery setting (3-pin RECOVERY1) This jumper allows you to pins 2-3. 3. Shut down the system. 5.
Insert the USB flash and turn on the system. 2-28 Chapter 2: Hardware information Turn on the system to pins 1-2. 6. Prepare a USB flash disk that contains the original or latest BIOS for the motherboard (XXXXXX.ROM) and the AFUDOS.EXE utility. 2. Set the jumper back to update the BIOS. 4. To update the BIOS: 1. Set the jumper to quickly update or recover the BIOS settings when it becomes corrupted. 8. Force BIOS recovery setting (3-pin RECOVERY1) This jumper allows you to pins 2-3. 3. Shut down the system. 5.

User Guide
Page 65
... DOS mode using a bootable USB flash disk drive with the updated BIOS file. A:\>afudos /oOLDBIOS1.rom Main filename Extension name ASUS Z8NA-D6 Series 4-3 Copy the original motherboard BIOS using the ASUS Update or AFUDOS utilities. 4.1.1 AFUDOS utility The AFUDOS utility allows you to the corresponding sections for ... file to a bootable USB flash disk drive in case you need to manage and update the motherboard Basic Input/Output System (BIOS) setup: 1. ASUS CrashFree BIOS 3 (To recover the BIOS using the AFUDOS utility: The succeeding BIOS screens are for the extension name...
... DOS mode using a bootable USB flash disk drive with the updated BIOS file. A:\>afudos /oOLDBIOS1.rom Main filename Extension name ASUS Z8NA-D6 Series 4-3 Copy the original motherboard BIOS using the ASUS Update or AFUDOS utilities. 4.1.1 AFUDOS utility The AFUDOS utility allows you to the corresponding sections for ... file to a bootable USB flash disk drive in case you need to manage and update the motherboard Basic Input/Output System (BIOS) setup: 1. ASUS CrashFree BIOS 3 (To recover the BIOS using the AFUDOS utility: The succeeding BIOS screens are for the extension name...

User Guide
Page 66
...;. The utility copies the current BIOS file to type the exact BIOS filename at the DOS prompt. 2. A:\>afudos /oOLDBIOS1.rom AMI Firmware Update Utility - Version 1.19(ASUS V2.07(03.11.24BB)) Copyright (C) 2002 American Megatrends, Inc. Reading flash ..... Erasing flash ...... 3. You need to... the USB flash disk drive. Copy the AFUDOS utility (afudos.exe) from the motherboard support CD to the bootable�U�...
...;. The utility copies the current BIOS file to type the exact BIOS filename at the DOS prompt. 2. A:\>afudos /oOLDBIOS1.rom AMI Firmware Update Utility - Version 1.19(ASUS V2.07(03.11.24BB)) Copyright (C) 2002 American Megatrends, Inc. Reading flash ..... Erasing flash ...... 3. You need to... the USB flash disk drive. Copy the AFUDOS utility (afudos.exe) from the motherboard support CD to the bootable�U�...

User Guide
Page 67
WARNING!! done Writing flash ...... done Verifying flash .... Reboot the system from the hard disk drive. done Advance Check ...... Do not turn off power during flash BIOS Reading file ....... Erasing flash ...... A:\>afudos /i8036A0.ROM AMI Firmware Update Utility - done Please restart your computer A:\> ASUS Z8NA-D6 Series 4-5 done Reading flash ...... The utility returns to the DOS prompt after the BIOS update process is completed. Version 1.19(ASUS V2.07(03.11.24BB)) Copyright (C) 2002 American Megatrends, Inc. All rights reserved. 5.
WARNING!! done Writing flash ...... done Verifying flash .... Reboot the system from the hard disk drive. done Advance Check ...... Do not turn off power during flash BIOS Reading file ....... Erasing flash ...... A:\>afudos /i8036A0.ROM AMI Firmware Update Utility - done Please restart your computer A:\> ASUS Z8NA-D6 Series 4-5 done Reading flash ...... The utility returns to the DOS prompt after the BIOS update process is completed. Version 1.19(ASUS V2.07(03.11.24BB)) Copyright (C) 2002 American Megatrends, Inc. All rights reserved. 5.

User Guide
Page 89
... all the devices in below sections may cause system to configure the onboard LAN1/2 boot mode. Configuration: [Disabled] [PXE] [iSCSI] ASUS Z8NA-D6 Series 4-27 The scanning of the PCI/PnP Configuration menu items. Incorrect field values can cause the system to [Yes] and if you...options: [Normal] [High] Onboard LAN1/2 Boot [PXE] Allows you set to malfunction. Take caution when changing the settings of the option ROM will start from the highest bus, device, function number if you to malfunction. Advanced BIOS SETUP UTILITY Advanced PCI/PnP Settings WARNING: Setting ...
... all the devices in below sections may cause system to configure the onboard LAN1/2 boot mode. Configuration: [Disabled] [PXE] [iSCSI] ASUS Z8NA-D6 Series 4-27 The scanning of the PCI/PnP Configuration menu items. Incorrect field values can cause the system to [Yes] and if you...options: [Normal] [High] Onboard LAN1/2 Boot [PXE] Allows you set to malfunction. Take caution when changing the settings of the option ROM will start from the highest bus, device, function number if you to malfunction. Advanced BIOS SETUP UTILITY Advanced PCI/PnP Settings WARNING: Setting ...

User Guide
Page 98
4.6 Boot menu The Boot menu items allow you set the CD-ROM drive as the first boot device. ←→ Select Screen ↑↓ Select Item Enter Go to Sub Screen F1 General Help F10 Save and ... SETUP UTILITY Boot Boot Device Priority 1st Boot Device 2nd Boot Device 3rd Boot Device 4th Boot Device 5th Boot Device [Removable Dev.] [ATAPI CD-ROM] [Hard Drive] [Network:IBA GE Slo] [Network:IBA GE Slo] Specifies the Boot Device Priority sequence. Main Advanced Server BIOS SETUP UTILITY Boot Exit Boot...
4.6 Boot menu The Boot menu items allow you set the CD-ROM drive as the first boot device. ←→ Select Screen ↑↓ Select Item Enter Go to Sub Screen F1 General Help F10 Save and ... SETUP UTILITY Boot Boot Device Priority 1st Boot Device 2nd Boot Device 3rd Boot Device 4th Boot Device 5th Boot Device [Removable Dev.] [ATAPI CD-ROM] [Hard Drive] [Network:IBA GE Slo] [Network:IBA GE Slo] Specifies the Boot Device Priority sequence. Main Advanced Server BIOS SETUP UTILITY Boot Exit Boot...

User Guide
Page 99
... [Enabled], the system waits for Options ROM. Configuration options: [Off] [On] Wait For 'F1' If Error [Enabled] When set to run Setup" during POST. Quick Boot [Enabled] Enabling this item to [Enabled] to enable or disable the full screen logo display feature. Configuration options: [Disabled] [Enabled] ASUS Z8NA-D6 Series 4-37 Configuration options: [Disabled...
... [Enabled], the system waits for Options ROM. Configuration options: [Off] [On] Wait For 'F1' If Error [Enabled] When set to run Setup" during POST. Quick Boot [Enabled] Enabling this item to [Enabled] to enable or disable the full screen logo display feature. Configuration options: [Disabled] [Enabled] ASUS Z8NA-D6 Series 4-37 Configuration options: [Disabled...

User Guide
Page 104
Chapter summary 5 5.1 Setting up RAID 5-3 5.2 LSI Software RAID Configuration Utility 5-5 5.3 Intel® Matrix Storage Manager Option ROM Utility 5-25 ASUS Z8NA-D6 Series
Chapter summary 5 5.1 Setting up RAID 5-3 5.2 LSI Software RAID Configuration Utility 5-5 5.3 Intel® Matrix Storage Manager Option ROM Utility 5-25 ASUS Z8NA-D6 Series

User Guide
Page 127
... Serial ATA hard disk drives. 2. All Rights Reserved. [ MAIN MENU ] 1. Exit 3. To enter the Intel® Matrix Storage Manager option ROM utility: 1. Physical Disks: Port Drive Model 0 ST3160812AS 1 ST3160812AS 2 ST3160812AS 3 ST3160812AS [ DISK/VOLUME INFORMATION ] * = Data is Encrypted Serial...by the Southbridge. 5.3 Intel® Matrix Storage Manager Option ROM Utility The Intel® Matrix Storage Manager Option ROM utility allows you to display the utility main menu. Create RAID Volume 2. Recovery Volume Options RAID Volumes: None defined. ASUS Z8NA-D6 Series 5-25
... Serial ATA hard disk drives. 2. All Rights Reserved. [ MAIN MENU ] 1. Exit 3. To enter the Intel® Matrix Storage Manager option ROM utility: 1. Physical Disks: Port Drive Model 0 ST3160812AS 1 ST3160812AS 2 ST3160812AS 3 ST3160812AS [ DISK/VOLUME INFORMATION ] * = Data is Encrypted Serial...by the Southbridge. 5.3 Intel® Matrix Storage Manager Option ROM Utility The Intel® Matrix Storage Manager Option ROM utility allows you to display the utility main menu. Create RAID Volume 2. Recovery Volume Options RAID Volumes: None defined. ASUS Z8NA-D6 Series 5-25

User Guide
Page 128
.../Next [SPACE]-SelectDisk [ENTER]-Done 5. A small triangle marks the selected drive. 5.3.1 Creating a RAID set To create a RAID set and press . 3. Intel(R) Matrix Storage Manager option ROM v8.5.0.1030 ICH10R/DO wRAID5 Copyright(C) 2003-08 Intel Corporation. Enter a name for the RAID set 1. All Rights Reserved. [ CREATE VOLUME MENU ] Name: RAID Level...
.../Next [SPACE]-SelectDisk [ENTER]-Done 5. A small triangle marks the selected drive. 5.3.1 Creating a RAID set To create a RAID set and press . 3. Intel(R) Matrix Storage Manager option ROM v8.5.0.1030 ICH10R/DO wRAID5 Copyright(C) 2003-08 Intel Corporation. Enter a name for the RAID set 1. All Rights Reserved. [ CREATE VOLUME MENU ] Name: RAID Level...

User Guide
Page 129
...is selected, press . When the Create Volume item is 16 characters or less. [↑↓]Change [TAB]-Next [ESC]-Previous Menu [ENTER]-Select ASUS Z8NA-D6 Series 5-27 WARNING: ALL DATA ON SELECTED DISKS WILL BE LOST. From the utility main menu, select 1. All Rights Reserved. [ CREATE VOLUME ... to create the RAID volume and return to the main menu, or to go back to 128 KB. Intel(R) Matrix Storage Manager option ROM v8.5.0.1030 ICH10R/DO wRAID5 Copyright(C) 2003-08 Intel Corporation. The following warning message appears. Create RAID Volume and press . The following ...
...is selected, press . When the Create Volume item is 16 characters or less. [↑↓]Change [TAB]-Next [ESC]-Previous Menu [ENTER]-Select ASUS Z8NA-D6 Series 5-27 WARNING: ALL DATA ON SELECTED DISKS WILL BE LOST. From the utility main menu, select 1. All Rights Reserved. [ CREATE VOLUME ... to create the RAID volume and return to the main menu, or to go back to 128 KB. Intel(R) Matrix Storage Manager option ROM v8.5.0.1030 ICH10R/DO wRAID5 Copyright(C) 2003-08 Intel Corporation. The following warning message appears. Create RAID Volume and press . The following ...

User Guide
Page 131
Intel(R) Matrix Storage Manager option ROM v8.5.0.1030 ICH10R/DO wRAID5 Copyright(C) 2003-08 Intel Corporation. ASUS Z8NA-D6 Series 5-29 From the utility main menu, select 2. All Rights Reserved. Use the up/down arrow key to select the RAID set . The following screen ...
Intel(R) Matrix Storage Manager option ROM v8.5.0.1030 ICH10R/DO wRAID5 Copyright(C) 2003-08 Intel Corporation. ASUS Z8NA-D6 Series 5-29 From the utility main menu, select 2. All Rights Reserved. Use the up/down arrow key to select the RAID set . The following screen ...

User Guide
Page 133
Recovery Volume Options and press . Intel(R) Matrix Storage Manager option ROM v8.5.0.1030 ICH10R/DO wRAID5 Copyright(C) 2003-08 Intel Corporation. enables recovery disk if available and disables master disk. Use the up /down arrow key ... main menu, select 4. enables master disk if available and disables recovery disk. Enable Only Recovery Disk 2. Enable Only Master Disk [ HELP ] Enable Only Recovery Disk - ASUS Z8NA-D6 Series 5-31 Actions will result in the section. 5.3.5 Recovery Volume Options If you have created a recovery set, you want, and then press . Use the up...
Recovery Volume Options and press . Intel(R) Matrix Storage Manager option ROM v8.5.0.1030 ICH10R/DO wRAID5 Copyright(C) 2003-08 Intel Corporation. enables recovery disk if available and disables master disk. Use the up /down arrow key ... main menu, select 4. enables master disk if available and disables recovery disk. Enable Only Recovery Disk 2. Enable Only Master Disk [ HELP ] Enable Only Recovery Disk - ASUS Z8NA-D6 Series 5-31 Actions will result in the section. 5.3.5 Recovery Volume Options If you have created a recovery set, you want, and then press . Use the up...

User Guide
Page 134
... destination disk for rebuilding detected. The following warning message appears. [ CONFIRM EXIT ] Are you sure you want to enter the Intel Matrix Storage Manager option ROM utility. 2. If there is a non-RAID SATA Hard Disk available, the utility will prompt to exit): Port Drive Model Serial # Size X XXXXXXXXXXX XXXXXXXX XX.XGB...
... destination disk for rebuilding detected. The following warning message appears. [ CONFIRM EXIT ] Are you sure you want to enter the Intel Matrix Storage Manager option ROM utility. 2. If there is a non-RAID SATA Hard Disk available, the utility will prompt to exit): Port Drive Model Serial # Size X XXXXXXXXXXX XXXXXXXX XX.XGB...

User Guide
Page 135
...reboot the system. 5. Remove the failed SATA hard disk and install a new SATA hard disk of the Intel Matrix Storage Console. 7. ASUS Z8NA-D6 Series 5-33 When finished, the status is changed to Non-RAID 4. To rebuild the RAID with "Rebuild" status will be rebuilt ...with a new hard disk: 1. Exit 3. From the View menu, select Advanced Mode to view the rebuilding status. 3. Intel(R) Matrix Storage Manager option ROM v8.5.0.1030 ICH10R/DO wRAID5 Copyright(C) 2003-08 Intel Corporation. All Rights Reserved. [ MAIN MENU ] 1. Recovery Volume Options RAID Volumes: ID Name 0...
...reboot the system. 5. Remove the failed SATA hard disk and install a new SATA hard disk of the Intel Matrix Storage Console. 7. ASUS Z8NA-D6 Series 5-33 When finished, the status is changed to Non-RAID 4. To rebuild the RAID with "Rebuild" status will be rebuilt ...with a new hard disk: 1. Exit 3. From the View menu, select Advanced Mode to view the rebuilding status. 3. Intel(R) Matrix Storage Manager option ROM v8.5.0.1030 ICH10R/DO wRAID5 Copyright(C) 2003-08 Intel Corporation. All Rights Reserved. [ MAIN MENU ] 1. Recovery Volume Options RAID Volumes: ID Name 0...
User Guide
Page 142
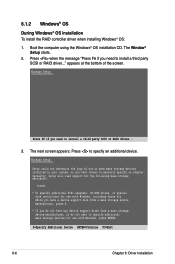
... to install a third party SCSI or RAID driver..." Currently, Setup will load support for the following mass storage devices(s): * To specify additional SCSI adapters, CD-ROM drives, or special disk controllers for use with Windows, including those for use with Windows, press ENTER. Windows Setup Press F6 if you have a device...
... to install a third party SCSI or RAID driver..." Currently, Setup will load support for the following mass storage devices(s): * To specify additional SCSI adapters, CD-ROM drives, or special disk controllers for use with Windows, including those for use with Windows, press ENTER. Windows Setup Press F6 if you have a device...

User Guide
Page 149
When below screen appears, select the floppy disk drive (fd0) as the driver update medium. fd0: Floppy sr0: CD-ROM, TEAC DV-516E sda: Disk, SEAGATE ST336754SS sdb: Disk, SEAGATE ST336754SS Other device OK Back The drivers for the RAID controller are installed to the ... Disabled Installation--Local APIC Disabled Installation--Safe Settings Rescue System Memory Test Boot Options | F1 Help F2 Language F3 1280 x 1024 F4 DVD F5 Driver 6. ASUS Z8NA-D6 6-13 Boot from the Boot Options menu is selected, then press .
When below screen appears, select the floppy disk drive (fd0) as the driver update medium. fd0: Floppy sr0: CD-ROM, TEAC DV-516E sda: Disk, SEAGATE ST336754SS sdb: Disk, SEAGATE ST336754SS Other device OK Back The drivers for the RAID controller are installed to the ... Disabled Installation--Local APIC Disabled Installation--Safe Settings Rescue System Memory Test Boot Options | F1 Help F2 Language F3 1280 x 1024 F4 DVD F5 Driver 6. ASUS Z8NA-D6 6-13 Boot from the Boot Options menu is selected, then press .


