
User Guide
Page 6
... a RAID set 5-29 5.3.4 Resetting disks to Non-RAID 5-30 5.3.5 5.3.6 Recovery Volume Options 5-31 Exiting the Intel® Matrix Storage Manager 5-32 5.3.7 Rebuilding the RAID 5-32 5.3.8 Setting the Boot array in the BIOS Setup Utility 5-34 Chapter 6: Driver installation 6.1 RAID driver installation 6-3 6.1.1 6.1.2 6.1.3 Creating a RAID driver disk 6-3 Windows® OS 6-6 Red Hat® Enterprise Linux OS 6-9 6.1.4 SUSE Linux Enterprise Server OS 6-12 6.2 Intel chipset device software installation 6-15 6.3 LAN driver installation 6-19 6.4 Display driver installation...
... a RAID set 5-29 5.3.4 Resetting disks to Non-RAID 5-30 5.3.5 5.3.6 Recovery Volume Options 5-31 Exiting the Intel® Matrix Storage Manager 5-32 5.3.7 Rebuilding the RAID 5-32 5.3.8 Setting the Boot array in the BIOS Setup Utility 5-34 Chapter 6: Driver installation 6.1 RAID driver installation 6-3 6.1.1 6.1.2 6.1.3 Creating a RAID driver disk 6-3 Windows® OS 6-6 Red Hat® Enterprise Linux OS 6-9 6.1.4 SUSE Linux Enterprise Server OS 6-12 6.2 Intel chipset device software installation 6-15 6.3 LAN driver installation 6-19 6.4 Display driver installation...
User Guide
Page 9
ASUS websites The ASUS website provides updated information on the motherboard. • Chapter 3: Powering up This chapter describes the power up , creating, and configuring RAID sets using the available utilities. • Chapter 6: Driver installation This chapter provides instructions for installing the necessary drivers for different system components. • Appendix: Reference information This appendix includes additional information that may refer to change system settings through the BIOS Setup menus. ix It includes...
ASUS websites The ASUS website provides updated information on the motherboard. • Chapter 3: Powering up This chapter describes the power up , creating, and configuring RAID sets using the available utilities. • Chapter 6: Driver installation This chapter provides instructions for installing the necessary drivers for different system components. • Appendix: Reference information This appendix includes additional information that may refer to change system settings through the BIOS Setup menus. ix It includes...
User Guide
Page 12
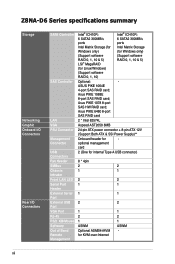
...management card 2 (One for internal Type A USB connector) 8 * 4pin 2 2 1 1 2 2 1 1 1 1 2 2 1 2 1 ASWM Optional ASMB4-iKVM for - xii Asus PIKE 1068E 8-port SAS RAID card; Asus PIKE 1078 8-port SAS HW RAID card; ASUS PIKE 1064E 4-port SAS RAID card; Z8NA-D6 Series specifications summary Storage Networking Graphic Onboard I/O Connectors Rear I/O Connectors SATA Controller SAS Controller LAN VGA PSU Connector Management Connector USB Connectors Fan Header SMBus Chassis Intruder Front LAN LED Serial Port Header External Serial Port External USB Port VGA Port RJ...
...management card 2 (One for internal Type A USB connector) 8 * 4pin 2 2 1 1 2 2 1 1 1 1 2 2 1 2 1 ASWM Optional ASMB4-iKVM for - xii Asus PIKE 1068E 8-port SAS RAID card; Asus PIKE 1078 8-port SAS HW RAID card; ASUS PIKE 1064E 4-port SAS RAID card; Z8NA-D6 Series specifications summary Storage Networking Graphic Onboard I/O Connectors Rear I/O Connectors SATA Controller SAS Controller LAN VGA PSU Connector Management Connector USB Connectors Fan Header SMBus Chassis Intruder Front LAN LED Serial Port Header External Serial Port External USB Port VGA Port RJ...

User Guide
Page 17
... list below. 1.2 Package contents Check your retailer. Discrete 7.1 channel audio card provides clearest high quality sounds ASUS Z8NA-D6 Series 1-3 Thank you start installing the motherboard, and hardware devices on it another standout in your package with Hardware RAID 5, 6, 50, 60 Marvell 8 port SAS RAID card Remote Management solution provides KVM over IP solution. Before you for the following items. Cables SATA data cable Accessories IO shield Application CD Support CD Documentation User Guide...
... list below. 1.2 Package contents Check your retailer. Discrete 7.1 channel audio card provides clearest high quality sounds ASUS Z8NA-D6 Series 1-3 Thank you start installing the motherboard, and hardware devices on it another standout in your package with Hardware RAID 5, 6, 50, 60 Marvell 8 port SAS RAID card Remote Management solution provides KVM over IP solution. Before you for the following items. Cables SATA data cable Accessories IO shield Application CD Support CD Documentation User Guide...
User Guide
Page 38
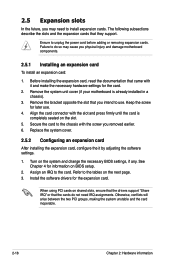
... on the slot. 5. Turn on BIOS setup. 2. Install the software drivers for later use . Ensure to the card. Align the card connector with the slot and press firmly until the card is already installed in a chassis). 3. Assign an IRQ to unplug the power cord before adding or removing expansion cards. Failure to do not need to the chassis with it by adjusting the software settings. 1. Remove the bracket opposite the slot that the cards do...
... on the slot. 5. Turn on BIOS setup. 2. Install the software drivers for later use . Ensure to the card. Align the card connector with the slot and press firmly until the card is already installed in a chassis). 3. Assign an IRQ to unplug the power cord before adding or removing expansion cards. Failure to do not need to the chassis with it by adjusting the software settings. 1. Remove the bracket opposite the slot that the cards do...
User Guide
Page 45
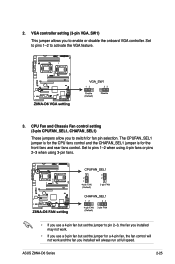
... a 4-pin fan, the fan control will not work . • If you use a 4-pin fan but set the jumper to activate the VGA feature. 3. CPU Fan and Chassis Fan control setting (3-pin CPUFAN_SEL1, CHAFAN_SEL1) These jumpers allow you to switch for fan pin selection. Set to pins 1-2 when using 4-pin fans or pins 2-3 when using 3-pin fans. • If you use a 3-pin fan but set the jumper for the front fans and rear fans control. Set to pins 1-2 to pin 2-3, the fan you installed may not work and the fan you installed will always run at full speed. ASUS Z8NA-D6 Series 2-25...
... a 4-pin fan, the fan control will not work . • If you use a 4-pin fan but set the jumper to activate the VGA feature. 3. CPU Fan and Chassis Fan control setting (3-pin CPUFAN_SEL1, CHAFAN_SEL1) These jumpers allow you to switch for fan pin selection. Set to pins 1-2 when using 4-pin fans or pins 2-3 when using 3-pin fans. • If you use a 3-pin fan but set the jumper for the front fans and rear fans control. Set to pins 1-2 to pin 2-3, the fan you installed may not work and the fan you installed will always run at full speed. ASUS Z8NA-D6 Series 2-25...

User Guide
Page 65
... and update the motherboard Basic Input/Output System (BIOS) setup: 1. A:\>afudos /oOLDBIOS1.rom Main filename Extension name ASUS Z8NA-D6 Series 4-3 4.1 Managing and updating your BIOS The following utilities allow you to copy the current BIOS file that you can use as shown. 1. ASUS CrashFree BIOS 3 (To recover the BIOS using a bootable USB flash disk drive with the updated BIOS file. Copying the current BIOS To copy the current BIOS file using a bootable USB flash disk drive.) 2. Boot the system in DOS mode using the AFUDOS utility: The succeeding BIOS screens...
... and update the motherboard Basic Input/Output System (BIOS) setup: 1. A:\>afudos /oOLDBIOS1.rom Main filename Extension name ASUS Z8NA-D6 Series 4-3 4.1 Managing and updating your BIOS The following utilities allow you to copy the current BIOS file that you can use as shown. 1. ASUS CrashFree BIOS 3 (To recover the BIOS using a bootable USB flash disk drive with the updated BIOS file. Copying the current BIOS To copy the current BIOS file using a bootable USB flash disk drive.) 2. Boot the system in DOS mode using the AFUDOS utility: The succeeding BIOS screens...
User Guide
Page 73
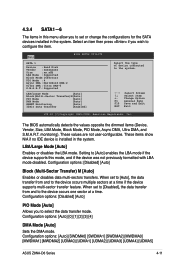
... mode. Main BIOS SETUP UTILITY SATA 1 Device :Hard Disk Vendor :xxxxxxxxx Size :xx.xGB LBA Mode :Supported Block Mode:16Sectors PIO Mode :4 Async DMA :MultiWord DMA-2 Ultra DMA :Ultra DMA-6 S.M.A.R.T.:Supported LBA/Large Mode [Auto] Block(Multi-Sector Transfer)M [Auto] PIO Mode [Auto] DMA Mode [Auto] SMART Monitoring [Auto] 32Bit Data Transfer [Enabled] Select the type of device connected to configure the item. Configuration options: [Disabled] [Auto] Block (Multi-Sector Transfer) M [Auto] Enables or disables data multi-sectors transfers. Change Option...
... mode. Main BIOS SETUP UTILITY SATA 1 Device :Hard Disk Vendor :xxxxxxxxx Size :xx.xGB LBA Mode :Supported Block Mode:16Sectors PIO Mode :4 Async DMA :MultiWord DMA-2 Ultra DMA :Ultra DMA-6 S.M.A.R.T.:Supported LBA/Large Mode [Auto] Block(Multi-Sector Transfer)M [Auto] PIO Mode [Auto] DMA Mode [Auto] SMART Monitoring [Auto] 32Bit Data Transfer [Enabled] Select the type of device connected to configure the item. Configuration options: [Disabled] [Auto] Block (Multi-Sector Transfer) M [Auto] Enables or disables data multi-sectors transfers. Change Option...
User Guide
Page 75
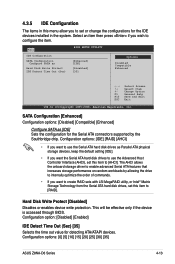
... +- Main BIOS SETUP UTILITY IDE Configuration SATA Configuration [Enhanced] Configure SATA as [IDE] Sets the configuration for detecting ATA/ATAPI devices. Configuration options: [0] [5] [10] [15] [20] [25] [30] [35] ASUS Z8NA-D6 Series 4-13 Change Option F1 General Help F10 Save and Exit ESC Exit v02.61 (C)Copyright 1985-2008, American Megatrends, Inc. Hard Disk Write Protect [Disabled] Disables or enables device write protection. Configuration option: [Disabled] [Enabled] IDE Detect Time Out (Sec) [35] Selects the time out value for the Serial ATA connectors supported by...
... +- Main BIOS SETUP UTILITY IDE Configuration SATA Configuration [Enhanced] Configure SATA as [IDE] Sets the configuration for detecting ATA/ATAPI devices. Configuration options: [0] [5] [10] [15] [20] [25] [30] [35] ASUS Z8NA-D6 Series 4-13 Change Option F1 General Help F10 Save and Exit ESC Exit v02.61 (C)Copyright 1985-2008, American Megatrends, Inc. Hard Disk Write Protect [Disabled] Disables or enables device write protection. Configuration option: [Disabled] [Enabled] IDE Detect Time Out (Sec) [35] Selects the time out value for the Serial ATA connectors supported by...
User Guide
Page 79
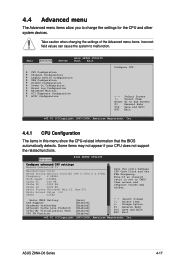
...to change the settings for the CPU and other system devices. Note:If an invalid ratio is set in this menu show the CPU-related information that the BIOS automatically detects. 4.4 Advanced menu The Advanced menu items allow you to malfunction. Main Advanced Server BIOS SETUP UTILITY Boot Exit CPU Configuration Chipset Configuration Legacy Device Configuration USB Configuration PCIPnP Configuration Power On Configuration Event Log Configuration Hardware Monitor PCI Exppress Configuration ACPI Configuration Configure CPU. ←→ Select Screen ↑↓ Select Item Enter Go...
...to change the settings for the CPU and other system devices. Note:If an invalid ratio is set in this menu show the CPU-related information that the BIOS automatically detects. 4.4 Advanced menu The Advanced menu items allow you to malfunction. Main Advanced Server BIOS SETUP UTILITY Boot Exit CPU Configuration Chipset Configuration Legacy Device Configuration USB Configuration PCIPnP Configuration Power On Configuration Event Log Configuration Hardware Monitor PCI Exppress Configuration ACPI Configuration Configure CPU. ←→ Select Screen ↑↓ Select Item Enter Go...
User Guide
Page 84
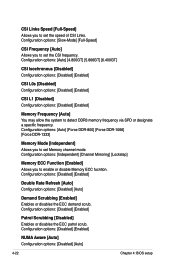
...: [Disabled] [Enabled] NUMA Aware [Auto] Configuration options: [Disabled] [Auto] 4-22 Chapter 4: BIOS setup Configuration options: [Auto] [4.800GT] [5.866GT] [6.400GT] CSI Isochronous [Disabled] Configuration options: [Disabled] [Enabled] CSI L0s [Disabled] Configuration options: [Disabled] [Enabled] CSI L1 [Disabled] Configuration options: [Disabled] [Enabled] Memory Frequency [Auto] You may allow the system to set the speed of CSI Links. Configuration options: [Disabled] [Enabled] Patrol Scrubbing [Disabled] Enables or disables the ECC patrol scrub. Configuration options: [Disabled...
...: [Disabled] [Enabled] NUMA Aware [Auto] Configuration options: [Disabled] [Auto] 4-22 Chapter 4: BIOS setup Configuration options: [Auto] [4.800GT] [5.866GT] [6.400GT] CSI Isochronous [Disabled] Configuration options: [Disabled] [Enabled] CSI L0s [Disabled] Configuration options: [Disabled] [Enabled] CSI L1 [Disabled] Configuration options: [Disabled] [Enabled] Memory Frequency [Auto] You may allow the system to set the speed of CSI Links. Configuration options: [Disabled] [Enabled] Patrol Scrubbing [Disabled] Enables or disables the ECC patrol scrub. Configuration options: [Disabled...
User Guide
Page 86
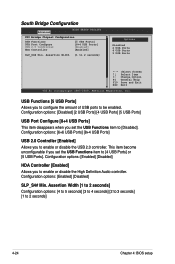
... you to be enabled. South Bridge Configuration Advanced BIOS SETUP UTILITY CPU Bridge Chipset Configuration USB Functions USB Port Configure USB 2.0 Controller HDA Controller [5 USB Ports] [8+4 USB Ports] [Enabled] [Enabled] SLP_S4# Min. USB Functions [5 USB Ports] Allows you set the USB Functions item to [Disabled]. Configuration options: [Disabled] [2 USB Ports] [4 USB Ports] [5 USB Ports] USB Port Configure [8+4 USB Ports] This item disappears when you to configure the amount of USB ports to enable or disable the High Definition Audio controller. This item become...
... you to be enabled. South Bridge Configuration Advanced BIOS SETUP UTILITY CPU Bridge Chipset Configuration USB Functions USB Port Configure USB 2.0 Controller HDA Controller [5 USB Ports] [8+4 USB Ports] [Enabled] [Enabled] SLP_S4# Min. USB Functions [5 USB Ports] Allows you set the USB Functions item to [Disabled]. Configuration options: [Disabled] [2 USB Ports] [4 USB Ports] [5 USB Ports] USB Port Configure [8+4 USB Ports] This item disappears when you to configure the amount of USB ports to enable or disable the High Definition Audio controller. This item become...

User Guide
Page 88
4.4.4 USB Configuration Advanced BIOS SETUP UTILITY USB Configuration Module Version - 2.24.3-13.4 USB Devices Enabled : None Legacy USB Support USB 2.0 Controller Mode BIOS EHCI Hand-Off [Enabled] [HiSpeed] [Enabled] Enables support for legacy USB devices. Configuration options: [Disabled] [Enabled] [Auto] The following item appears only when you set USB Function to [Enabled]. The following item appears only when you set the USB 2.0 controller to detect the presence of USB devices at startup. Setting to [Auto] allows the system to HiSpeed (480Mbps) or FullSpeed (...
4.4.4 USB Configuration Advanced BIOS SETUP UTILITY USB Configuration Module Version - 2.24.3-13.4 USB Devices Enabled : None Legacy USB Support USB 2.0 Controller Mode BIOS EHCI Hand-Off [Enabled] [HiSpeed] [Enabled] Enables support for legacy USB devices. Configuration options: [Disabled] [Enabled] [Auto] The following item appears only when you set USB Function to [Enabled]. The following item appears only when you set the USB 2.0 controller to detect the presence of USB devices at startup. Setting to [Auto] allows the system to HiSpeed (480Mbps) or FullSpeed (...
User Guide
Page 100
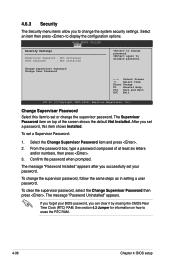
... BIOS password, you set a password, this item to set a Supervisor Password: 1. After you can clear it by erasing the CMOS Real Time Clock (RTC) RAM. To change password. Change Supervisor Password Change User Password ←→ Select Screen ↑↓ Select Item Enter Change F1 General Help F10 Save and Exit ESC Exit v02.61 (C)Copyright 1985-2008, American Megatrends, Inc. From the password box, type a password composed of the screen shows the default Not Installed...
... BIOS password, you set a password, this item to set a Supervisor Password: 1. After you can clear it by erasing the CMOS Real Time Clock (RTC) RAM. To change password. Change Supervisor Password Change User Password ←→ Select Screen ↑↓ Select Item Enter Change F1 General Help F10 Save and Exit ESC Exit v02.61 (C)Copyright 1985-2008, American Megatrends, Inc. From the password box, type a password composed of the screen shows the default Not Installed...
User Guide
Page 101
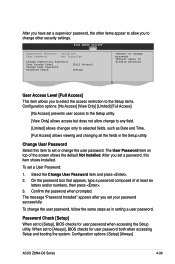
... user password when accessing the Setup utility. again to change password. Password Check [Setup] When set to [Setup], BIOS checks for user password both when accessing Setup and booting the system. Configuration options: [Setup] [Always] ASUS Z8NA-D6 Series 4-39 Confirm the password when prompted. After you have set a supervisor password, the other items appear to allow change to any field. [Limited] allows changes only to selected fields, such as in the Setup utility. Main Advanced BIOS SETUP UTILITY Server Power Boot Tools Exit Supervisor Password : Installed User Password...
... user password when accessing the Setup utility. again to change password. Password Check [Setup] When set to [Setup], BIOS checks for user password both when accessing Setup and booting the system. Configuration options: [Setup] [Always] ASUS Z8NA-D6 Series 4-39 Confirm the password when prompted. After you have set a supervisor password, the other items appear to allow change to any field. [Limited] allows changes only to selected fields, such as in the Setup utility. Main Advanced BIOS SETUP UTILITY Server Power Boot Tools Exit Supervisor Password : Installed User Password...
User Guide
Page 105
... striping and data mirroring combined without parity (redundancy data) having to the entire system. 5.1 Setting up RAID The motherboard comes with the following SATA RAID solutions: • LSI Software RAID Configuration Utility (default) with RAID 0, RAID 1, and RAID 10 support (for both Linux and Windows OS). (Z8NA-D6 model only) • Intel Matrix Storage Manager with the Intel® ICH10R southbridge controller that of a single disk alone, thus improving data access and storage.
... striping and data mirroring combined without parity (redundancy data) having to the entire system. 5.1 Setting up RAID The motherboard comes with the following SATA RAID solutions: • LSI Software RAID Configuration Utility (default) with RAID 0, RAID 1, and RAID 10 support (for both Linux and Windows OS). (Z8NA-D6 model only) • Intel Matrix Storage Manager with the Intel® ICH10R southbridge controller that of a single disk alone, thus improving data access and storage.

User Guide
Page 106
... RAID controller. Enter the BIOS Setup during POST. 2. Set Configure SATA as to save your changes and exit the BIOS Setup. To do this: 1. For example, use the LSI Logic Embedded SATA RAID Setup Utility or the Intel® Matrix Storage Manager if you installed Serial ATA hard disk drives on how to use , you can create a RAID set from SATA hard disk drives attached to the signal connector at the back of the same model and capacity when creating a disk array. 5.1.2 Installing hard disk drives The motherboard supports Serial...
... RAID controller. Enter the BIOS Setup during POST. 2. Set Configure SATA as to save your changes and exit the BIOS Setup. To do this: 1. For example, use the LSI Logic Embedded SATA RAID Setup Utility or the Intel® Matrix Storage Manager if you installed Serial ATA hard disk drives on how to use , you can create a RAID set from SATA hard disk drives attached to the signal connector at the back of the same model and capacity when creating a disk array. 5.1.2 Installing hard disk drives The motherboard supports Serial...
User Guide
Page 107
... system after installing all the SATA hard disk drives. 2. LSI Software RAID Configuration Utility Ver A.60 Jul 30, 2008 BIOS Version A.08.09161344R Management Menu Configure Initialize Objects Rebuild Check Consistency Configure VD(s) Use Cursor Keys to select an option from the connected SATA ODD. 3. Use the arrow keys to Navigate Between Items And Press Enter To Select An Option ASUS Z8NA-D6 Series 5-5 Turn on your screen due to be manually adjusted. Otherwise, the system will not boot from the...
... system after installing all the SATA hard disk drives. 2. LSI Software RAID Configuration Utility Ver A.60 Jul 30, 2008 BIOS Version A.08.09161344R Management Menu Configure Initialize Objects Rebuild Check Consistency Configure VD(s) Use Cursor Keys to select an option from the connected SATA ODD. 3. Use the arrow keys to Navigate Between Items And Press Enter To Select An Option ASUS Z8NA-D6 Series 5-5 Turn on your screen due to be manually adjusted. Otherwise, the system will not boot from the...
User Guide
Page 142
... installation To install the RAID controller driver when installing Windows® OS: 1. The next screen appears. Press to manually specify an adapter. Windows Setup Setup could not determine the type of the screen. Press when the message "Press F6 if you need to install a third party SCSI or RAID driver..." Currently, Setup will load support for the following mass storage devices(s): * To specify additional SCSI adapters, CD-ROM drives, or special disk controllers for use with Windows, press ENTER...
... installation To install the RAID controller driver when installing Windows® OS: 1. The next screen appears. Press to manually specify an adapter. Windows Setup Setup could not determine the type of the screen. Press when the message "Press F6 if you need to install a third party SCSI or RAID driver..." Currently, Setup will load support for the following mass storage devices(s): * To specify additional SCSI adapters, CD-ROM drives, or special disk controllers for use with Windows, press ENTER...

User Guide
Page 162
... devices. The screen display and driver options vary under different operating system versions. 6-26 Chapter 6: Driver installation Install the necessary drivers to run the DVD. 6.5.2 Drivers menu The Drivers menu shows the available device drivers if the system detects installed devices. 6.5 Management applications and utilities installation The support DVD that came with the motherboard package contains the drivers, management applications, and utilities that you can install to locate the file ASSETUP.EXE from the BIN folder. The DVD automatically displays the Drivers menu...
... devices. The screen display and driver options vary under different operating system versions. 6-26 Chapter 6: Driver installation Install the necessary drivers to run the DVD. 6.5.2 Drivers menu The Drivers menu shows the available device drivers if the system detects installed devices. 6.5 Management applications and utilities installation The support DVD that came with the motherboard package contains the drivers, management applications, and utilities that you can install to locate the file ASSETUP.EXE from the BIN folder. The DVD automatically displays the Drivers menu...


