User Guide
Page 8
...yourself. viii These devices could interrupt the grounding circuit. • Ensure that your power supply is broken, do not try to the correct voltage in your area. Operation safety • Before installing the motherboard and adding devices on a stable surface. • If you are using, ...contact your local power company. • If the power supply is set to fix it , carefully read all the manuals that the power cables for the devices are unplugged before ...
...yourself. viii These devices could interrupt the grounding circuit. • Ensure that your power supply is broken, do not try to the correct voltage in your area. Operation safety • Before installing the motherboard and adding devices on a stable surface. • If you are using, ...contact your local power company. • If the power supply is set to fix it , carefully read all the manuals that the power cables for the devices are unplugged before ...
User Guide
Page 12
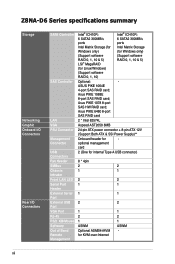
... 1 1 2 2 1 2 1 ASWM Optional ASMB4-iKVM for - Asus PIKE 6480 8-port SAS RAID card 2 * Intel 82574L Aspeed AST2050 8MB 24-pin ATX power connector + 8-pin ATX 12V (Support Both ATX & SSI Power Supply)** Onboard header for KVM-over-Internet 1 2 1 ASWM - xii Z8NA-D6 Series specifications summary Storage Networking Graphic Onboard I/O Connectors Rear I/O Connectors SATA ...5) LSI® MegaRAID RAID 0, 1, 10 & 5) (for Linux/Windows) (Support software RAID 0, 1, 10) Optional: - Asus PIKE 1078 8-port SAS HW RAID card; ASUS PIKE 1064E 4-port SAS RAID card;
... 1 1 2 2 1 2 1 ASWM Optional ASMB4-iKVM for - Asus PIKE 6480 8-port SAS RAID card 2 * Intel 82574L Aspeed AST2050 8MB 24-pin ATX power connector + 8-pin ATX 12V (Support Both ATX & SSI Power Supply)** Onboard header for KVM-over-Internet 1 2 1 ASWM - xii Z8NA-D6 Series specifications summary Storage Networking Graphic Onboard I/O Connectors Rear I/O Connectors SATA ...5) LSI® MegaRAID RAID 0, 1, 10 & 5) (for Linux/Windows) (Support software RAID 0, 1, 10) Optional: - Asus PIKE 1078 8-port SAS HW RAID card; ASUS PIKE 1064E 4-port SAS RAID card;
User Guide
Page 13
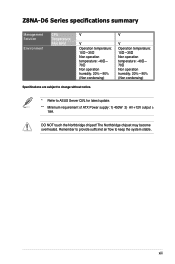
DO NOT touch the Northbridge chipset! Remember to provide sufficinet air flow to ASUS Server QVL for latest update. ** Minimum requirement of ATX Power supply: 1) 450W 2) All +12V output ≥ 18A. The Northbridge chipset may become overheated. Z8NA-D6 Series specifications summary Management Solution Environment CPU Temperature FAN RPM V V V Operation temperature: 10℃-35℃ Non operation...
DO NOT touch the Northbridge chipset! Remember to provide sufficinet air flow to ASUS Server QVL for latest update. ** Minimum requirement of ATX Power supply: 1) 450W 2) All +12V output ≥ 18A. The Northbridge chipset may become overheated. Z8NA-D6 Series specifications summary Management Solution Environment CPU Temperature FAN RPM V V V Operation temperature: 10℃-35℃ Non operation...
User Guide
Page 19
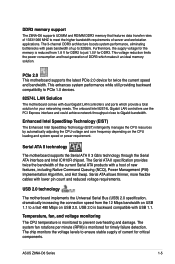
.... PCIe 2.0 This motherboard supports the latest PCIe 2.0 device for timely failure detection. ASUS Z8NA-D6 Series 1-5 The onboard... new features, including Native Command Queuing (NCQ), Power Management (PM) Implementation Algorithm, and Hot Swap....motherboard comes with dual Gigabit LAN controllers and ports which makes it an ideal memory solution. The chip monitors the voltage levels to ensure stable supply of server and workstation applications. Furthermore, the supply voltage for the memory is monitored to prevent overheating and damage. DDR3 memory support The Z8NA-D6...
.... PCIe 2.0 This motherboard supports the latest PCIe 2.0 device for timely failure detection. ASUS Z8NA-D6 Series 1-5 The onboard... new features, including Native Command Queuing (NCQ), Power Management (PM) Implementation Algorithm, and Hot Swap....motherboard comes with dual Gigabit LAN controllers and ports which makes it an ideal memory solution. The chip monitors the voltage levels to ensure stable supply of server and workstation applications. Furthermore, the supply voltage for the memory is monitored to prevent overheating and damage. DDR3 memory support The Z8NA-D6...
User Guide
Page 23
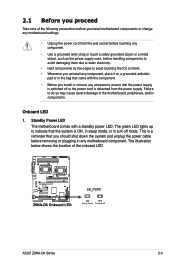
...system is ON, in sleep mode, or in any component, ensure that the power supply is switched off mode. 2.1 Before you proceed Take note of the onboard LED ASUS Z8NA-D6 Series 2-3 Standby Power LED The motherboard comes with the component. • Before you should shut down the system ...and unplug the power cable before removing or plugging in soft-off or the power cord is detached from the power supply. The illustration below shows...
...system is ON, in sleep mode, or in any component, ensure that the power supply is switched off mode. 2.1 Before you proceed Take note of the onboard LED ASUS Z8NA-D6 Series 2-3 Standby Power LED The motherboard comes with the component. • Before you should shut down the system ...and unplug the power cable before removing or plugging in soft-off or the power cord is detached from the power supply. The illustration below shows...
User Guide
Page 37
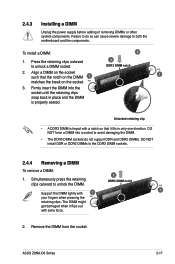
...DIMM from the socket. Unlocked retaining clip • A DDR3 DIMM is properly seated. Press the retaining clips outward to both the motherboard and the components. Firmly insert the DIMM into a socket to avoid damaging the DIMM. • The DDR3 DIMM sockets do so...ASUS Z8NA-D6 Series 2-17 To install a DIMM: 2 1. DO NOT force a DIMM into the socket until the retaining clips snap back in only one direction. Simultaneously press the retaining clips outward to the DDR3 DIMM sockets. 2.4.4 Removing a DIMM To remove a DIMM: 1. 2.4.3 Installing a DIMM Unplug the power supply...
...DIMM from the socket. Unlocked retaining clip • A DDR3 DIMM is properly seated. Press the retaining clips outward to both the motherboard and the components. Firmly insert the DIMM into a socket to avoid damaging the DIMM. • The DDR3 DIMM sockets do so...ASUS Z8NA-D6 Series 2-17 To install a DIMM: 2 1. DO NOT force a DIMM into the socket until the retaining clips snap back in only one direction. Simultaneously press the retaining clips outward to the DDR3 DIMM sockets. 2.4.4 Removing a DIMM To remove a DIMM: 1. 2.4.3 Installing a DIMM Unplug the power supply...

User Guide
Page 55
ASUS Z8NA-D6 Series 2-35 10. BMC header (BMC_FW1) (Z8NA-D6 model only) The BMC connector on the motherboard supports an ASUS® Server Management Board 4 Series (ASMB4). 11. Devices communicate with an SMBus host and/or other SMBus devices using the SMBus interface. Power Supply SMBus connector (5-pin PSUSMB1) This connector allows you to connect SMBus (System Management Bus) to the power supply unit to read PSU information.
ASUS Z8NA-D6 Series 2-35 10. BMC header (BMC_FW1) (Z8NA-D6 model only) The BMC connector on the motherboard supports an ASUS® Server Management Board 4 Series (ASMB4). 11. Devices communicate with an SMBus host and/or other SMBus devices using the SMBus interface. Power Supply SMBus connector (5-pin PSUSMB1) This connector allows you to connect SMBus (System Management Bus) to the power supply unit to read PSU information.

User Guide
Page 56
... above; 12V1 & 12V2 ≥18A.). 2-36 Chapter 2: Hardware information otherwise, the system will not boot up if the power is recommended when configuring a system with more power-consuming devices. ATX power connectors (24-pin ATXPWR1, 8-pin ATX12V1) These connectors are designed to connect the 24+8-pin power plugs; The power supply plugs are for an SSI & ATX power supply plugs.
... above; 12V1 & 12V2 ≥18A.). 2-36 Chapter 2: Hardware information otherwise, the system will not boot up if the power is recommended when configuring a system with more power-consuming devices. ATX power connectors (24-pin ATXPWR1, 8-pin ATX12V1) These connectors are designed to connect the 24+8-pin power plugs; The power supply plugs are for an SSI & ATX power supply plugs.

User Guide
Page 61
... the instructions in the following order: a. ASUS Z8NA-D6 Series 3-3 Ensure that is equipped with ATX power supplies, the system LED lights up . System power 6. After applying power, the system power LED on the system front panel case lights up when you turned on the power, the system may light up or switch ... 30 seconds from the time you press the ATX power button. Connect the power cord to a power outlet that all the connections, replace the system case cover. 2. Turn on test. The system then runs the power-on the screen. At power on the chain) c. Check the jumper settings...
... the instructions in the following order: a. ASUS Z8NA-D6 Series 3-3 Ensure that is equipped with ATX power supplies, the system LED lights up . System power 6. After applying power, the system power LED on the system front panel case lights up when you turned on the power, the system may light up or switch ... 30 seconds from the time you press the ATX power button. Connect the power cord to a power outlet that all the connections, replace the system case cover. 2. Turn on test. The system then runs the power-on the screen. At power on the chain) c. Check the jumper settings...


