Z87M-PLUS User's Manual
Page 21
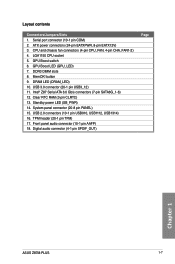
LGA1150 CPU socket 5. DRAM LED (DRAM_LED) 10. Clear RTC RAM (3-pin CLRTC) 13. Digital audio connector (4-1 pin SPDIF_OUT) Page Chapter 1 ASUS Z87M-PLUS 1-7 Standby power LED (SB_PWR) 14. button 9. System panel connector (20-8 pin PANEL) 15. Serial port connector (10-1 pin COM) 2. CPU and chassis fan connectors (4-pin ...
LGA1150 CPU socket 5. DRAM LED (DRAM_LED) 10. Clear RTC RAM (3-pin CLRTC) 13. Digital audio connector (4-1 pin SPDIF_OUT) Page Chapter 1 ASUS Z87M-PLUS 1-7 Standby power LED (SB_PWR) 14. button 9. System panel connector (20-8 pin PANEL) 15. Serial port connector (10-1 pin COM) 2. CPU and chassis fan connectors (4-pin ...
Z87M-PLUS User's Manual
Page 32
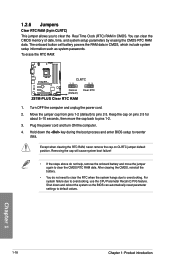
To erase the RTC RAM: Z87M-PLUS CLRTC 12 23 Normal (Default) Z87M-PLUS Clear RTC RAM Clear RTC 1. Except when clearing the RTC RAM, never remove the cap on pins 2-3 for about 5~10 seconds, then move the jumper again to clear the Real Time Clock (RTC) RAM in CMOS, which include system setup information such as ...down and reboot the system so the BIOS can clear the CMOS memory of date, time, and system setup parameters by erasing the CMOS RTC RAM data. For system failure due to reenter data. Removing the cap will cause system boot failure! • If the steps above do not ...
To erase the RTC RAM: Z87M-PLUS CLRTC 12 23 Normal (Default) Z87M-PLUS Clear RTC RAM Clear RTC 1. Except when clearing the RTC RAM, never remove the cap on pins 2-3 for about 5~10 seconds, then move the jumper again to clear the Real Time Clock (RTC) RAM in CMOS, which include system setup information such as ...down and reboot the system so the BIOS can clear the CMOS memory of date, time, and system setup parameters by erasing the CMOS RTC RAM data. For system failure due to reenter data. Removing the cap will cause system boot failure! • If the steps above do not ...
Z87M-PLUS User's Manual
Page 60
... to boot after POST: • Press ++ simultaneously. • Press the reset button on the system chassis. • Press the power button to erase the RTC RAM. • The BIOS setup program does not support the bluetooth devices.
... to boot after POST: • Press ++ simultaneously. • Press the reset button on the system chassis. • Press the power button to erase the RTC RAM. • The BIOS setup program does not support the bluetooth devices.

Z87M-PLUS User's Manual
Page 65
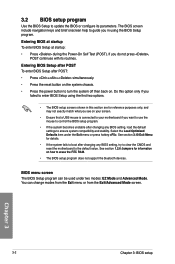
The Main menu provides you an overview of the basic system information, and allows you set the system date, time, language, and security settings. ASUS Z87M-PLUS 3-7 Chapter 3 Security The Security menu items allow you to change the system security settings. • If you enter the Advanced Mode of the...[Installed]. 3.4 Main menu The Main menu screen appears when you have forgotten your BIOS password, erase the CMOS Real Time Clock (RTC) RAM to clear the BIOS password. See section 1.2.6 Jumpers for information on top of the BIOS Setup program. After you to erase the RTC...
The Main menu provides you an overview of the basic system information, and allows you set the system date, time, language, and security settings. ASUS Z87M-PLUS 3-7 Chapter 3 Security The Security menu items allow you to change the system security settings. • If you enter the Advanced Mode of the...[Installed]. 3.4 Main menu The Main menu screen appears when you have forgotten your BIOS password, erase the CMOS Real Time Clock (RTC) RAM to clear the BIOS password. See section 1.2.6 Jumpers for information on top of the BIOS Setup program. After you to erase the RTC...

Z87M-PLUS User's Manual
Page 142
... the internal Intel® SATA ports. • The performance of Intel® Smart Response Technology and Intel® Rapid Storage Technology vary with system memory (RAM) over 4GB under 32-bit Windows® 7 OS. • Intel® 2013 Desktop Responsiveness Technologies is supported only on system configuration. Intel® storage combinations...
... the internal Intel® SATA ports. • The performance of Intel® Smart Response Technology and Intel® Rapid Storage Technology vary with system memory (RAM) over 4GB under 32-bit Windows® 7 OS. • Intel® 2013 Desktop Responsiveness Technologies is supported only on system configuration. Intel® storage combinations...


