
Z87-C User's Manual
Page 1
Z87-C Motherboard
Z87-C Motherboard
Z87-C User's Manual
Page 3
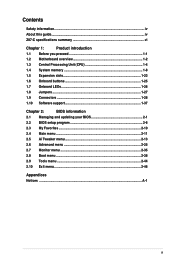
Contents Safety information...iv About this guide...iv Z87-C specifications summary vi Chapter 1: Product introduction 1.1 Before you proceed 1-1 1.2 Motherboard overview 1-2 1.3 Central Processing Unit (CPU 1-4 1.4 System memory 1-8 1.5 Expansion slots 1-23 1.6 Onboard buttons 1-25 1.7 Onboard LEDs 1-26 1.8 Jumpers...1-27 1.9 Connectors 1-28 1.10 Software support 1-37 Chapter 2: ...
Contents Safety information...iv About this guide...iv Z87-C specifications summary vi Chapter 1: Product introduction 1.1 Before you proceed 1-1 1.2 Motherboard overview 1-2 1.3 Central Processing Unit (CPU 1-4 1.4 System memory 1-8 1.5 Expansion slots 1-23 1.6 Onboard buttons 1-25 1.7 Onboard LEDs 1-26 1.8 Jumpers...1-27 1.9 Connectors 1-28 1.10 Software support 1-37 Chapter 2: ...
Z87-C User's Manual
Page 4
... How this guide This user guide contains the information you add a device. • Before connecting or removing signal cables from the motherboard, ensure that all cables are correctly connected and the power cables are not damaged. If you are not sure about the voltage of... the product in your area. If possible, disconnect all power cables from the existing system before you need when installing and configuring the motherboard. These devices could interrupt the grounding circuit. • Ensure that came with the product, contact a qualified service technician or your local...
... How this guide This user guide contains the information you add a device. • Before connecting or removing signal cables from the motherboard, ensure that all cables are correctly connected and the power cables are not damaged. If you are not sure about the voltage of... the product in your area. If possible, disconnect all power cables from the existing system before you need when installing and configuring the motherboard. These devices could interrupt the grounding circuit. • Ensure that came with the product, contact a qualified service technician or your local...
Z87-C User's Manual
Page 9
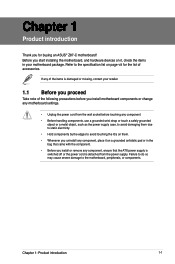
... 1: Product introduction 1-1 Refer to the specification list on page viii for buying an ASUS® Z87-C motherboard! Chapter 1 Product introduction Chapter 1: Product introduction Thank you for the list of the following precautions before you install motherboard components or change any motherboard settings. • Unplug the power cord from the wall socket before touching any component...
... 1: Product introduction 1-1 Refer to the specification list on page viii for buying an ASUS® Z87-C motherboard! Chapter 1 Product introduction Chapter 1: Product introduction Thank you for the list of the following precautions before you install motherboard components or change any motherboard settings. • Unplug the power cord from the wall socket before touching any component...
Z87-C User's Manual
Page 10
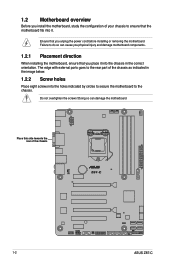
Ensure that you unplug the power cord before installing or removing the motherboard. Doing so can cause you physical injury and damage motherboard components. 1.2.1 Placement direction When installing the motherboard, ensure that you place it . Place this side towards the rear of the chassis 1-2 ASUS Z87-C The edge with external ports goes to the rear part...
Ensure that you unplug the power cord before installing or removing the motherboard. Doing so can cause you physical injury and damage motherboard components. 1.2.1 Placement direction When installing the motherboard, ensure that you place it . Place this side towards the rear of the chassis 1-2 ASUS Z87-C The edge with external ports goes to the rear part...
Z87-C User's Manual
Page 11
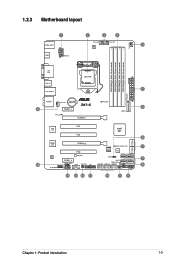
1.2.3 Motherboard layout Chapter 1: Product introduction 1-3
1.2.3 Motherboard layout Chapter 1: Product introduction 1-3
Z87-C User's Manual
Page 12
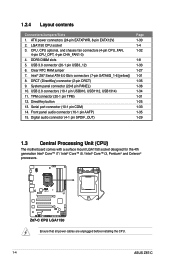
... 1-30 1-4 1-32 1-8 1-33 1-27 1-31 1-35 1-36 1-34 1-31 1-25 1-33 1-35 1-29 1.3 Central Processing Unit (CPU) The motherboard comes with a surface mount LGA1150 socket designed for the 4th generation Intel® Core™ i7 / Intel® Core™ i5 / Intel® ...-6 [yellow]) 8. USB 2.0 connectors (10-1 pin USB910, USB1112, USB1314) 11. Ensure that all power cables are unplugged before installing the CPU. 1-4 ASUS Z87-C LGA1150 CPU socket 3. Serial port connector (10-1 pin COM) 14. Front panel audio connector (10-1 pin AAFP) 15. 1.2.4 Layout contents Connectors/Jumpers...
... 1-30 1-4 1-32 1-8 1-33 1-27 1-31 1-35 1-36 1-34 1-31 1-25 1-33 1-35 1-29 1.3 Central Processing Unit (CPU) The motherboard comes with a surface mount LGA1150 socket designed for the 4th generation Intel® Core™ i7 / Intel® Core™ i5 / Intel® ...-6 [yellow]) 8. USB 2.0 connectors (10-1 pin USB910, USB1112, USB1314) 11. Ensure that all power cables are unplugged before installing the CPU. 1-4 ASUS Z87-C LGA1150 CPU socket 3. Serial port connector (10-1 pin COM) 14. Front panel audio connector (10-1 pin AAFP) 15. 1.2.4 Layout contents Connectors/Jumpers...
Z87-C User's Manual
Page 13
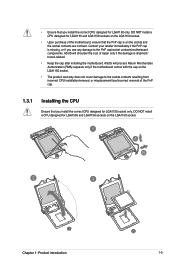
... with the cap on the LGA1150 socket. • The product warranty does not cover damage to the PnP cap/socket contacts/motherboard components. ASUS will shoulder the cost of repair only if the damage is on the LGA1150 socket. Contact your retailer immediately if the PnP cap is missing, ...
... with the cap on the LGA1150 socket. • The product warranty does not cover damage to the PnP cap/socket contacts/motherboard components. ASUS will shoulder the cost of repair only if the damage is on the LGA1150 socket. Contact your retailer immediately if the PnP cap is missing, ...

Z87-C User's Manual
Page 16
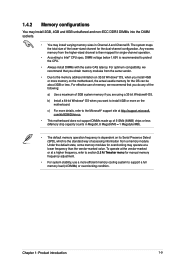
A DDR3 module is notched differently from a DDR or DDR2 module. Recommended memory configurations Install one memory module in slot A2 first as a single-channel operation. 1-8 ASUS Z87-C DO NOT install a DDR or DDR2 memory module to the DDR3 slot. 1.4 System memory 1.4.1 Overview The motherboard comes with four Double Data Rate 3 (DDR3) Dual In-line Memory Modules (DIMM) slots.
A DDR3 module is notched differently from a DDR or DDR2 module. Recommended memory configurations Install one memory module in slot A2 first as a single-channel operation. 1-8 ASUS Z87-C DO NOT install a DDR or DDR2 memory module to the DDR3 slot. 1.4 System memory 1.4.1 Overview The motherboard comes with four Double Data Rate 3 (DDR3) Dual In-line Memory Modules (DIMM) slots.
Z87-C User's Manual
Page 17
... actual usable memory for the OS can be about 3GB or less. c) For more memory on the motherboard. com/kb/929605/en-us. • This motherboard does not support DIMMs made up of 512Mb (64MB) chips or less (Memory chip capacity counts in Channel A and Channel B. Under the default state, some ...
... actual usable memory for the OS can be about 3GB or less. c) For more memory on the motherboard. com/kb/929605/en-us. • This motherboard does not support DIMMs made up of 512Mb (64MB) chips or less (Memory chip capacity counts in Channel A and Channel B. Under the default state, some ...

Z87-C User's Manual
Page 18
...Timing Voltage 11-13-13-35 1.65V DIMM socket support (Optional) 124 ••• DDR3 2500(O.C.) MHz capability Vendors Part No. Z87-C Motherboard Qualified Vendors Lists (QVL) DDR3 2800(O.C.) MHz capability Vendors Part No. DS - - Size APACER 78.BAGFF.AFC0C APACER 78.CAGFF.AFD0C ...SS/ Chip Chip Timing DS Brand NO. Timing 10-11-11-31 Voltage 1.65 DIMM socket support (Optional) 1 24 • •• 1-10 ASUS Z87-C Size AX3U2600GW8G11-DG2 16GB (2x4GB) SS/ Chip Chip DS Brand NO. G.SKILL F3-20000CL10Q-16GBZHD(XMP) 16GB (4x4GB) DS - - Size SS/ ...
...Timing Voltage 11-13-13-35 1.65V DIMM socket support (Optional) 124 ••• DDR3 2500(O.C.) MHz capability Vendors Part No. Z87-C Motherboard Qualified Vendors Lists (QVL) DDR3 2800(O.C.) MHz capability Vendors Part No. DS - - Size APACER 78.BAGFF.AFC0C APACER 78.CAGFF.AFD0C ...SS/ Chip Chip Timing DS Brand NO. Timing 10-11-11-31 Voltage 1.65 DIMM socket support (Optional) 1 24 • •• 1-10 ASUS Z87-C Size AX3U2600GW8G11-DG2 16GB (2x4GB) SS/ Chip Chip DS Brand NO. G.SKILL F3-20000CL10Q-16GBZHD(XMP) 16GB (4x4GB) DS - - Size SS/ ...
Z87-C User's Manual
Page 31
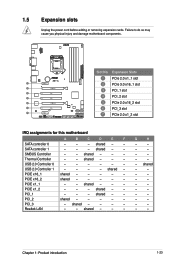
... - - - shared - - - Expansion Slots PCIe 2.0 x1_1 slot PCIe 3.0 x16_1 slot PCI_1 slot PCI_2 slot PCIe 2.0 x16_2 slot PCI_3 slot PCIe 2.0 x1_2 slot IRQ assignments for this motherboard A B C D E F SATA controller 0 - - - shared - - - PCI_1 - - - PCI_3 - Realtek LAN - - SATA controller 1 - - - USB 2.0 Controller 0 - - - - - - PCIE x16_1 shared - - - - - shared - - PCI_2 shared - - - - - shared - - - - USB 2.0 Controller 1 - - - - shared - - - G H - - - - - - - - - shared...
... - - - shared - - - Expansion Slots PCIe 2.0 x1_1 slot PCIe 3.0 x16_1 slot PCI_1 slot PCI_2 slot PCIe 2.0 x16_2 slot PCI_3 slot PCIe 2.0 x1_2 slot IRQ assignments for this motherboard A B C D E F SATA controller 0 - - - shared - - - PCI_1 - - - PCI_3 - Realtek LAN - - SATA controller 1 - - - USB 2.0 Controller 0 - - - - - - PCIE x16_1 shared - - - - - shared - - PCI_2 shared - - - - - shared - - - - USB 2.0 Controller 1 - - - - shared - - - G H - - - - - - - - - shared...
Z87-C User's Manual
Page 32
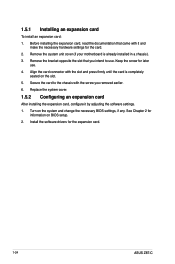
... the system and change the necessary BIOS settings, if any. Keep the screw for the expansion card. 1-24 ASUS Z87-C Install the software drivers for later use . Remove the system unit cover (if your motherboard is completely seated on the slot. 5. Remove the bracket opposite the slot that came with the screw you...
... the system and change the necessary BIOS settings, if any. Keep the screw for the expansion card. 1-24 ASUS Z87-C Install the software drivers for later use . Remove the system unit cover (if your motherboard is completely seated on the slot. 5. Remove the bracket opposite the slot that came with the screw you...
Z87-C User's Manual
Page 34
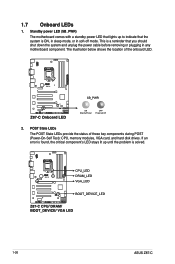
... with a standby power LED that lights up until the problem is ON, in sleep mode, or in any motherboard component. If an error is found, the critical component's LED stays lit up to indicate that you should shut down the system and unplug the ... components during POST (Power-On-Self Test): CPU, memory modules, VGA card, and hard disk drives. This is a reminder that the system is solved. 1-26 ASUS Z87-C 1.7 Onboard LEDs 1.
... with a standby power LED that lights up until the problem is ON, in sleep mode, or in any motherboard component. If an error is found, the critical component's LED stays lit up to indicate that you should shut down the system and unplug the ... components during POST (Power-On-Self Test): CPU, memory modules, VGA card, and hard disk drives. This is a reminder that the system is solved. 1-26 ASUS Z87-C 1.7 Onboard LEDs 1.
Z87-C User's Manual
Page 40
These are not jumpers! Insufficient air flow inside the system may damage the motherboard components. 5. Do not forget to connect the fan cables to the motherboard connector labeled CHA_FAN1-3 for better thermal environment. 1-32 ASUS Z87-C CPU, CPU optional, and chassis fan connectors (4-pin CPU_FAN; 4-pin CPU_OPT; 4-pin...and CHA_FAN 1-3 connectors support the ASUS FAN Xpert 2 feature. • If you install two VGA cards, we recommend that the black wire of each cable matches the ground pin of the connector. Do not place jumper caps on the motherboard, ensuring that you plug the ...
These are not jumpers! Insufficient air flow inside the system may damage the motherboard components. 5. Do not forget to connect the fan cables to the motherboard connector labeled CHA_FAN1-3 for better thermal environment. 1-32 ASUS Z87-C CPU, CPU optional, and chassis fan connectors (4-pin CPU_FAN; 4-pin CPU_OPT; 4-pin...and CHA_FAN 1-3 connectors support the ASUS FAN Xpert 2 feature. • If you install two VGA cards, we recommend that the black wire of each cable matches the ground pin of the connector. Do not place jumper caps on the motherboard, ensuring that you plug the ...

Z87-C User's Manual
Page 42
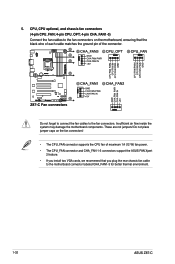
USB1314) These connectors are for USB 2.0 ports. These USB connectors comply with USB 2.0 specification that supports up to the USB connectors. Never connect a 1394 cable to 480 Mbps connection speed. 8. Connect the USB module cable to any of these connectors, then install the module to a slot opening at the back of the system chassis. USB 2.0 connectors (10-1 pin USB910; Doing so will damage the motherboard! 1-34 ASUS Z87-C USB1112;
USB1314) These connectors are for USB 2.0 ports. These USB connectors comply with USB 2.0 specification that supports up to the USB connectors. Never connect a 1394 cable to 480 Mbps connection speed. 8. Connect the USB module cable to any of these connectors, then install the module to a slot opening at the back of the system chassis. USB 2.0 connectors (10-1 pin USB910; Doing so will damage the motherboard! 1-34 ASUS Z87-C USB1112;
Z87-C User's Manual
Page 43
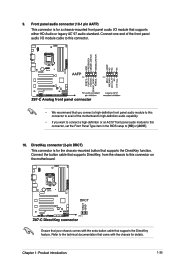
... chassis-mounted button that supports the DirectKey function. 9. DirectKey connector (2-pin DRCT) This connector is for details. Refer to this connector on the motherboard. Ensure that your chassis comes with the chassis for a chassis-mounted front panel audio I /O module cable to this connector. • We ... that came with the extra button cable that supports either HD Audio or legacy AC`97 audio standard. Connect one end of the motherboard's high-definition audio capability. • If you want to connect a high-definition or an AC'97 front panel audio module to...
... chassis-mounted button that supports the DirectKey function. 9. DirectKey connector (2-pin DRCT) This connector is for details. Refer to this connector on the motherboard. Ensure that your chassis comes with the chassis for a chassis-mounted front panel audio I /O module cable to this connector. • We ... that came with the extra button cable that supports either HD Audio or legacy AC`97 audio standard. Connect one end of the motherboard's high-definition audio capability. • If you want to connect a high-definition or an AC'97 front panel audio module to...
Z87-C User's Manual
Page 45
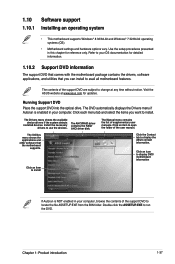
Click each menu tab and select the items you can install to avail all motherboard features. The Utilities menu shows the applications and other software that you want to change at www.asus.com for updates. Chapter 1: Product introduction 1-37 Install the necessary drivers to run the DVD....Drivers menu if Autorun is NOT enabled in your computer, browse the contents of supplementary user manuals. Click an icon to display DVD/ motherboard information Click an item to locate the file ASSETUP.EXE from the BIN folder. The AHCI/RAID driver contains the RAID/ AHCI driver...
Click each menu tab and select the items you can install to avail all motherboard features. The Utilities menu shows the applications and other software that you want to change at www.asus.com for updates. Chapter 1: Product introduction 1-37 Install the necessary drivers to run the DVD....Drivers menu if Autorun is NOT enabled in your computer, browse the contents of supplementary user manuals. Click an icon to display DVD/ motherboard information Click an item to locate the file ASSETUP.EXE from the BIN folder. The AHCI/RAID driver contains the RAID/ AHCI driver...
Z87-C User's Manual
Page 47
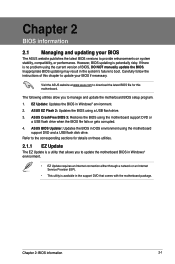
... Updater: Updates the BIOS in Windows® environment. 2. EZ Update: Updates the BIOS in DOS environment using the current version of this motherboard. ASUS EZ Flash 2: Updates the BIOS using the motherboard support DVD or a USB flash drive when the BIOS file fails or gets corrupted. 4. Chapter 2: BIOS information Chapter 2 BIOS information 2.1 Managing...
... Updater: Updates the BIOS in Windows® environment. 2. EZ Update: Updates the BIOS in DOS environment using the current version of this motherboard. ASUS EZ Flash 2: Updates the BIOS using the motherboard support DVD or a USB flash drive when the BIOS file fails or gets corrupted. 4. Chapter 2: BIOS information Chapter 2 BIOS information 2.1 Managing...

Z87-C User's Manual
Page 49
...or gets corrupted during the updating process. The utility automatically checks the devices for the BIOS file. Chapter 2: BIOS information 2-3 Turn on the ASUS official website. Insert the support DVD to the optical drive or the USB flash drive that you press to load default BIOS values. To ...system compatibility and stability, we recommend that contains the BIOS file to the USB port. 3. Doing so can restore a corrupted BIOS file using the motherboard support DVD or a USB flash drive that contains the updated BIOS file. • Before using this utility, rename the BIOS file in the ...
...or gets corrupted during the updating process. The utility automatically checks the devices for the BIOS file. Chapter 2: BIOS information 2-3 Turn on the ASUS official website. Insert the support DVD to the optical drive or the USB flash drive that you press to load default BIOS values. To ...system compatibility and stability, we recommend that contains the BIOS file to the USB port. 3. Doing so can restore a corrupted BIOS file using the motherboard support DVD or a USB flash drive that contains the updated BIOS file. • Before using this utility, rename the BIOS file in the ...


