Z87-C User's Manual
Page 9
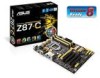
... a grounded antistatic pad or in your retailer. 1.1 Before you start installing the motherboard, and hardware devices on it on page viii for buying an ASUS® Z87-C motherboard! Failure to do so may cause severe damage to avoid touching the ICs on them. • Whenever you install or remove any of the...
... a grounded antistatic pad or in your retailer. 1.1 Before you start installing the motherboard, and hardware devices on it on page viii for buying an ASUS® Z87-C motherboard! Failure to do so may cause severe damage to avoid touching the ICs on them. • Whenever you install or remove any of the...
Z87-C User's Manual
Page 10
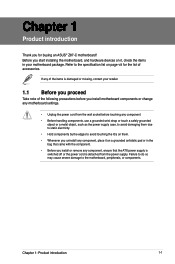
... the image below. 1.2.2 Screw holes Place eight screws into the holes indicated by circles to secure the motherboard to the rear part of the chassis 1-2 ASUS Z87-C Doing so can cause you physical injury and damage motherboard components. 1.2.1 Placement direction When installing the motherboard, ensure that you install the motherboard, study the...
... the image below. 1.2.2 Screw holes Place eight screws into the holes indicated by circles to secure the motherboard to the rear part of the chassis 1-2 ASUS Z87-C Doing so can cause you physical injury and damage motherboard components. 1.2.1 Placement direction When installing the motherboard, ensure that you install the motherboard, study the...
Z87-C User's Manual
Page 12
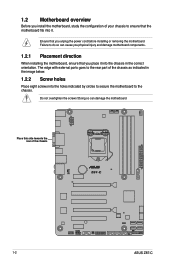
...™ i3, Pentium® and Celeron® processors. 1.2.4 Layout contents Connectors/Jumpers/Slots 1. Ensure that all power cables are unplugged before installing the CPU. 1-4 ASUS Z87-C Intel® Z87 Serial ATA 6.0 Gb/s connectors (7-pin SATA6G_1-6 [yellow]) 8. LGA1150 CPU socket 3. USB 3.0 connector (20-1 pin USB3_12) 6. System panel connector (20-8 pin PANEL) 10. TPM connector...
...™ i3, Pentium® and Celeron® processors. 1.2.4 Layout contents Connectors/Jumpers/Slots 1. Ensure that all power cables are unplugged before installing the CPU. 1-4 ASUS Z87-C Intel® Z87 Serial ATA 6.0 Gb/s connectors (7-pin SATA6G_1-6 [yellow]) 8. LGA1150 CPU socket 3. USB 3.0 connector (20-1 pin USB3_12) 6. System panel connector (20-8 pin PANEL) 10. TPM connector...

Z87-C User's Manual
Page 16
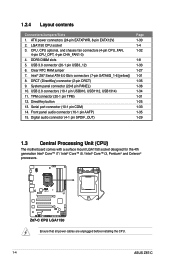
DO NOT install a DDR or DDR2 memory module to the DDR3 slot. Recommended memory configurations Install one memory module in slot A2 first as a single-channel operation. 1-8 ASUS Z87-C 1.4 System memory 1.4.1 Overview The motherboard comes with four Double Data Rate 3 (DDR3) Dual In-line Memory Modules (DIMM) slots. A DDR3 module is notched differently from a DDR or DDR2 module.
DO NOT install a DDR or DDR2 memory module to the DDR3 slot. Recommended memory configurations Install one memory module in slot A2 first as a single-channel operation. 1-8 ASUS Z87-C 1.4 System memory 1.4.1 Overview The motherboard comes with four Double Data Rate 3 (DDR3) Dual In-line Memory Modules (DIMM) slots. A DDR3 module is notched differently from a DDR or DDR2 module.

Z87-C User's Manual
Page 18
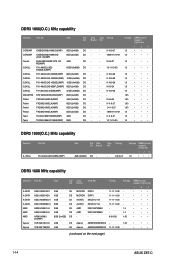
...; • DDR3 2666(O.C.) MHz capability Vendors Part No. DS - - Timing 10-11-11-31 Voltage 1.65 DIMM socket support (Optional) 1 24 • •• 1-10 ASUS Z87-C SS DS DS DS DS DS SS DS DS - - 12-13-13-35 - 12-13-13-35 - 11-13-13-35 - 11-13-13-35...) SS/ Chip Chip Timing DS Brand NO. Size AX3U2600GW8G11-DG2 16GB (2x4GB) SS/ Chip Chip DS Brand NO. Size SS/ Chip Chip DS Brand NO. Z87-C Motherboard Qualified Vendors Lists (QVL) DDR3 2800(O.C.) MHz capability Vendors Part No. G.SKILL F3-20000CL10Q-16GBZHD(XMP) 16GB (4x4GB) DS - - Size SS/ DS G.SKILL ...
...; • DDR3 2666(O.C.) MHz capability Vendors Part No. DS - - Timing 10-11-11-31 Voltage 1.65 DIMM socket support (Optional) 1 24 • •• 1-10 ASUS Z87-C SS DS DS DS DS DS SS DS DS - - 12-13-13-35 - 12-13-13-35 - 11-13-13-35 - 11-13-13-35...) SS/ Chip Chip Timing DS Brand NO. Size AX3U2600GW8G11-DG2 16GB (2x4GB) SS/ Chip Chip DS Brand NO. Size SS/ Chip Chip DS Brand NO. Z87-C Motherboard Qualified Vendors Lists (QVL) DDR3 2800(O.C.) MHz capability Vendors Part No. G.SKILL F3-20000CL10Q-16GBZHD(XMP) 16GB (4x4GB) DS - - Size SS/ DS G.SKILL ...
Z87-C User's Manual
Page 22
...; • • • • Apacer AM5D5908DEQSCK - 1.65 • • • Apacer AM5D6008BQQSCK 11-11-11-28 - • • • (continued on the next page) 1-14 ASUS Z87-C DDR3 1866(O.C.) MHz capability Vendors Part No. Size SS/ DS A-DATA A-DATA A-DATA A-DATA AMD AMD AMD Apacer Apacer AD3U1600C2G11 2GB SS AD3U1600C4G11 4GB DS...
...; • • • • Apacer AM5D5908DEQSCK - 1.65 • • • Apacer AM5D6008BQQSCK 11-11-11-28 - • • • (continued on the next page) 1-14 ASUS Z87-C DDR3 1866(O.C.) MHz capability Vendors Part No. Size SS/ DS A-DATA A-DATA A-DATA A-DATA AMD AMD AMD Apacer Apacer AD3U1600C2G11 2GB SS AD3U1600C4G11 4GB DS...

Z87-C User's Manual
Page 24
...; • • • • • • • • • • • • • • • • • • • • • • • • 1-16 ASUS Z87-C Timing DS Brand EKM324L28BP8I16(XMP) 4GB (2x2GB) DS EKM324L28BP8I16(XMP) 4GB (2x2GB) DS M2X2G64CB88 G7N- 2GB SS DG(XMP) M2X4G64CB8HG 4GB DS 5N-DG(XMP...
...; • • • • • • • • • • • • • • • • • • • • • • • • 1-16 ASUS Z87-C Timing DS Brand EKM324L28BP8I16(XMP) 4GB (2x2GB) DS EKM324L28BP8I16(XMP) 4GB (2x2GB) DS M2X2G64CB88 G7N- 2GB SS DG(XMP) M2X4G64CB8HG 4GB DS 5N-DG(XMP...

Z87-C User's Manual
Page 26
... 2GB 9-9-9-24 1.5 9-9-9-24 1.5 9 - 9-9-9-24 1.5 • • • • • • • • • • • - - 9-9-9-24 1.5 • • • (continued on the next page) 1-18 ASUS Z87-C DDR3 1333 MHz capability Vendors Part No. SAMSUNG K4B1G0846F Timing - Voltage DIMM socket support (Optional) 12 4 - • • • SAMSUNG K4B1G0846F(ECC) - - • • •...
... 2GB 9-9-9-24 1.5 9-9-9-24 1.5 9 - 9-9-9-24 1.5 • • • • • • • • • • • - - 9-9-9-24 1.5 • • • (continued on the next page) 1-18 ASUS Z87-C DDR3 1333 MHz capability Vendors Part No. SAMSUNG K4B1G0846F Timing - Voltage DIMM socket support (Optional) 12 4 - • • • SAMSUNG K4B1G0846F(ECC) - - • • •...

Z87-C User's Manual
Page 30
To remove a DIMM 1-22 ASUS Z87-C
To remove a DIMM 1-22 ASUS Z87-C
Z87-C User's Manual
Page 32
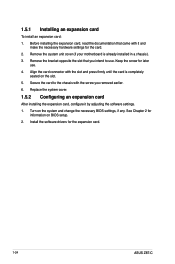
... the system cover. 1.5.2 Configuring an expansion card After installing the expansion card, configure it and make the necessary hardware settings for the expansion card. 1-24 ASUS Z87-C
... the system cover. 1.5.2 Configuring an expansion card After installing the expansion card, configure it and make the necessary hardware settings for the expansion card. 1-24 ASUS Z87-C
Z87-C User's Manual
Page 34
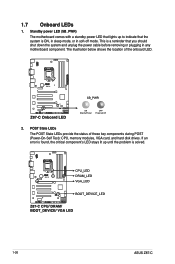
This is a reminder that the system is solved. 1-26 ASUS Z87-C Standby power LED (SB_PWR) The motherboard comes with a standby power LED that lights up until the problem is ON, in sleep mode, or in any ...
This is a reminder that the system is solved. 1-26 ASUS Z87-C Standby power LED (SB_PWR) The motherboard comes with a standby power LED that lights up until the problem is ON, in sleep mode, or in any ...

Z87-C User's Manual
Page 36
... Linked BLINKING Data activity Speed LED Status Description OFF 10Mbps connection ORANGE 100Mbps connection GREEN 1Gbps connection ACT/LINK LED SPEED LED LAN port 1-28 ASUS Z87-C USB 3.0 ports 5 and 6 4. HDMI port 7. 1.9 Connectors 1.9.1 Rear panel connectors Rear panel connectors 1. Intel® LAN (RJ-45) port...
... Linked BLINKING Data activity Speed LED Status Description OFF 10Mbps connection ORANGE 100Mbps connection GREEN 1Gbps connection ACT/LINK LED SPEED LED LAN port 1-28 ASUS Z87-C USB 3.0 ports 5 and 6 4. HDMI port 7. 1.9 Connectors 1.9.1 Rear panel connectors Rear panel connectors 1. Intel® LAN (RJ-45) port...
Z87-C User's Manual
Page 38
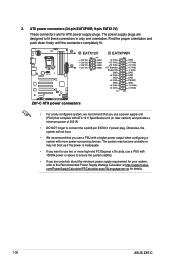
... (24-pin EATXPWR; 8-pin EATX12V) These connectors are designed to connect the 4-pin/8-pin EATX12 V power plug. The power supply plugs are for details. 1-30 ASUS Z87-C Otherwise, the system will not boot. • We recommend that complies with 1000W power or above to the Recommended Power Supply Wattage Calculator at http...
... (24-pin EATXPWR; 8-pin EATX12V) These connectors are designed to connect the 4-pin/8-pin EATX12 V power plug. The power supply plugs are for details. 1-30 ASUS Z87-C Otherwise, the system will not boot. • We recommend that complies with 1000W power or above to the Recommended Power Supply Wattage Calculator at http...
Z87-C User's Manual
Page 40
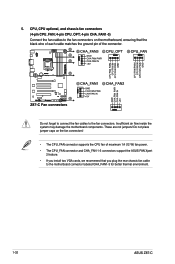
... of each cable matches the ground pin of maximum 1A (12 W) fan power. • The CPU_FAN connector and CHA_FAN 1-3 connectors support the ASUS FAN Xpert 2 feature. • If you install two VGA cards, we recommend that you plug the rear chassis fan cable to the motherboard ...connector labeled CHA_FAN1-3 for better thermal environment. 1-32 ASUS Z87-C CPU, CPU optional, and chassis fan connectors (4-pin CPU_FAN; 4-pin CPU_OPT; 4-pin CHA_FAN1-3) Connect the fan cables to the fan connectors. ...
... of each cable matches the ground pin of maximum 1A (12 W) fan power. • The CPU_FAN connector and CHA_FAN 1-3 connectors support the ASUS FAN Xpert 2 feature. • If you install two VGA cards, we recommend that you plug the rear chassis fan cable to the motherboard ...connector labeled CHA_FAN1-3 for better thermal environment. 1-32 ASUS Z87-C CPU, CPU optional, and chassis fan connectors (4-pin CPU_FAN; 4-pin CPU_OPT; 4-pin CHA_FAN1-3) Connect the fan cables to the fan connectors. ...

Z87-C User's Manual
Page 42
USB1112; These USB connectors comply with USB 2.0 specification that supports up to the USB connectors. USB 2.0 connectors (10-1 pin USB910; Doing so will damage the motherboard! 1-34 ASUS Z87-C Never connect a 1394 cable to 480 Mbps connection speed. USB1314) These connectors are for USB 2.0 ports. Connect the USB module cable to any of these connectors, then install the module to a slot opening at the back of the system chassis. 8.
USB1112; These USB connectors comply with USB 2.0 specification that supports up to the USB connectors. USB 2.0 connectors (10-1 pin USB910; Doing so will damage the motherboard! 1-34 ASUS Z87-C Never connect a 1394 cable to 480 Mbps connection speed. USB1314) These connectors are for USB 2.0 ports. Connect the USB module cable to any of these connectors, then install the module to a slot opening at the back of the system chassis. 8.

Z87-C User's Manual
Page 44
... system beeps and warnings. • ATX power button/soft-off button (2-pin PWRSW) This connector is in sleep or soft-off the system power. 1-36 ASUS Z87-C Pressing the power button turns the system on the system power, and blinks when the system is for the system power button. System panel connector...
... system beeps and warnings. • ATX power button/soft-off button (2-pin PWRSW) This connector is in sleep or soft-off the system power. 1-36 ASUS Z87-C Pressing the power button turns the system on the system power, and blinks when the system is for the system power button. System panel connector...

Z87-C User's Manual
Page 48
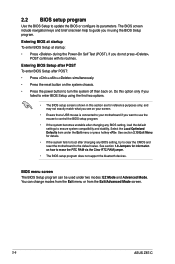
2.1.2 ASUS EZ Flash 2 The ASUS EZ Flash 2 feature allows you start using an OS‑based utility or a bootable floppy disk....flash disk that contains the latest BIOS file to find the BIOS file, and then press to prevent system boot failure! 2-2 ASUS Z87-C Reboot the system when the update process is done. • This function supports USB flash disks with FAT 32/16 ... updating the BIOS to perform the BIOS update process. Go to the Tool menu to select ASUS EZ Flash 2 Utility and press to update the BIOS without using this utility, download the latest BIOS file from the...
2.1.2 ASUS EZ Flash 2 The ASUS EZ Flash 2 feature allows you start using an OS‑based utility or a bootable floppy disk....flash disk that contains the latest BIOS file to find the BIOS file, and then press to prevent system boot failure! 2-2 ASUS Z87-C Reboot the system when the update process is done. • This function supports USB flash disks with FAT 32/16 ... updating the BIOS to perform the BIOS update process. Go to the Tool menu to select ASUS EZ Flash 2 Utility and press to update the BIOS without using this utility, download the latest BIOS file from the...

Z87-C User's Manual
Page 50
...disk due to FreeDOS (http://www.freedos.org)! Turn off the computer and disconnect all SATA hard disk drives (optional). When the ASUS Logo appears, press to the USB port. 2. Insert the support DVD into the optical drive and select the optical drive as shown....when the BIOS fails or gets corrupted during the updating process. This utility also allows you to boot using defaults 3. C:\>d: D:\> 2-4 ASUS Z87-C 2.1.4 ASUS BIOS Updater The ASUS BIOS Updater allows you to Drive D (USB flash drive). The succeeding utility screens are for reference only. Download the latest BIOS ...
...disk due to FreeDOS (http://www.freedos.org)! Turn off the computer and disconnect all SATA hard disk drives (optional). When the ASUS Logo appears, press to the USB port. 2. Insert the support DVD into the optical drive and select the optical drive as shown....when the BIOS fails or gets corrupted during the updating process. This utility also allows you to boot using defaults 3. C:\>d: D:\> 2-4 ASUS Z87-C 2.1.4 ASUS BIOS Updater The ASUS BIOS Updater allows you to Drive D (USB flash drive). The succeeding utility screens are for reference only. Download the latest BIOS ...
Z87-C User's Manual
Page 52
... Mode and Advanced Mode. BIOS menu screen The BIOS Setup program can change modes from the Exit menu or from the Exit/Advanced Mode screen. 2-6 ASUS Z87-C The BIOS screen include navigation keys and brief onscreen help to turn the system off then back on how to erase the RTC RAM via...
... Mode and Advanced Mode. BIOS menu screen The BIOS Setup program can change modes from the Exit menu or from the Exit/Advanced Mode screen. 2-6 ASUS Z87-C The BIOS screen include navigation keys and brief onscreen help to turn the system off then back on how to erase the RTC RAM via...
Z87-C User's Manual
Page 54
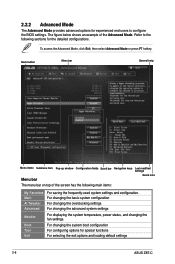
... top of the Advanced Mode. 2.2.2 Advanced Mode The Advanced Mode provides advanced options for special functions For selecting the exit options and loading default settings 2-8 ASUS Z87-C Refer to configure the BIOS settings.
... top of the Advanced Mode. 2.2.2 Advanced Mode The Advanced Mode provides advanced options for special functions For selecting the exit options and loading default settings 2-8 ASUS Z87-C Refer to configure the BIOS settings.


