VP229QVP229HE Series User Guide
Page 3
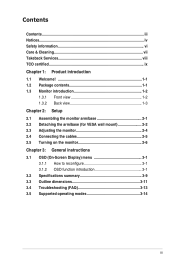
... 1.1 Welcome 1-1 1.2 Package contents 1-1 1.3 Monitor introduction 1-2 1.3.1 Front view 1-2 1.3.2 Back view 1-3 Chapter 2: Setup 2.1 Assembling the monitor arm/base 2-1 2.2 Detaching the arm/base (for VESA wall mount 2-2 2.3 Adjusting the monitor 2-4 2.4 Connecting the cables 2-5 2.5 Turning on the monitor 2-6 Chapter 3: General instructions 3.1 OSD (On-Screen Display) menu 3-1 3.1.1 How to reconfigure 3-1 3.1.2 OSD function introduction 3-1 3.2 Specifications summary 3-9 3.3 Outline dimensions 3-11 3.4 Troubleshooting (FAQ 3-13 3.5 Supported operating modes 3-14 iii
... 1.1 Welcome 1-1 1.2 Package contents 1-1 1.3 Monitor introduction 1-2 1.3.1 Front view 1-2 1.3.2 Back view 1-3 Chapter 2: Setup 2.1 Assembling the monitor arm/base 2-1 2.2 Detaching the arm/base (for VESA wall mount 2-2 2.3 Adjusting the monitor 2-4 2.4 Connecting the cables 2-5 2.5 Turning on the monitor 2-6 Chapter 3: General instructions 3.1 OSD (On-Screen Display) menu 3-1 3.1.1 How to reconfigure 3-1 3.1.2 OSD function introduction 3-1 3.2 Specifications summary 3-9 3.3 Outline dimensions 3-11 3.4 Troubleshooting (FAQ 3-13 3.5 Supported operating modes 3-14 iii

VP229QVP229HE Series User Guide
Page 4
The use of the monitor to the graphics card is required to assure compliance with FCC regulations. The monitor and computer are designed to radio or television reception, which can radiate radio frequency energy and, if not installed and used in a particular installation. Please visit http://www.energystar.gov/powermanagement for connection of shielded cables for detail information on power management and...
The use of the monitor to the graphics card is required to assure compliance with FCC regulations. The monitor and computer are designed to radio or television reception, which can radiate radio frequency energy and, if not installed and used in a particular installation. Please visit http://www.energystar.gov/powermanagement for connection of shielded cables for detail information on power management and...
VP229QVP229HE Series User Guide
Page 6
.... • Avoid dust, humidity, and temperature extremes. Safety information • Before setting up the monitor, carefully read all cables are correctly connected and the power cables are not sure of the type of power supply to your home, consult your dealer or local power company. • Use the appropriate power plug which have appropriate configured receptacles marked between 100-240V AC. •...
.... • Avoid dust, humidity, and temperature extremes. Safety information • Before setting up the monitor, carefully read all cables are correctly connected and the power cables are not sure of the type of power supply to your home, consult your dealer or local power company. • Use the appropriate power plug which have appropriate configured receptacles marked between 100-240V AC. •...

VP229QVP229HE Series User Guide
Page 7
... display by yourself! The screen will recover slowly or you can turn off and unplug the power cord. Do not repair the screen by the stand or the cord. • Cleaning. Conventions used in completing a task. Stubborn stains may be removed with a cloth dampened with the monitor: • You may find slightly uneven brightness on the screen depending on the screen, as it may remain after switching...
... display by yourself! The screen will recover slowly or you can turn off and unplug the power cord. Do not repair the screen by the stand or the cord. • Cleaning. Conventions used in completing a task. Stubborn stains may be removed with a cloth dampened with the monitor: • You may find slightly uneven brightness on the screen depending on the screen, as it may remain after switching...

VP229QVP229HE Series User Guide
Page 12
... the power indicator is off. • Enters the OSD menu. • Toggles the Key Lock function between on /off with a long press for 5 seconds. 3. Selects an available input source. 1-2 Chapter 1: Product introduction 1.3 1.3.1 Monitor introduction Front view VP229Q/VP229HE VA229QSB Menu Close Input Select Brightness Blue Light Filter Menu Close Input Select Brightness Blue Light Filter 65 432 1 1. Status White Amber Off Description On Standby mode Off 2. Menu button: • Press this button to display the OSD menu...
... the power indicator is off. • Enters the OSD menu. • Toggles the Key Lock function between on /off with a long press for 5 seconds. 3. Selects an available input source. 1-2 Chapter 1: Product introduction 1.3 1.3.1 Monitor introduction Front view VP229Q/VP229HE VA229QSB Menu Close Input Select Brightness Blue Light Filter Menu Close Input Select Brightness Blue Light Filter 65 432 1 1. Status White Amber Off Description On Standby mode Off 2. Menu button: • Press this button to display the OSD menu...

VP229QVP229HE Series User Guide
Page 13
... port is for PC VGA connection. 7. HDMI port. This 15-pin port is for connection with a USB upstream cable. 5. Line in . This port is for connection with an HDMI compatible device. 6. USB 2.0 upstream port. This port is only available when an HDMI/DP cable is for connection with a DisplayPort compatible device. 5. This port connects the power cord. 2. This port connects PC audio source by the audio cable. 3. Earphone jack. Shortcut • Press this button to display the OSD menu when the OSD is off . • Default: Blue light...
... port is for PC VGA connection. 7. HDMI port. This 15-pin port is for connection with a USB upstream cable. 5. Line in . This port is for connection with an HDMI compatible device. 6. USB 2.0 upstream port. This port is only available when an HDMI/DP cable is for connection with a DisplayPort compatible device. 5. This port connects the power cord. 2. This port connects PC audio source by the audio cable. 3. Earphone jack. Shortcut • Press this button to display the OSD menu when the OSD is off . • Default: Blue light...

VP229QVP229HE Series User Guide
Page 14
Control buttons. 1-4 Chapter 1: Product introduction Kensington lock slot. 10. 8. These ports are for connection with USB devices, such as USB keyboard/mouse, USB flash drive, etc. 9. USB 2.0 downstream ports.
Control buttons. 1-4 Chapter 1: Product introduction Kensington lock slot. 10. 8. These ports are for connection with USB devices, such as USB keyboard/mouse, USB flash drive, etc. 9. USB 2.0 downstream ports.

VP229QVP229HE Series User Guide
Page 15
... base to the monitor. VA229QSB: Fix the base to the arm by fastening the bundled screw. 4. ASUS VA229Q/ VP229Q/ VP229HE Series LCD Monitor 2-1 2.1 Assembling the monitor arm/base To assemble the monitor base: 1. VA229QSB: Remove the stop screw at the bottom of the monitor face down on the base. 3. VP229Q/ VP229HE: Fix the base to the arm by rotating the base until it fits into the groove on a table. 2. Attach the base into the arm, making...
... base to the monitor. VA229QSB: Fix the base to the arm by fastening the bundled screw. 4. ASUS VA229Q/ VP229Q/ VP229HE Series LCD Monitor 2-1 2.1 Assembling the monitor arm/base To assemble the monitor base: 1. VA229QSB: Remove the stop screw at the bottom of the monitor face down on the base. 3. VP229Q/ VP229HE: Fix the base to the arm by rotating the base until it fits into the groove on a table. 2. Attach the base into the arm, making...

VP229QVP229HE Series User Guide
Page 19
... power cord securely to the monitor's AC input port, the other end to the computer's audio-out port. • To use the earphone: connect the end with plug type to the monitor's earphone jack when an HDMI/DP signal is normal that the monitor slightly shakes while you adjust the viewing angle. 2.4 Connecting the cables Connect the cables as the following instructions: VP229Q/VP229HE VA229QSB • To connect the power cord: Connect one end of the VGA/HDMI...
... power cord securely to the monitor's AC input port, the other end to the computer's audio-out port. • To use the earphone: connect the end with plug type to the monitor's earphone jack when an HDMI/DP signal is normal that the monitor slightly shakes while you adjust the viewing angle. 2.4 Connecting the cables Connect the cables as the following instructions: VP229Q/VP229HE VA229QSB • To connect the power cord: Connect one end of the VGA/HDMI...

VP229QVP229HE Series User Guide
Page 20
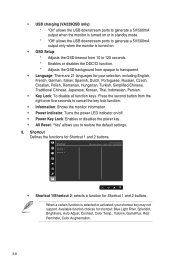
... power indicator lights up in the OSD menu. 2.5 Turning on the monitor to work. See page 1-2 for the location of the USB upstream cable to the monitor's USB upstream port, and the larger end (type A) to your computer is ON. 2-6 Chapter 2: Setup That will enable the USB ports on the monitor Press the power button . Make sure your computer's USB 2.0 port. When these cables are connected, you can choose the desired signal from the Input...
... power indicator lights up in the OSD menu. 2.5 Turning on the monitor to work. See page 1-2 for the location of the USB upstream cable to the monitor's USB upstream port, and the larger end (type A) to your computer is ON. 2-6 Chapter 2: Setup That will enable the USB ports on the monitor Press the power button . Make sure your computer's USB 2.0 port. When these cables are connected, you can choose the desired signal from the Input...
VP229QVP229HE Series User Guide
Page 21
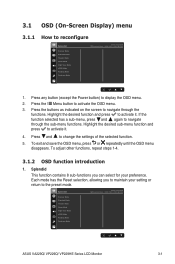
... Mode Standard Mode Theater Mode Game Mode Night View Mode sRGB Mode Reading Mode Darkroom Mode ASUS VA229QSB Standard Mode HDMI 1920 x 1080 @ 60Hz ASUS VA229Q/ VP229Q/ VP229HE Series LCD Monitor 3-1 Press the buttons as indicated on the screen to navigate through the functions. To exit and save the OSD menu, press or repeatedly until the OSD menu disappears. Press and to activate the OSD menu. 3. Each mode has the Reset selection, allowing you can select for your setting...
... Mode Standard Mode Theater Mode Game Mode Night View Mode sRGB Mode Reading Mode Darkroom Mode ASUS VA229QSB Standard Mode HDMI 1920 x 1080 @ 60Hz ASUS VA229Q/ VP229Q/ VP229HE Series LCD Monitor 3-1 Press the buttons as indicated on the screen to navigate through the functions. To exit and save the OSD menu, press or repeatedly until the OSD menu disappears. Press and to activate the OSD menu. 3. Each mode has the Reset selection, allowing you can select for your setting...

VP229QVP229HE Series User Guide
Page 22
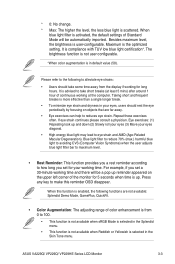
Eye Care ASUS VA229QSB Standard Mode HDMI 1920 x 1080 @ 60Hz Blue Light Filter Rest Reminder Color Augmentation • Blue Light Filter: In this function, you can adjust settings to Max. 3-2 Standard Mode meets Energy Star® requirements. • Theater Mode: Best choice for movies with Splendid Video Enhancement. • Game Mode: Best choice for game playing with Splendid Video Enhancement. • Night View Mode: Best choice for dark-scene games or...
Eye Care ASUS VA229QSB Standard Mode HDMI 1920 x 1080 @ 60Hz Blue Light Filter Rest Reminder Color Augmentation • Blue Light Filter: In this function, you can adjust settings to Max. 3-2 Standard Mode meets Energy Star® requirements. • Theater Mode: Best choice for movies with Splendid Video Enhancement. • Game Mode: Best choice for game playing with Splendid Video Enhancement. • Night View Mode: Best choice for dark-scene games or...
VP229QVP229HE Series User Guide
Page 23
... or Yellowish is from the display if working time. Eye exercises: (1) Repeating look up reminder appeared on objects that are not available: Splendid Demo Mode, GamePlus, QuickFit. • Color Augmentation: The adjusting range of the monitor for long hours. Blue light filter to reduce 70% (max.) harmful blue light to avoiding CVS (Computer Vision Syndrome) when the user adjusts blue light filter bar to maximum...
... or Yellowish is from the display if working time. Eye exercises: (1) Repeating look up reminder appeared on objects that are not available: Splendid Demo Mode, GamePlus, QuickFit. • Color Augmentation: The adjusting range of the monitor for long hours. Blue light filter to reduce 70% (max.) harmful blue light to avoiding CVS (Computer Vision Syndrome) when the user adjusts blue light filter bar to maximum...

VP229QVP229HE Series User Guide
Page 24
Color Set a desired color setting from this menu. Color Brightness Contrast Saturation Color Temp. Image Set the image related setting from this menu. 3. Image Sharpness Trace Free Aspect Control VividPixel ASCR AMD FreeSync Position More ASUS VA229QSB Standard Mode HDMI 1920 x 1080 @ 60Hz • Sharpness: The adjusting range is from 0 to full, 4:3, or OverScan. 4:3 is only available when input source is in 4:3 format. Skin Tone ASUS VA229QSB Standard Mode HDMI 1920 x 1080 @ 60Hz • Brightness: The adjusting range is from 0 to 100...
Color Set a desired color setting from this menu. Color Brightness Contrast Saturation Color Temp. Image Set the image related setting from this menu. 3. Image Sharpness Trace Free Aspect Control VividPixel ASCR AMD FreeSync Position More ASUS VA229QSB Standard Mode HDMI 1920 x 1080 @ 60Hz • Sharpness: The adjusting range is from 0 to full, 4:3, or OverScan. 4:3 is only available when input source is in 4:3 format. Skin Tone ASUS VA229QSB Standard Mode HDMI 1920 x 1080 @ 60Hz • Brightness: The adjusting range is from 0 to 100...

VP229QVP229HE Series User Guide
Page 25
... and HDMI only): Allows an AMD FreeSync supported* graphics source to its optimized position, clock, and phase (for VGA mode only). 5. The adjusting range is from which source. Sound Volume Mute Source ASUS VA229QSB Standard Mode HDMI 1920 x 1080 @ 60Hz • Volume: the adjusting range is not proportional. • Auto Adjust.: Automatically adjusts the image to dynamically adjust display refresh rate based on typical content frame rates for power efficient, virtually stutter free and low-latency display update. * AMD FreeSync (DisplayPort and HDMI only...
... and HDMI only): Allows an AMD FreeSync supported* graphics source to its optimized position, clock, and phase (for VGA mode only). 5. The adjusting range is from which source. Sound Volume Mute Source ASUS VA229QSB Standard Mode HDMI 1920 x 1080 @ 60Hz • Volume: the adjusting range is not proportional. • Auto Adjust.: Automatically adjusts the image to dynamically adjust display refresh rate based on typical content frame rates for power efficient, virtually stutter free and low-latency display update. * AMD FreeSync (DisplayPort and HDMI only...

VP229QVP229HE Series User Guide
Page 26
... can position on 4 sides of the screen, serving as an easy and handy tool for users when playing different types of the display so you to adjust the system. Display Alignment displays alignment lines on the left of games. Input Select In this function, you know how smooth the game is running. Input Select ASUS VA229QSB Standard Mode HDMI 1920 x 1080 @ 60Hz VGA HDMI...
... can position on 4 sides of the screen, serving as an easy and handy tool for users when playing different types of the display so you to adjust the system. Display Alignment displays alignment lines on the left of games. Input Select In this function, you know how smooth the game is running. Input Select ASUS VA229QSB Standard Mode HDMI 1920 x 1080 @ 60Hz VGA HDMI...
VP229QVP229HE Series User Guide
Page 28
... output when the monitor is turned on /off. • Power Key Lock: Enables or disables the power key. • All Reset: "Yes" allows you to transparent. • Language: There are 21 languages for your shortcut key may not support. Press the second button from opaque to restore the default settings. 8. Shortcut Defines the functions for Shortcut 1 and 2 buttons. Shortcut ASUS VA229QSB Standard Mode HDMI 1920 x 1080 @ 60Hz...
... output when the monitor is turned on /off. • Power Key Lock: Enables or disables the power key. • All Reset: "Yes" allows you to transparent. • Language: There are 21 languages for your shortcut key may not support. Press the second button from opaque to restore the default settings. 8. Shortcut Defines the functions for Shortcut 1 and 2 buttons. Shortcut ASUS VA229QSB Standard Mode HDMI 1920 x 1080 @ 60Hz...

VP229QVP229HE Series User Guide
Page 29
Resolution Pixel pitch Brightness (Typ.) Contrast Ratio (Typ.) Contrast Ratio (Max.) Viewing angle (H/V) CR>10 Display colors Response time Splendid Video Enhancement Splendid selection Auto adjustment Color temperature selection Analog input Digital input Earphone jack Audio input Speaker (Built-in) USB 2.0 port Colors Power LED Tilt Pivot Swivel Height Adjustment Kensington lock AC input voltage Power consumption Temperature (Operating) TFT LCD 21.5" (16:9, 54.62 cm) wide screen 1920 x 1080 0.24795 x 0.24795 mm 250 cd/m2 1000:1 100,000,000:1 (with ASCR on) 178˚...
Resolution Pixel pitch Brightness (Typ.) Contrast Ratio (Typ.) Contrast Ratio (Max.) Viewing angle (H/V) CR>10 Display colors Response time Splendid Video Enhancement Splendid selection Auto adjustment Color temperature selection Analog input Digital input Earphone jack Audio input Speaker (Built-in) USB 2.0 port Colors Power LED Tilt Pivot Swivel Height Adjustment Kensington lock AC input voltage Power consumption Temperature (Operating) TFT LCD 21.5" (16:9, 54.62 cm) wide screen 1920 x 1080 0.24795 x 0.24795 mm 250 cd/m2 1000:1 100,000,000:1 (with ASCR on) 178˚...

VP229QVP229HE Series User Guide
Page 30
... Blue Light, ISO9241-307, PC-Recycle, UkrSEPRO, ICES-3, EU Energy Label, VCCI, TCO, CU, CCC, CEL, MEPS, KC, KCC, E-Standby VN MEPS, PSB, Taiwan Green Mark *Specifications are subject to change without notice. **Measuring a screen brightness of 200 nits without stand); 2.9 kg (net with stand); 4.4 kg (gross) Multi-languages Accessories Compliance and Standards VP229HE: 2.5 kg (net without audio/USB/Card reader connection. 3-10 Chapter 3: OSD (On-Screen Display) menu...
... Blue Light, ISO9241-307, PC-Recycle, UkrSEPRO, ICES-3, EU Energy Label, VCCI, TCO, CU, CCC, CEL, MEPS, KC, KCC, E-Standby VN MEPS, PSB, Taiwan Green Mark *Specifications are subject to change without notice. **Measuring a screen brightness of 200 nits without stand); 2.9 kg (net with stand); 4.4 kg (gross) Multi-languages Accessories Compliance and Standards VP229HE: 2.5 kg (net without audio/USB/Card reader connection. 3-10 Chapter 3: OSD (On-Screen Display) menu...
VP229QVP229HE Series User Guide
Page 33
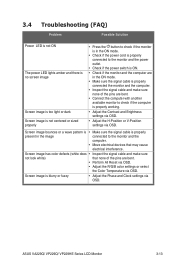
... image connected to check if the computer is properly working. • Adjust the Contrast and Brightness settings via OSD. • Adjust the H-Position or V-Position settings via OSD. 3.4 Troubleshooting (FAQ) Problem Possible Solution Power LED is not ON The power LED lights amber and there is no screen image Screen image is too light or dark Screen image is not centered or sized properly • Press the button to check if the monitor is in the ON mode. • Check if the power cord is properly connected...
... image connected to check if the computer is properly working. • Adjust the Contrast and Brightness settings via OSD. • Adjust the H-Position or V-Position settings via OSD. 3.4 Troubleshooting (FAQ) Problem Possible Solution Power LED is not ON The power LED lights amber and there is no screen image Screen image is too light or dark Screen image is not centered or sized properly • Press the button to check if the monitor is in the ON mode. • Check if the power cord is properly connected...


