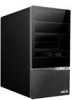
User Manual
Page 2
...2009 Copyright © 2009 ASUSTeK Computer Inc. SPECIFICATIONS AND INFORMATION CONTAINED IN THIS MANUAL ARE FURNISHED FOR INFORMATIONAL USE ONLY, AND ARE SUBJECT TO CHANGE AT ANY TIME WITHOUT NOTICE, AND SHOULD NOT BE CONSTRUED AS A COMMITMENT BY ASUS. All Rights Reserved. or (2) the serial number...permission of their respective companies, and are used only for identification or explanation and to the owners' benefit, without intent to infringe. ASUS PROVIDES THIS MANUAL "AS IS" WITHOUT WARRANTY OF ANY KIND, EITHER EXPRESS OR IMPLIED, INCLUDING BUT NOT LIMITED TO THE IMPLIED WARRANTIES...
...2009 Copyright © 2009 ASUSTeK Computer Inc. SPECIFICATIONS AND INFORMATION CONTAINED IN THIS MANUAL ARE FURNISHED FOR INFORMATIONAL USE ONLY, AND ARE SUBJECT TO CHANGE AT ANY TIME WITHOUT NOTICE, AND SHOULD NOT BE CONSTRUED AS A COMMITMENT BY ASUS. All Rights Reserved. or (2) the serial number...permission of their respective companies, and are used only for identification or explanation and to the owners' benefit, without intent to infringe. ASUS PROVIDES THIS MANUAL "AS IS" WITHOUT WARRANTY OF ANY KIND, EITHER EXPRESS OR IMPLIED, INCLUDING BUT NOT LIMITED TO THE IMPLIED WARRANTIES...

User Manual
Page 26
Motherboard Info Displays the general specifications of the support DVD. 2.3.5 Other information The icons on the top right corner of the screen give additional information on the motherboard and the contents of the motherboard. Browse this DVD Displays the support DVD contents in graphical format. 2-6 Chapter 2: Starting up Click an icon to display the specified information.
Motherboard Info Displays the general specifications of the support DVD. 2.3.5 Other information The icons on the top right corner of the screen give additional information on the motherboard and the contents of the motherboard. Browse this DVD Displays the support DVD contents in graphical format. 2-6 Chapter 2: Starting up Click an icon to display the specified information.
User Manual
Page 45
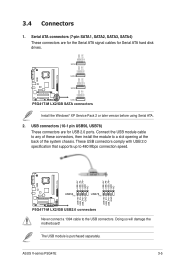
Doing so will damage the motherboard! ASUS V-series P5G41E 3-5 GND RSATA_RXN4 RSATA_RXP4 GND RSATA_TXN4 RSATA_TXP4 GND SATA4 GND RSATA_RXN3 RSATA_RXP3 GND RSATA_TXN3 RSATA_TXP3 GND SATA3 GND RSATA_RXN2 RSATA_RXP2 GND RSATA_TXN2 RSATA_TXP2 GND GND RSATA_RXN1...separately. Connect the USB module cable to any of these connectors, then install the module to the USB connectors. These USB connectors comply with USB 2.0 specification that supports up to 480 Mbps connection speed. Serial ATA connectors (7-pin SATA1, SATA2, SATA3, SATA4) These connectors are for Serial ATA hard disk ...
Doing so will damage the motherboard! ASUS V-series P5G41E 3-5 GND RSATA_RXN4 RSATA_RXP4 GND RSATA_TXN4 RSATA_TXP4 GND SATA4 GND RSATA_RXN3 RSATA_RXP3 GND RSATA_TXN3 RSATA_TXP3 GND SATA3 GND RSATA_RXN2 RSATA_RXP2 GND RSATA_TXN2 RSATA_TXP2 GND GND RSATA_RXN1...separately. Connect the USB module cable to any of these connectors, then install the module to the USB connectors. These USB connectors comply with USB 2.0 specification that supports up to 480 Mbps connection speed. Serial ATA connectors (7-pin SATA1, SATA2, SATA3, SATA4) These connectors are for Serial ATA hard disk ...
User Manual
Page 47
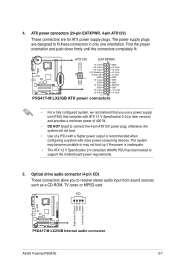
... connectors allow you use a power supply unit (PSU) that complies with a higher power output is inadequate. • The ATX 12 V Specification 2.0-compliant (400W) PSU has been tested to receive stereo audio input from sound sources such as a CD-ROM, TV tuner, or MPEG card...Channel P5G41T-M LX2/GB P5G41T-M LX2/GB Internal audio connector ASUS V-series P5G41E 3-7 Find the proper orientation and push down firmly until the connectors completely fit. otherwise, the system will not boot. • Use of a PSU with ATX 12 V Specification 2.0 (or later version) and provides a minimum power ...
... connectors allow you use a power supply unit (PSU) that complies with a higher power output is inadequate. • The ATX 12 V Specification 2.0-compliant (400W) PSU has been tested to receive stereo audio input from sound sources such as a CD-ROM, TV tuner, or MPEG card...Channel P5G41T-M LX2/GB P5G41T-M LX2/GB Internal audio connector ASUS V-series P5G41E 3-7 Find the proper orientation and push down firmly until the connectors completely fit. otherwise, the system will not boot. • Use of a PSU with ATX 12 V Specification 2.0 (or later version) and provides a minimum power ...
User Manual
Page 59
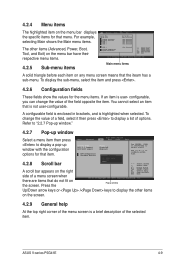
... then press to Sub-screen F1 General Help F10 Save and Exit ESC Exit A solid triangle before each item on the menu bar displays the specific items for that item. Pop-up window with the configuration options for that menu. Suspend Mode ACPI 2.0 Support ACOU AOUC suport [Auto] [Disabled] [Enabled] APM... any menu screen means that the iteam has a sub-menu. For example, selecting Main shows the Main menu items. The other items on the screen. ASUS V-series P5G41E 4-9
... then press to Sub-screen F1 General Help F10 Save and Exit ESC Exit A solid triangle before each item on the menu bar displays the specific items for that item. Pop-up window with the configuration options for that menu. Suspend Mode ACPI 2.0 Support ACOU AOUC suport [Auto] [Disabled] [Enabled] APM... any menu screen means that the iteam has a sub-menu. For example, selecting Main shows the Main menu items. The other items on the screen. ASUS V-series P5G41E 4-9
User Manual
Page 61
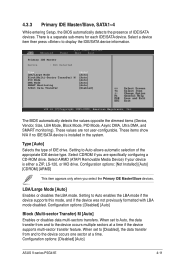
... Mode, PIO Mode, Async DMA, Ultra DMA, and SMART monitoring). These values are specifically configuring a CD-ROM drive. Select ARMD (ATAPI Removable Media Device) if your device is installed in the system. Configuration options: [Disabled] [Auto] ASUS V-series P5G41E 4-11 Select a device item then press to Auto enables the LBA mode if the...
... Mode, PIO Mode, Async DMA, Ultra DMA, and SMART monitoring). These values are specifically configuring a CD-ROM drive. Select ARMD (ATAPI Removable Media Device) if your device is installed in the system. Configuration options: [Disabled] [Auto] ASUS V-series P5G41E 4-11 Select a device item then press to Auto enables the LBA mode if the...
User Manual
Page 63
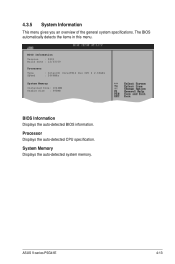
System Memory Displays the auto-detected system memory. ASUS V-series P5G41E 4-13 The BIOS automatically detects the items in this menu. Processor Displays the auto-detected CPU specification. 4.3.5 System Information This menu gives you an overview of the general system specifications. BIOS Information Version : 0201 Build Date : 12/03/09 Processor Type Speed : Intel(R) Core(TM)2 Duo CPU @ 2.66GHz : 2666MHz System Memory Installed Size: 1024MB Usable Size : 990MB BIOS Information Displays the auto-detected BIOS information.
System Memory Displays the auto-detected system memory. ASUS V-series P5G41E 4-13 The BIOS automatically detects the items in this menu. Processor Displays the auto-detected CPU specification. 4.3.5 System Information This menu gives you an overview of the general system specifications. BIOS Information Version : 0201 Build Date : 12/03/09 Processor Type Speed : Intel(R) Core(TM)2 Duo CPU @ 2.66GHz : 2666MHz System Memory Installed Size: 1024MB Usable Size : 990MB BIOS Information Displays the auto-detected BIOS information.
User Manual
Page 72
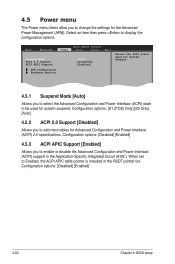
When set to Enabled, the ACPI APIC table pointer is included in the Application-Specific Integrated Circuit (ASIC). Configuration options: [Disabled] [Enabled] 4-22 Chapter 4: BIOS setup Main Advanced Power Suspend Mode ACPI 2.0 Support ACPI APIC Support APM Configuration Hardware Monitor ... and Power Interface (ACPI) state to display the configuration options. Select an item then press to be used for Advanced Configuration and Power Interface (ACPI) 2.0 specifications.
When set to Enabled, the ACPI APIC table pointer is included in the Application-Specific Integrated Circuit (ASIC). Configuration options: [Disabled] [Enabled] 4-22 Chapter 4: BIOS setup Main Advanced Power Suspend Mode ACPI 2.0 Support ACPI APIC Support APM Configuration Hardware Monitor ... and Power Interface (ACPI) state to display the configuration options. Select an item then press to be used for Advanced Configuration and Power Interface (ACPI) 2.0 specifications.
User Manual
Page 74
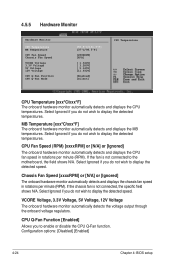
... the detected temperatures. Select Ignored if you do not wish to enable or disable the CPU Q-Fan function. If the fan is not connected, the specific field shows N/A. The onboard hardware monitor automatically detects and displays the MB temperatures. Configuration options: [Disabled] [Enabled] 4-24 Chapter 4: BIOS setup Chassis Fan Speed [xxxxRPM...
... the detected temperatures. Select Ignored if you do not wish to enable or disable the CPU Q-Fan function. If the fan is not connected, the specific field shows N/A. The onboard hardware monitor automatically detects and displays the MB temperatures. Configuration options: [Disabled] [Enabled] 4-24 Chapter 4: BIOS setup Chassis Fan Speed [xxxxRPM...