Asus RS120-E4 - 0 MB RAM Support and Manuals
Get Help and Manuals for this Asus item
View All Support Options Below
Free Asus RS120-E4 manuals!
Problems with Asus RS120-E4?
Ask a Question
Free Asus RS120-E4 manuals!
Problems with Asus RS120-E4?
Ask a Question
Popular Asus RS120-E4 Manual Pages
User Guide - Page 11
ASUS RS120-E4/PA4
1- Product introduction
Chapter 1
This chapter describes the general features of the chassis kit. It includes sections on front panel and rear panel specifications.
User Guide - Page 13
... type optical drive) 4 x SATAII hard disk drive with
- ASUS RS120-E4/PA4
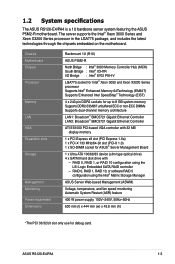
1- The server supports the Intel® Xeon 3000 Series and Xeon X3200 Series processor in the LGA775 package, and includes the latest technologies through the chipsets embedded on the motherboard. 1.2 System specifications
The ASUS RS120-E4/PA4 is a 1U barebone server system featuring the ASUS P5M2-R motherboard.
User Guide - Page 15
... switch again to SATA3 port (Port2) 11. PCI-X and PCI Express x8 riser card bracket
2. Hot-swap HDD tray 3 Connects to turn off)
ASUS RS120-E4/PA4
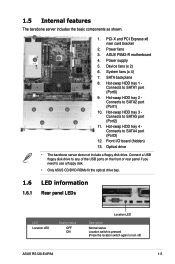
1- 1.5 Internal features
The barebone server includes the basic components as shown.
2
1
4
3
5
6
5
7
8
9
13
10
11
12
1. Power supply 5. Hot-swap HDD tray 4 Connects to SATA4 port (Port3) 12. System...
User Guide - Page 19
... connectors under the top front cover.
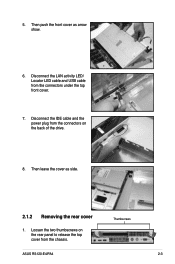
7. Then push the front cover as side.
2.1.2 Removing the rear cover
1. Then leave the cover as arrow show.
6. Thumbscrews
ASUS RS120-E4/PA4
2-
Disconnect the LAN activity LED/ Locator LED cable and USB cable from the connectors on the rear panel to release the top cover from the...
User Guide - Page 29
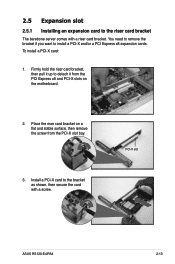
... on a flat and stable surface, then remove the screw from the PCI‑X slot bay.
3. Place the riser card bracket on the motherboard.
2. PCI-X slot
ASUS RS120-E4/PA4
2-13 Firmly hold the riser card bracket, then pull it up to install a PCI-X and/or a PCI Express x8 expansion cards.
User Guide - Page 31

... bay.
The three pegs on the motherboard.
3. Connect the cable(s) to ensure that the bracket is properly in place. Install the riser card bracket with the rear panel.
4. Press the riser card bracket until the golden connectors completely fit the slot...the card, if applicable.
2.5.2 Reinstalling the riser card bracket
To reinstall the riser card bracket: 1. ASUS RS120-E4/PA4
2-15
User Guide - Page 33
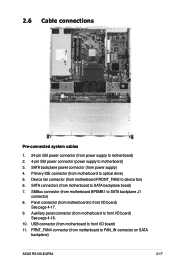
...backplane J1
connector) 8. Auxiliary panel connector (from motherboard to SATA backplane board) 7. Primary IDE connector (from motherboard to FAN_IN connector on SATA
backplane)
ASUS RS120-E4/PA4
2-17 FRNT_FAN4 connector (from motherboard to optical drive) 5. Device fan connector (from motherboard FRONT_FAN3 to motherboard) 3. 2.6 Cable connections
1 2
3
9 6 78
10 4 5 11
Pre...
User Guide - Page 35
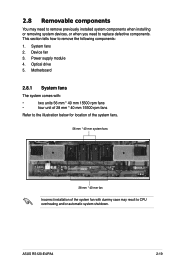
... system fan with dummy case may need to remove previously installed system components when installing or removing system devices, or when you need to CPU overheating and/or automatic system shutdown. ASUS RS120-E4/PA4
2-19 Device fan 3. Optical drive 5. 2.8 Removable components
You may result to replace defective components. This section tells how to remove the following...
User Guide - Page 37
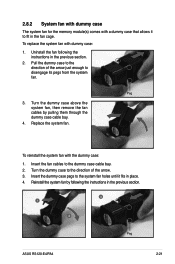
... it to fit in the previous section.
3 1
2
Peg
ASUS RS120-E4/PA4
2-21 To replace the system fan with the dummy case: 1. Turn the dummy case above the system fan, then remove the fan cables by following the instructions in place. 4. Peg
3. Uninstall the fan following the instructions in the fan cage. Turn the dummy case to...
User Guide - Page 39
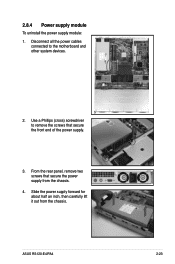
From the rear panel, remove two screws that secure the front end of the power supply.
3. ASUS RS120-E4/PA4
2-23 Slide the power supply forward for about half an inch, then carefully lift it out from the chassis.
4.
Use a Phillips (cross) screwdriver to the ...
User Guide - Page 41
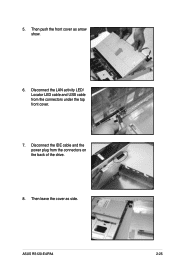
Then push the front cover as side. Disconnect the IDE cable and the power plug from the connectors under the top front cover.
7. Disconnect the LAN activity LED/ Locator LED cable and USB cable from the connectors on the back of the drive.
8. Then leave the cover as arrow show.
6. 5. ASUS RS120-E4/PA4
2-25
User Guide - Page 43
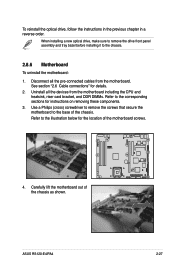
.... Refer to the corresponding sections for instructions on removing these components. 3. Carefully lift the motherboard out of the motherboard screws.
®
P5M2-R
4. When installing a new optical drive, make sure to remove the drive front panel assembly and tray bezel before installing it to the base of the chassis.
ASUS RS120-E4/PA4
2-27 Use a Philips (cross) screwdriver...
User Guide - Page 45
Installation options
Chapter 3
This chapter describes how to install the optional components and devices into the barebone server.
ASUS RS120-E4/PA4
2-
User Guide - Page 47
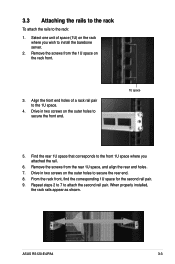
... holes of space (1U) on the outer holes to secure the front end.
1U space
5. Find the rear 1U space that corresponds to the front 1U space where you wish to the rack:
1. When properly installed, the rack rails appear as shown. ASUS RS120-E4/PA4
3- 3.3 Attaching the rails to the rack
To attach the rails to install the barebone server.
2.
User Guide - Page 49
ASUS RS120-E4/PA4 Motherboard info
Chapter 4
This chapter includes the motherboard layout, and brief descriptions of the jumpers and internal connectors.
Asus RS120-E4 Reviews
We have not received any reviews for Asus yet.