

User Manual
Page 3
... (QVL 1-8 Chapter 2: Starting up 2.1 Installing an operating system 2-2 2.2 Powering up 2-2 2.3 Support DVD information 2-2 2.3.1 Running the support DVD 2-3 2.3.2 Utilities menu 2-4 2.3.3 Manual menu 2-5 2.3.4 ASUS Contact information 2-6 2.3.5 Other information 2-7 Chapter 3: Motherboard info 3.1 Introduction 3-2 3.2 Motherboard layout 3-2 3.3 Jumpers 3-3 3.4 Connectors 3-5 Chapter 4: BIOS setup 4.1 Managing and updating your BIOS 4-2 4.1.1 ASUS Update utility 4-2 4.1.2 ASUS EZ Flash 2 utility 4-5 4.1.3 ASUS CrashFree BIOS 4-6 4.2 BIOS setup program 4-7 iii
... (QVL 1-8 Chapter 2: Starting up 2.1 Installing an operating system 2-2 2.2 Powering up 2-2 2.3 Support DVD information 2-2 2.3.1 Running the support DVD 2-3 2.3.2 Utilities menu 2-4 2.3.3 Manual menu 2-5 2.3.4 ASUS Contact information 2-6 2.3.5 Other information 2-7 Chapter 3: Motherboard info 3.1 Introduction 3-2 3.2 Motherboard layout 3-2 3.3 Jumpers 3-3 3.4 Connectors 3-5 Chapter 4: BIOS setup 4.1 Managing and updating your BIOS 4-2 4.1.1 ASUS Update utility 4-2 4.1.2 ASUS EZ Flash 2 utility 4-5 4.1.3 ASUS CrashFree BIOS 4-6 4.2 BIOS setup program 4-7 iii

User Manual
Page 7
.... • Avoid dust, humidity, and temperature extremes. If you add a device. • Before connecting or removing signal cables from the motherboard, ensure that all power cables are using, contact your power supply is broken, do not try to fix it , carefully read all cables... technical problems with the package. • Before using an adapter or extension cord. DO NOT throw the motherboard in your retailer. Operation safety • Before installing the motherboard and adding devices on a stable surface. • If you are unplugged. • Seek professional assistance before...
.... • Avoid dust, humidity, and temperature extremes. If you add a device. • Before connecting or removing signal cables from the motherboard, ensure that all power cables are using, contact your power supply is broken, do not try to fix it , carefully read all cables... technical problems with the package. • Before using an adapter or extension cord. DO NOT throw the motherboard in your retailer. Operation safety • Before installing the motherboard and adding devices on a stable surface. • If you are unplugged. • Seek professional assistance before...
User Manual
Page 8
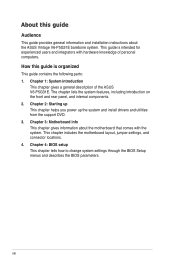
... This chapter gives information about the ASUS Vintage V6-P5G31E barebone system. viii This chapter includes the motherboard layout, jumper settings, and connector locations. 4. Chapter 2: Starting up This chapter helps you power up the system and install drivers...users and integrators with the system. How this guide Audience This guide provides general information and installation instructions about the motherboard that comes with hardware knowledge of the ASUS V6-P5G31E. Chapter 4: BIOS setup This chapter tells how to change system settings through the BIOS Setup menus and describes ...
... This chapter gives information about the ASUS Vintage V6-P5G31E barebone system. viii This chapter includes the motherboard layout, jumper settings, and connector locations. 4. Chapter 2: Starting up This chapter helps you power up the system and install drivers...users and integrators with the system. How this guide Audience This guide provides general information and installation instructions about the motherboard that comes with hardware knowledge of the ASUS V6-P5G31E. Chapter 4: BIOS setup This chapter tells how to change system settings through the BIOS Setup menus and describes ...
User Manual
Page 12
... slot, Serial ATA, USB 2.0, and 6-channel audio feature the system and take you for choosing the ASUS V6-P5G31E! The ASUS V6-P5G31E is an all-in the 775-land package. The system comes in a stylish casing and powered by the ASUS motherboard that supports the Intel® Core™2 Extreme / Core™2 Duo / Core™2 Quad / Pentium...
... slot, Serial ATA, USB 2.0, and 6-channel audio feature the system and take you for choosing the ASUS V6-P5G31E! The ASUS V6-P5G31E is an all-in the 775-land package. The system comes in a stylish casing and powered by the ASUS motherboard that supports the Intel® Core™2 Extreme / Core™2 Duo / Core™2 Quad / Pentium...

User Manual
Page 17
Hard disk drive bay 5. PCI slots 12. ASUS motherboard 9. Power supply unit 6. PCI Express x1 slot 11. PCI Express x16 slot 10. DIMM sockets 8. CPU socket 7. ASUS V6-P5G31E 1-7 1.4 Internal components The illustration below is the internal view of the system when you disassemble or assemble the system. Metal bracket lock Refer to the ...
Hard disk drive bay 5. PCI slots 12. ASUS motherboard 9. Power supply unit 6. PCI Express x1 slot 11. PCI Express x16 slot 10. DIMM sockets 8. CPU socket 7. ASUS V6-P5G31E 1-7 1.4 Internal components The illustration below is the internal view of the system when you disassemble or assemble the system. Metal bracket lock Refer to the ...

User Manual
Page 22
...supports Windows® XP/Vista/7 operating systems (OS). Refer to install the SATA drivers. 2.2 Powering up Visit the ASUS website at any time without the necessary drivers. R Press to enter the OS. Always install the latest OS version... included in a RAID set without notice. Use a RAID driver disk when installing Windows XP OS to change at www.asus.com for updates. 2-2 Chapter 2: Starting up Press the system power button ( ) to turn ON the system 2.3 ... Serial ATA hard drives in this chapter for general reference only. Motherboard settings and hardware options vary.
...supports Windows® XP/Vista/7 operating systems (OS). Refer to install the SATA drivers. 2.2 Powering up Visit the ASUS website at any time without the necessary drivers. R Press to enter the OS. Always install the latest OS version... included in a RAID set without notice. Use a RAID driver disk when installing Windows XP OS to change at www.asus.com for updates. 2-2 Chapter 2: Starting up Press the system power button ( ) to turn ON the system 2.3 ... Serial ATA hard drives in this chapter for general reference only. Motherboard settings and hardware options vary.
User Manual
Page 23
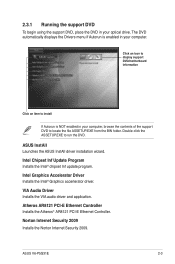
Click an icon to display support DVD/motherboard information Click an item to install If Autorun is enabled in your computer. ASUS InstAll Launches the ASUS InstAll driver installation wizard. ASUS V6-P5G31E 2-3 Intel Graphics Accelerator Driver Installs the Intel® Graphics accerlerator driver. Atheros AR8121 PCI-E Ethernet Controller Installs the Atheros® AR8121 PCI-E Ethernet Controller...
Click an icon to display support DVD/motherboard information Click an item to install If Autorun is enabled in your computer. ASUS InstAll Launches the ASUS InstAll driver installation wizard. ASUS V6-P5G31E 2-3 Intel Graphics Accelerator Driver Installs the Intel® Graphics accerlerator driver. Atheros AR8121 PCI-E Ethernet Controller Installs the Atheros® AR8121 PCI-E Ethernet Controller...

User Manual
Page 24
... version of the utilities through the Installation Wizard. ASUS InstAll Installs all of the BIOS from the ASUS website. Atheros Ethernet Utility Installs the Atheros® Ethernet Utility. ASUS Update Allows you to the ASUS website. Before using the ASUS Update, make sure that the motherboard supports. ASUS PC Probe II This smart utility monitors the fan...
... version of the utilities through the Installation Wizard. ASUS InstAll Installs all of the BIOS from the ASUS website. Atheros Ethernet Utility Installs the Atheros® Ethernet Utility. ASUS Update Allows you to the ASUS website. Before using the ASUS Update, make sure that the motherboard supports. ASUS PC Probe II This smart utility monitors the fan...

User Manual
Page 26
ASUS Motherboard Installation Guide Allows you to open the VIA HD Audio User's Manual. VIA HD Audio User's Manual Allows you to open the ASUS Motherboard Utility Guide. You can also find this information on the inside front cover of this user guide. 2-6 Chapter 2: Starting up NIS 2009 Subscription Renewal Guide Allows you to display the ASUS contact information. ASUS Motherboard Utility Guide Allows you to open the NIS 2009 Subscription Renewal Guide. 2.3.4 ASUS Contact information Click the Contact tab to open the ASUS Motherboard Installation Guide.
ASUS Motherboard Installation Guide Allows you to open the VIA HD Audio User's Manual. VIA HD Audio User's Manual Allows you to open the ASUS Motherboard Utility Guide. You can also find this information on the inside front cover of this user guide. 2-6 Chapter 2: Starting up NIS 2009 Subscription Renewal Guide Allows you to display the ASUS contact information. ASUS Motherboard Utility Guide Allows you to open the NIS 2009 Subscription Renewal Guide. 2.3.4 ASUS Contact information Click the Contact tab to open the ASUS Motherboard Installation Guide.
User Manual
Page 27
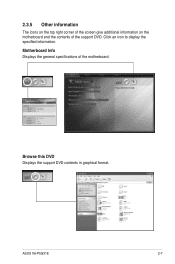
2.3.5 Other information The icons on the top right corner of the screen give additional information on the motherboard and the contents of the motherboard. ASUSTeK Computer INC. Click an icon to display the specified information. P5KPL-AM EPU V-P5G41H Rav 1.xx American Megatrends Inc. 0407 10/10/2009 P5KPL-AM EPU Browse this DVD Displays the support DVD contents in graphical format. Motherboard Info Displays the general specifications of the support DVD. V6-P5G31E P5KPLAME.ROM ASUS V6-P5G31E 2-7
2.3.5 Other information The icons on the top right corner of the screen give additional information on the motherboard and the contents of the motherboard. ASUSTeK Computer INC. Click an icon to display the specified information. P5KPL-AM EPU V-P5G41H Rav 1.xx American Megatrends Inc. 0407 10/10/2009 P5KPL-AM EPU Browse this DVD Displays the support DVD contents in graphical format. Motherboard Info Displays the general specifications of the support DVD. V6-P5G31E P5KPLAME.ROM ASUS V6-P5G31E 2-7

User Manual
Page 29
R This chapter includes the motherboard layout, jumper settings, and connector locations. Motherboard info Chapter 3 This chapter gives information about he motherboard that comes with the system.
R This chapter includes the motherboard layout, jumper settings, and connector locations. Motherboard info Chapter 3 This chapter gives information about he motherboard that comes with the system.

User Manual
Page 30
3.1 Introduction The Vintage V6-P5G31E barebone system comes with an ASUS motherboard. This chapter provides technical information about the motherboard for future upgrades or system reconfiguration. 3.2 Motherboard layout 3-2 Chapter 3: Motherboard info
3.1 Introduction The Vintage V6-P5G31E barebone system comes with an ASUS motherboard. This chapter provides technical information about the motherboard for future upgrades or system reconfiguration. 3.2 Motherboard layout 3-2 Chapter 3: Motherboard info

User Manual
Page 32
... +5V to enable or disable the keyboard wake-up the compurer from S1 sleep mode (CPU stopped, DRAM refreshed, system running in the BIOS. 3-4 Chapter 3: Motherboard info 2. This feature requires an ATX power supply that can wake up the computer from S3 and S4 sleep modes (no power to pins 2-3 (+5VSB...
... +5V to enable or disable the keyboard wake-up the compurer from S1 sleep mode (CPU stopped, DRAM refreshed, system running in the BIOS. 3-4 Chapter 3: Motherboard info 2. This feature requires an ATX power supply that can wake up the computer from S3 and S4 sleep modes (no power to pins 2-3 (+5VSB...

User Manual
Page 33
... 480 Mbps connection speed. ASUS V6-P5G31E 3-5 These USB connectors comply with USB 2.0 specification that supports up to the USB connectors. The USB module is purchased separately. USB connectors (10-1 pin USB56, USB78) These connectors are for the Serial ATA signal cables for USB 2.0 ports. Doing so will damage the motherboard! Serial ATA connectors...
... 480 Mbps connection speed. ASUS V6-P5G31E 3-5 These USB connectors comply with USB 2.0 specification that supports up to the USB connectors. The USB module is purchased separately. USB connectors (10-1 pin USB56, USB78) These connectors are for the Serial ATA signal cables for USB 2.0 ports. Doing so will damage the motherboard! Serial ATA connectors...

User Manual
Page 34
... following modes to match the covered hole on each Ultra DMA 100/66 signal cable: blue, black, and gray. Connect the blue connector to the motherboard's IDE connector, then select one of device(s) Master Slave Master Slave Cable connector Black Black Gray Black or gray • Pin 20 on the IDE...
... following modes to match the covered hole on each Ultra DMA 100/66 signal cable: blue, black, and gray. Connect the blue connector to the motherboard's IDE connector, then select one of device(s) Master Slave Master Slave Cable connector Black Black Gray Black or gray • Pin 20 on the IDE...
User Manual
Page 35
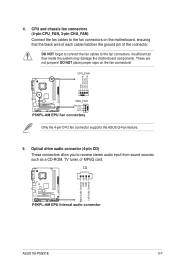
... sound sources such as a CD-ROM, TV tuner, or MPEG card. Insufficient air flow inside the system may damage the motherboard components. ASUS V6-P5G31E 3-7 4. Optical drive audio connector (4-pin CD) These connectors allow you to the fan connectors. DO NOT place jumper caps on the... motherboard, ensuring that the black wire of each cable matches the ground pin of the connector. CPU and chassis fan connectors. (4-pin ...
... sound sources such as a CD-ROM, TV tuner, or MPEG card. Insufficient air flow inside the system may damage the motherboard components. ASUS V6-P5G31E 3-7 4. Optical drive audio connector (4-pin CD) These connectors allow you to the fan connectors. DO NOT place jumper caps on the... motherboard, ensuring that the black wire of each cable matches the ground pin of the connector. CPU and chassis fan connectors. (4-pin ...

User Manual
Page 36
... to this connector to avail of the S/PDIF audio cable to this connector and the other end to [HD Audio]. Connect one end of the motherboard's high-definition audio capability. • By default, this connector, set to allow digital sound output. 6. Front panel audio connector (10-1 pin AAFP) This connector is... to this connector is for details. 7. See section "4.4.3 Chipset" for the S/PDIF audio module to HD Audio. The S/PDIF out module is purchased separately. 3-8 Chapter 3: Motherboard info
... to this connector to avail of the S/PDIF audio cable to this connector and the other end to [HD Audio]. Connect one end of the motherboard's high-definition audio capability. • By default, this connector, set to allow digital sound output. 6. Front panel audio connector (10-1 pin AAFP) This connector is... to this connector is for details. 7. See section "4.4.3 Chipset" for the S/PDIF audio module to HD Audio. The S/PDIF out module is purchased separately. 3-8 Chapter 3: Motherboard info
User Manual
Page 37
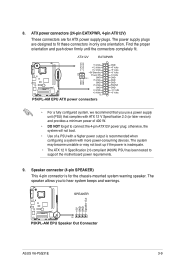
... boot up if the power is inadequate. • The ATX 12 V Specification 2.0-compliant (400W) PSU has been tested to hear system beeps and warnings. ASUS V6-P5G31E 3-9 ATX power connectors (24-pin EATXPWR, 4-pin ATX12V) These connectors are designed to connect the 4-pin ATX12V power plug; The speaker allows you use a... the proper orientation and push down firmly until the connectors completely fit. • For a fully configured system, we recommend that you to support the motherboard power requirements. 9. The power supply plugs are for the chassis-mounted system warning speaker.
... boot up if the power is inadequate. • The ATX 12 V Specification 2.0-compliant (400W) PSU has been tested to hear system beeps and warnings. ASUS V6-P5G31E 3-9 ATX power connectors (24-pin EATXPWR, 4-pin ATX12V) These connectors are designed to connect the 4-pin ATX12V power plug; The speaker allows you use a... the proper orientation and push down firmly until the connectors completely fit. • For a fully configured system, we recommend that you to support the motherboard power requirements. 9. The power supply plugs are for the chassis-mounted system warning speaker.

User Manual
Page 38
... connector is for the HDD Activity LED. Connect the chassis power LED cable to the HDD. • Power/Soft-off the system power. 3-10 Chapter 3: Motherboard info
... connector is for the HDD Activity LED. Connect the chassis power LED cable to the HDD. • Power/Soft-off the system power. 3-10 Chapter 3: Motherboard info

User Manual
Page 40
... for details on these utilities. Save a copy of the original motherboard BIOS file to a USB flash disk in case you need to restore the BIOS in the future. 4.1.1 ASUS Update utility The ASUS Update is available in the support DVD that allows you to manage.... 4.1 Managing and updating your system. ASUS CrashFree BIOS 3: Updates the BIOS using a USB flash disk. 3. This utility is a utility that comes with the motherboard package. Click the Utilities tab, then click Install ASUS Update. 3. Installing ASUS Update To install ASUS Update: 1. Quit all Windows® applications...
... for details on these utilities. Save a copy of the original motherboard BIOS file to a USB flash disk in case you need to restore the BIOS in the future. 4.1.1 ASUS Update utility The ASUS Update is available in the support DVD that allows you to manage.... 4.1 Managing and updating your system. ASUS CrashFree BIOS 3: Updates the BIOS using a USB flash disk. 3. This utility is a utility that comes with the motherboard package. Click the Utilities tab, then click Install ASUS Update. 3. Installing ASUS Update To install ASUS Update: 1. Quit all Windows® applications...


