

User Manual
Page 3
... Qualified Vendors Lists (QVL 1-8 Chapter 2: Starting up 2.1 Installing an operating system 2-2 2.2 Powering up 2-2 2.3 Support DVD information 2-2 2.3.1 Running the support DVD 2-3 2.3.2 Utilities menu 2-4 2.3.3 Manual menu 2-5 2.3.4 ASUS Contact information 2-6 2.3.5 Other information 2-7 Chapter 3: Motherboard info 3.1 Introduction 3-2 3.2 Motherboard layout 3-2 3.3 Jumpers 3-3 3.4 Connectors 3-5 Chapter 4: BIOS setup 4.1 Managing and updating your BIOS 4-2 4.1.1 ASUS Update utility 4-2 4.1.2 ASUS EZ Flash 2 utility 4-5 4.1.3 ASUS CrashFree BIOS 4-6 4.2 BIOS setup program...
... Qualified Vendors Lists (QVL 1-8 Chapter 2: Starting up 2.1 Installing an operating system 2-2 2.2 Powering up 2-2 2.3 Support DVD information 2-2 2.3.1 Running the support DVD 2-3 2.3.2 Utilities menu 2-4 2.3.3 Manual menu 2-5 2.3.4 ASUS Contact information 2-6 2.3.5 Other information 2-7 Chapter 3: Motherboard info 3.1 Introduction 3-2 3.2 Motherboard layout 3-2 3.3 Jumpers 3-3 3.4 Connectors 3-5 Chapter 4: BIOS setup 4.1 Managing and updating your BIOS 4-2 4.1.1 ASUS Update utility 4-2 4.1.2 ASUS EZ Flash 2 utility 4-5 4.1.3 ASUS CrashFree BIOS 4-6 4.2 BIOS setup program...

User Manual
Page 6
.../TV technician for a Class B digital device, pursuant to radio communications. This equipment has been tested and found to correct the interference by the party responsible for radio noise emissions from that may cause harmful interference to Part 15 of Communications. WARNING! The use of shielded cables for connection of the monitor to provide reasonable protection against harmful...
.../TV technician for a Class B digital device, pursuant to radio communications. This equipment has been tested and found to correct the interference by the party responsible for radio noise emissions from that may cause harmful interference to Part 15 of Communications. WARNING! The use of shielded cables for connection of the monitor to provide reasonable protection against harmful...

User Manual
Page 7
... product has been designed to enable proper reuse of parts and recycling. If you are not sure about the voltage of the electrical outlet you add a device. • Before connecting or removing signal cables from the motherboard, ensure that all cables are correctly connected and the power cables are using an adapter or extension cord. Operation safety • Before installing the motherboard and adding devices on a stable surface. •...
... product has been designed to enable proper reuse of parts and recycling. If you are not sure about the voltage of the electrical outlet you add a device. • Before connecting or removing signal cables from the motherboard, ensure that all cables are correctly connected and the power cables are using an adapter or extension cord. Operation safety • Before installing the motherboard and adding devices on a stable surface. •...
User Manual
Page 8
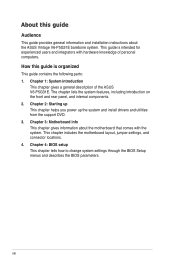
... guide Audience This guide provides general information and installation instructions about the motherboard that comes with hardware knowledge of the ASUS V6-P5G31E. This chapter includes the motherboard layout, jumper settings, and connector locations. 4. This guide is organized This guide contains the following parts: 1. About this guide is intended for experienced users and integrators with the system. Chapter 2: Starting up This chapter helps you power up the system and install drivers and utilities from the support DVD...
... guide Audience This guide provides general information and installation instructions about the motherboard that comes with hardware knowledge of the ASUS V6-P5G31E. This chapter includes the motherboard layout, jumper settings, and connector locations. 4. This guide is organized This guide contains the following parts: 1. About this guide is intended for experienced users and integrators with the system. Chapter 2: Starting up This chapter helps you power up the system and install drivers and utilities from the support DVD...
User Manual
Page 12
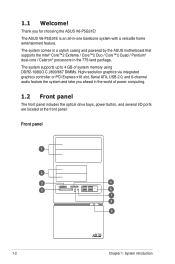
...® dual-core / Celeron® processors in -one barebone system with a versatile home entertainment feature. Front panel 1 2 3 4 5 6 7 8 9 R 1-2 Chapter 1: System introduction Thank you ahead in the world of system memory using DDR2-1066(O.C.)/800/667 DIMMs. High-resolution graphics via integrated graphics controller or PCI Express x16 slot, Serial ATA, USB 2.0, and 6-channel audio feature the system and take you for choosing the ASUS V6-P5G31E! 1.1 Welcome...
...® dual-core / Celeron® processors in -one barebone system with a versatile home entertainment feature. Front panel 1 2 3 4 5 6 7 8 9 R 1-2 Chapter 1: System introduction Thank you ahead in the world of system memory using DDR2-1066(O.C.)/800/667 DIMMs. High-resolution graphics via integrated graphics controller or PCI Express x16 slot, Serial ATA, USB 2.0, and 6-channel audio feature the system and take you for choosing the ASUS V6-P5G31E! 1.1 Welcome...

User Manual
Page 15
.../LINK SPEED LED LED LAN port 13. Line In port (light blue). This vent is for the LAN port LED indications. Video Graphics Adapter (VGA) port. This port connects a headphone or a speaker. This purple 6-pin connector is for the function of this port becomes Front Speaker Out. 15. Power Switch. Parallel port. This port allows gigabit connection to the table below for a VGA monitor or other serial devices.. 9. Line Out port (lime). This port connects the tape, CD, DVD player, or other devices. 11. Audio 2, 4, or 6-channel configuration Port Light...
.../LINK SPEED LED LED LAN port 13. Line In port (light blue). This vent is for the LAN port LED indications. Video Graphics Adapter (VGA) port. This port connects a headphone or a speaker. This purple 6-pin connector is for the function of this port becomes Front Speaker Out. 15. Power Switch. Parallel port. This port allows gigabit connection to the table below for a VGA monitor or other serial devices.. 9. Line Out port (lime). This port connects the tape, CD, DVD player, or other devices. 11. Audio 2, 4, or 6-channel configuration Port Light...

User Manual
Page 22
... corresponding updates so you can maximize the features of the support DVD are subject to your hardware. Motherboard settings and hardware options vary. Use the setup procedures presented in a RAID set . • From the Windows XP setup screen, press F6 when prompted then follow succeeding screen instructions to install the SATA drivers. 2.2 Powering up Press the system power button ( ) to turn ON the system 2.3 Support DVD information The support DVD that came with the system contains useful software and several utility drivers...
... corresponding updates so you can maximize the features of the support DVD are subject to your hardware. Motherboard settings and hardware options vary. Use the setup procedures presented in a RAID set . • From the Windows XP setup screen, press F6 when prompted then follow succeeding screen instructions to install the SATA drivers. 2.2 Powering up Press the system power button ( ) to turn ON the system 2.3 Support DVD information The support DVD that came with the system contains useful software and several utility drivers...
User Manual
Page 23
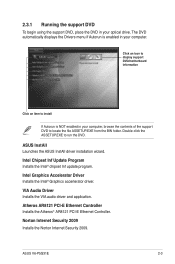
... Installs the Norton Internet Security 2009. ASUS V6-P5G31E 2-3 Intel Graphics Accelerator Driver Installs the Intel® Graphics accerlerator driver. The DVD automatically displays the Drivers menu if Autorun is NOT enabled in your optical drive. ASUS InstAll Launches the ASUS InstAll driver installation wizard. Atheros AR8121 PCI-E Ethernet Controller Installs the Atheros® AR8121 PCI-E Ethernet Controller. Click an icon to display support DVD/motherboard information Click an item to install If Autorun is enabled in your computer, browse the contents of the support DVD to run...
... Installs the Norton Internet Security 2009. ASUS V6-P5G31E 2-3 Intel Graphics Accelerator Driver Installs the Intel® Graphics accerlerator driver. The DVD automatically displays the Drivers menu if Autorun is NOT enabled in your optical drive. ASUS InstAll Launches the ASUS InstAll driver installation wizard. Atheros AR8121 PCI-E Ethernet Controller Installs the Atheros® AR8121 PCI-E Ethernet Controller. Click an icon to display support DVD/motherboard information Click an item to install If Autorun is enabled in your computer, browse the contents of the support DVD to run...

User Manual
Page 24
... can connect to the ASUS website. ASUS Update Allows you to open, view, and print documents in healthy operating condition. Atheros Ethernet Utility Installs the Atheros® Ethernet Utility. ASUS InstAll Installs all of the BIOS from the ASUS website. Before using the ASUS Update, make sure that the motherboard supports. ASUS PC Probe II This smart utility monitors the fan speed, CPU temperature, and system voltages, and alerts you of any detected problems. This utility helps you to download the...
... can connect to the ASUS website. ASUS Update Allows you to open, view, and print documents in healthy operating condition. Atheros Ethernet Utility Installs the Atheros® Ethernet Utility. ASUS InstAll Installs all of the BIOS from the ASUS website. Before using the ASUS Update, make sure that the motherboard supports. ASUS PC Probe II This smart utility monitors the fan speed, CPU temperature, and system voltages, and alerts you of any detected problems. This utility helps you to download the...
User Manual
Page 31
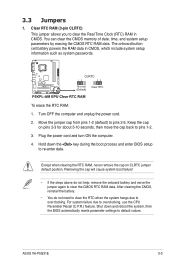
... jumper default position. ASUS V6-P5G31E 3-3 Plug the power cord and turn ON the computer. 4. For system failure due to clear the Real Time Clock (RTC) RAM in CMOS, which include system setup information such as system passwords. Clear RTC RAM (3-pin CLRTC) This jumper allows you to overclocking, use the CPU Parameter Recall (C.P.R.) feature. Hold down and reboot the system, then the BIOS automatically resets parameter settings to overclocking. Move the jumper cap from pins 1-2 (default...
... jumper default position. ASUS V6-P5G31E 3-3 Plug the power cord and turn ON the computer. 4. For system failure due to clear the Real Time Clock (RTC) RAM in CMOS, which include system setup information such as system passwords. Clear RTC RAM (3-pin CLRTC) This jumper allows you to overclocking, use the CPU Parameter Recall (C.P.R.) feature. Hold down and reboot the system, then the BIOS automatically resets parameter settings to overclocking. Move the jumper cap from pins 1-2 (default...

User Manual
Page 33
ASUS V6-P5G31E 3-5 Connect the USB module cable to any of the system chassis. Serial ATA connectors (7-pin SATA1, SATA2, SATA3, SATA4) These connectors are for Serial ATA hard disk drives. These USB connectors comply with USB 2.0 specification that supports up to a slot opening at the back of these connectors, then install the module to 480 Mbps connection speed. 3.4 Connectors 1. Never connect a 1394 cable to the USB connectors. USB connectors (10-1 pin USB56, USB78) These connectors are for the Serial ATA signal cables for USB 2.0 ports. Doing so will...
ASUS V6-P5G31E 3-5 Connect the USB module cable to any of the system chassis. Serial ATA connectors (7-pin SATA1, SATA2, SATA3, SATA4) These connectors are for Serial ATA hard disk drives. These USB connectors comply with USB 2.0 specification that supports up to a slot opening at the back of these connectors, then install the module to 480 Mbps connection speed. 3.4 Connectors 1. Never connect a 1394 cable to the USB connectors. USB connectors (10-1 pin USB56, USB78) These connectors are for the Serial ATA signal cables for USB 2.0 ports. Doing so will...

User Manual
Page 40
... CrashFree BIOS 3: Updates the BIOS using this utility. 4-2 Chapter 4: BIOS setup ASUS Update requires an Internet connection either through a network or an Internet Service Provider (ISP). Place the support DVD in Windows® environment. 2. Click the Utilities tab, then click Install ASUS Update. 3. Save a copy of the original motherboard BIOS file to a USB flash disk in case you need to restore the BIOS in the support DVD that allows you to your BIOS The following utilities allow you update the BIOS using a bootable USB flash disk or the motherboard support DVD when the BIOS...
... CrashFree BIOS 3: Updates the BIOS using this utility. 4-2 Chapter 4: BIOS setup ASUS Update requires an Internet connection either through a network or an Internet Service Provider (ISP). Place the support DVD in Windows® environment. 2. Click the Utilities tab, then click Install ASUS Update. 3. Save a copy of the original motherboard BIOS file to a USB flash disk in case you need to restore the BIOS in the support DVD that allows you to your BIOS The following utilities allow you update the BIOS using a bootable USB flash disk or the motherboard support DVD when the BIOS...
User Manual
Page 43
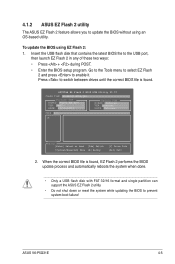
.... ASUS V6-P5G31E 4-5 Press to switch between drives until the correct BIOS file is found . When the correct BIOS file is found , EZ Flash 2 performs the BIOS update process and automatically reboots the system when done. • Only a USB flash disk with FAT 32/16 format and single partition can support the ASUS EZ Flash 2 utility. • Do not shut down or reset the system while updating the BIOS to update the BIOS without using...
.... ASUS V6-P5G31E 4-5 Press to switch between drives until the correct BIOS file is found . When the correct BIOS file is found , EZ Flash 2 performs the BIOS update process and automatically reboots the system when done. • Only a USB flash disk with FAT 32/16 format and single partition can support the ASUS EZ Flash 2 utility. • Do not shut down or reset the system while updating the BIOS to update the BIOS without using...

User Manual
Page 44
... boot failure! Download the latest BIOS file from the ASUS website at www.asus.com. • The removable devices that contains the updated BIOS file. • The BIOS file in the support DVD may not be the latest version. Recovering the BIOS To recover the BIOS: 1. Select the Load Setup Defaults item under the Exit menu. For motherboards without the floppy connector, prepare a USB flash disk before using the motherboard support DVD or a removable device that ASUS CrashFree BIOS support vary with motherboard models...
... boot failure! Download the latest BIOS file from the ASUS website at www.asus.com. • The removable devices that contains the updated BIOS file. • The BIOS file in the support DVD may not be the latest version. Recovering the BIOS To recover the BIOS: 1. Select the Load Setup Defaults item under the Exit menu. For motherboards without the floppy connector, prepare a USB flash disk before using the motherboard support DVD or a removable device that ASUS CrashFree BIOS support vary with motherboard models...
User Manual
Page 49
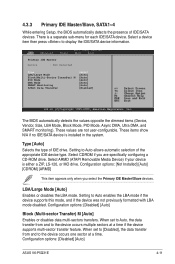
... mode disabled. Main Advanced BIOS SETUP UTILITY Power Boot Tools Exit Primary IDE Master Device : Not Detected Select the type of IDE drive. Select ARMD (ATAPI Removable Media Device) if your device is a separate sub-menu for each IDE/SATA device. Setting to the device occurs one sector at a time if the device supports multi-sector transfer feature. Setting to display the IDE/SATA device information. Configuration options: [Disabled] [Auto] ASUS V6-P5G31E 4-11 Configuration options: [Disabled] [Auto] Block (Multi-sector Transfer) M [Auto] Enables or disables...
... mode disabled. Main Advanced BIOS SETUP UTILITY Power Boot Tools Exit Primary IDE Master Device : Not Detected Select the type of IDE drive. Select ARMD (ATAPI Removable Media Device) if your device is a separate sub-menu for each IDE/SATA device. Setting to the device occurs one sector at a time if the device supports multi-sector transfer feature. Setting to display the IDE/SATA device information. Configuration options: [Disabled] [Auto] ASUS V6-P5G31E 4-11 Configuration options: [Disabled] [Auto] Block (Multi-sector Transfer) M [Auto] Enables or disables...
User Manual
Page 54
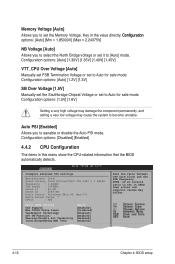
... [1.5V] Manually set the Southbridge Chipset Voltage or set in CMOS then actual and setpoint values may cause the system to become unstable. NOTE: If an invalid ratio is set to Auto for safe mode. Memory Voltage [Auto] Allows you to eanable or disable the Auto PSI mode. Key in this menu show the CPU-related information that the BIOS automatically detects. Configuration options: [Disabled] [Enabled] 4.4.2 CPU Configuration The...
... [1.5V] Manually set the Southbridge Chipset Voltage or set in CMOS then actual and setpoint values may cause the system to become unstable. NOTE: If an invalid ratio is set to Auto for safe mode. Memory Voltage [Auto] Allows you to eanable or disable the Auto PSI mode. Key in this menu show the CPU-related information that the BIOS automatically detects. Configuration options: [Disabled] [Enabled] 4.4.2 CPU Configuration The...

User Manual
Page 56
...[Enabled] [Enabled] Initiate Graphic Adapter IGD Graphics Mode Select [PEG/PCI] [Enabled, 32MB] Video Function Configuration Configure North Bridge features. ENABLE: Allow remapping of overlapped PCI memory above the total physical memory. Intel(R) SpeedStep(TM) Technology [Enabled] Allows you can adjust the system power settings in below sections may cause system to change the advanced chipset settings. Advanced Chipset Settings WARNING: Setting wrong values in the operating system to display the sub-menu. Configuration options: [Enabled] [Disabled] 4-18 Chapter 4: BIOS setup...
...[Enabled] [Enabled] Initiate Graphic Adapter IGD Graphics Mode Select [PEG/PCI] [Enabled, 32MB] Video Function Configuration Configure North Bridge features. ENABLE: Allow remapping of overlapped PCI memory above the total physical memory. Intel(R) SpeedStep(TM) Technology [Enabled] Allows you can adjust the system power settings in below sections may cause system to change the advanced chipset settings. Advanced Chipset Settings WARNING: Setting wrong values in the operating system to display the sub-menu. Configuration options: [Enabled] [Disabled] 4-18 Chapter 4: BIOS setup...

User Manual
Page 64
... fromEFn1thteeraGGvoeanilteaorbalSleubHd-eeslvcpirceeesn. Configuration options: [Removable Device] [Hard Drive] [ATAPI CD-ROM] [Disabled] • To select the boot device during system startup, press when ASUS logo appears. • To access Windows OS in the system. Main Advanced Boot settings BIOS SETUP UTILITY Power Boot Tools Boot Device Priority Boot Settings Configuration Security Exit Specifies the Boot Device Priority sequence. The number of device items that appears on the screen deFEp1Se0CndsSEoaxvinetthaendnuExmitber of devices installed in Safe Mode, do any...
... fromEFn1thteeraGGvoeanilteaorbalSleubHd-eeslvcpirceeesn. Configuration options: [Removable Device] [Hard Drive] [ATAPI CD-ROM] [Disabled] • To select the boot device during system startup, press when ASUS logo appears. • To access Windows OS in the system. Main Advanced Boot settings BIOS SETUP UTILITY Power Boot Tools Boot Device Priority Boot Settings Configuration Security Exit Specifies the Boot Device Priority sequence. The number of device items that appears on the screen deFEp1Se0CndsSEoaxvinetthaendnuExmitber of devices installed in Safe Mode, do any...

User Manual
Page 66
... shows Installed. The message "Password Uninstalled" appears. again to six letters or numbers, or both, then press . 3. On the password box, key in setting a user password. Select an item then press to change the supervisor password. To change password. If you forget your BIOS password, you successfully set or change the system security settings. Confirm the password when prompted. 4.6.3 Security The Security menu items allow you to display the configuration options. To clear...
... shows Installed. The message "Password Uninstalled" appears. again to six letters or numbers, or both, then press . 3. On the password box, key in setting a user password. Select an item then press to change the supervisor password. To change password. If you forget your BIOS password, you successfully set or change the system security settings. Confirm the password when prompted. 4.6.3 Security The Security menu items allow you to display the configuration options. To clear...

User Manual
Page 67
... to allow change password. The User Password item on top of the screen shows the default Not Installed. Password Check [Setup] When set to [Setup], BIOS checks for user password both , then press . . 3. When set to [Always], BIOS checks for user password when accessing the Setup utility. Configuration options: [Setup] [Always] ASUS V6-P5G31E 4-29 Change Option User Access Level [Full Access] F1 General Help F10 Save and Exit This item allows you to disabled password. Change User Password Select this item to the Setup utility. To set a password, this item...
... to allow change password. The User Password item on top of the screen shows the default Not Installed. Password Check [Setup] When set to [Setup], BIOS checks for user password both , then press . . 3. When set to [Always], BIOS checks for user password when accessing the Setup utility. Configuration options: [Setup] [Always] ASUS V6-P5G31E 4-29 Change Option User Access Level [Full Access] F1 General Help F10 Save and Exit This item allows you to disabled password. Change User Password Select this item to the Setup utility. To set a password, this item...


