
786 MANUAL TERMINATOR TUALATIN English V1.0
Page 5
... Contents Disclaimer/Copyrights 2 ASUS Contact Information 3 FCC/CDC Statements 4 System Package Contents 7 Introduction: About This Guide 9 Audience 10 Contents Description 10 Chapter 1: System Introduction 11 1.1 Front Panel Features 12 1.2 Rear Panel Features 13 Chapter 2: Basic Installation 15 2.1 Remove the Cover 16 2.2 Detach the Drive Frame 17 2.3 Install a CPU 19 2.4 Install System Memory...
... Contents Disclaimer/Copyrights 2 ASUS Contact Information 3 FCC/CDC Statements 4 System Package Contents 7 Introduction: About This Guide 9 Audience 10 Contents Description 10 Chapter 1: System Introduction 11 1.1 Front Panel Features 12 1.2 Rear Panel Features 13 Chapter 2: Basic Installation 15 2.1 Remove the Cover 16 2.2 Detach the Drive Frame 17 2.3 Install a CPU 19 2.4 Install System Memory...

786 MANUAL TERMINATOR TUALATIN English V1.0
Page 6
3.7 Central Processing Unit (CPU 46 3.8 Expansion Cards 47 3.9 Connectors 49 Chapter 4: Starting Up 61 4.1 Powering Up the First Time 62 4.2 Install the Operating System 64 4.3 ASUS PC Probe 67 Chapter 5: BIOS Information 73 5.1 Managing and Updating Your BIOS 74 5.2 BIOS Setup Program 78 5.3 Main Menu 81 5.4 Advanced Menu 87 5.5 Power Menu 97 5.6 Boot Menu 102 5.7 Exit Menu 104 6
3.7 Central Processing Unit (CPU 46 3.8 Expansion Cards 47 3.9 Connectors 49 Chapter 4: Starting Up 61 4.1 Powering Up the First Time 62 4.2 Install the Operating System 64 4.3 ASUS PC Probe 67 Chapter 5: BIOS Information 73 5.1 Managing and Updating Your BIOS 74 5.2 BIOS Setup Program 78 5.3 Main Menu 81 5.4 Advanced Menu 87 5.5 Power Menu 97 5.6 Boot Menu 102 5.7 Exit Menu 104 6

786 MANUAL TERMINATOR TUALATIN English V1.0
Page 19
Unlock the socket by pressing the lever sideways then lifting it up to install a CPU. 1. Follow these steps to a 90°-100° angle. Locate the CPU socket on the motherboard. CPU Fan Connector (CPU_FAN) CPU Socket 370 2. Socket Pin 1 ASUS Terminator Barebone System 19 2.3 Install a CPU The ASUS TUSC motherboard that comes installed in the chassis has a Socket 370 that supports an Intel Pentium III/Celeron processor.
Unlock the socket by pressing the lever sideways then lifting it up to install a CPU. 1. Follow these steps to a 90°-100° angle. Locate the CPU socket on the motherboard. CPU Fan Connector (CPU_FAN) CPU Socket 370 2. Socket Pin 1 ASUS Terminator Barebone System 19 2.3 Install a CPU The ASUS TUSC motherboard that comes installed in the chassis has a Socket 370 that supports an Intel Pentium III/Celeron processor.

786 MANUAL TERMINATOR TUALATIN English V1.0
Page 20
...Pin 1 5. Push down the lever to the 3-pin CPU_FAN connector on the motherboard. 2.3 Install a CPU 3. Refer to prevent bending the pins and damaging the CPU. The lever clicks in step 1. If the CPU does not fit completely, check its notched or marked corner matches the Socket Pin 1, while making sure... that the socket is parallel to the socket. Carefully insert the CPU into the socket to the picture in place indicating that the CPU is locked. 6. Connect the CPU fan cable to secure the CPU. DO NOT force the CPU into the socket until it fits in one orientation...
...Pin 1 5. Push down the lever to the 3-pin CPU_FAN connector on the motherboard. 2.3 Install a CPU 3. Refer to prevent bending the pins and damaging the CPU. The lever clicks in step 1. If the CPU does not fit completely, check its notched or marked corner matches the Socket Pin 1, while making sure... that the socket is parallel to the socket. Carefully insert the CPU into the socket to the picture in place indicating that the CPU is locked. 6. Connect the CPU fan cable to secure the CPU. DO NOT force the CPU into the socket until it fits in one orientation...
786 MANUAL TERMINATOR TUALATIN English V1.0
Page 37
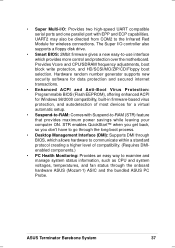
...long boot process. • Desktop Management Interface (DMI): Supports DMI through BIOS, which provides more control and protection over the motherboard. ASUS Terminator Barebone System 37 Provides Vcore and CPU/SDRAM frequency adjustments, boot block write protection, and HD/SCSI/MO/ZIP/CD/Floppy boot selection. • Super Multi-I /O controller ... of compatibility. (Requires DMIenabled components.) • PC Health Monitoring: Provides an easy way to examine and manage system status information, such as CPU and system voltages, temperatures, and fan status through the onboard hardware...
...long boot process. • Desktop Management Interface (DMI): Supports DMI through BIOS, which provides more control and protection over the motherboard. ASUS Terminator Barebone System 37 Provides Vcore and CPU/SDRAM frequency adjustments, boot block write protection, and HD/SCSI/MO/ZIP/CD/Floppy boot selection. • Super Multi-I /O controller ... of compatibility. (Requires DMIenabled components.) • PC Health Monitoring: Provides an easy way to examine and manage system status information, such as CPU and system voltages, temperatures, and fan status through the onboard hardware...
786 MANUAL TERMINATOR TUALATIN English V1.0
Page 41
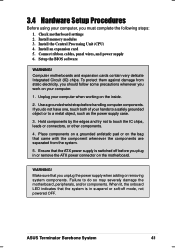
...not powered OFF. WARNING! Make sure that the ATX power supply is in or remove the ATX power connector on the inside. 2. ASUS Terminator Barebone System 41 When lit, the onboard LED indicates that came with the component whenever the components are separated from static electricity, you...have one, touch both of your computer, you plug in suspend or soft-off before handling computer components. Install the Central Processing Unit (CPU) 4. Ensure that you do so may severely damage the motherboard, peripherals, and/or components. Failure to touch the IC chips, leads ...
...not powered OFF. WARNING! Make sure that the ATX power supply is in or remove the ATX power connector on the inside. 2. ASUS Terminator Barebone System 41 When lit, the onboard LED indicates that came with the component whenever the components are separated from static electricity, you...have one, touch both of your computer, you plug in suspend or soft-off before handling computer components. Install the Central Processing Unit (CPU) 4. Ensure that you do so may severely damage the motherboard, peripherals, and/or components. Failure to touch the IC chips, leads ...
786 MANUAL TERMINATOR TUALATIN English V1.0
Page 43
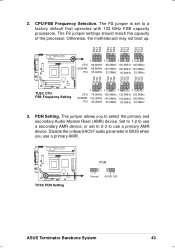
...of the processor. PDN Setting. FS2 FS1 FS0 FS2 FS1 FS0 FS2 FS1 FS0 FS2 FS1 FS0 TUSC 1 1 1 1 ® CPU 66.8MHz 66.6MHz 100.0MHz 100.0MHz SDRAM 66.8MHz 100.0MHz 100.0MHz 133.3MHz PCI 33.4MHz 33.3MHz 33.3MHz ...33.3MHz FS2 FS1 FS0 FS2 FS1 FS0 FS2 FS1 FS0 FS2 FS1 FS0 TUSC CPU FSB Frequency Setting 1 1 1 1 CPU 70.0MHz 105.0MHz 133.3MHz 133.3MHz SDRAM 105.0MHz 140.0MHz 133.3MHz 100.0MHz PCI 35.0MHz... in BIOS when you to use a primary AMR. TUSC ® TUSC PDN Setting PDN 12 Normal 23 AUDIO DIS ASUS Terminator Barebone System 43
...of the processor. PDN Setting. FS2 FS1 FS0 FS2 FS1 FS0 FS2 FS1 FS0 FS2 FS1 FS0 TUSC 1 1 1 1 ® CPU 66.8MHz 66.6MHz 100.0MHz 100.0MHz SDRAM 66.8MHz 100.0MHz 100.0MHz 133.3MHz PCI 33.4MHz 33.3MHz 33.3MHz ...33.3MHz FS2 FS1 FS0 FS2 FS1 FS0 FS2 FS1 FS0 FS2 FS1 FS0 TUSC CPU FSB Frequency Setting 1 1 1 1 CPU 70.0MHz 105.0MHz 133.3MHz 133.3MHz SDRAM 105.0MHz 140.0MHz 133.3MHz 100.0MHz PCI 35.0MHz... in BIOS when you to use a primary AMR. TUSC ® TUSC PDN Setting PDN 12 Normal 23 AUDIO DIS ASUS Terminator Barebone System 43

786 MANUAL TERMINATOR TUALATIN English V1.0
Page 44
... generally thinner with memory chips) of choice for a system memory configuration of 32MB up to operate 100MHz/133MHz, use only PC100-/PC133-compliant DIMMs. • ASUS motherboards support Serial Presence Detect (SPD) DIMMs. This is the memory of the DIMM takes up one row on bootup screen. • Single-sided DIMMs... come in 32, 64,128, 256MB; One side (with higher pin density than 18 chips are not supported on this motherboard. • For the system CPU bus to 1GB.
... generally thinner with memory chips) of choice for a system memory configuration of 32MB up to operate 100MHz/133MHz, use only PC100-/PC133-compliant DIMMs. • ASUS motherboards support Serial Presence Detect (SPD) DIMMs. This is the memory of the DIMM takes up one row on bootup screen. • Single-sided DIMMs... come in 32, 64,128, 256MB; One side (with higher pin density than 18 chips are not supported on this motherboard. • For the system CPU bus to 1GB.

786 MANUAL TERMINATOR TUALATIN English V1.0
Page 46
... FC-PGA TUSC ® Gold Arrow Pentium III (Tualatin) FC-PGA2 TUSC Socket 370 Gold Arrow Note in the illustration that you match the marked corner of the CPU with the corresponding corner on one before installing the CPU. Be careful not to scrape the motherboard when mounting/...you obtain one corner) to help you identify the proper orientation and enable you buy a CPU, the heatsink and fan are already attached to the CPU. Failure to do so will cause the CPU to avoid damaging the motherboard. 46 Chapter 3: Motherboard Information WARNING! Install an auxillary fan...
... FC-PGA TUSC ® Gold Arrow Pentium III (Tualatin) FC-PGA2 TUSC Socket 370 Gold Arrow Note in the illustration that you match the marked corner of the CPU with the corresponding corner on one before installing the CPU. Be careful not to scrape the motherboard when mounting/...you obtain one corner) to help you identify the proper orientation and enable you buy a CPU, the heatsink and fan are already attached to the CPU. Failure to do so will cause the CPU to avoid damaging the motherboard. 46 Chapter 3: Motherboard Information WARNING! Install an auxillary fan...
786 MANUAL TERMINATOR TUALATIN English V1.0
Page 55
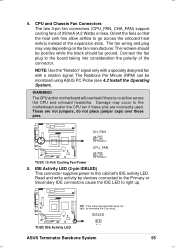
...plug may occur to the motherboard and/or the CPU fan if these pins are not jumpers, do not place jumper caps over these pins. The Rotations Per Minute (RPM) can be ground. WARNING! IDELED TUSC IDE Activity LED ASUS Terminator Barebone System 55 The red wire should be ...positive while the black should be monitored using ASUS PC Probe (see 4.2 Install the Operating System). Connect the fan plug to go across the CPU and onboard heatsinks. NOTE: Use the "Rotation" ...
...plug may occur to the motherboard and/or the CPU fan if these pins are not jumpers, do not place jumper caps over these pins. The Rotations Per Minute (RPM) can be ground. WARNING! IDELED TUSC IDE Activity LED ASUS Terminator Barebone System 55 The red wire should be ...positive while the black should be monitored using ASUS PC Probe (see 4.2 Install the Operating System). Connect the fan plug to go across the CPU and onboard heatsinks. NOTE: Use the "Rotation" ...

786 MANUAL TERMINATOR TUALATIN English V1.0
Page 62
... DRAM installed or detected One long beep followed by Video card not found or video card three short beeps memory bad High frequency beeps when CPU overheated system is equipped with "green" standards or if it has a power standby feature, the monitor LED may have failed a power-on tests. Connect the...
... DRAM installed or detected One long beep followed by Video card not found or video card three short beeps memory bad High frequency beeps when CPU overheated system is equipped with "green" standards or if it has a power standby feature, the monitor LED may have failed a power-on tests. Connect the...
786 MANUAL TERMINATOR TUALATIN English V1.0
Page 66
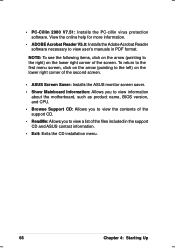
...for more information. • ADOBE Acrobat Reader V5.0: Installs the Adobe Acrobat Reader software necessary to view user's manuals in the support CD and ASUS contact information. • Exit: Exits the CD installation menu. 66 Chapter 4: Starting Up NOTE: To see the following items, click on the... Saver: Installs the ASUS monitor screen saver. • Show Mainboard Information: Allows you to view information about the motherboard, such as product name, BIOS version, and CPU. • Browse Support CD: Allows you to view the contents of the support CD. • ReadMe: Allows you to the ...
...for more information. • ADOBE Acrobat Reader V5.0: Installs the Adobe Acrobat Reader software necessary to view user's manuals in the support CD and ASUS contact information. • Exit: Exits the CD installation menu. 66 Chapter 4: Starting Up NOTE: To see the following items, click on the... Saver: Installs the ASUS monitor screen saver. • Show Mainboard Information: Allows you to view information about the motherboard, such as product name, BIOS version, and CPU. • Browse Support CD: Allows you to view the contents of the support CD. • ReadMe: Allows you to the ...

786 MANUAL TERMINATOR TUALATIN English V1.0
Page 67
ASUS Terminator Barebone System 67 To bypass this startup screen, clear the Show up in next execution check box. 4.3 ASUS PC Probe ASUS PC Probe is running. Clicking the icon allows you to Programs, and then ASUS Utility, and then click Probe Vx.xx. The PC Probe icon ...continuously monitor your computer system's vital components, such as hard disk space, memory usage, and CPU type, CPU speed, and internal/external frequencies through the DMI Explorer. 4.3.1 Starting ASUS PC Probe When ASUS PC Probe starts, a splash screen appears allowing you to select whether to show the screen...
ASUS Terminator Barebone System 67 To bypass this startup screen, clear the Show up in next execution check box. 4.3 ASUS PC Probe ASUS PC Probe is running. Clicking the icon allows you to Programs, and then ASUS Utility, and then click Probe Vx.xx. The PC Probe icon ...continuously monitor your computer system's vital components, such as hard disk space, memory usage, and CPU type, CPU speed, and internal/external frequencies through the DMI Explorer. 4.3.1 Starting ASUS PC Probe When ASUS PC Probe starts, a splash screen appears allowing you to select whether to show the screen...

786 MANUAL TERMINATOR TUALATIN English V1.0
Page 69
... of your PC for future reference. Smart Fan Control adjusts the fan speed automatically based on the current CPU temperature and predefined threshold. ASUS Terminator Barebone System 69 When When CPU Overheated is selected, the CPU cooling system is enabled whenever the CPU temperature reaches the threshold value. History Lets you enable/disable Smart Fan Control...
... of your PC for future reference. Smart Fan Control adjusts the fan speed automatically based on the current CPU temperature and predefined threshold. ASUS Terminator Barebone System 69 When When CPU Overheated is selected, the CPU cooling system is enabled whenever the CPU temperature reaches the threshold value. History Lets you enable/disable Smart Fan Control...

786 MANUAL TERMINATOR TUALATIN English V1.0
Page 70
DMI Explorer Shows information pertinent to the PC, such as CPU type, CPU speed, and internal/external frequencies, and memory size. Utility Lets you run a program, click Execute Program. Device Summary Shows a summary of the ASUS Probe modules. NOTE: This feature is currently unavailable. 70 Chapter 4: Starting Up Memory Shows the PC memory load, memory usage, and paging file usage. To run programs outside of devices present in your PC.
DMI Explorer Shows information pertinent to the PC, such as CPU type, CPU speed, and internal/external frequencies, and memory size. Utility Lets you run a program, click Execute Program. Device Summary Shows a summary of the ASUS Probe modules. NOTE: This feature is currently unavailable. 70 Chapter 4: Starting Up Memory Shows the PC memory load, memory usage, and paging file usage. To run programs outside of devices present in your PC.
786 MANUAL TERMINATOR TUALATIN English V1.0
Page 87
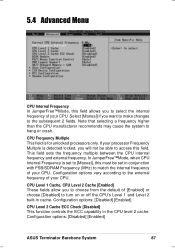
... [Manual] if you to match the internal frequency of your CPU. Configuration options: [Disabled] [Enabled] ASUS Terminator Barebone System 87 This field sets the frequency multiple between the CPU internal frequency and external frequency. If your CPU. Note that selecting a frequency higher than the CPU manufacturer recommends may cause the system to turn on or off...
... [Manual] if you to match the internal frequency of your CPU. Configuration options: [Disabled] [Enabled] ASUS Terminator Barebone System 87 This field sets the frequency multiple between the CPU internal frequency and external frequency. If your CPU. Note that selecting a frequency higher than the CPU manufacturer recommends may cause the system to turn on or off...

786 MANUAL TERMINATOR TUALATIN English V1.0
Page 90
...] Memory Hole At Address [None] This parameter allows you to reserve an address space for the video memory of the processor. Configuration options: [None] [Enabled] CPU to VGA Memory Post Write [Enabled] Configuration options: [Enabled] [Disabled] Video Memory Cache Mode [USWC] USWC (uncacheable, speculative write combining) is a new cache technology for...
...] Memory Hole At Address [None] This parameter allows you to reserve an address space for the video memory of the processor. Configuration options: [None] [Enabled] CPU to VGA Memory Post Write [Enabled] Configuration options: [Enabled] [Disabled] Video Memory Cache Mode [USWC] USWC (uncacheable, speculative write combining) is a new cache technology for...

786 MANUAL TERMINATOR TUALATIN English V1.0
Page 101
...continue, DEL to [Ignore] only if necessary. ASUS Terminator Barebone System 101 VCORE Voltage, +3.3V Voltage, +5V Voltage, +12V Voltage [xx.xxV] The onboard hardware monitor is able to detect the Power Supply and CPU temperatures. 5.5.2 Hardware Monitor CPU Temperature [N/A] JTPWR Temperature [N/A] The onboard hardware monitor...of the fans is able to [Ignore] only if necessary. Set to detect the CPU fan speed and the chassis fan speed in rotations per minute (RPM). Chassis Fan Speed [N/A] CPU Fan Speed [xxxxRPM] / Chassis Fan Speed [xxxxRPM] The onboard hardware monitor is ...
...continue, DEL to [Ignore] only if necessary. ASUS Terminator Barebone System 101 VCORE Voltage, +3.3V Voltage, +5V Voltage, +12V Voltage [xx.xxV] The onboard hardware monitor is able to detect the Power Supply and CPU temperatures. 5.5.2 Hardware Monitor CPU Temperature [N/A] JTPWR Temperature [N/A] The onboard hardware monitor...of the fans is able to [Ignore] only if necessary. Set to detect the CPU fan speed and the chassis fan speed in rotations per minute (RPM). Chassis Fan Speed [N/A] CPU Fan Speed [xxxxRPM] / Chassis Fan Speed [xxxxRPM] The onboard hardware monitor is ...


