Asus T3-M2NC51PV - T Series - 0 MB RAM Support and Manuals
Get Help and Manuals for this Asus item
View All Support Options Below
Free Asus T3-M2NC51PV manuals!
Problems with Asus T3-M2NC51PV?
Ask a Question
Free Asus T3-M2NC51PV manuals!
Problems with Asus T3-M2NC51PV?
Ask a Question
Asus T3-M2NC51PV Videos

ASUS T3-M2NC51PV
Duration: 3:25
Total Views: 794
Duration: 3:25
Total Views: 794
Popular Asus T3-M2NC51PV Manual Pages
User Guide - Page 8
... the power supply unit specification for this guide is intended for experienced users and integrators with the system. About this guide
Audience
This guide provides general information and installation instructions about the motherboard that comes with hardware knowledge of the ASUS T3-M2NC51PV.
Chapter 3: Starting up This chapter helps you power up the system and install drivers...
User Guide - Page 29
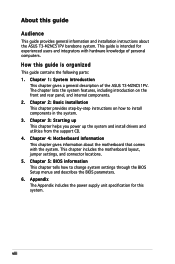
2.6.2 DIMM installation
To install a DDR2 DIMM:
1.
Firmly insert the DIMM into a socket to avoid damaging the DIMM! DO NOT force a DIMM into the socket until the retaining clips snap back in only one direction. ASUS T3-M2NC51PV
2-13 Retaining clips 2
2
3 4
4
1
A DDR2 DIMM is properly seated. Unlock...a notch so that the notch on the DIMM matches the break on the motherboard.
2.
User Guide - Page 31
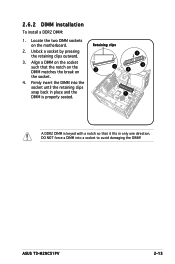
...Secure the card with it with the slot, then press firmly. 5. ASUS T3-M2NC51PV
2-15 Locate and remove one screw. 6. Before installing the expansion card, read the documentation that came with one metal bracket...
2. Replace the metal braket lock, then secure it and make the necessary hardware settings for ISA or PCI devices. 2.7.2 Expansion card installation
To install an expansion card:
...
User Guide - Page 33
... of the power supply unit.
1
ASUS T3-M2NC51PV
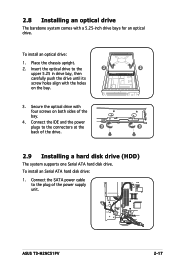
2-17 Connect the SATA power cable
to the
2
2
upper 5.25 in drive bay, then
carefully push the drive until its
screw holes align with four screws on the bay.
3. Insert the optical drive to the plug of the drive.
2.9 Installing a hard disk drive (HDD)
The system supports one Serial ATA...
User Guide - Page 35
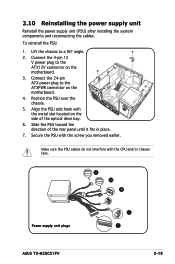
... bay. 6. Lift the chassis to the ATXPWR connector on the motherboard. 4. Align the PSU side hook with the metal slot located on the motherboard. 3. Secure the PSU with the CPU and/or chassis fans.
8
9A
9B
Power supply unit plugs
2 3
ASUS T3-M2NC51PV
2-19 Connect the 4-pin 12
V power plug to the ATX12V connector on the side of the...
User Guide - Page 37
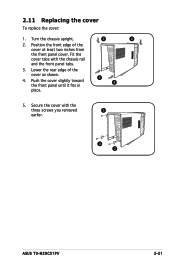
... front panel until it fits in place.
4 4
5. 2.11 Replacing the cover
To replace the cover:
1. Position the front edge of the cover as shown.
4. Secure the cover with the chassis rail and the front panel tabs.
3. Fit the cover tabs with the
three screws you removed
3
earlier.
4 2
ASUS T3-M2NC51PV
2-21 Turn the chassis upright.
3
2
2.
User Guide - Page 40

Press the system power button ( ) to your hardware. 3.1 Installing an operating system
The barebone system supports Windows® 2000/XP operating systems (OS).
Press to change at any time without notice. Because motherboard settings and hardware options vary, use the setup procedures presented in sleep mode (S3) depending on the OS setting.
3.3 Support CD information
The support CD that ...
User Guide - Page 41
ASUS T3-M2NC51PV
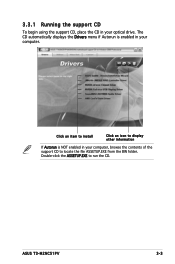
3- Double-click the ASSETUP.EXE to locate the file ASSETUP.EXE from the BIN folder. Click an item to install
Click an icon to display other information
If Autorun is enabled in your computer. The CD automatically displays the Drivers menu if Autorun is NOT enabled in your optical drive. 3.3.1 Running the support CD...
User Guide - Page 45
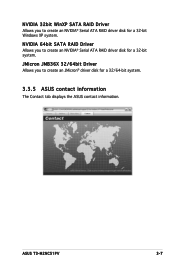
... to create an JMicron® driver disk for a 32/64-bit system.
3.3.5 ASUS contact information
The Contact tab displays the ASUS contact information.
JMicron JMB36X 32/64bit Driver Allows you to create an NVIDIA® Serial ATA RAID driver disk for a 32-bit Windows XP system.
ASUS T3-M2NC51PV
3- NVIDIA 32bit WinXP SATA RAID Driver Allows you to create an NVIDIA...
User Guide - Page 56
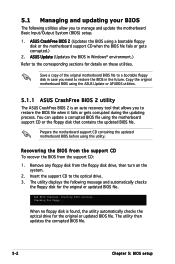
Prepare the motherboard support CD containing the updated motherboard BIOS before using a bootable floppy disk or the motherboard support CD when the BIOS file fails or gets corrupted.)
2. Remove any floppy disk from the support CD:
1. Insert the support CD to manage and update the motherboard Basic Input/Output System (BIOS) setup.
1.
ASUS CrashFree BIOS 2 (Updates the BIOS using this ...
User Guide - Page 57
...Doing so can cause system boot failure!
4.
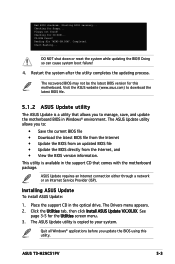
Click the Utilities tab, then click Install ASUS Update VX.XX.XX. ASUS T3-M2NC51PV
5- Bad BIOS checksum. Starting BIOS recovery... Start flashing...
The ASUS Update utility is available in the support CD that allows you to manage, save, and update the motherboard BIOS in the optical drive. CD-ROM found ! DO NOT shut down or reset...
User Guide - Page 59
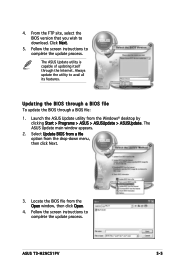
... Follow the screen instructions to download. Launch the ASUS Update utility from the drop‑down menu, then click Next.
3. Locate the BIOS file from the Open window, then click Open.
4. Updating the BIOS through a BIOS file To update the BIOS through the Internet. ASUS T3-M2NC51PV
5- The ASUS Update utility is capable of updating itself through a BIOS file:
1.
4. From...
User Guide - Page 73
...] [13T]... [25T]
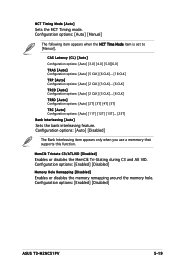
Bank Interleaving [Auto]
Sets the bank interleaving feature. Configuration options: [Enabled]...supports this function. MemClk Tristate C3/ATLVID [Disabled]
Enables or disables the MemClk Tri-Stating during C3 and Alt VID. MCT Timing Mode [Auto]
Sets the MCT Timing mode. Configuration options: [Enabled] [Disabled]
ASUS T3-M2NC51PV
5-19 Configuration options: [Auto] [Manual...
User Guide - Page 83
...trap Interrupt 19. To change password.
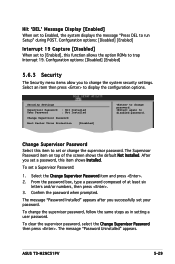
From the password box, type a password composed of the screen shows the default Not Installed. Confirm the password when prompted. Hit 'DEL' Message Display [Enabled] When set a Supervisor Password:
1.
To set to Enabled, the system displays the message "Press DEL to change the supervisor password. ASUS T3-M2NC51PV
5-29
Configuration options...
User Guide - Page 84
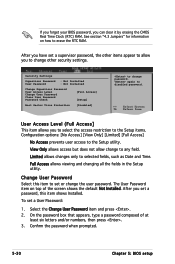
... changing all the fields in the Setup utility. The User Password item on how to set a User Password:
1. To set or change the user password. On the password box that appears, type a password composed of the screen shows the default Not Installed. If you forget your BIOS password, you to change password.
Select the Change User Password item and press . 2.
User Access Level...
Asus T3-M2NC51PV Reviews
We have not received any reviews for Asus yet.