User Guide
Page 10
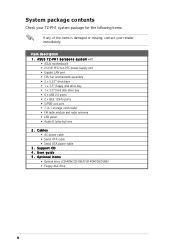
P H 1 b a r e b o n e s y s t e m with • ASUS motherboard • 250 W PFC/non-PFC power supply unit • Gigabit LAN port • CPU fan and heatsink assembly • 2 x 5.25" drive bays • 1 x 3.5" floppy disk drive bay • 1 x 3.5" hard disk drive bay • 6 x USB ... Item description 1 . User guide 5 . Cables • AC power cable • Serial ATA cable • Serial ATA power cable 3 . Support CD 4 . System package contents Check your T2-PH1 system package for the following items. If any of the items is damaged or missing, contact your retailer immediately.
P H 1 b a r e b o n e s y s t e m with • ASUS motherboard • 250 W PFC/non-PFC power supply unit • Gigabit LAN port • CPU fan and heatsink assembly • 2 x 5.25" drive bays • 1 x 3.5" floppy disk drive bay • 1 x 3.5" hard disk drive bay • 6 x USB ... Item description 1 . User guide 5 . Cables • AC power cable • Serial ATA cable • Serial ATA power cable 3 . Support CD 4 . System package contents Check your T2-PH1 system package for the following items. If any of the items is damaged or missing, contact your retailer immediately.
User Guide
Page 24
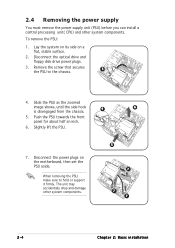
... 4. Lay the system on its side on the motherboard, then set the PSU aside. Remove the screw that secures 3 the PSU to hold or support it firmly. The unit may accidentally drop and damage other system components. To remove the PSU: 1. Slide the PSU as the zoomed image shows, ...on a flat, stable surface. 2. 2.4 Removing the power supply You must remove the power supply unit (PSU) before you can install a central processing unit( CPU) and other system components. 5 7 7 7 2-4 Chapter 2: Basic installation Disconnect the optical drive and floppy disk drive power plugs. 3.
... 4. Lay the system on its side on the motherboard, then set the PSU aside. Remove the screw that secures 3 the PSU to hold or support it firmly. The unit may accidentally drop and damage other system components. To remove the PSU: 1. Slide the PSU as the zoomed image shows, ...on a flat, stable surface. 2. 2.4 Removing the power supply You must remove the power supply unit (PSU) before you can install a central processing unit( CPU) and other system components. 5 7 7 7 2-4 Chapter 2: Basic installation Disconnect the optical drive and floppy disk drive power plugs. 3.
User Guide
Page 50
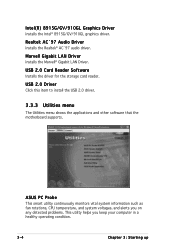
...Card Reader Software Installs the driver for the storage card reader. ASUS PC Probe This smart utility continuously monitors vital system information such as fan rotations, CPU temperature, and system voltages, and alerts you on any detected... problems. This utility helps you keep your computer in a healthy operating condition. 3-4 Chapter 3: Starting up USB 2.0 Driver Click this item to install the USB 2.0 driver. 3.3.3 Utilities menu The Utilities menu shows the applications and other software that the motherboard supports...
...Card Reader Software Installs the driver for the storage card reader. ASUS PC Probe This smart utility continuously monitors vital system information such as fan rotations, CPU temperature, and system voltages, and alerts you on any detected... problems. This utility helps you keep your computer in a healthy operating condition. 3-4 Chapter 3: Starting up USB 2.0 Driver Click this item to install the USB 2.0 driver. 3.3.3 Utilities menu The Utilities menu shows the applications and other software that the motherboard supports...
User Guide
Page 67
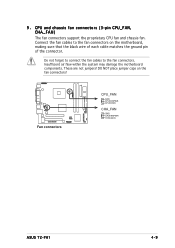
...) The fan connectors support the proprietary CPU fan and chassis fan. Insufficient air flow within the system may damage the motherboard components. Do not forget to connect the fan cables to the fan connectors on the fan connectors! ® Fan connectors CPU_FAN GND CPUFANPWR CPUFANIN CHA_FAN GND CPUFANPWR SYSFANIN ASUS T2-PH1 4-9 These are not...
...) The fan connectors support the proprietary CPU fan and chassis fan. Insufficient air flow within the system may damage the motherboard components. Do not forget to connect the fan cables to the fan connectors on the fan connectors! ® Fan connectors CPU_FAN GND CPUFANPWR CPUFANIN CHA_FAN GND CPUFANPWR SYSFANIN ASUS T2-PH1 4-9 These are not...
User Guide
Page 93
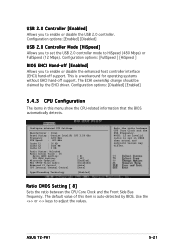
...Hand-off [Enabled] Allows you to set in this item is a workaround for operating systems without EHCI hand-off support. Configure advanced CPU Settings Manufacturer : Intel Brand String : Genuine Intel(R) CPU 3.20 GHz Frequency : 3200 MHz FSB Speed : 800 MHz Cache L1 Cache L2 Cache L3 : 16 KB... (12 Mbps). USB 2.0 Controller [Enabled] Allows you to adjust the values. ASUS T2-PH1 5-21 The ECHI ownership change should be claimed by BIOS. The default value of this menu show the CPU-related information that the BIOS automatically detects. Ratio CMOS Setting [ 8] Sets the ...
...Hand-off [Enabled] Allows you to set in this item is a workaround for operating systems without EHCI hand-off support. Configure advanced CPU Settings Manufacturer : Intel Brand String : Genuine Intel(R) CPU 3.20 GHz Frequency : 3200 MHz FSB Speed : 800 MHz Cache L1 Cache L2 Cache L3 : 16 KB... (12 Mbps). USB 2.0 Controller [Enabled] Allows you to adjust the values. ASUS T2-PH1 5-21 The ECHI ownership change should be claimed by BIOS. The default value of this menu show the CPU-related information that the BIOS automatically detects. Ratio CMOS Setting [ 8] Sets the ...
User Guide
Page 94
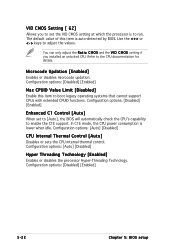
... [Auto], the BIOS will automatically check the CPU's capability to boot legacy operating systems that cannot support CPUs with extended CPUID functions. Configuration options: [Auto] [Disabled] CPU Internal Thermal Control [Auto] Disables or sets the CPU internal thermal control. Configuration options: [Disabled]... CPUID Value Limit [Disabled] Enable this item is lower when idle. In C1E mode, the CPU power consumption is auto-detected by BIOS. Refer to the CPU documentation for details. Configuration options: [Auto] [Disabled] Hyper Threading Technology [Enabled] Enables or disables...
... [Auto], the BIOS will automatically check the CPU's capability to boot legacy operating systems that cannot support CPUs with extended CPUID functions. Configuration options: [Auto] [Disabled] CPU Internal Thermal Control [Auto] Disables or sets the CPU internal thermal control. Configuration options: [Disabled]... CPUID Value Limit [Disabled] Enable this item is lower when idle. In C1E mode, the CPU power consumption is auto-detected by BIOS. Refer to the CPU documentation for details. Configuration options: [Auto] [Disabled] Hyper Threading Technology [Enabled] Enables or disables...


