User Guide
Page 4
... radio station 3-11 3.5.3 Presetting a station 3-12 3.5.4 Adjusting the volume 3-12 Chapter 4: Motherboard Info 4.1 Introduction 4-2 4.2 Motherboard layout 4-2 4.3 Jumpers 4-3 4.4 Connectors 4-5 Chapter 5: BIOS Information 5.1 Managing and updating your BIOS 5-2 5.1.1 Creating a bootable floppy disk 5-2 5.1.2 ASUS EZ Flash utility 5-3 5.1.3 AFUDOS utility 5-4 5.1.4 ASUS CrashFree BIOS 2 utility 5-6 5.1.5 ASUS Update utility 5-8 5.2 BIOS setup program 5-11 5.2.1 BIOS menu screen 5-12 5.2.2 Menu bar 5-12 5.2.3 Navigation keys 5-12 iv
... radio station 3-11 3.5.3 Presetting a station 3-12 3.5.4 Adjusting the volume 3-12 Chapter 4: Motherboard Info 4.1 Introduction 4-2 4.2 Motherboard layout 4-2 4.3 Jumpers 4-3 4.4 Connectors 4-5 Chapter 5: BIOS Information 5.1 Managing and updating your BIOS 5-2 5.1.1 Creating a bootable floppy disk 5-2 5.1.2 ASUS EZ Flash utility 5-3 5.1.3 AFUDOS utility 5-4 5.1.4 ASUS CrashFree BIOS 2 utility 5-6 5.1.5 ASUS Update utility 5-8 5.2 BIOS setup program 5-11 5.2.1 BIOS menu screen 5-12 5.2.2 Menu bar 5-12 5.2.3 Navigation keys 5-12 iv
User Guide
Page 8
Chapter 4: Motherboard information This chapter gives information about the ASUS T2-PH1 barebone system. This chapter includes the motherboard layout, jumper settings, and connector locations. 5. Appendix The Appendix includes the power supply ... 4 . Chapter 5: BIOS information This chapter tells how to install components in the system. 3. How this guide is intended for this system. About this guide Audience This guide provides general information and installation instructions about the motherboard that comes with hardware knowledge of the ASUS T2-PH1. This guide is organized...
Chapter 4: Motherboard information This chapter gives information about the ASUS T2-PH1 barebone system. This chapter includes the motherboard layout, jumper settings, and connector locations. 5. Appendix The Appendix includes the power supply ... 4 . Chapter 5: BIOS information This chapter tells how to install components in the system. 3. How this guide is intended for this system. About this guide Audience This guide provides general information and installation instructions about the motherboard that comes with hardware knowledge of the ASUS T2-PH1. This guide is organized...

User Guide
Page 20
... The LED panel displays the system time in 24-hour format when the system is in soft-off or stand-by mode, S3 (Suspend-to-RAM), or S4 (Suspend-to page 3-11 for details on the system mode. FM radio mode Refer to -Disk) state. Enter the...
... The LED panel displays the system time in 24-hour format when the system is in soft-off or stand-by mode, S3 (Suspend-to-RAM), or S4 (Suspend-to page 3-11 for details on the system mode. FM radio mode Refer to -Disk) state. Enter the...
User Guide
Page 51
... either through a network or an Internet Service Provider (ISP). DirectX® improves the multimedia featuers of your computer so you to update the motherboard BIOS and drivers. ASUS T2-PH1 3-5 Adobe Acrobat Reader V5.0 The Acrobat® Acrobat Reader® software is installed in Portable Document Format (PDF). The Microsoft® DirectX® 9.0c...
... either through a network or an Internet Service Provider (ISP). DirectX® improves the multimedia featuers of your computer so you to update the motherboard BIOS and drivers. ASUS T2-PH1 3-5 Adobe Acrobat Reader V5.0 The Acrobat® Acrobat Reader® software is installed in Portable Document Format (PDF). The Microsoft® DirectX® 9.0c...
User Guide
Page 53
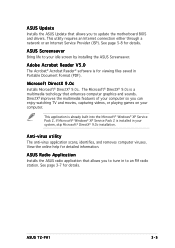
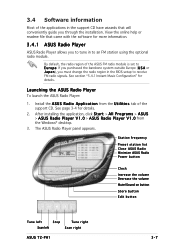
...information Most of the applications in the support CD have wizards that came with the software for more information. 3.4.1 ASUS Radio Player ASUS Radio Player allows you to tune in the BIOS setup to receive FM radio signals. See section "5.4.1 Instant Music Configuration" for details. 2. After installing the ...ASUS Radio Player panel appears. Station frequency Preset station list Close ASUS Radio Minimize ASUS Radio Power button Clock Increase the volume Decrease the volume Mute/Sound on button Store button Edit button Tune left Stop Scan left Tune right Scan right ASUS T2-PH1...
...information Most of the applications in the support CD have wizards that came with the software for more information. 3.4.1 ASUS Radio Player ASUS Radio Player allows you to tune in the BIOS setup to receive FM radio signals. See section "5.4.1 Instant Music Configuration" for details. 2. After installing the ...ASUS Radio Player panel appears. Station frequency Preset station list Close ASUS Radio Minimize ASUS Radio Power button Clock Increase the volume Decrease the volume Mute/Sound on button Store button Edit button Tune left Stop Scan left Tune right Scan right ASUS T2-PH1...
User Guide
Page 55
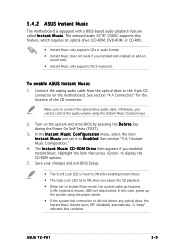
... a b l e d. See section "5.4.1 Instant Music Configuration." 4. Save your changes and exit BIOS Setup. • The Scroll Lock LED is equipped with a BIOS-based audio playback feature called I n s t a n t M u s i c C D - In this condition. ASUS T2-PH1 3-9 To enable ASUS Instant Music: 1. R O M D r i v e item appears if you enabled Instant Music...audio cable. A "beep" indicates this case, power up features (LAN, keyboard, mouse, USB) are deactivated. 3.4.2 ASUS Instant Music The motherboard is fixed to ON after enabling Instant Music. • The Caps Lock LED turns ON when ...
... a b l e d. See section "5.4.1 Instant Music Configuration." 4. Save your changes and exit BIOS Setup. • The Scroll Lock LED is equipped with a BIOS-based audio playback feature called I n s t a n t M u s i c C D - In this condition. ASUS T2-PH1 3-9 To enable ASUS Instant Music: 1. R O M D r i v e item appears if you enabled Instant Music...audio cable. A "beep" indicates this case, power up features (LAN, keyboard, mouse, USB) are deactivated. 3.4.2 ASUS Instant Music The motherboard is fixed to ON after enabling Instant Music. • The Caps Lock LED turns ON when ...
User Guide
Page 56
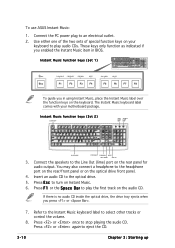
...F6 F7 F8 To guide you press or . 7. If there is no audio CD inside the optical drive, the drive tray ejects when you in BIOS. Refer to the Instant Music keyboard label to eject the CD. 3-10 Chapter 3: Starting up The Instant Music keyboard label comes with your keyboard ...to stop playing the audio CD. UP 3. To use ASUS Instant Music: 1. Instant Music function keys (Set 2) CD ON/OFF CAPS SCROLL LOCK LOCK LED LED PLAY/PAUSE STOP/EJECT PREVIOUS NEXT VOL. You ...
...F6 F7 F8 To guide you press or . 7. If there is no audio CD inside the optical drive, the drive tray ejects when you in BIOS. Refer to the Instant Music keyboard label to eject the CD. 3-10 Chapter 3: Starting up The Instant Music keyboard label comes with your keyboard ...to stop playing the audio CD. UP 3. To use ASUS Instant Music: 1. Instant Music function keys (Set 2) CD ON/OFF CAPS SCROLL LOCK LOCK LED LED PLAY/PAUSE STOP/EJECT PREVIOUS NEXT VOL. You ...

User Guide
Page 60
4.1 Introduction The ASUS T2-PH1 motherboard comes already installed in the ASUS T2-PH1 system. This chapter provides technical information about the motherboard for future upgrades or system reconfiguration. 4.2 Motherboard layout 24.89cm (9.8in) PS/2 T:Mouse B:Keyboard VGA1... VT6307 PCI IE1394_1 IE1394_0 DDR DIMM_B (64/72-bit, 184-pin module) ® DDR DIMM_A (64/72-bit, 184-pin module) LGA775 CPU_FAN Flash BIOS PRI_IDE Intel 915G SB_PWR USB56 USB78 BUZZ BAT J1 Intel ICH6 PANEL SATA2 SATA1 ATXPWR Super I/O LCD_PANEL FLOPPY 20.06cm (7.9in) CLRTC 4-2 Chapter 4: Motherboard ...
4.1 Introduction The ASUS T2-PH1 motherboard comes already installed in the ASUS T2-PH1 system. This chapter provides technical information about the motherboard for future upgrades or system reconfiguration. 4.2 Motherboard layout 24.89cm (9.8in) PS/2 T:Mouse B:Keyboard VGA1... VT6307 PCI IE1394_1 IE1394_0 DDR DIMM_B (64/72-bit, 184-pin module) ® DDR DIMM_A (64/72-bit, 184-pin module) LGA775 CPU_FAN Flash BIOS PRI_IDE Intel 915G SB_PWR USB56 USB78 BUZZ BAT J1 Intel ICH6 PANEL SATA2 SATA1 ATXPWR Super I/O LCD_PANEL FLOPPY 20.06cm (7.9in) CLRTC 4-2 Chapter 4: Motherboard ...
User Guide
Page 61
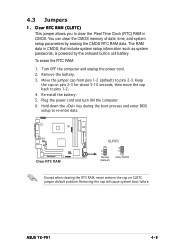
... Jumpers 1. Removing the cap will cause system boot failure. Clear RTC RAM (CLRTC) This jumper allows you to pins 2-3. Remove the battery. 3. Hold down the key during the boot process and enter BIOS setup to pins 1-2. 4. ASUS T2-PH1 4-3 Turn OFF the computer and unplug the power cord. 2. Keep the... cap on pins 2-3 for about 5-10 seconds, then move the cap back to re-enter data. ® Clear RTC RAM CLRTC 2 1 Normal (Default) 3 ...
... Jumpers 1. Removing the cap will cause system boot failure. Clear RTC RAM (CLRTC) This jumper allows you to pins 2-3. Remove the battery. 3. Hold down the key during the boot process and enter BIOS setup to pins 1-2. 4. ASUS T2-PH1 4-3 Turn OFF the computer and unplug the power cord. 2. Keep the... cap on pins 2-3 for about 5-10 seconds, then move the cap back to re-enter data. ® Clear RTC RAM CLRTC 2 1 Normal (Default) 3 ...
User Guide
Page 72
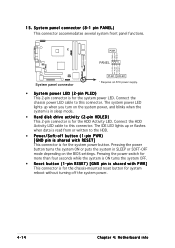
...; System power LED (2-pin PLED) This 2-pin connector is for the system power LED. 15. The IDE LED lights up when you turn on the BIOS settings. Connect the chassis power LED cable to this connector. System panel connector (8-1 pin PANEL) This connector accommodates several system front panel functions. ® PWR...
...; System power LED (2-pin PLED) This 2-pin connector is for the system power LED. 15. The IDE LED lights up when you turn on the BIOS settings. Connect the chassis power LED cable to this connector. System panel connector (8-1 pin PANEL) This connector accommodates several system front panel functions. ® PWR...

User Guide
Page 73
Chapter 5 This chapter tells how to change system settings through the BIOS Setup menus and describes the BIOS parameters. BIOS setup MODE ASUS T2-PH1 1
Chapter 5 This chapter tells how to change system settings through the BIOS Setup menus and describes the BIOS parameters. BIOS setup MODE ASUS T2-PH1 1

User Guide
Page 74
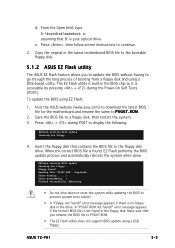
...BIOS using the ASUS Update or AFUDOS utilities. 5.1.1 Creating a bootable floppy disk 1. DOS environment a. Windows® XP environment a. Select the 3 1/2 Floppy Drive icon. Insert a formatted, high density 1.44 MB floppy disk into the drive. b. Copy the original motherboard BIOS using a bootable floppy disk or the motherboard support CD when the BIOS... 3. Click S t a r t, then select R u n. 5-2 Chapter 5: BIOS setup A S U S E Z F l a s h (Updates the BIOS using a bootable floppy disk.) 2. Insert a 1.44 MB floppy disk to the optical drive. Click F i l e from the menu, ...
...BIOS using the ASUS Update or AFUDOS utilities. 5.1.1 Creating a bootable floppy disk 1. DOS environment a. Windows® XP environment a. Select the 3 1/2 Floppy Drive icon. Insert a formatted, high density 1.44 MB floppy disk into the drive. b. Copy the original motherboard BIOS using a bootable floppy disk or the motherboard support CD when the BIOS... 3. Click S t a r t, then select R u n. 5-2 Chapter 5: BIOS setup A S U S E Z F l a s h (Updates the BIOS using a bootable floppy disk.) 2. Insert a 1.44 MB floppy disk to the optical drive. Click F i l e from the menu, ...
User Guide
Page 75
...R O M. 2. Insert the floppy disk that contains the BIOS file to continue. 2. When the correct BIOS file is no floppy disk in the drive. error message appears if the correct BIOS file is your optical drive. ASUS T2-PH1 5-3 Press , then follow screen instructions to the floppy disk... drive. e. From the Open field, type D:\bootdisk\makeboot a: assuming that you to update the BIOS without having to P 5 G 6 T ....
...R O M. 2. Insert the floppy disk that contains the BIOS file to continue. 2. When the correct BIOS file is no floppy disk in the drive. error message appears if the correct BIOS file is your optical drive. ASUS T2-PH1 5-3 Press , then follow screen instructions to the floppy disk... drive. e. From the Open field, type D:\bootdisk\makeboot a: assuming that you to update the BIOS without having to P 5 G 6 T ....

User Guide
Page 76
...use as shown. 1. Boot the system in DOS mode, then at least 600 KB free space to update the BIOS file in DOS environment using a bootable floppy disk with the updated BIOS file. Copy the AFUDOS utility (afudos.exe) from the motherboard support CD to the bootable floppy disk you to ... returns to the floppy disk. A:\>afudos /oOLDBIOS1.ROM AMI Firmware Update Utility - Copying the current BIOS To copy the current BIOS file using the AFUDOS utility: • Make sure that you to copy the current BIOS file that the floppy disk is not write-protected and has at the prompt type: afudos...
...use as shown. 1. Boot the system in DOS mode, then at least 600 KB free space to update the BIOS file in DOS environment using a bootable floppy disk with the updated BIOS file. Copy the AFUDOS utility (afudos.exe) from the motherboard support CD to the bootable floppy disk you to ... returns to the floppy disk. A:\>afudos /oOLDBIOS1.ROM AMI Firmware Update Utility - Copying the current BIOS To copy the current BIOS file using the AFUDOS utility: • Make sure that you to copy the current BIOS file that the floppy disk is not write-protected and has at the prompt type: afudos...

User Guide
Page 77
...! Erasing flash .... A:\>afudos /iP5G6T.ROM 4. A:\>afudos /iP5G6T.ROM AMI Firmware Update Utility - Do not turn off power during flash BIOS Reading file ..... ASUS T2-PH1 5-5 done Reading flash .... Updating the BIOS file To update the BIOS file using the AFUDOS utility: 1. Copy the AFUDOS utility (afudos.exe) from the motherboard support CD to a bootable floppy disk...
...! Erasing flash .... A:\>afudos /iP5G6T.ROM 4. A:\>afudos /iP5G6T.ROM AMI Firmware Update Utility - Do not turn off power during flash BIOS Reading file ..... ASUS T2-PH1 5-5 done Reading flash .... Updating the BIOS file To update the BIOS file using the AFUDOS utility: 1. Copy the AFUDOS utility (afudos.exe) from the motherboard support CD to a bootable floppy disk...

User Guide
Page 78
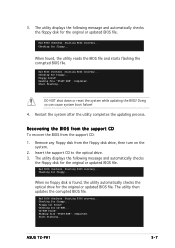
...The utility returns to the DOS prompt after the BIOS update process is an auto recovery tool that you to restore the BIOS file when it fails or gets corrupted during flash BIOS Reading file ..... Version 1.19(ASUS V2.07(03.11.24BB)) Copyright (C) 2003 ...floppy disk with the original or updated BIOS file to P 5 G 6 T . Recovering the BIOS from a floppy disk To recover the BIOS from the hard disk drive. done Reading flash .... R O M. WARNING!! done Please restart your computer A:\> 5.1.4 ASUS CrashFree BIOS 2 utility The ASUS CrashFree BIOS 2 is completed. Turn on the system...
...The utility returns to the DOS prompt after the BIOS update process is an auto recovery tool that you to restore the BIOS file when it fails or gets corrupted during flash BIOS Reading file ..... Version 1.19(ASUS V2.07(03.11.24BB)) Copyright (C) 2003 ...floppy disk with the original or updated BIOS file to P 5 G 6 T . Recovering the BIOS from a floppy disk To recover the BIOS from the hard disk drive. done Reading flash .... R O M. WARNING!! done Please restart your computer A:\> 5.1.4 ASUS CrashFree BIOS 2 utility The ASUS CrashFree BIOS 2 is completed. Turn on the system...
User Guide
Page 79
... the updating process. Insert the support CD to the optical drive. 3. Starting BIOS recovery... Starting BIOS recovery... ASUS T2-PH1 5-7 3. Checking for floppy... Bad BIOS checksum. Start flashing... Bad BIOS checksum. Floppy not found , the utility reads the BIOS file and starts flashing the corrupted BIOS file. Completed. The utility displays the following message and automatically checks the floppy...
... the updating process. Insert the support CD to the optical drive. 3. Starting BIOS recovery... Starting BIOS recovery... ASUS T2-PH1 5-7 3. Checking for floppy... Bad BIOS checksum. Start flashing... Bad BIOS checksum. Floppy not found , the utility reads the BIOS file and starts flashing the corrupted BIOS file. Completed. The utility displays the following message and automatically checks the floppy...
User Guide
Page 80
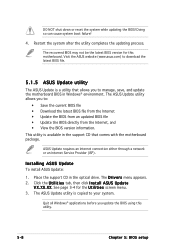
... s t a l l A S U S U p d a t e V X . Place the support CD in Windows® environment. The ASUS Update utility is available in the support CD that allows you to download the latest BIOS file. 5.1.5 ASUS Update utility The ASUS Update is a utility that comes with the motherboard package. Doing so can cause system boot failure...network or an Internet Service Provider (ISP). See page 3-4 for this utility. 5-8 Chapter 5: BIOS setup Visit the ASUS website (www.asus.com) to manage, save, and update the motherboard BIOS in the optical drive. The D r i v e r s menu appears. 2. DO...
... s t a l l A S U S U p d a t e V X . Place the support CD in Windows® environment. The ASUS Update utility is available in the support CD that allows you to download the latest BIOS file. 5.1.5 ASUS Update utility The ASUS Update is a utility that comes with the motherboard package. Doing so can cause system boot failure...network or an Internet Service Provider (ISP). See page 3-4 for this utility. 5-8 Chapter 5: BIOS setup Visit the ASUS website (www.asus.com) to manage, save, and update the motherboard BIOS in the optical drive. The D r i v e r s menu appears. 2. DO...
User Guide
Page 81
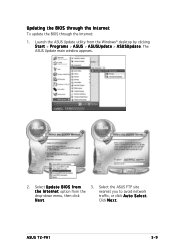
The ASUS Update main window appears. 2. Click N e x t. Updating the BIOS through the Internet To update the BIOS through the Internet: 1. ASUS T2-PH1 5-9 Select the ASUS FTP site t h e I O S f r o m 3. N e x t. Select U p d a t e B I n t e r n e t option from the Windows® desktop by clicking S t a r t > P r o g r a m s > A S U S > A S U S U p d a t e > A S U S U p d a t e. Launch the ASUS Update utility from the nearest you to avoid network drop-down menu, then click traffic, or click A u t o S e l e c t.
The ASUS Update main window appears. 2. Click N e x t. Updating the BIOS through the Internet To update the BIOS through the Internet: 1. ASUS T2-PH1 5-9 Select the ASUS FTP site t h e I O S f r o m 3. N e x t. Select U p d a t e B I n t e r n e t option from the Windows® desktop by clicking S t a r t > P r o g r a m s > A S U S > A S U S U p d a t e > A S U S U p d a t e. Launch the ASUS Update utility from the nearest you to avoid network drop-down menu, then click traffic, or click A u t o S e l e c t.

User Guide
Page 82
... click S a v e. 4. Follow the screen instructions to complete the update process. From the FTP site, select the BIOS version that you wish to avail all its features. The ASUS Update utility is capable of updating itself through a BIOS file: 1. The ASUS Update main window appears. 2. 4. Always update the utility to download. Click Next. 5. Locate the...
... click S a v e. 4. Follow the screen instructions to complete the update process. From the FTP site, select the BIOS version that you wish to avail all its features. The ASUS Update utility is capable of updating itself through a BIOS file: 1. The ASUS Update main window appears. 2. 4. Always update the utility to download. Click Next. 5. Locate the...


