T2-PE1 English User Manual E2151
Page 4
... Probe II 3-11 Chapter 4: Motherboard Info 4.1 Introduction 4-2 4.2 Motherboard layout 4-2 4.3 Jumper 4-3 4.4 Connectors 4-4 Chapter 5: BIOS Information 5.1 Managing and updating your BIOS 5-2 5.1.1 Creating a bootable floppy disk 5-2 5.1.2 ASUS EZ Flash utility 5-3 5.1.3 AFUDOS utility 5-4 5.1.4 ASUS CrashFree BIOS 2 utility 5-6 5.1.5 ASUS Update utility 5-8 5.2 BIOS setup program 5-11 5.2.1 BIOS menu screen 5-12 5.2.2 Menu bar 5-12 5.2.3 Navigation keys 5-12 5.2.4 Menu items 5-13 5.2.5 Sub-menu items 5-13 iv
... Probe II 3-11 Chapter 4: Motherboard Info 4.1 Introduction 4-2 4.2 Motherboard layout 4-2 4.3 Jumper 4-3 4.4 Connectors 4-4 Chapter 5: BIOS Information 5.1 Managing and updating your BIOS 5-2 5.1.1 Creating a bootable floppy disk 5-2 5.1.2 ASUS EZ Flash utility 5-3 5.1.3 AFUDOS utility 5-4 5.1.4 ASUS CrashFree BIOS 2 utility 5-6 5.1.5 ASUS Update utility 5-8 5.2 BIOS setup program 5-11 5.2.1 BIOS menu screen 5-12 5.2.2 Menu bar 5-12 5.2.3 Navigation keys 5-12 5.2.4 Menu items 5-13 5.2.5 Sub-menu items 5-13 iv
T2-PE1 English User Manual E2151
Page 8
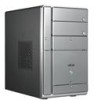
This chapter includes the motherboard layout, jumper settings, and connector locations. 5. Chapter 5: BIOS information This chapter tells how to install components in the system. 3. Chapter 1: System introduction This chapter gives a general description of...intended for this guide Audience This guide provides general information and installation instructions about the motherboard that comes with hardware knowledge of the ASUS Terminator 2. Appendix The Appendix includes the power supply unit specification for experienced users and integrators with the system. The chapter lists ...
This chapter includes the motherboard layout, jumper settings, and connector locations. 5. Chapter 5: BIOS information This chapter tells how to install components in the system. 3. Chapter 1: System introduction This chapter gives a general description of...intended for this guide Audience This guide provides general information and installation instructions about the motherboard that comes with hardware knowledge of the ASUS Terminator 2. Appendix The Appendix includes the power supply unit specification for experienced users and integrators with the system. The chapter lists ...
T2-PE1 English User Manual E2151
Page 33
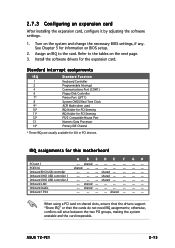
...Port 13 Numeric Data Processor 14* Primary IDE Channel * These IRQs are usually available for information on the next page. 3. shared -- -- -- -- ASUS T2-PE1 2-15 See Chapter 5 for ISA or PCI devices. shared PCIEX16 shared Onboard EHCI USB controller -- -- -- Onboard LAN -- shared -- -- -- Turn...Share IRQ" or that the cards do not need IRQ assignments; When using a PCI card on the system and change the necessary BIOS settings, if any. IRQ assignments for the expansion card. shared -- -- -- -- 2.7.3 Configuring an expansion card After installing the...
...Port 13 Numeric Data Processor 14* Primary IDE Channel * These IRQs are usually available for information on the next page. 3. shared -- -- -- -- ASUS T2-PE1 2-15 See Chapter 5 for ISA or PCI devices. shared PCIEX16 shared Onboard EHCI USB controller -- -- -- Onboard LAN -- shared -- -- -- Turn...Share IRQ" or that the cards do not need IRQ assignments; When using a PCI card on the system and change the necessary BIOS settings, if any. IRQ assignments for the expansion card. shared -- -- -- -- 2.7.3 Configuring an expansion card After installing the...
T2-PE1 English User Manual E2151
Page 48
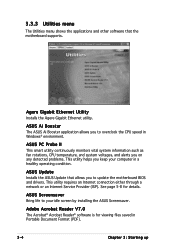
...and system voltages, and alerts you on any detected problems. This utility helps you keep your idle screen by installing the ASUS Screensaver. This utility requires an Internet connection either through a network or an Internet Service Provider (ISP). Agere Gigabit Ethernet ...Utility Installs the Agere Gigabit Ethernet utility. ASUS Update Installs the ASUS Update that the motherboard supports. ASUS Ai Booster The ASUS Ai Booster application allows you to update the motherboard BIOS and drivers. 3.3.3 Utilities menu The Utilities menu shows the applications...
...and system voltages, and alerts you on any detected problems. This utility helps you keep your idle screen by installing the ASUS Screensaver. This utility requires an Internet connection either through a network or an Internet Service Provider (ISP). Agere Gigabit Ethernet ...Utility Installs the Agere Gigabit Ethernet utility. ASUS Update Installs the ASUS Update that the motherboard supports. ASUS Ai Booster The ASUS Ai Booster application allows you to update the motherboard BIOS and drivers. 3.3.3 Utilities menu The Utilities menu shows the applications...
T2-PE1 English User Manual E2151
Page 51
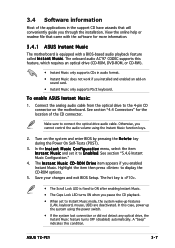
... turns OFF (disabled) automatically. The I n s t a n t M u s i c and set to E n a b l e d. ASUS T2-PE1 3-7 Turn on the motherboard. Save your changes and exit BIOS Setup. R O M D r i v e item appears if you installed and enabled an add-on sound card. • Instant Music only supports PS...Music only supports CDs in the support CD have wizards that came with a BIOS-based audio playback feature called I n s t a n t M u s i c. See section "4.4 Connectors" for more information. 3.4.1 ASUS Instant Music The motherboard is fixed to ON after enabling Instant Music. •...
... turns OFF (disabled) automatically. The I n s t a n t M u s i c and set to E n a b l e d. ASUS T2-PE1 3-7 Turn on the motherboard. Save your changes and exit BIOS Setup. R O M D r i v e item appears if you installed and enabled an add-on sound card. • Instant Music only supports PS...Music only supports CDs in the support CD have wizards that came with a BIOS-based audio playback feature called I n s t a n t M u s i c. See section "4.4 Connectors" for more information. 3.4.1 ASUS Instant Music The motherboard is fixed to ON after enabling Instant Music. •...
T2-PE1 English User Manual E2151
Page 52
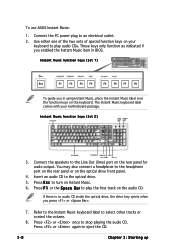
To use ASUS Instant Music: 1. You may also connect a headphone to stop playing the audio CD. Press or once to the headphone port on the rear panel or ..., place the Instant Music label over the function keys on the rear panel for audio output. UP F5 F6 F7 F8 To guide you in BIOS. These keys only function as indicated if you press or . 7. UP 3. Refer to the Instant Music keyboard label to play audio CDs. Insert an audio...
To use ASUS Instant Music: 1. You may also connect a headphone to stop playing the audio CD. Press or once to the headphone port on the rear panel or ..., place the Instant Music label over the function keys on the rear panel for audio output. UP F5 F6 F7 F8 To guide you in BIOS. These keys only function as indicated if you press or . 7. UP 3. Refer to the Instant Music keyboard label to play audio CDs. Insert an audio...
T2-PE1 English User Manual E2151
Page 53
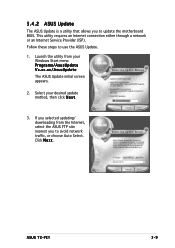
... that allows you to avoid network traffic, or choose Auto Select. Select your Windows Start menu: Programs/AsusUpdate Vx.xx.xx/AsusUpdate The ASUS Update initial screen appears. 2. ASUS T2-PE1 3-9 This utility requires an Internet connection either through a network or an Internet Service Provider (ISP). If you selected updating/ downloading from your desired...
... that allows you to avoid network traffic, or choose Auto Select. Select your Windows Start menu: Programs/AsusUpdate Vx.xx.xx/AsusUpdate The ASUS Update initial screen appears. 2. ASUS T2-PE1 3-9 This utility requires an Internet connection either through a network or an Internet Service Provider (ISP). If you selected updating/ downloading from your desired...
T2-PE1 English User Manual E2151
Page 54
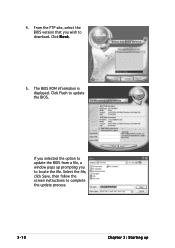
Click Flash to download. Click N e x t. 5. If you selected the option to locate the file. Select the file, click Save, then follow the screen instructions to complete the update process. 3-10 Chapter 3: Starting up prompting you wish to update the BIOS. The BIOS ROM information is displayed. From the FTP site, select the BIOS version that you to update the BIOS from a file, a window pops up 4.
Click Flash to download. Click N e x t. 5. If you selected the option to locate the file. Select the file, click Save, then follow the screen instructions to complete the update process. 3-10 Chapter 3: Starting up prompting you wish to update the BIOS. The BIOS ROM information is displayed. From the FTP site, select the BIOS version that you to update the BIOS from a file, a window pops up 4.
T2-PE1 English User Manual E2151
Page 62
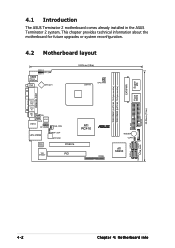
... about the motherboard for future upgrades or system reconfiguration. 4.2 Motherboard layout KBMS T:Mouse B:Keyboard VGA IOC_MB ATX12V1 24.89cm (9.8in) LGA775 CPU_FAN Super I/O EATXPWR Flash BIOS DDR DIMM1 (64/72-bit, 184-pin module) DDR DIMM2 (64/72-bit, 184-pin module) PARALLEL PORT PRI_IDE FLOPPY 20.06cm (7.9in) Line Out... Marvell 88E8053 PCIEX16 ATI RC410 VIA VT6307 PCI ¤ PANEL BUZZER CLRTC BAT ATI SB450 SATA4 SATA2 SATA1 SB_PWR SATA3 4-2 Chapter 4: Motherboard info 4.1 Introduction The ASUS Terminator 2 motherboard comes already installed in the...
... about the motherboard for future upgrades or system reconfiguration. 4.2 Motherboard layout KBMS T:Mouse B:Keyboard VGA IOC_MB ATX12V1 24.89cm (9.8in) LGA775 CPU_FAN Super I/O EATXPWR Flash BIOS DDR DIMM1 (64/72-bit, 184-pin module) DDR DIMM2 (64/72-bit, 184-pin module) PARALLEL PORT PRI_IDE FLOPPY 20.06cm (7.9in) Line Out... Marvell 88E8053 PCIEX16 ATI RC410 VIA VT6307 PCI ¤ PANEL BUZZER CLRTC BAT ATI SB450 SATA4 SATA2 SATA1 SB_PWR SATA3 4-2 Chapter 4: Motherboard info 4.1 Introduction The ASUS Terminator 2 motherboard comes already installed in the...

T2-PE1 English User Manual E2151
Page 63
... 1-2 (default) to pins 2-3. Reinstall the battery. 5. Turn OFF the computer and unplug the power cord. 2. Hold down the key during the boot process and enter BIOS setup to re-enter data. ¤ Clear RTC RAM CLRTC 2 1 Normal (Default) 3 2 Clear CMOS Except when clearing the RTC RAM, never remove the cap on... in CMOS, that include system setup information such as system passwords, is powered by erasing the CMOS RTC RAM data. To erase the RTC RAM: 1. ASUS T2-PE1 4-3
... 1-2 (default) to pins 2-3. Reinstall the battery. 5. Turn OFF the computer and unplug the power cord. 2. Hold down the key during the boot process and enter BIOS setup to re-enter data. ¤ Clear RTC RAM CLRTC 2 1 Normal (Default) 3 2 Clear CMOS Except when clearing the RTC RAM, never remove the cap on... in CMOS, that include system setup information such as system passwords, is powered by erasing the CMOS RTC RAM data. To erase the RTC RAM: 1. ASUS T2-PE1 4-3

T2-PE1 English User Manual E2151
Page 69
ASUS T2-PE1 4-9 USB6 and USB7 are for the system power LED. Pressing the power button turns the system ON or puts the system in sleep mode. • ... button. The system power LED lights up or flashes when data is read from or written to the front I /O boarde (T2-IO). The IDE LED lights up when you turn on the BIOS settings. System panel connector (8-1 pin PANEL) This connector accommodates several system front panel functions. Refer to the HDD. •...
ASUS T2-PE1 4-9 USB6 and USB7 are for the system power LED. Pressing the power button turns the system ON or puts the system in sleep mode. • ... button. The system power LED lights up or flashes when data is read from or written to the front I /O boarde (T2-IO). The IDE LED lights up when you turn on the BIOS settings. System panel connector (8-1 pin PANEL) This connector accommodates several system front panel functions. Refer to the HDD. •...

T2-PE1 English User Manual E2151
Page 71
Chapter 5 This chapter tells how to change system settings through the BIOS Setup menus and describes the BIOS parameters. BIOS setup ASUS T2-PE1 1
Chapter 5 This chapter tells how to change system settings through the BIOS Setup menus and describes the BIOS parameters. BIOS setup ASUS T2-PE1 1

T2-PE1 English User Manual E2151
Page 72
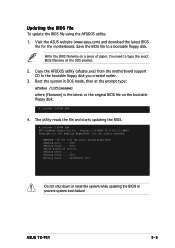
...s k from the menu, then select F o r m a t. Insert a formatted, high density 1.44 MB floppy disk into the drive. Copy the original motherboard BIOS using a bootable floppy disk.) 2. d. Click F i l e from the format options field, then click S t a r t. Windows® 2000 environment To create...a r t from the Windows® desktop, then select M y C o m p u t e r. c. b. Save a copy of the original motherboard BIOS file to a bootable floppy disk in DOS mode using the ASUS Update or AFUDOS utilities. 5.1.1 Creating a bootable floppy disk 1. A F o r m a t 3 1 / 2 F l o p p y D...
...s k from the menu, then select F o r m a t. Insert a formatted, high density 1.44 MB floppy disk into the drive. Copy the original motherboard BIOS using a bootable floppy disk.) 2. d. Click F i l e from the format options field, then click S t a r t. Windows® 2000 environment To create...a r t from the Windows® desktop, then select M y C o m p u t e r. c. b. Save a copy of the original motherboard BIOS file to a bootable floppy disk in DOS mode using the ASUS Update or AFUDOS utilities. 5.1.1 Creating a bootable floppy disk 1. A F o r m a t 3 1 / 2 F l o p p y D...
T2-PE1 English User Manual E2151
Page 73
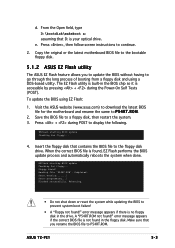
....ROM not found ! error message appears if the correct BIOS file is no floppy disk in the drive. ASUS T2-PE1 5-3 Copy the original or the latest motherboard BIOS file to the bootable floppy disk. 5.1.2 ASUS EZ Flash utility The ASUS EZ Flash feature allows you rename the BIOS file to continue. 2. Floppy found !" error message appears if...
....ROM not found ! error message appears if the correct BIOS file is no floppy disk in the drive. ASUS T2-PE1 5-3 Copy the original or the latest motherboard BIOS file to the bootable floppy disk. 5.1.2 ASUS EZ Flash utility The ASUS EZ Flash feature allows you rename the BIOS file to continue. 2. Floppy found !" error message appears if...

T2-PE1 English User Manual E2151
Page 74
... earlier. 2. The utility copies the current BIOS file to the DOS prompt after copying the current BIOS file. 5-4 Chapter 5: BIOS setup All rights reserved. The actual BIOS screen displays may not be exactly the same as backup when the BIOS fails or gets corrupted during the updating process...you can use as shown. 1. Version 1.10 Copyright (C) 2002 American Megatrends, Inc. Copying the current BIOS To copy the current BIOS file using a bootable floppy disk with the updated BIOS file. Copy the AFUDOS utility (afudos.exe) from the motherboard support CD to save the file. •...
... earlier. 2. The utility copies the current BIOS file to the DOS prompt after copying the current BIOS file. 5-4 Chapter 5: BIOS setup All rights reserved. The actual BIOS screen displays may not be exactly the same as backup when the BIOS fails or gets corrupted during the updating process...you can use as shown. 1. Version 1.10 Copyright (C) 2002 American Megatrends, Inc. Copying the current BIOS To copy the current BIOS file using a bootable floppy disk with the updated BIOS file. Copy the AFUDOS utility (afudos.exe) from the motherboard support CD to save the file. •...
T2-PE1 English User Manual E2151
Page 75
...then at the DOS prompt. 2. Version 1.19(ASUS V2.07(03.11.24BB)) Copyright (C) 2003 American Megatrends, Inc. The utility reads the file and starts updating the BIOS. done Search bootblock version Advance Check........ ASUS T2-PE1 5-5 A:\>afudos /iP54RT.ROM 4. done Reading flash... .... Do not turn off power during flash BIOS Reading file ..... You need to the bootable floppy disk you ...
...then at the DOS prompt. 2. Version 1.19(ASUS V2.07(03.11.24BB)) Copyright (C) 2003 American Megatrends, Inc. The utility reads the file and starts updating the BIOS. done Search bootblock version Advance Check........ ASUS T2-PE1 5-5 A:\>afudos /iP54RT.ROM 4. done Reading flash... .... Do not turn off power during flash BIOS Reading file ..... You need to the bootable floppy disk you ...

T2-PE1 English User Manual E2151
Page 76
...)) Copyright (C) 2003 American Megatrends, Inc. Do not turn off power during the updating process. done Please restart your computer A:\> 5.1.4 ASUS CrashFree BIOS 2 utility The ASUS CrashFree BIOS 2 is completed. WARNING!! done Writing flash ..... The utility returns to the DOS prompt after the BIOS update process is an auto recovery tool that you to restore the...
...)) Copyright (C) 2003 American Megatrends, Inc. Do not turn off power during the updating process. done Please restart your computer A:\> 5.1.4 ASUS CrashFree BIOS 2 utility The ASUS CrashFree BIOS 2 is completed. WARNING!! done Writing flash ..... The utility returns to the DOS prompt after the BIOS update process is an auto recovery tool that you to restore the...

T2-PE1 English User Manual E2151
Page 77
...DO NOT shut down or reset the system while updating the BIOS! Restart the system after the utility completes the updating process. Checking for floppy... Checking for floppy... Checking for floppy... Completed. ASUS T2-PE1 5-7 Bad BIOS checksum. Checking for CD-ROM... Doing so can cause ...system boot failure! 4. Floppy not found , the utility reads the BIOS file and starts flashing the corrupted BIOS file. The utility displays the following message ...
...DO NOT shut down or reset the system while updating the BIOS! Restart the system after the utility completes the updating process. Checking for floppy... Checking for floppy... Checking for floppy... Completed. ASUS T2-PE1 5-7 Bad BIOS checksum. Checking for CD-ROM... Doing so can cause ...system boot failure! 4. Floppy not found , the utility reads the BIOS file and starts flashing the corrupted BIOS file. The utility displays the following message ...
T2-PE1 English User Manual E2151
Page 78
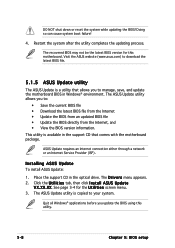
... comes with the motherboard package. DO NOT shut down or reset the system while updating the BIOS! Doing so can cause system boot failure! 4. Installing ASUS Update To install ASUS Update: 1. X X . The recovered BIOS may not be the latest BIOS version for the U t i l i t i e s screen menu. 3. Click the U t i l i t i e s tab, then click I n s t a l l A S U S U p d a t e V X . Restart the system after the...
... comes with the motherboard package. DO NOT shut down or reset the system while updating the BIOS! Doing so can cause system boot failure! 4. Installing ASUS Update To install ASUS Update: 1. X X . The recovered BIOS may not be the latest BIOS version for the U t i l i t i e s screen menu. 3. Click the U t i l i t i e s tab, then click I n s t a l l A S U S U p d a t e V X . Restart the system after the...

T2-PE1 English User Manual E2151
Page 79
Select U p d a t e B I n t e r n e t option from the Windows® desktop by clicking S t a r t > P r o g r a m s > A S U S > A S U S U p d a t e > A S U S U p d a t e. N e x t. Select the ASUS FTP site t h e I O S f r o m 3. Click N e x t. ASUS T2-PE1 5-9 Launch the ASUS Update utility from the nearest you to avoid network drop-down menu, then click traffic, or click A u t o S e l e c t. Updating the BIOS through the Internet To update the BIOS through the Internet: 1. The ASUS Update main window appears. 2.
Select U p d a t e B I n t e r n e t option from the Windows® desktop by clicking S t a r t > P r o g r a m s > A S U S > A S U S U p d a t e > A S U S U p d a t e. N e x t. Select the ASUS FTP site t h e I O S f r o m 3. Click N e x t. ASUS T2-PE1 5-9 Launch the ASUS Update utility from the nearest you to avoid network drop-down menu, then click traffic, or click A u t o S e l e c t. Updating the BIOS through the Internet To update the BIOS through the Internet: 1. The ASUS Update main window appears. 2.


