T2-P User Manual
Page 3
... a CPU 27 2.5.1 Removing the CPU fan and heatsink assembly .... 27 2.5.2 CPU installation 28 2.5.3 Re-installing the CPU fan and heatsink assembly 29 2.6 Installing a DIMM 30 2.6.1 Memory configurations 30 2.6.2 DIMM installation 31 2.7 Installing an expansion card 32 2.7.1 Expansion slots 32 2.7.2 Expansion card installation 33 2.7.3 Configuring an expansion card 34 2.8 Installing a second optical...
... a CPU 27 2.5.1 Removing the CPU fan and heatsink assembly .... 27 2.5.2 CPU installation 28 2.5.3 Re-installing the CPU fan and heatsink assembly 29 2.6 Installing a DIMM 30 2.6.1 Memory configurations 30 2.6.2 DIMM installation 31 2.7 Installing an expansion card 32 2.7.1 Expansion slots 32 2.7.2 Expansion card installation 33 2.7.3 Configuring an expansion card 34 2.8 Installing a second optical...
T2-P User Manual
Page 12
... Terminator 2 definitely delivers the cutting edge technology for the sophisticated. The system comes in -one barebone system with 800MHz FSB, and up to 2GB system memory. Deluxe model 1 2 Standard model 1 2 3 4 9 10 MODE 5 6 7 8 11 12 13 14 MODE 3 4 5 6 7 8 15 16 17 18 12 Chapter 1: System ... Gigabit/Fast Ethernet and wireless networking, Terminator 2 is an all-in a stylish mini-tower casing, and powered by the ASUS P4P8T motherboard that supports Intel® Pentium® 4 Northwood/ Prescott processor with a versatile home entertainment feature. Thank you for choosing the...
... Terminator 2 definitely delivers the cutting edge technology for the sophisticated. The system comes in -one barebone system with 800MHz FSB, and up to 2GB system memory. Deluxe model 1 2 Standard model 1 2 3 4 9 10 MODE 5 6 7 8 11 12 13 14 MODE 3 4 5 6 7 8 15 16 17 18 12 Chapter 1: System ... Gigabit/Fast Ethernet and wireless networking, Terminator 2 is an all-in a stylish mini-tower casing, and powered by the ASUS P4P8T motherboard that supports Intel® Pentium® 4 Northwood/ Prescott processor with a versatile home entertainment feature. Thank you for choosing the...

T2-P User Manual
Page 15
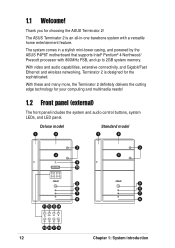
...174;/Microdrive™ card slot . Secure Digital™/MultimediaCard slot . Floppy disk drive. Memory Stick®/Memory Stick Pro™ card slot. This drive is for 1.44MB, 3.5-inch floppy disk... slots, and several I/O ports are located inside the front panel doors. Optical drive. This is for a Memory Stick®/Memory Stick Pro™ storage card. 23. This slot is inserted into any of the card slots. •...19. This slot is an IDE optical drive. 21. ASUS Terminator 2 barebone system 15 Open the front panel doors by pressing the mark. Deluxe model (with it...
...174;/Microdrive™ card slot . Secure Digital™/MultimediaCard slot . Floppy disk drive. Memory Stick®/Memory Stick Pro™ card slot. This drive is for 1.44MB, 3.5-inch floppy disk... slots, and several I/O ports are located inside the front panel doors. Optical drive. This is for a Memory Stick®/Memory Stick Pro™ storage card. 23. This slot is inserted into any of the card slots. •...19. This slot is an IDE optical drive. 21. ASUS Terminator 2 barebone system 15 Open the front panel doors by pressing the mark. Deluxe model (with it...
T2-P User Manual
Page 24
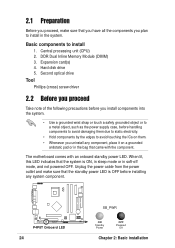
DDR Dual Inline Memory Module (DIMM) 3. When lit, this LED indicates that the system is OFF before handling components to avoid damaging them due to static electricity. • Hold ...
DDR Dual Inline Memory Module (DIMM) 3. When lit, this LED indicates that the system is OFF before handling components to avoid damaging them due to static electricity. • Hold ...
T2-P User Manual
Page 30
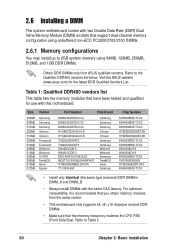
... • Always install DIMMs with this motherboard. Visit the ASUS website (www.asus.com) for use with the same CAS latency. For optimum compatibility, it is recommended that you obtain memory modules from ASUS qualified vendors. 2.6 Installing a DIMM The system motherboard comes with... two Double Data Rate (DDR) Dual Inline Memory Module (DIMM) sockets that support dual-channel memory configuration using 64MB, 128MB, 256MB, 512MB,...
... • Always install DIMMs with this motherboard. Visit the ASUS website (www.asus.com) for use with the same CAS latency. For optimum compatibility, it is recommended that you obtain memory modules from ASUS qualified vendors. 2.6 Installing a DIMM The system motherboard comes with... two Double Data Rate (DDR) Dual Inline Memory Module (DIMM) sockets that support dual-channel memory configuration using 64MB, 128MB, 256MB, 512MB,...

T2-P User Manual
Page 31
...synchronization The system motherboard supports different memory frequencies depending on the motherboard. 2. DO NOT force a DIMM into the socket until the retaining clips snap back in only one direction. Unlock a socket by pressing the retaining clips outward. 3. Align a DIMM on the socket. 4. ASUS Terminator 2 barebone system 31 Locate... and the DIMM is properly seated. CPU FSB 800 MHz 533 MHz 400 MHz DDR DIMM Type PC3200/PC2700*/PC2100 PC2700/PC2100 PC2100 Memory Frequency 400/333*/266 MHz 333/266 MHz 266 MHz *When using 800MHz CPU FSB, PC2700 DDR DIMMs may run only at 320MHz...
...synchronization The system motherboard supports different memory frequencies depending on the motherboard. 2. DO NOT force a DIMM into the socket until the retaining clips snap back in only one direction. Unlock a socket by pressing the retaining clips outward. 3. Align a DIMM on the socket. 4. ASUS Terminator 2 barebone system 31 Locate... and the DIMM is properly seated. CPU FSB 800 MHz 533 MHz 400 MHz DDR DIMM Type PC3200/PC2700*/PC2100 PC2700/PC2100 PC2100 Memory Frequency 400/333*/266 MHz 333/266 MHz 266 MHz *When using 800MHz CPU FSB, PC2700 DDR DIMMs may run only at 320MHz...
T2-P User Manual
Page 77
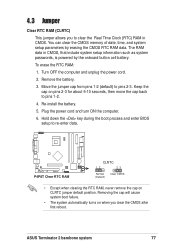
ASUS Terminator 2 barebone system 77 The RAM data in CMOS. Plug the power cord and turn ON the computer. 6. Re-install the battery. 5. Hold down the ... failure. • The system automatically turns on CLRTC jumper default position. Turn OFF the computer and unplug the power cord. 2. You can clear the CMOS memory of date, time, and system setup parameters by the onboard button cell battery.
ASUS Terminator 2 barebone system 77 The RAM data in CMOS. Plug the power cord and turn ON the computer. 6. Re-install the battery. 5. Hold down the ... failure. • The system automatically turns on CLRTC jumper default position. Turn OFF the computer and unplug the power cord. 2. You can clear the CMOS memory of date, time, and system setup parameters by the onboard button cell battery.
T2-P User Manual
Page 103
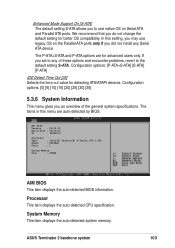
... in this setting, you may use native OS on the Parallel ATA ports only if you did not install any of the general system specifications. ASUS Terminator 2 barebone system 103 The P-ATA+S-ATA and P-ATA options are auto-detected by BIOS. Configuration options: [0] [5] [10] [15] [20] [25] [30]...: [P-ATA+S-ATA] [S-ATA] [P-ATA] IDE Detect Time Out [35] Selects the time out value for detecting ATA/ATAPI devices. System Memory This item displays the auto-detected system memory. AMI BIOS Version : 08.00.09 Build Date : 09/03/03 ID : P4P8T113 Processor Type Speed Count : Intel(R) Pentium(R) 4...
... in this setting, you may use native OS on the Parallel ATA ports only if you did not install any of the general system specifications. ASUS Terminator 2 barebone system 103 The P-ATA+S-ATA and P-ATA options are auto-detected by BIOS. Configuration options: [0] [5] [10] [15] [20] [25] [30]...: [P-ATA+S-ATA] [S-ATA] [P-ATA] IDE Detect Time Out [35] Selects the time out value for detecting ATA/ATAPI devices. System Memory This item displays the auto-detected system memory. AMI BIOS Version : 08.00.09 Build Date : 09/03/03 ID : P4P8T113 Processor Type Speed Count : Intel(R) Pentium(R) 4...
T2-P User Manual
Page 105
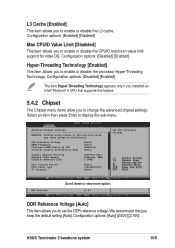
... [Enabled] This item allows you to enable or disable the processor Hyper-Threading Technology. Configuration options: [Auto] [2.60V] [2.70V] ASUS Terminator 2 barebone system 105 Configuration options: [Enabled] [Disabled] Max CPUID Value Limit [Disabled] This item allows you to enable or ...DRAM Frequency Configure DRAM Timing by SPD Internal Graphic Acceleration Mode [Auto] [Auto] [Enabled] [Auto] Graphic Adapter Priority Onboard Video Memory Graphics Aperture Size [AGP/Int-VGA] [Enabled, 8MB] [ 64MB] Boot Display Device Flat Panel type TV Standard [Auto] [640x480LVDS]...
... [Enabled] This item allows you to enable or disable the processor Hyper-Threading Technology. Configuration options: [Auto] [2.60V] [2.70V] ASUS Terminator 2 barebone system 105 Configuration options: [Enabled] [Disabled] Max CPUID Value Limit [Disabled] This item allows you to enable or ...DRAM Frequency Configure DRAM Timing by SPD Internal Graphic Acceleration Mode [Auto] [Auto] [Enabled] [Auto] Graphic Adapter Priority Onboard Video Memory Graphics Aperture Size [AGP/Int-VGA] [Enabled, 8MB] [ 64MB] Boot Display Device Flat Panel type TV Standard [Auto] [640x480LVDS]...

T2-P User Manual
Page 107
...SECAM_L1] [NTSC_433] [PAL_D] [SECAM_B] [NTSC_N] [PAL_H] [PAL_I] [PAL_M] [PAL_N] [PAL_60] MPS Revision [1.4] Configuration options: [1.4] [1.1] ASUS Terminator 2 barebone system 107 Configuration options: [4MB] [8MB] [16MB] [32MB] [64MB] [128MB] [128MB] Boot Display Device [Auto] ...This parameter allows you to set the size of the onboard video memory. Configuration options: [640x480LVDS] [640x480CMOS] [800x600LVDS] [800x600CMOS] [1024x768LVDS] [1024x768CMOS] [1280x1024LVDS] [1280x1024CMOS] [1400x1050LVDS] [1400x1050CMOS] ...
...SECAM_L1] [NTSC_433] [PAL_D] [SECAM_B] [NTSC_N] [PAL_H] [PAL_I] [PAL_M] [PAL_N] [PAL_60] MPS Revision [1.4] Configuration options: [1.4] [1.1] ASUS Terminator 2 barebone system 107 Configuration options: [4MB] [8MB] [16MB] [32MB] [64MB] [128MB] [128MB] Boot Display Device [Auto] ...This parameter allows you to set the size of the onboard video memory. Configuration options: [640x480LVDS] [640x480CMOS] [800x600LVDS] [800x600CMOS] [1024x768LVDS] [1024x768CMOS] [1280x1024LVDS] [1280x1024CMOS] [1400x1050LVDS] [1400x1050CMOS] ...
T2-P User Manual
Page 110
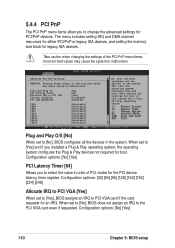
... required for legacy ISA devices. The menu includes setting IRQ and DMA channel resources for either PCI/PnP or legacy ISA devices, and setting the memory size block for boot if your system has a Plug and Play operating system. Advanced PCI PnP settings WARNING: Setting wrong values in the system. Plug...
... required for legacy ISA devices. The menu includes setting IRQ and DMA channel resources for either PCI/PnP or legacy ISA devices, and setting the memory size block for boot if your system has a Plug and Play operating system. Advanced PCI PnP settings WARNING: Setting wrong values in the system. Plug...

