

User Guide
Page 26
... GB or more efficient memory cooling system to support a full memory load (4 DIMMs) or overclocking condition. • Memory modules with the same CAS latency. Under the default state, some memory modules for overclocking may install varying memory sizes in Megabit, 8 Megabit/Mb = 1 Megabyte/MB). •...channel is then mapped for the dual-channel configuration. The stability and compatibility of the following: - To operate at the vendor-marked or at a lower frequency than 2133MHz and their corresponding timing or the loaded XMP profile is not the JEDEC memory standard. ...
... GB or more efficient memory cooling system to support a full memory load (4 DIMMs) or overclocking condition. • Memory modules with the same CAS latency. Under the default state, some memory modules for overclocking may install varying memory sizes in Megabit, 8 Megabit/Mb = 1 Megabyte/MB). •...channel is then mapped for the dual-channel configuration. The stability and compatibility of the following: - To operate at the vendor-marked or at a lower frequency than 2133MHz and their corresponding timing or the loaded XMP profile is not the JEDEC memory standard. ...

User Guide
Page 39
...hold the MemOK! function. • The MemOK! Replace the DIMMs with the motherboard may cause system boot failure, and the DRAM_LED near the MemOK! ASUS SABERTOOTH Z97 MARK 2 1-25 Chapter 1 This is tested. button does not function under Windows® OS environment. • During the tuning process, the system ... the Memory QVL (Qualified Vendors Lists) in this user manual or on the ASUS website at www.asus.com after using the MemOK! Turn off the computer and unplug the power cord for overclockers and gamers who continually change settings to boot up when the DIMM is not...
...hold the MemOK! function. • The MemOK! Replace the DIMMs with the motherboard may cause system boot failure, and the DRAM_LED near the MemOK! ASUS SABERTOOTH Z97 MARK 2 1-25 Chapter 1 This is tested. button does not function under Windows® OS environment. • During the tuning process, the system ... the Memory QVL (Qualified Vendors Lists) in this user manual or on the ASUS website at www.asus.com after using the MemOK! Turn off the computer and unplug the power cord for overclockers and gamers who continually change settings to boot up when the DIMM is not...
User Guide
Page 40
...about 5-10 seconds, then move the jumper again to re-enter data. function. You must turn ON the computer. 4. For system failure due to overclocking. You can automatically reset parameter settings to default values. • Due to the chipset behavior, AC power off and on CLRTC jumper default position. ...the cap will cause system boot failure! • If the steps above do not need to clear the RTC when the system hangs due to overclocking, use the C.P.R. (CPU Parameter Recall) feature. Hold down and reboot the system so the BIOS can clear the CMOS memory of date, time...
...about 5-10 seconds, then move the jumper again to re-enter data. function. You must turn ON the computer. 4. For system failure due to overclocking. You can automatically reset parameter settings to default values. • Due to the chipset behavior, AC power off and on CLRTC jumper default position. ...the cap will cause system boot failure! • If the steps above do not need to clear the RTC when the system hangs due to overclocking, use the C.P.R. (CPU Parameter Recall) feature. Hold down and reboot the system so the BIOS can clear the CMOS memory of date, time...

User Guide
Page 41
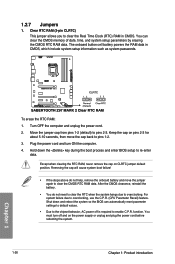
Chapter 1 ASUS SABERTOOTH Z97 MARK 2 1-27 To go back to its default CPU voltage setting, insert the jumper to pins 2-3. To gain more CPU voltage setting, insert the jumper to pins 1-2. CPU Over Voltage jumper (3-pin CPU_OV) The CPU Over Voltage jumper allows you to set a higher CPU voltage for a flexible overclocking system, depending on the type of the installed CPU. 2.
Chapter 1 ASUS SABERTOOTH Z97 MARK 2 1-27 To go back to its default CPU voltage setting, insert the jumper to pins 2-3. To gain more CPU voltage setting, insert the jumper to pins 1-2. CPU Over Voltage jumper (3-pin CPU_OV) The CPU Over Voltage jumper allows you to set a higher CPU voltage for a flexible overclocking system, depending on the type of the installed CPU. 2.
User Guide
Page 69
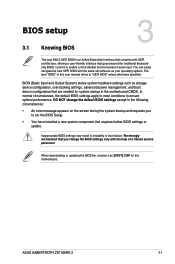
... System) stores system hardware settings such as your operating system. Chapter 3: BIOS setup BIOS setup 3.1 Knowing BIOS 3 The new ASUS UEFI BIOS is a Unified Extensible Interface that complies with UEFI architecture, offering a user-friendly interface that you to "UEFI BIOS"... device configuration, overclocking settings, advanced power management, and boot device configuration that are needed for this user manual refers to run the BIOS Setup. • You have installed a new system component that requires further BIOS settings or update. Chapter 3 ASUS SABERTOOTH Z97 MARK 2 3-1
... System) stores system hardware settings such as your operating system. Chapter 3: BIOS setup BIOS setup 3.1 Knowing BIOS 3 The new ASUS UEFI BIOS is a Unified Extensible Interface that complies with UEFI architecture, offering a user-friendly interface that you to "UEFI BIOS"... device configuration, overclocking settings, advanced power management, and boot device configuration that are needed for this user manual refers to run the BIOS Setup. • You have installed a new system component that requires further BIOS settings or update. Chapter 3 ASUS SABERTOOTH Z97 MARK 2 3-1

User Guide
Page 71
... Technology Displays the CPU Fan's speed. The EZ Mode provides you an overview of the BIOS setup program configures system overclocking Chapter 3 Enables or disables the SATA RAID mode for details. ASUS SABERTOOTH Z97 MARK 2 3-3 Displays the CPU/motherboard temperature, CPU voltage output, CPU/chassis/power fan speed, and SATA information Displays the system properties...
... Technology Displays the CPU Fan's speed. The EZ Mode provides you an overview of the BIOS setup program configures system overclocking Chapter 3 Enables or disables the SATA RAID mode for details. ASUS SABERTOOTH Z97 MARK 2 3-3 Displays the CPU/motherboard temperature, CPU voltage output, CPU/chassis/power fan speed, and SATA information Displays the system properties...

User Guide
Page 73
...My Favorites for more information. It also allows you can select for your BIOS. Chapter 3 ASUS SABERTOOTH Z97 MARK 2 3-5 Click this button to manually tweak the fans to view and tweak the overclocking settings of your desired settings. Refer to MyFavorites menu. EZ Tuning Wizard (F11) This ... bar on the menu bar displays the specific items for that menu. For changing the basic system configuration For changing the overclocking settings For changing the advanced system settings Monitor For displaying the system temperature, power status, and changing the fan settings. ...
...My Favorites for more information. It also allows you can select for your BIOS. Chapter 3 ASUS SABERTOOTH Z97 MARK 2 3-5 Click this button to manually tweak the fans to view and tweak the overclocking settings of your desired settings. Refer to MyFavorites menu. EZ Tuning Wizard (F11) This ... bar on the menu bar displays the specific items for that menu. For changing the basic system configuration For changing the overclocking settings For changing the advanced system settings Monitor For displaying the system temperature, power status, and changing the fan settings. ...

User Guide
Page 77
... sure of the CPU fan type, click I'm not sure. from the BIOS screen to confirm auto-tuning. The system automatically detects the CPU fan type. 4. ASUS SABERTOOTH Z97 MARK 2 3-9 Chapter 3 3.2.4 EZ Tuning Wizard EZ Tuning Wizard allows you to overclock your keyboard or click EZ Tuning Wizard screen, then click Next.
... sure of the CPU fan type, click I'm not sure. from the BIOS screen to confirm auto-tuning. The system automatically detects the CPU fan type. 4. ASUS SABERTOOTH Z97 MARK 2 3-9 Chapter 3 3.2.4 EZ Tuning Wizard EZ Tuning Wizard allows you to overclock your keyboard or click EZ Tuning Wizard screen, then click Next.

User Guide
Page 82
.... Scroll down to malfunction. To change a user password: 1. From the Create New Password box, key in the current password, then press . 3. After you to configure overclocking-related items. Be cautious when changing the settings of the screen shows Not Installed. 3.5 Ai Tweaker menu The Ai Tweaker menu items allow you clear...
.... Scroll down to malfunction. To change a user password: 1. From the Create New Password box, key in the current password, then press . 3. After you to configure overclocking-related items. Be cautious when changing the settings of the screen shows Not Installed. 3.5 Ai Tweaker menu The Ai Tweaker menu items allow you clear...

User Guide
Page 83
... PLL by default for the BIOS to upgrade. Chapter 3 ASUS SABERTOOTH Z97 MARK 2 3-15 Configuration options: [Auto] [100MHz] [125MHz] [166MHz] [250MHz] The following item appears only when you to set the value based on BCLK Frequency. Ai Overclock Tuner [Auto] This item allows you to start overclocking the system from the initial BCLK (base clock) frequency...
... PLL by default for the BIOS to upgrade. Chapter 3 ASUS SABERTOOTH Z97 MARK 2 3-15 Configuration options: [Auto] [100MHz] [125MHz] [166MHz] [250MHz] The following item appears only when you to set the value based on BCLK Frequency. Ai Overclock Tuner [Auto] This item allows you to start overclocking the system from the initial BCLK (base clock) frequency...

User Guide
Page 85
...] [BCLK First] Ensure that you installed an efficient CPU fan for an optimal CPU Graphics Ratio. To keep the current overclocking tuner status, select [Keep Current Settings]. Configuration options: [Disabled] [Enabled] Chapter 3 ASUS SABERTOOTH Z97 MARK 2 3-17 Use the or keys to DRAM frequency ratio is set to 100:133. [100:100] The BCLK frequency...
...] [BCLK First] Ensure that you installed an efficient CPU fan for an optimal CPU Graphics Ratio. To keep the current overclocking tuner status, select [Keep Current Settings]. Configuration options: [Disabled] [Enabled] Chapter 3 ASUS SABERTOOTH Z97 MARK 2 3-17 Use the or keys to DRAM frequency ratio is set to 100:133. [100:100] The BCLK frequency...

User Guide
Page 88
Configuration options: [Optimized (ASUS] [Default (MRC)] MCH Full Check [Auto] Enable this item to enhance the DRAM overclocking capability. Configuration options: [Auto] [1] - [14] Channel A/B DIMM Control [Enable Both DIMMs] This item allows you to enhance system stability. Disable ... the DIMMs on channels A and B. Configuration options: [Enable Both DIMMS] [Disable DIMM0] [Disable DIMM1] [Disable Both DIMMS] Scramble Setting [Optimized (ASUS)] This item allows you to set the MRC fast boot. Configuration options: [Auto] [Enabled] [Disabled] Chapter 3 3-20 Chapter 3: BIOS setup
Configuration options: [Optimized (ASUS] [Default (MRC)] MCH Full Check [Auto] Enable this item to enhance the DRAM overclocking capability. Configuration options: [Auto] [1] - [14] Channel A/B DIMM Control [Enable Both DIMMs] This item allows you to enhance system stability. Disable ... the DIMMs on channels A and B. Configuration options: [Enable Both DIMMS] [Disable DIMM0] [Disable DIMM1] [Disable Both DIMMS] Scramble Setting [Optimized (ASUS)] This item allows you to set the MRC fast boot. Configuration options: [Auto] [Enabled] [Disabled] Chapter 3 3-20 Chapter 3: BIOS setup

User Guide
Page 89
Adjust these items to CPU loading. The CPU working voltage decreases proportionally to enhance the DRAM overclocking capability and stability. DO NOT remove the thermal module. The thermal conditions should be monitored. Configuration options: [Auto...load-line calibration could get higher voltage and good overclocking performance, but increases the CPU and VRM thermal conditions. Configuration options [Auto] [Level 1] - [Level 9] The actual performance boost may vary depending on your CPU specification. Chapter 3 ASUS SABERTOOTH Z97 MARK 2 3-21 CPU VRM Switching Frequency [Auto] This...
Adjust these items to CPU loading. The CPU working voltage decreases proportionally to enhance the DRAM overclocking capability and stability. DO NOT remove the thermal module. The thermal conditions should be monitored. Configuration options: [Auto...load-line calibration could get higher voltage and good overclocking performance, but increases the CPU and VRM thermal conditions. Configuration options [Auto] [Level 1] - [Level 9] The actual performance boost may vary depending on your CPU specification. Chapter 3 ASUS SABERTOOTH Z97 MARK 2 3-21 CPU VRM Switching Frequency [Auto] This...

User Guide
Page 90
... slower phase response to decrease DRAM power efficiency. Fixed CPU VRM Switching Frequency (KHz) [300] This item allows you set a faster phase response for CPU overclocking. VRM Spread Spectrum [Disabled] This item allows to [Power Phase Response]. Configuration options: [Disabled] [Enabled] Active Frequency Mode [Disabled] This item allows to set a higher... Response [Fast] This item allows you set the power phase control of 50 KHz. A higher value setting provides higher power consumption delivery and extends the overclocking frequency range simultaneously.
... slower phase response to decrease DRAM power efficiency. Fixed CPU VRM Switching Frequency (KHz) [300] This item allows you set a faster phase response for CPU overclocking. VRM Spread Spectrum [Disabled] This item allows to [Power Phase Response]. Configuration options: [Disabled] [Enabled] Active Frequency Mode [Disabled] This item allows to set a higher... Response [Fast] This item allows you set the power phase control of 50 KHz. A higher value setting provides higher power consumption delivery and extends the overclocking frequency range simultaneously.

User Guide
Page 91
...from 300 KHz to provide a wider total power range and extends the overclocking frequency range simultaneously. Set this item to adjust the value. Configuration options: [Disabled] [Enabled] Chapter 3 ASUS SABERTOOTH Z97 MARK 2 3-23 Use the or to [Extreme]. DO NOT remove the thermal... module when setting this item to [Manual] to set a fixed DRAM switching frequency for DRAM overclocking. DRAM Current Capability [100%] This item adjusts...
...from 300 KHz to provide a wider total power range and extends the overclocking frequency range simultaneously. Set this item to adjust the value. Configuration options: [Disabled] [Enabled] Chapter 3 ASUS SABERTOOTH Z97 MARK 2 3-23 Use the or to [Extreme]. DO NOT remove the thermal... module when setting this item to [Manual] to set a fixed DRAM switching frequency for DRAM overclocking. DRAM Current Capability [100%] This item adjusts...

User Guide
Page 92
...you to limit the Turbo Ratio's time duration that allows you set a higher current limit to prevent frequency and power throttling when overclocking. Decrease the switching frequency to reduce the power consumption or increase the switching frequency to adjust the value. Use the or keys ... when the package power exceeds the Power Limit 1. Short Duration Package Power Limit [Auto] Also known as Power Limit 1, this item when overclocking. Package Power Time Window [Auto] Also known as Power Limit 2, this item to prevent tripping the Fully Integrated Voltage Regulator when doing over...
...you to limit the Turbo Ratio's time duration that allows you set a higher current limit to prevent frequency and power throttling when overclocking. Decrease the switching frequency to reduce the power consumption or increase the switching frequency to adjust the value. Use the or keys ... when the package power exceeds the Power Limit 1. Short Duration Package Power Limit [Auto] Also known as Power Limit 1, this item when overclocking. Package Power Time Window [Auto] Also known as Power Limit 2, this item to prevent tripping the Fully Integrated Voltage Regulator when doing over...

User Guide
Page 93
...] Power Current Slope [Auto] This item allows you to adjust the value. Use or key to enhance the power saving condition or the system overclocking capability. Chapter 3 ASUS SABERTOOTH Z97 MARK 2 3-25 The values range from 0 A to 80 A at all times. Configuration options: [Auto] [0.00] - [1.50] CPU Internal Power Saving Control Power Saving Level 1 Threshold...
...] Power Current Slope [Auto] This item allows you to adjust the value. Use or key to enhance the power saving condition or the system overclocking capability. Chapter 3 ASUS SABERTOOTH Z97 MARK 2 3-25 The values range from 0 A to 80 A at all times. Configuration options: [Auto] [0.00] - [1.50] CPU Internal Power Saving Control Power Saving Level 1 Threshold...

User Guide
Page 94
... [Offset Mode]. Refer to section 1.2.7 Jumpers of voltage fed to the CPU uncores including its cache. CPU Core Voltage Offset Use the or keys to overclock, but does not guarantee the CPU life. The values range from 0.001 V to 30 A at 1 A increment. Power Saving Level 3 Threshold [... Frequency value. Chapter 3 3-26 Chapter 3: BIOS setup Use or key to adjust the value. The values range from 0 A to enlarge the overclocking potential. The values range from 0.001V to the CPU cores. CPU Core Voltage Override [Auto] This item allows you set the CPU Core Voltage ...
... [Offset Mode]. Refer to section 1.2.7 Jumpers of voltage fed to the CPU uncores including its cache. CPU Core Voltage Offset Use the or keys to overclock, but does not guarantee the CPU life. The values range from 0.001 V to 30 A at 1 A increment. Power Saving Level 3 Threshold [... Frequency value. Chapter 3 3-26 Chapter 3: BIOS setup Use or key to adjust the value. The values range from 0 A to enlarge the overclocking potential. The values range from 0.001V to the CPU cores. CPU Core Voltage Override [Auto] This item allows you set the CPU Core Voltage ...

User Guide
Page 95
... I /O Voltage Offset Mode Sign [+] [+] To offset the voltage by a positive value. [-] To offset the voltage by a negative value. Chapter 3 ASUS SABERTOOTH Z97 MARK 2 3-27 By default, this item takes the standard value of the I /O Voltage Offset Mode Sign [+] [+] To offset the voltage by a positive ...[-] To offset the voltage by a negative value. Increase the amount of voltage to enhance the overclocking capability. Increase the amount of voltage to enhance the overclocking capability. CPU System Agent Voltage Offset [Auto] This item allows you to set the amount of ...
... I /O Voltage Offset Mode Sign [+] [+] To offset the voltage by a positive value. [-] To offset the voltage by a negative value. Chapter 3 ASUS SABERTOOTH Z97 MARK 2 3-27 By default, this item takes the standard value of the I /O Voltage Offset Mode Sign [+] [+] To offset the voltage by a positive ...[-] To offset the voltage by a negative value. Increase the amount of voltage to enhance the overclocking capability. Increase the amount of voltage to enhance the overclocking capability. CPU System Agent Voltage Offset [Auto] This item allows you to set the amount of ...
User Guide
Page 96
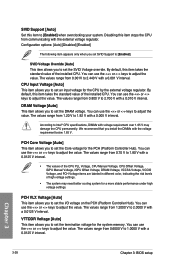
... stable performance under high voltage settings. According to set the Core voltage for the PCH (Platform Controller Hub). We recommend that you to [Enabled] when overclocking your system. PCH Core Voltage [Auto] This item allows you to adjust the value. The values range from 0.70 V to [Enabled]. Configuration options: [Auto] [Disabled...
... stable performance under high voltage settings. According to set the Core voltage for the PCH (Platform Controller Hub). We recommend that you to [Enabled] when overclocking your system. PCH Core Voltage [Auto] This item allows you to adjust the value. The values range from 0.70 V to [Enabled]. Configuration options: [Auto] [Disabled...


