

User Guide
Page 3
...SABERTOOTH Z97 MARK 2 specifications summary ix Package contents...xiii Installation tools and components xiv Chapter 1: Product Introduction 1.1 Special features 1-1 1.1.1 Product highlights 1-1 1.1.2 "Ultimate COOL" Thermal Solutions 1-2 1.1.3 "TUF Engine" Power Design 1-3 1.1.4 "Safe & Stable!" Guardian Angel 1-3 1.1.5 ASUS EZ DIY 1-4 1.1.6 ASUS...2-7 2.1.6 SATA device connection 2-8 2.1.7 Front I/O Connector 2-9 2.1.8 Expansion Card installation 2-10 2.2 BIOS update utility 2-11 2.3 Motherboard rear and audio connections 2-12 2.3.1 Rear I/O connection 2-12 ...
...SABERTOOTH Z97 MARK 2 specifications summary ix Package contents...xiii Installation tools and components xiv Chapter 1: Product Introduction 1.1 Special features 1-1 1.1.1 Product highlights 1-1 1.1.2 "Ultimate COOL" Thermal Solutions 1-2 1.1.3 "TUF Engine" Power Design 1-3 1.1.4 "Safe & Stable!" Guardian Angel 1-3 1.1.5 ASUS EZ DIY 1-4 1.1.6 ASUS...2-7 2.1.6 SATA device connection 2-8 2.1.7 Front I/O Connector 2-9 2.1.8 Expansion Card installation 2-10 2.2 BIOS update utility 2-11 2.3 Motherboard rear and audio connections 2-12 2.3.1 Rear I/O connection 2-12 ...

User Guide
Page 4
... SPD Information 3-59 3.10 Exit menu 3-60 3.11 Updating BIOS 3-61 3.11.1 EZ Update 3-61 3.11.2 ASUS EZ Flash 2 3-62 3.11.3 ASUS CrashFree BIOS 3 3-63 iv Chapter 3: BIOS setup 3.1 Knowing BIOS 3-1 3.2 BIOS setup program 3-2 3.2.1 EZ Mode 3-3 3.2.2 Advanced Mode 3-4 3.2.3 Q-Fan Control 3-7 3.2.4 EZ Tuning Wizard 3-9 3.3 My Favorites 3-10 3.4 Main menu 3-12 3.5 Ai Tweaker menu ... 3.6.9 Network Stack Configuration 3-44 3.6.10 Intel(R) Rapid Storage Technology 3-45 3.7 Monitor menu 3-46 3.8 Boot menu 3-51 3.9 Tool menu 3-57 3.9.1 ASUS EZ Flash 2 Utility 3-57...
... SPD Information 3-59 3.10 Exit menu 3-60 3.11 Updating BIOS 3-61 3.11.1 EZ Update 3-61 3.11.2 ASUS EZ Flash 2 3-62 3.11.3 ASUS CrashFree BIOS 3 3-63 iv Chapter 3: BIOS setup 3.1 Knowing BIOS 3-1 3.2 BIOS setup program 3-2 3.2.1 EZ Mode 3-3 3.2.2 Advanced Mode 3-4 3.2.3 Q-Fan Control 3-7 3.2.4 EZ Tuning Wizard 3-9 3.3 My Favorites 3-10 3.4 Main menu 3-12 3.5 Ai Tweaker menu ... 3.6.9 Network Stack Configuration 3-44 3.6.10 Intel(R) Rapid Storage Technology 3-45 3.7 Monitor menu 3-46 3.8 Boot menu 3-51 3.9 Tool menu 3-57 3.9.1 ASUS EZ Flash 2 Utility 3-57...
User Guide
Page 5
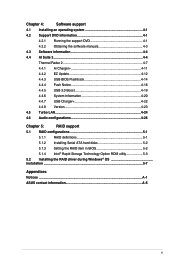
... Obtaining the software manuals 4-3 4.3 Software information 4-4 4.4 AI Suite 3...4-4 Thermal Radar 2 4-7 4.4.1 Ai Charger 4-11 4.4.2 EZ Update 4-12 4.4.3 USB BIOS Flashback 4-14 4.4.4 Push Notice 4-16 4.4.5 USB 3.0 Boost 4-19 4.4.6 System Information 4-20 4.4.7 USB Charger 4-22 4.4.8 Version 4-23 4.5 Turbo LAN ...definitions 5-1 5.1.2 Installing Serial ATA hard disks 5-2 5.1.3 Setting the RAID item in BIOS 5-2 5.1.4 Intel® Rapid Storage Technology Option ROM utility 5-3 5.2 Installing the RAID driver during Windows® OS installation...5-7 Appendices ...
... Obtaining the software manuals 4-3 4.3 Software information 4-4 4.4 AI Suite 3...4-4 Thermal Radar 2 4-7 4.4.1 Ai Charger 4-11 4.4.2 EZ Update 4-12 4.4.3 USB BIOS Flashback 4-14 4.4.4 Push Notice 4-16 4.4.5 USB 3.0 Boost 4-19 4.4.6 System Information 4-20 4.4.7 USB Charger 4-22 4.4.8 Version 4-23 4.5 Turbo LAN ...definitions 5-1 5.1.2 Installing Serial ATA hard disks 5-2 5.1.3 Setting the RAID item in BIOS 5-2 5.1.4 Intel® Rapid Storage Technology Option ROM utility 5-3 5.2 Installing the RAID driver during Windows® OS installation...5-7 Appendices ...

User Guide
Page 7
... support This chapter describes the RAID configurations. Refer to change system settings through the BIOS Setup menus. It includes description of the standard package. vii ASUS websites The ASUS website provides updated information on the motherboard. • Chapter 2: Basic installation This ... the hardware setup procedures that may have to perform when installing system components. • Chapter 3: BIOS setup This chapter tells how to the ASUS contact information. 2. Optional documentation Your product package may include optional documentation, such as warranty flyers, ...
... support This chapter describes the RAID configurations. Refer to change system settings through the BIOS Setup menus. It includes description of the standard package. vii ASUS websites The ASUS website provides updated information on the motherboard. • Chapter 2: Basic installation This ... the hardware setup procedures that may have to perform when installing system components. • Chapter 3: BIOS setup This chapter tells how to the ASUS contact information. 2. Optional documentation Your product package may include optional documentation, such as warranty flyers, ...

User Guide
Page 11
... Keyboard & Mouse, File Transfer - with USB BIOS Flashback Wizard for all smart devices - ASUS Q-Shield - ASUS EZ Flash 2 - ASUS Q-DIMM - Profile - Multi-language BIOS 1 x DisplayPort 1 x HDMI port 1 x Optical S/PDIF Output 1 x USB BIOS Flashback Button 1 x LAN (RJ45) port 4 x USB 3.0/2.0 ports (blue, 1 supports USB BIOS Flashback) 4 x USB 2.0/1.1 ports 8-channel Audio I /O Ports - ASUS Q-Connector - SABERTOOTH Z97 MARK 2 specifications summary Other Special Features Rear Panel...
... Keyboard & Mouse, File Transfer - with USB BIOS Flashback Wizard for all smart devices - ASUS Q-Shield - ASUS EZ Flash 2 - ASUS Q-DIMM - Profile - Multi-language BIOS 1 x DisplayPort 1 x HDMI port 1 x Optical S/PDIF Output 1 x USB BIOS Flashback Button 1 x LAN (RJ45) port 4 x USB 3.0/2.0 ports (blue, 1 supports USB BIOS Flashback) 4 x USB 2.0/1.1 ports 8-channel Audio I /O Ports - ASUS Q-Connector - SABERTOOTH Z97 MARK 2 specifications summary Other Special Features Rear Panel...

User Guide
Page 12
... (AAFP) 24-pin EATX Power connector 8-pin EATX 12V Power connector System Panel (Q-Connector) 1 x MemOK! SABERTOOTH Z97 MARK 2 specifications summary Internal I/O connectors BIOS features Accessories Manageability Support DVD contents Form factor 2 x USB 3.0/2.0 connectors support additional 4 USB 3.0/2.0 ports (19... Chassis Fan connectors (4-pin Black) for ASUS ThunderboltEX series support 1 x Clear CMOS jumper 64 Mb Flash ROM, UEFI AMI BIOS, PnP, DMI 2.7, WfM 2.0, SM BIOS 2.7, ACPI 5.0, Multi-language BIOS, ASUS EZ Flash 2, ASUS CrashFree BIOS 3, My Favorites, Quick Note, Last Modified...
... (AAFP) 24-pin EATX Power connector 8-pin EATX 12V Power connector System Panel (Q-Connector) 1 x MemOK! SABERTOOTH Z97 MARK 2 specifications summary Internal I/O connectors BIOS features Accessories Manageability Support DVD contents Form factor 2 x USB 3.0/2.0 connectors support additional 4 USB 3.0/2.0 ports (19... Chassis Fan connectors (4-pin Black) for ASUS ThunderboltEX series support 1 x Clear CMOS jumper 64 Mb Flash ROM, UEFI AMI BIOS, PnP, DMI 2.7, WfM 2.0, SM BIOS 2.7, ACPI 5.0, Multi-language BIOS, ASUS EZ Flash 2, ASUS CrashFree BIOS 3, My Favorites, Quick Note, Last Modified...

User Guide
Page 18
...better electric conductivity, it convenient and easy to install on your modified settings • F12 BIOS snapshot hotkey • F3 Shortcut for most accessed information • ASUS DRAM SPD (Serial Presence Detect) information detecting faulty DIMMs, and helping with dual selectable ...connection quick and accurate. It offers you with difficult POST situations. 1.1.5 ASUS EZ DIY ASUS UEFI BIOS (EZ Mode) ASUS UEFI BIOS, a UEFI compliant architecture, offers the first mouse-controlled intuitive graphical BIOS interface that allows you to easily connect or disconnect the chassis front ...
...better electric conductivity, it convenient and easy to install on your modified settings • F12 BIOS snapshot hotkey • F3 Shortcut for most accessed information • ASUS DRAM SPD (Serial Presence Detect) information detecting faulty DIMMs, and helping with dual selectable ...connection quick and accurate. It offers you with difficult POST situations. 1.1.5 ASUS EZ DIY ASUS UEFI BIOS (EZ Mode) ASUS UEFI BIOS, a UEFI compliant architecture, offers the first mouse-controlled intuitive graphical BIOS interface that allows you to easily connect or disconnect the chassis front ...
User Guide
Page 19
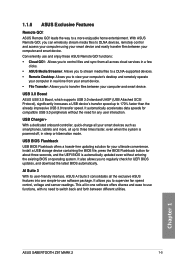
... in real-time from your ultimate convenience. It automatically accelerates data speeds for about three seconds, and the UEFI BIOS is powered off, in -one simple-to supervise fan speed control, voltage and sensor readings. Install a USB storage device containing the... when the system is automatically updated even without the need to use functions, with no need for any user interaction. Chapter 1 ASUS SABERTOOTH Z97 MARK 2 1-5 1.1.6 ASUS Exclusive Features Remote GO! leads the way to regularly check for your smart device. • File Transfer: Allows you to -use and...
... in real-time from your ultimate convenience. It automatically accelerates data speeds for about three seconds, and the UEFI BIOS is powered off, in -one simple-to supervise fan speed control, voltage and sensor readings. Install a USB storage device containing the... when the system is automatically updated even without the need to use functions, with no need for any user interaction. Chapter 1 ASUS SABERTOOTH Z97 MARK 2 1-5 1.1.6 ASUS Exclusive Features Remote GO! leads the way to regularly check for your smart device. • File Transfer: Allows you to -use and...

User Guide
Page 36
...10YT3E5 9 - Single-sided DS - Double-sided DIMM support: (1) Supports one pair of individual CPUs. settings in the BIOS for the hyper DIMM support. • Visit the ASUS website for better compatibility. (4) Supports four (4) modules inserted into any slot as two pairs of Dual-channel memory configuration.... • ASUS exclusively provides hyper DIMM support function. • Hyper DIMM support is subject to the physical characteristics of Dual-channel memory...
...10YT3E5 9 - Single-sided DS - Double-sided DIMM support: (1) Supports one pair of individual CPUs. settings in the BIOS for the hyper DIMM support. • Visit the ASUS website for better compatibility. (4) Supports four (4) modules inserted into any slot as two pairs of Dual-channel memory configuration.... • ASUS exclusively provides hyper DIMM support function. • Hyper DIMM support is subject to the physical characteristics of Dual-channel memory...

User Guide
Page 39
...• If your system fails to boot up when the DIMM is not properly installed. button to boot and load the BIOS default settings. ASUS SABERTOOTH Z97 MARK 2 1-25 Chapter 1 Replace the DIMMs with ones recommended in the Memory QVL (Qualified Vendors Lists) in this user manual or ...on the ASUS website at www.asus.com after using the MemOK! If the installed DIMMs still fail to boot after turning on a bare or ...
...• If your system fails to boot up when the DIMM is not properly installed. button to boot and load the BIOS default settings. ASUS SABERTOOTH Z97 MARK 2 1-25 Chapter 1 Replace the DIMMs with ones recommended in the Memory QVL (Qualified Vendors Lists) in this user manual or ...on the ASUS website at www.asus.com after using the MemOK! If the installed DIMMs still fail to boot after turning on a bare or ...
User Guide
Page 40
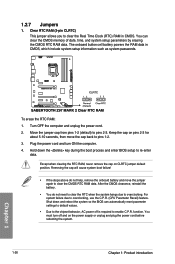
.... Turn OFF the computer and unplug the power cord. 2. Keep the cap on CLRTC jumper default position. Hold down and reboot the system so the BIOS can clear the CMOS memory of date, time, and system setup parameters by erasing the CMOS RTC RAM data. After the CMOS clearance, reinstall the... the cap on pins 2-3 for about 5-10 seconds, then move the jumper again to pins 1-2. 3. Shut down the key during the boot process and enter BIOS setup to overclocking. Removing the cap will cause system boot failure! • If the steps above do not need to clear the RTC when the...
.... Turn OFF the computer and unplug the power cord. 2. Keep the cap on CLRTC jumper default position. Hold down and reboot the system so the BIOS can clear the CMOS memory of date, time, and system setup parameters by erasing the CMOS RTC RAM data. After the CMOS clearance, reinstall the... the cap on pins 2-3 for about 5-10 seconds, then move the jumper again to pins 1-2. 3. Shut down the key during the boot process and enter BIOS setup to overclocking. Removing the cap will cause system boot failure! • If the steps above do not need to clear the RTC when the...

User Guide
Page 43
ASUS SABERTOOTH Z97 MARK 2 1-29 Chapter 1 • These connectors are set , refer to [RAID Mode]. If you installed Serial ATA hard disk drives, you intend to create a Serial ATA RAID set using these connectors, set the SATA Mode item in the BIOS to section 5.1 RAID configurations or the manual bundled in the motherboard support DVD. 1.2.9 Internal...
ASUS SABERTOOTH Z97 MARK 2 1-29 Chapter 1 • These connectors are set , refer to [RAID Mode]. If you installed Serial ATA hard disk drives, you intend to create a Serial ATA RAID set using these connectors, set the SATA Mode item in the BIOS to section 5.1 RAID configurations or the manual bundled in the motherboard support DVD. 1.2.9 Internal...

User Guide
Page 47
.... Connect the thermistor cable and place the sensor on the device or the motherboard's component to [HD] or [AC97]. 7. Thermal Sensor connectors (2-pin T_SENSOR1; 6. Chapter 1 ASUS SABERTOOTH Z97 MARK 2 1-33 Front panel audio connector (10-1 pin AAFP) This connector is for the thermistor cables that monitor the temperature of the front panel audio I /O module... you want to connect a high-definition or an AC'97 front panel audio module to this connector, set the Front Panel Type item in the BIOS setup to detect its temperature.
.... Connect the thermistor cable and place the sensor on the device or the motherboard's component to [HD] or [AC97]. 7. Thermal Sensor connectors (2-pin T_SENSOR1; 6. Chapter 1 ASUS SABERTOOTH Z97 MARK 2 1-33 Front panel audio connector (10-1 pin AAFP) This connector is for the thermistor cables that monitor the temperature of the front panel audio I /O module... you want to connect a high-definition or an AC'97 front panel audio module to this connector, set the Front Panel Type item in the BIOS setup to detect its temperature.

User Guide
Page 63
.../file format error. This may have risks. To use USB BIOS Flashback: 1. ASUS SABERTOOTH Z97 MARK 2 2-11 Place the bundled support DVD to automatically download the latest BIOS version. 4. Launch the USB BIOS Flashback Wizard to the optical drive and install the USB BIOS Flashback Wizard. If the BIOS program is not operating properly. Simply insert a USB storage device...
.../file format error. This may have risks. To use USB BIOS Flashback: 1. ASUS SABERTOOTH Z97 MARK 2 2-11 Place the bundled support DVD to automatically download the latest BIOS version. 4. Launch the USB BIOS Flashback Wizard to the optical drive and install the USB BIOS Flashback Wizard. If the BIOS program is not operating properly. Simply insert a USB storage device...

User Guide
Page 64
LAN (RJ-45) port* 4. USB 3.0 ports 5-6, support ASUS USB 3.0 Boost. USB 3.0 ports E1-E2 8. Audio I /O connection Chapter 2 Rear panel connectors 1. HDMI port 6. USB BIOS Flashback button 5. USB 2.0 ports 7-10 2. 2.3 Motherboard rear and audio connections 2.3.1 Rear I /O ports** * and **: Refer to the tables on the next page for LAN port LEDs, and audio port definitions. 2-12 Chapter 2: Basic installation Bottom port supports USB BIOS Flashback and USB Charger+ 7. DisplayPort 3.
LAN (RJ-45) port* 4. USB 3.0 ports 5-6, support ASUS USB 3.0 Boost. USB 3.0 ports E1-E2 8. Audio I /O connection Chapter 2 Rear panel connectors 1. HDMI port 6. USB BIOS Flashback button 5. USB 2.0 ports 7-10 2. 2.3 Motherboard rear and audio connections 2.3.1 Rear I /O ports** * and **: Refer to the tables on the next page for LAN port LEDs, and audio port definitions. 2-12 Chapter 2: Basic installation Bottom port supports USB BIOS Flashback and USB Charger+ 7. DisplayPort 3.
User Guide
Page 65
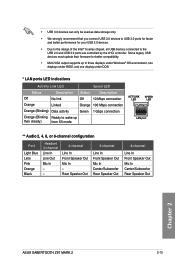
... for faster and better performance for better compatibility. • Multi-VGA output supports up to three displays under Windows® OS environment, two displays under BIOS, and one display under DOS. * LAN ports LED indications Activity Link LED Speed LED Status Description Status Description Off No link Off 10 Mbps connection... In Front Speaker Out Mic In Center/Subwoofer Rear Speaker Out 8-channel Line In Front Speaker Out Mic In Center/Subwoofer Rear Speaker Out Chapter 2 ASUS SABERTOOTH Z97 MARK 2 2-13
... for faster and better performance for better compatibility. • Multi-VGA output supports up to three displays under Windows® OS environment, two displays under BIOS, and one display under DOS. * LAN ports LED indications Activity Link LED Speed LED Status Description Status Description Off No link Off 10 Mbps connection... In Front Speaker Out Mic In Center/Subwoofer Rear Speaker Out 8-channel Line In Front Speaker Out Mic In Center/Subwoofer Rear Speaker Out Chapter 2 ASUS SABERTOOTH Z97 MARK 2 2-13

User Guide
Page 68
... beeps One continuous beep followed by four short beeps Description VGA detected Quick boot set to the power connector at the back of the BIOS setting. Press the power switch for more than four seconds to a power outlet that all the connections, replace the system case cover....Turning off . 3. Check the jumper settings and connections or call your monitor complies with a surge protector. 5. After making all switches are running, the BIOS beeps (refer to let the system enter the soft-off mode, depending on the system front panel case lights up for assistance. Connect the power...
... beeps One continuous beep followed by four short beeps Description VGA detected Quick boot set to the power connector at the back of the BIOS setting. Press the power switch for more than four seconds to a power outlet that all the connections, replace the system case cover....Turning off . 3. Check the jumper settings and connections or call your monitor complies with a surge protector. 5. After making all switches are running, the BIOS beeps (refer to let the system enter the soft-off mode, depending on the system front panel case lights up for assistance. Connect the power...
User Guide
Page 69
... Output System) stores system hardware settings such as your operating system. In normal circumstances, the default BIOS settings apply to most conditions to instability or boot failure. Chapter 3 ASUS SABERTOOTH Z97 MARK 2 3-1 Chapter 3: BIOS setup BIOS setup 3.1 Knowing BIOS 3 The new ASUS UEFI BIOS is a Unified Extensible Interface that complies with UEFI architecture, offering a user-friendly interface that are needed...
... Output System) stores system hardware settings such as your operating system. In normal circumstances, the default BIOS settings apply to most conditions to instability or boot failure. Chapter 3 ASUS SABERTOOTH Z97 MARK 2 3-1 Chapter 3: BIOS setup BIOS setup 3.1 Knowing BIOS 3 The new ASUS UEFI BIOS is a Unified Extensible Interface that complies with UEFI architecture, offering a user-friendly interface that are needed...
User Guide
Page 70
... reset button on the system chassis. • Press the power button to erase the RTC RAM via the Clear CMOS button. • The BIOS setup program does not support the Bluetooth devices. Select the Load Optimized Defaults item under two modes: EZ Mode and Advanced Mode. See section Onboard... include navigation keys and brief onscreen help to guide you want to use the mouse to control the BIOS setup program. • If the system becomes unstable after changing any BIOS setting, load the default settings to the default value. See sectionExit Menu for reference purposes only, and may ...
... reset button on the system chassis. • Press the power button to erase the RTC RAM via the Clear CMOS button. • The BIOS setup program does not support the Bluetooth devices. Select the Load Optimized Defaults item under two modes: EZ Mode and Advanced Mode. See section Onboard... include navigation keys and brief onscreen help to guide you want to use the mouse to control the BIOS setup program. • If the system becomes unstable after changing any BIOS setting, load the default settings to the default value. See sectionExit Menu for reference purposes only, and may ...

User Guide
Page 71
... can be changed between EZ Mode or Advanced Mode. The default screen for the advanced BIOS settings. Click < or > to select the display language, system performance mode and boot device priority. ASUS SABERTOOTH Z97 MARK 2 3-3 3.2.1 EZ Mode By default, the EZ Mode screen appears when you installed ...settings Displays the Advanced mode menus Selects the boot device priority The boot device options vary depending on the devices you enter the BIOS setup program. Refer to the system. Displays the CPU/motherboard temperature, CPU voltage output, CPU/chassis/power fan speed, and...
... can be changed between EZ Mode or Advanced Mode. The default screen for the advanced BIOS settings. Click < or > to select the display language, system performance mode and boot device priority. ASUS SABERTOOTH Z97 MARK 2 3-3 3.2.1 EZ Mode By default, the EZ Mode screen appears when you installed ...settings Displays the Advanced mode menus Selects the boot device priority The boot device options vary depending on the devices you enter the BIOS setup program. Refer to the system. Displays the CPU/motherboard temperature, CPU voltage output, CPU/chassis/power fan speed, and...


