
User Manual
Page 3
...2-2 2.2 Powering up 2-2 2.3 Support DVD information 2-2 2.3.1 Running the support DVD 2-3 2.3.2 Utilities menu 2-4 2.3.3 Make Disk menu 2-5 2.3.4 Manual menu 2-5 2.3.5 ASUS Contact information 2-6 2.3.6 Other information 2-6 2.4 Software information 2-8 2.4.1 AI Suite II 2-8 2.4.2 ASUS AI Manager 2-25 2.4.3 ASUS Webstorage 2-28 2.4.4 ASUS @ Vibe 2-30 Chapter 3 Motherboard info 3.1 Introduction 3-2 3.2 Motherboard layout 3-2 3.3 Jumper 3-3 3.4 Connectors 3-4 Chapter 4 BIOS setup 4.1 Managing and updating your BIOS 4-2 4.1.1 ASUS Update utility 4-3 iii
...2-2 2.2 Powering up 2-2 2.3 Support DVD information 2-2 2.3.1 Running the support DVD 2-3 2.3.2 Utilities menu 2-4 2.3.3 Make Disk menu 2-5 2.3.4 Manual menu 2-5 2.3.5 ASUS Contact information 2-6 2.3.6 Other information 2-6 2.4 Software information 2-8 2.4.1 AI Suite II 2-8 2.4.2 ASUS AI Manager 2-25 2.4.3 ASUS Webstorage 2-28 2.4.4 ASUS @ Vibe 2-30 Chapter 3 Motherboard info 3.1 Introduction 3-2 3.2 Motherboard layout 3-2 3.3 Jumper 3-3 3.4 Connectors 3-4 Chapter 4 BIOS setup 4.1 Managing and updating your BIOS 4-2 4.1.1 ASUS Update utility 4-3 iii
User Manual
Page 7
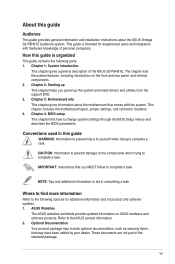
... the components when trying to complete a task. These documents are not part of the ASUS S2-P8H61E. vii The chapter lists the system features, including introduction on ASUS hardware and software products. Optional Documentation Your product package may have been added by your ... information Refer to change system settings through the BIOS Setup menus and describes the BIOS parameters. ASUS Websites The ASUS websites worldwide provide updated information on the front and rear panel, and internal components. 2. Chapter 4: BIOS setup This chapter tells how to the following parts...
... the components when trying to complete a task. These documents are not part of the ASUS S2-P8H61E. vii The chapter lists the system features, including introduction on ASUS hardware and software products. Optional Documentation Your product package may have been added by your ... information Refer to change system settings through the BIOS Setup menus and describes the BIOS parameters. ASUS Websites The ASUS websites worldwide provide updated information on the front and rear panel, and internal components. 2. Chapter 4: BIOS setup This chapter tells how to the following parts...

User Manual
Page 24
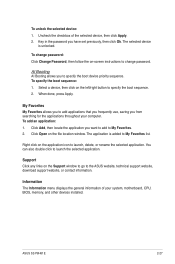
...2. Click to customize the interface settings Click to show the Support information Click to show the system information Click to update the motherboard BIOS Click to monitor sensors or CPU frequency Click to complete the installation. The AI Suite II icon appears in -one interface that will...DVD in the support DVD have wizards that integrates several ASUS utilities and allows users to launch and operate these utilities simultaneously. Click each button to select and launch a utility, to monitor the system, to update the motherboard BIOS, to display the system information, and to open ...
...2. Click to customize the interface settings Click to show the Support information Click to show the system information Click to update the motherboard BIOS Click to monitor sensors or CPU frequency Click to complete the installation. The AI Suite II icon appears in -one interface that will...DVD in the support DVD have wizards that integrates several ASUS utilities and allows users to launch and operate these utilities simultaneously. Click each button to select and launch a utility, to monitor the system, to update the motherboard BIOS, to display the system information, and to open ...

User Manual
Page 30
... items on the right side. 2-14 Chapter 2: Starting up Select the BIOS version that allows you to update the motherboard BIOS and the BIOS boot logo with the ASUS designed update utilities. The ASUS Update utility allows you to avoid network traffic. Click Next. When there ...from Internet, and then click Next. 2. Update The Update section allows you to manage, save the current BIOS file or view the BIOS version information. Select the ASUS FTP site nearest you to u�p�d�a�t�e��t�h�e��B�I �...
... items on the right side. 2-14 Chapter 2: Starting up Select the BIOS version that allows you to update the motherboard BIOS and the BIOS boot logo with the ASUS designed update utilities. The ASUS Update utility allows you to avoid network traffic. Click Next. When there ...from Internet, and then click Next. 2. Update The Update section allows you to manage, save the current BIOS file or view the BIOS version information. Select the ASUS FTP site nearest you to u�p�d�a�t�e��t�h�e��B�I �...

User Manual
Page 31
ASUS S2-P8H61E 2-15 4. Follow the onscreen instructions to avoid network traffic, and click Next. 3. Select the ASUS FTP site nearest you to complete the update process. From the ASUS Update screen, select Download BIOS from Internet: 1. Download BIOS from Internet To download BIOS from Interent, and then click Next. 2. Select the BIOS version that you want to continue. 5. You...
ASUS S2-P8H61E 2-15 4. Follow the onscreen instructions to avoid network traffic, and click Next. 3. Select the ASUS FTP site nearest you to complete the update process. From the ASUS Update screen, select Download BIOS from Internet: 1. Download BIOS from Internet To download BIOS from Interent, and then click Next. 2. Select the BIOS version that you want to continue. 5. You...

User Manual
Page 32
Click Finish to continue. 4. 4. Click Yes if you want to change the boot logo or No to complete the process. Locate the BIOS file, click Open, and click Next. 3. From the ASUS Update screen, select Update BIOS from file, and then click Next. 2. Updating the BIOS through a BIOS file To update the BIOS through a BIOS file: 1. Follow the onscreen instructions to complete the update process. 2-16 Chapter 2: Starting up
Click Finish to continue. 4. 4. Click Yes if you want to change the boot logo or No to complete the process. Locate the BIOS file, click Open, and click Next. 3. From the ASUS Update screen, select Update BIOS from file, and then click Next. 2. Updating the BIOS through a BIOS file To update the BIOS through a BIOS file: 1. Follow the onscreen instructions to complete the update process. 2-16 Chapter 2: Starting up

User Manual
Page 33
.... From the ASUS Update screen, select Save BIOS to the BIOS file. ASUS MyLogo The ASUS MyLogo utility lets you install the ASUS Update utility from the Support DVD. • Obtain the latest BIOS file from the ASUS website at www.asus.com. • You can create your own boot logo image in GIF file format. ASUS S2-P8H61E 2-17 ASUS MyLogo is...
.... From the ASUS Update screen, select Save BIOS to the BIOS file. ASUS MyLogo The ASUS MyLogo utility lets you install the ASUS Update utility from the Support DVD. • Obtain the latest BIOS file from the ASUS website at www.asus.com. • You can create your own boot logo image in GIF file format. ASUS S2-P8H61E 2-17 ASUS MyLogo is...

User Manual
Page 34
From the ASUS Update screen, select MyLogo, and then click Next. 2. To update the BIOS boot logo: 1. Select Change the BIOS boot logo of my motherboard, then click Next. 3. Locate the picture that you want to use as your BIOS boot logo�,�t�h�e��n� click Next. 4 S�e�l�e�...
From the ASUS Update screen, select MyLogo, and then click Next. 2. To update the BIOS boot logo: 1. Select Change the BIOS boot logo of my motherboard, then click Next. 3. Locate the picture that you want to use as your BIOS boot logo�,�t�h�e��n� click Next. 4 S�e�l�e�...

User Manual
Page 35
... ASUS S2-P8H61E 2-19 Select Change the boot logo of a downloaded BIOS file and update this BIOS to complete the update process. Locate the picture that you want to the motherboard: 1. Click Next. Follow the onscreen instructions to my motherboard, then click Next. 3. To change the BIOS ...file's boot logo and update the BIOS to use as your BIOS boot logo�,�t�h�e��n� click Next. 4 S�e�l�e�c&#...
... ASUS S2-P8H61E 2-19 Select Change the boot logo of a downloaded BIOS file and update this BIOS to complete the update process. Locate the picture that you want to the motherboard: 1. Click Next. Follow the onscreen instructions to my motherboard, then click Next. 3. To change the BIOS ...file's boot logo and update the BIOS to use as your BIOS boot logo�,�t�h�e��n� click Next. 4 S�e�l�e�c&#...

User Manual
Page 36
...appears only when you want the changes to complete the update process. Select Change the boot logo of a downloaded BIOS file (But do not update this BIOS to the motherboard: 1. 5. ���T��h�e�s�y�s�t�e�m��s&#...;I�O�S� and loading the new boot logo. 6. Click OK on the confirmation message. To change the BIOS files's boot logo without updating the BIOS to my motherboard.), then click Next. 2-20 Chapter 2: Starting up Click Yes if you run the software from the...
...appears only when you want the changes to complete the update process. Select Change the boot logo of a downloaded BIOS file (But do not update this BIOS to the motherboard: 1. 5. ���T��h�e�s�y�s�t�e�m��s&#...;I�O�S� and loading the new boot logo. 6. Click OK on the confirmation message. To change the BIOS files's boot logo without updating the BIOS to my motherboard.), then click Next. 2-20 Chapter 2: Starting up Click Yes if you run the software from the...

User Manual
Page 37
... your BIOS boot logo�,�t�h�e��n� click Next. 4 S�e�l�e�c�t�y�o��u�r�d�e��s�ir�e�d��s�i�z�e�f�o�r��th�e��b�o��o�t logo. ASUS S2-P8H61E 2-21...
... your BIOS boot logo�,�t�h�e��n� click Next. 4 S�e�l�e�c�t�y�o��u�r�d�e��s�ir�e�d��s�i�z�e�f�o�r��th�e��b�o��o�t logo. ASUS S2-P8H61E 2-21...

User Manual
Page 38
System Information The System Information section displays the information about the motherboard, CPU and memory slots and disks. • Click the MB tab to see the details on the motherboard manufacturer, product name, version, and BIOS. • Click the CPU tab to see the details on the processor and the Cache. 2-22 Chapter 2: Starting up
System Information The System Information section displays the information about the motherboard, CPU and memory slots and disks. • Click the MB tab to see the details on the motherboard manufacturer, product name, version, and BIOS. • Click the CPU tab to see the details on the processor and the Cache. 2-22 Chapter 2: Starting up
User Manual
Page 43
...links on the file location window. AI Booting AI Booting allows you from searching for the applications throughout your system, motherboard, CPU, BIOS, memory, and other devices installed. Click Open on the Support window to go to specify the boot device priority sequence. When done...you frequently use, saving you to the ASUS website, technical support website, download support website, or contact information. Click Add, then locate the application you have set previously, then click Ok. Uncheck the checkbox of your computer. ASUS S2-P8H61E 2-27 The application is unlocked. To...
...links on the file location window. AI Booting AI Booting allows you from searching for the applications throughout your system, motherboard, CPU, BIOS, memory, and other devices installed. Click Open on the Support window to go to specify the boot device priority sequence. When done...you frequently use, saving you to the ASUS website, technical support website, download support website, or contact information. Click Add, then locate the application you have set previously, then click Ok. Uncheck the checkbox of your computer. ASUS S2-P8H61E 2-27 The application is unlocked. To...

User Manual
Page 48
... 32Mb BIOS Lithium Cell CMOS Power ATX12V EATXPWR DDR3 DIMM_B1 (64bit, 240-pin module) DDR3 DIMM_A1 (64bit, 240-pin module) DVI_D_VGA P8H61-I USB34 ASM 1042 LAN1_USB3_12 AUDIO RTL 8111E AAFP VIA VT1708S SPDIF_OUT LGA1155 EPU PCI1EX16 SB_PWR CLRTC F_PANEL 3-2 Chapter 3: Motherboard info 3.1 Introduction The Vintage S2-P8H61E barebone system comes with an ASUS motherboard...
... 32Mb BIOS Lithium Cell CMOS Power ATX12V EATXPWR DDR3 DIMM_B1 (64bit, 240-pin module) DDR3 DIMM_A1 (64bit, 240-pin module) DVI_D_VGA P8H61-I USB34 ASM 1042 LAN1_USB3_12 AUDIO RTL 8111E AAFP VIA VT1708S SPDIF_OUT LGA1155 EPU PCI1EX16 SB_PWR CLRTC F_PANEL 3-2 Chapter 3: Motherboard info 3.1 Introduction The Vintage S2-P8H61E barebone system comes with an ASUS motherboard...

User Manual
Page 49
...erase the RTC RAM: 1. Move the jumper cap from pins 1-2 (default) to re-enter data. Hold down and reboot the system, then the BIOS automatically resets parameter settings to overclocking, use the CPU Parameter Recall (C.P.R.) feature. CLRTC 12 23 P8H61-I Normal (Default) P8H61-I Clear RTC RAM Clear... system hangs due to clear the Real Time Clock (RTC) RAM in CMOS, which include system setup information such as system passwords. ASUS S2-P8H61E 3-3 The onboard button cell battery powers the RAM data in CMOS. You can clear the CMOS memory of date, time, and system...
...erase the RTC RAM: 1. Move the jumper cap from pins 1-2 (default) to re-enter data. Hold down and reboot the system, then the BIOS automatically resets parameter settings to overclocking, use the CPU Parameter Recall (C.P.R.) feature. CLRTC 12 23 P8H61-I Normal (Default) P8H61-I Clear RTC RAM Clear... system hangs due to clear the Real Time Clock (RTC) RAM in CMOS, which include system setup information such as system passwords. ASUS S2-P8H61E 3-3 The onboard button cell battery powers the RAM data in CMOS. You can clear the CMOS memory of date, time, and system...

User Manual
Page 52
Digital Audio connector (4-1 pin SPDIF_OUT) This connector is set the HD Audio Controller item in the BIOS to allow digital sound output. Connect one end of the motherboard's high-definition audio capability. • By default, this connector is for details. • Connect ...
Digital Audio connector (4-1 pin SPDIF_OUT) This connector is set the HD Audio Controller item in the BIOS to allow digital sound output. Connect one end of the motherboard's high-definition audio capability. • By default, this connector is for details. • Connect ...

User Manual
Page 55
BIOS setup Chapter 4 This chapter tells how to change system settings through the BIOS Setup menus and describes the BIOS parameters.
BIOS setup Chapter 4 This chapter tells how to change system settings through the BIOS Setup menus and describes the BIOS parameters.

User Manual
Page 56
... may result to system boot failure. • Save a copy of a trained service personnel. • BIOS updating is no problem in using the ASUS Update utility. • Download the latest BIOS file from the ASUS website at www.asus.com 4-2 Chapter 4: BIOS setup We strongly recommend that are needed for system startup in the motherboard CMOS. In...
... may result to system boot failure. • Save a copy of a trained service personnel. • BIOS updating is no problem in using the ASUS Update utility. • Download the latest BIOS file from the ASUS website at www.asus.com 4-2 Chapter 4: BIOS setup We strongly recommend that are needed for system startup in the motherboard CMOS. In...
User Manual
Page 57
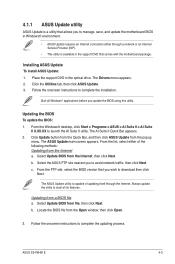
..., then click Next. From the list, select either through the Internet. Select Update BIOS from a BIOS file a. Updating from the Internet, then click Next. b. The Drivers menu appears. 2. The ASUS Update main screen appears. b. Always update the utility to complete the updating process. ...to download then click Next. Quit all its features. The AI Suite II Quick Bar appears. 2. The ASUS Update utility is available in the optical drive. Select Update BIOS from the Open window, then click Open. 3. Locate the BIOS file from file, then click Next. ASUS S2-P8H61E 4-3
..., then click Next. From the list, select either through the Internet. Select Update BIOS from a BIOS file a. Updating from the Internet, then click Next. b. The Drivers menu appears. 2. The ASUS Update main screen appears. b. Always update the utility to complete the updating process. ...to download then click Next. Quit all its features. The AI Suite II Quick Bar appears. 2. The ASUS Update utility is available in the optical drive. Select Update BIOS from the Open window, then click Open. 3. Locate the BIOS file from file, then click Next. ASUS S2-P8H61E 4-3

User Manual
Page 58
...8226; DO NOT shut down or reset the system while updating the BIOS to the Drive field. 4. Insert the USB flash disk that contains the latest BIOS, and then press . 5. Exit ASUSTek EZ Flash 2 BIOS ROM Utility V00.75 Flash Info MODEL: S2-P8H61E File Path: fs0:\ Drive fs0:\ VER: 0309 Folder Info 11/... S2-P8H61E.ROM File Info MODEL: Help Info VER: DATE [Enter] Select or Load [Tab] Switch [Up/Down/PageUp/PageDown/Home/End] Move [Esc] Exit [F2] Backup 3. Go to the Tool menu to select ASUS EZ Flash Utility and press to the Folder Info field. 6. Enter the Advanced Mode of the BIOS ...
...8226; DO NOT shut down or reset the system while updating the BIOS to the Drive field. 4. Insert the USB flash disk that contains the latest BIOS, and then press . 5. Exit ASUSTek EZ Flash 2 BIOS ROM Utility V00.75 Flash Info MODEL: S2-P8H61E File Path: fs0:\ Drive fs0:\ VER: 0309 Folder Info 11/... S2-P8H61E.ROM File Info MODEL: Help Info VER: DATE [Enter] Select or Load [Tab] Switch [Up/Down/PageUp/PageDown/Home/End] Move [Esc] Exit [F2] Backup 3. Go to the Tool menu to select ASUS EZ Flash Utility and press to the Folder Info field. 6. Enter the Advanced Mode of the BIOS ...


