Asus RS100-E10-PI2 Support and Manuals
Get Help and Manuals for this Asus item
View All Support Options Below
Free Asus RS100-E10-PI2 manuals!
Problems with Asus RS100-E10-PI2?
Ask a Question
Free Asus RS100-E10-PI2 manuals!
Problems with Asus RS100-E10-PI2?
Ask a Question
Popular Asus RS100-E10-PI2 Manual Pages
User Manual - Page 13
...
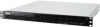
4 x RJ-45 ports
1 x RJ-45 ports (One for the latest update
Memory Size
32GB, 16GB, 8GB, 4GB (UDIMM)
Expansion Slots
Total PCI/PCI...Support software RAID 0, 1, 10 & 5) * When the M.2 is a 1U barebone server system featuring the ASUS P11C-M/4L server board.
1.3 System specifications
The ASUS RS100-E10-PI2 is SATA signal, the gray SATA ports will be
disabled. Model Name
RS100-E10-PI2...
User Manual - Page 15
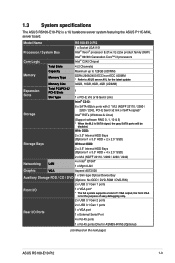
... panel. The I/O shield with easily accessible features.
ASUS RS100-E10-PI2
1-5 Optical drive (optional)
Q-Code
4
3
2
1
LAN LEDs
Message LED
HDD Access LED
2
4
Power button
1
3
Asset tag VGA port USB 3.1 Gen 1 port Reset button
Location button
Turn off the system power and detach the power supply before removing or replacing any system component.
1.5 Rear panel features
The...
User Manual - Page 27
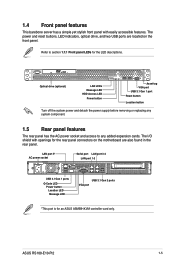
The fastener on the airduct should align with the screw hole on the motherboard. Reattach the screw and secure the airduct onto the motherboard. ASUS RS100-E10-PI2
2-9
Locate and remove the screw from the motherboard.
2. To install the airduct: 1. Place the airduct over the heatsink.
User Manual - Page 29

...; To install two or more DIMMs, refer to the user guide bundled in the wrong direction to the user guide for the Qualified Vendor List (QVL) of the memory modules. Apply force to both ends then insert the DIMM vertically into place and the DIMM cannot be pushed in only one direction. ASUS RS100-E10-PI2
2-11...
User Manual - Page 31
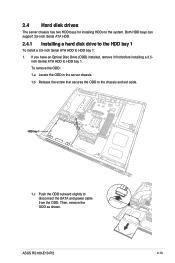
... Disc Drive (ODD) installed, remove it first before installing a 3.5-
ASUS RS100-E10-PI2
2-13 To remove the ODD: 1.a Locate the ODD in the server chassis. 1.b Release the screw that secures the ODD to disconnect the SATA and power cable from the ODD.
HDD bay 1
1.c Push the ODD outward slightly to the chassis and set aside. inch Sertial ATA...
User Manual - Page 33
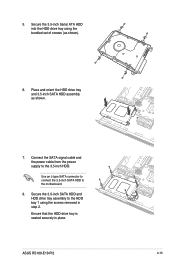
... cable and the power cable from the power supply to the HDD bay 1 using the bundled set of screws (as shown.
7.
Place and orient the HDD drive tray and 3.5-inch SATA HDD assembly as shown).
6.
ASUS RS100-E10-PI2
2-15 Secure the 3.5-inch Serial ATA HDD into the HDD drive tray using the screws removed...
User Manual - Page 35
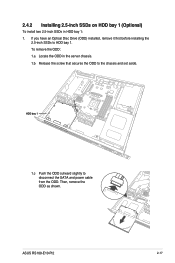
... before installing the
2.5-inch SSDs to disconnect the SATA and power cable from the ODD. ASUS RS100-E10-PI2
2-17 To remove the ODD: 1.a Locate the ODD in HDD bay 1: 1. 2.4.2 Installing 2.5-inch SSDs on HDD bay 1 (Optional)
To install two 2.5-inch SSDs in the server chassis. 1.b Release the screw that secures the ODD to the chassis and set aside...
User Manual - Page 37
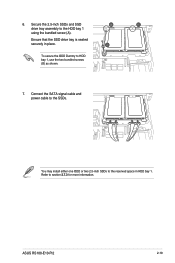
... 1, use the two bundled screws (B) as shown.
7.
You may install either one ODD or two 2.5-inch SSDs to section 2.7.3 for more information. Ensure that the SSD drive tray is seated securely in HDD bay 1. Refer to the reserved space in place.
6. ASUS RS100-E10-PI2
2-19 Secure the 2.5-inch SSDs and SSD drive tray assembly...
User Manual - Page 51
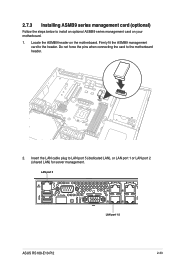
Do not force the pins when connecting the card to install an optional ASMB9 series management card on the motherboard. 2.7.3 Installing ASMB9 series management card (optional)
Follow the steps below to the motherboard header.
4
2. LAN port 5
Q-Code
2
4
1
3
LAN port 1-2
ASUS RS100-E10-PI2
2-33 Locate the ASMB9 header on your motherboard.
1. Insert the LAN cable plug to the...
User Manual - Page 55
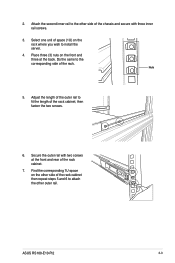
... with three inner rail screws.
3. Find the corresponding 1U space on the rack where you wish to install the server.
4. Do the same to the other side of the rack cabinet, then fasten the two screws.
6. ASUS RS100-E10-PI2
3-3 Attach the second inner rail to the corresponding side of the rack cabinet.
7.
Adjust the length...
User Manual - Page 57
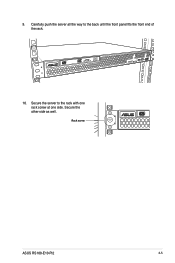
Secure the server to the back until the front panel fits the front end of the rack.
4
3
2
1
10. 9.
Secure the other side as well. Carefully push the server all the way to the rack with one rack screw at one side. Rack screw
4
3
2
1
ASUS RS100-E10-PI2
3-5
User Manual - Page 93

ASUS RS100-E10-PI2
5-7 5.2.1 BIOS menu screen
Menu items
Menu bar
Configuration fields
General help
Navigation keys
5.2.2 Menu bar
The menu bar on top of the screen has the following main items:
Main
For changing the basic system configuration
Advanced
For changing the advanced system settings
Chipset
For changing the chipset settings
Security
For changing the security...
User Manual - Page 107
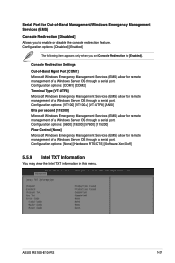
... the console redirection feature. Console Redirection Settings
Out-of-Band Mgmt Port [COM1] Microsoft Windows Emergency Management Services (EMS) allow for remote management of a Windows Server OS through a serial port. ASUS RS100-E10-PI2
5-21 Configuration options: [COM1] [COM2] Terminal Type [VT-UTF8] Microsoft Windows Emergency Management Services (EMS) allow for remote management of...
User Manual - Page 147
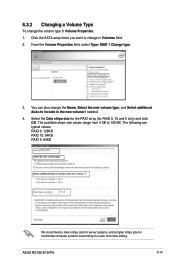
... typical values: RAID 0: 128KB RAID 10: 64KB RAID 5: 64KB
We recommend a lower stripe size for server systems, and a higher stripe size for multimedia computer systems used mainly for RAID 0, 10 and 5 only) and click OK. ASUS RS100-E10-PI2
6-15 Click the SATA array items you want to change the Name, Select the new volume...
User Manual - Page 155

... to change at any time without notice. Double-click the Setup.exe to run the support DVD. If Autorun is NOT enabled in your computer. ASUS RS100-E10-PI2
7-5
Onscreen display and content vary depending on Windows® Server 2016.
7.3 Running the Support DVD
When you place the support DVD into the optical drive, the DVD automatically displays the...
Asus RS100-E10-PI2 Reviews
We have not received any reviews for Asus yet.