Asus RS100-E9-PI2 Support and Manuals
Get Help and Manuals for this Asus item
View All Support Options Below
Free Asus RS100-E9-PI2 manuals!
Problems with Asus RS100-E9-PI2?
Ask a Question
Free Asus RS100-E9-PI2 manuals!
Problems with Asus RS100-E9-PI2?
Ask a Question
Popular Asus RS100-E9-PI2 Manual Pages
User Guide - Page 13
...ASUS RS100-E9-PI2
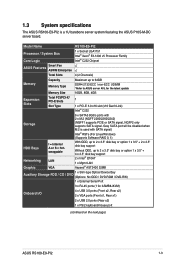
1-3 Gray SATA port will be disabled when M.2 is a 1U barebone server system featuring the ASUS P10S-M-DC server board. 1.3 System specifications
The ASUS RS100-E9-PI2 is used with SATA signal)
Intel® RSTe (For Linux/Windows) (Supports... x External Serial Port
3 x RJ-45 ports (1 for the latest update
Memory Size
16GB, 8GB, 4GB
Expansion Slots
Total PCI/PCI-X/ PCI-E ...
User Guide - Page 15
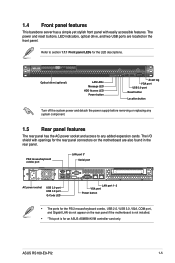
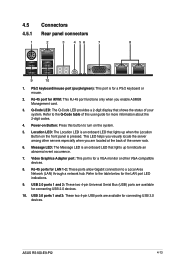
... and detach the power supply before removing or replacing any added expansion cards. PS/2 mouse/keyboard combo port
LAN port 3* Serial port
AC power socket
USB 2.0 port USB 3.0 port
Q-Code LED
LAN port 1~2 VGA port
Power button
• The ports for the LED descriptions. ASUS RS100-E9-PI2
1-5
The power and reset buttons, LED indicators, optical...
User Guide - Page 23
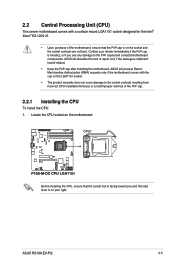
...installing the CPU, ensure that the PnP cap is on your retailer immediately if the PnP cap is missing, or if you and the load lever is on the motherboard.
Locate the CPU socket on the socket and the socket contacts are not bent. ASUS RS100-E9-PI2
2-5 ASUS... from incorrect CPU installation/removal, or a lost/improper removal of repair only if the damage is shipment/ transit-related.
&#...
User Guide - Page 31
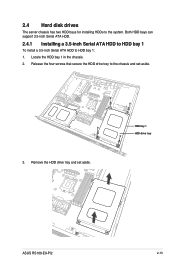
Remove the HDD drive tray and set aside.
3.
Both HDD bays can support 3.5-inch Serial ATA HDD.
2.4.1 Installing a 3.5-inch Serial ATA HDD to HDD bay 1
To install a 3.5-inch Serial ATA HDD to the system. Locate the HDD bay 1 in the chassis. 2. HDD bay 1 HDD drive tray
ASUS RS100-E9-PI2
2-13 Release the four screws that secure the HDD...
User Guide - Page 37
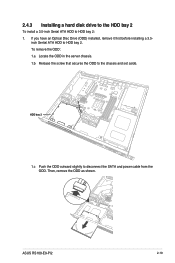
Then, remove the ODD as shown. 2.4.3 Installing a hard disk drive to the HDD bay 2
To install a 3.5-inch Serial ATA HDD to the chassis and set aside.
If you have an Optical Disc Drive (ODD) installed, remove it first before installing a 3.5-
ASUS RS100-E9-PI2
2-19 To remove the ODD: 1.a Locate the ODD in the server chassis. 1.b Release the screw that secures...
User Guide - Page 41
... the ODD. To remove the ODD: 1.a Locate the ODD in HDD bay 2: 1.
ASUS RS100-E9-PI2
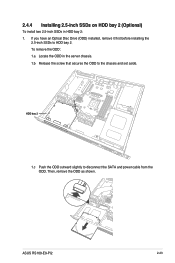
2-23 2.4.4 Installing 2.5-inch SSDs on HDD bay 2 (Optional)
To install two 2.5-inch SSDs in the server chassis. 1.b Release the screw that secures the ODD to the chassis and set aside. Then, remove the ODD as shown. HDD bay 2
1.c Push the ODD outward...
User Guide - Page 57
... then repeat steps 5 and 6 to install the server.
4.
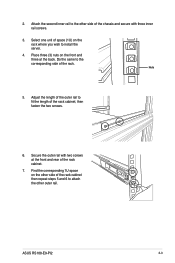
Adjust the length of the outer rail to the other side of the rack cabinet.
7. Attach the second inner rail to fit the length of the rack. Do the same to the corresponding side of the rack cabinet, then fasten the two screws.
6. Nuts
5. ASUS RS100-E9-PI2
3-3 2.
User Guide - Page 59
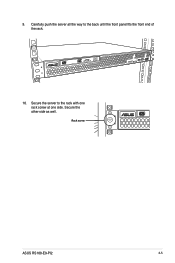
Carefully push the server all the way to the rack with one rack screw at one side. Rack screw
4
3
2
1
ASUS RS100-E9-PI2
3-5 9.
Secure the server to the back until the front panel fits the front end of the rack.
4
3
2
1
10. Secure the other side as well.
User Guide - Page 67
... in sleep mode, or in any motherboard component.
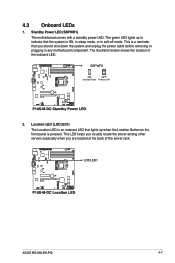
This LED helps you visually locate the server among other servers especially when you should shut down the system and unplug the power cable before removing or ... power LED. The illustration below shows the location of the server rack. Location LED (LOCLED1) The Location LED is pressed. 4.3 Onboard LEDs
1. ASUS RS100-E9-PI2
4-7
User Guide - Page 73
...shows the status of the server rack.
6. Refer to indicate an abnormal event occurrence.
7. Power-on Button: Press this user guide for LAN 1-2: These ...codes.
4. This LED helps you visually locate the server among other VGA-compatible devices.
8. USB 2.0 ports 1 and 2: These two 4-pin Universal Serial Bus (USB) ports are available for connecting USB 2.0 devices.
10. ASUS RS100-E9-PI2...
User Guide - Page 93
...
For configuring options for special functions
Save & Exit
For selecting the save & exit options
Server Mgmt
For changing the server mgmt settings
Event Logs
For changing the event log settings
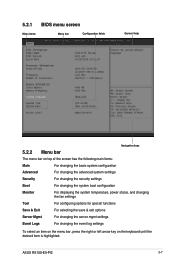
To select an item on the menu bar, press the right or left arrow key on the keyboard until the desired item is highlighted. ASUS RS100-E9-PI2
5-7
User Guide - Page 103
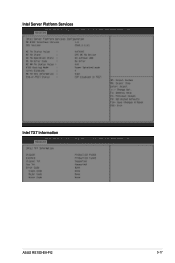
Intel Server Platform Services Intel TXT Information
ASUS RS100-E9-PI2
5-17
User Guide - Page 111

... Management Services (EMS) Console Redirection [Disabled] Allows you to select a COM port to display redirection of Legacy OS and Legacy OPROM Messages. Configuration options: [COM1] [COM2]
Terminal Type [VT-UTF8] Allows you to set the terminal type for remote management of -band management. Configuration options: [None] [Hardware RTS/CTS] [Software Xon/Xoff]
ASUS RS100-E9-PI2...
User Guide - Page 149
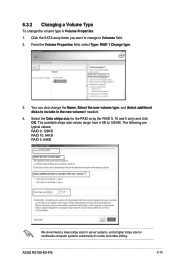
... typical values: RAID 0: 128KB RAID 10: 64KB RAID 5: 64KB
We recommend a lower stripe size for server systems, and a higher stripe size for multimedia computer systems used mainly for RAID 0, 10 and 5 only) and click OK. ASUS RS100-E9-PI2
6-15 The available stripe size values range from 4 KB to change in Volumes field. 2. You can...
User Guide - Page 157

...By default, the Drivers tab is NOT enabled in your computer. Manual 4. ASUS RS100-E9-PI2
7-5 Visit the ASUS website (www.asus.com) for the latest updates on software and utilities.
• The support DVD is supported on the Windows® Server 2012 Operating System (OS).
7.2 Management applications and utilities installation
The support DVD that you place the support DVD into the...
Asus RS100-E9-PI2 Reviews
We have not received any reviews for Asus yet.