

User Manual
Page 21
... system memory to boost system performance. 1.3.2 ROG Exclusive Features Extreme Engine Digi+ II Optimum power efficiency with premium components and intelligent digital design The Extreme Engine Digi+ II has been upgraded and equipped with the finest Japan-made 10K Black Metallic capacitors,...the BIOS screenshot are over all components. GPU.DIMM Post Enter the BIOS for total system control. ROG RAMPAGE IV GENE 1-3 Chapter 1 Dual-Channel DDR3 2400(O.C.) support The motherboard supports DDR3 memory that features data transfer rates of a button. Never want your opponents. Tweak it , ...
... system memory to boost system performance. 1.3.2 ROG Exclusive Features Extreme Engine Digi+ II Optimum power efficiency with premium components and intelligent digital design The Extreme Engine Digi+ II has been upgraded and equipped with the finest Japan-made 10K Black Metallic capacitors,...the BIOS screenshot are over all components. GPU.DIMM Post Enter the BIOS for total system control. ROG RAMPAGE IV GENE 1-3 Chapter 1 Dual-Channel DDR3 2400(O.C.) support The motherboard supports DDR3 memory that features data transfer rates of a button. Never want your opponents. Tweak it , ...

User Manual
Page 115
...manually update the BIOS. ASUS CrashFree BIOS 3: Restores the BIOS using a USB flash disk drive without entering BIOS or OS. Chapter 3 ROG RAMPAGE IV GENE 3-41 Quit all Windows® applications before you to manage, save, and update the motherboard BIOS in the system's ...Update the BIOS from the motherboard support DVD, launch ASUS Update by clicking Update > ASUS Update on system stability, compatibility, or performance. ASUS Update: Updates the BIOS in DOS environment using this motherboard. Launching ASUS Update After installing AI Suite II from an updated BIOS ...
...manually update the BIOS. ASUS CrashFree BIOS 3: Restores the BIOS using a USB flash disk drive without entering BIOS or OS. Chapter 3 ROG RAMPAGE IV GENE 3-41 Quit all Windows® applications before you to manage, save, and update the motherboard BIOS in the system's ...Update the BIOS from the motherboard support DVD, launch ASUS Update by clicking Update > ASUS Update on system stability, compatibility, or performance. ASUS Update: Updates the BIOS in DOS environment using this motherboard. Launching ASUS Update After installing AI Suite II from an updated BIOS ...
User Manual
Page 127
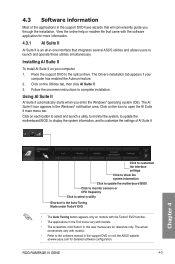
... utility, to monitor the system, to update the motherboard BIOS, to display the system information, and to customize the settings of AI Suite II in the Windows® notification area. 4.3 Software information...conveniently guide you enter the Windows® operating system (OS). ROG RAMPAGE IV GENE 4-3 Using AI Suite II AI Suite II automatically starts when you through the installation. View the online help or ... application for more information. 4.3.1 AI Suite II AI Suite II is an all-in the support DVD or visit the ASUS website at www.asus.com for reference only. Place the support ...
... utility, to monitor the system, to update the motherboard BIOS, to display the system information, and to customize the settings of AI Suite II in the Windows® notification area. 4.3 Software information...conveniently guide you enter the Windows® operating system (OS). ROG RAMPAGE IV GENE 4-3 Using AI Suite II AI Suite II automatically starts when you through the installation. View the online help or ... application for more information. 4.3.1 AI Suite II AI Suite II is an all-in the support DVD or visit the ASUS website at www.asus.com for reference only. Place the support ...

User Manual
Page 133
After installing AI Suite II from the motherboard support DVD, launch DIGI+ Power Control by the VCCSA Loadline....delivery. CPU Power Phase Control Increase phase number under light system loading to increase VRM efficiency. Chapter 4 ROG RAMPAGE IV GENE 4-9 Select CPU Power or DRAM Power to longer component lifespan and minimize power loss. Set to a higher value... The behavior of the DRAM Controller is decided by clicking Tool > DIGI+ Power Control on the AI Suite II main menu bar. 4.3.3 DIGI+ Power Control DIGI+ PowerControl allows you to adjust the voltage settings and control...
After installing AI Suite II from the motherboard support DVD, launch DIGI+ Power Control by the VCCSA Loadline....delivery. CPU Power Phase Control Increase phase number under light system loading to increase VRM efficiency. Chapter 4 ROG RAMPAGE IV GENE 4-9 Select CPU Power or DRAM Power to longer component lifespan and minimize power loss. Set to a higher value... The behavior of the DRAM Controller is decided by clicking Tool > DIGI+ Power Control on the AI Suite II main menu bar. 4.3.3 DIGI+ Power Control DIGI+ PowerControl allows you to adjust the voltage settings and control...
User Manual
Page 135
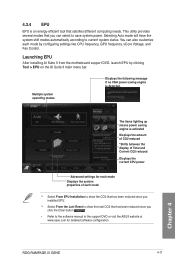
You can select to save system power. Launching EPU After installing AI Suite II from the motherboard support DVD, launch EPU by configuring settings like CPU frequency, GPU frequency, vCore Voltage, and Fan Control. 4.3.4 EPU EPU is an energy-efficient tool ...in the support DVD or visit the ASUS website at www.asus.com for each mode Displays the system properties of each mode by clicking Tool > EPU on the AI Suite II main menu bar. This utility provides several modes that satisfies different computing needs. Chapter 4 ROG RAMPAGE IV GENE 4-11 The items lighting up means...
You can select to save system power. Launching EPU After installing AI Suite II from the motherboard support DVD, launch EPU by configuring settings like CPU frequency, GPU frequency, vCore Voltage, and Fan Control. 4.3.4 EPU EPU is an energy-efficient tool ...in the support DVD or visit the ASUS website at www.asus.com for each mode Displays the system properties of each mode by clicking Tool > EPU on the AI Suite II main menu bar. This utility provides several modes that satisfies different computing needs. Chapter 4 ROG RAMPAGE IV GENE 4-11 The items lighting up means...

User Manual
Page 137
The History Record function allows you want to need. 2. Launching Sensor Recorder After installing AI Suite II from the motherboard support DVD, launch Sensor Recorder by clicking Tool > Sensor Recorder on the left for certain purposes. ROG RAMPAGE IV GENE 4-13 Chapter 4 Click on the History Record tab and adjust the settings on the AI Suite...
The History Record function allows you want to need. 2. Launching Sensor Recorder After installing AI Suite II from the motherboard support DVD, launch Sensor Recorder by clicking Tool > Sensor Recorder on the left for certain purposes. ROG RAMPAGE IV GENE 4-13 Chapter 4 Click on the History Record tab and adjust the settings on the AI Suite...
User Manual
Page 145
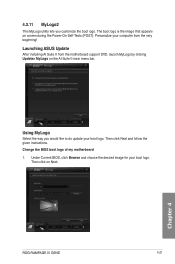
... DVD, launch MyLogo by clicking Update> MyLogo on Next. Chapter 4 ROG RAMPAGE IV GENE 4-21 Change the BIOS boot logo of my motherboard 1. Then click on the AI Suite II main menu bar. Launching ASUS Update After installing AI Suite II from the very beginning! Under Current BIOS, click Browse and choose the desired image for your...
... DVD, launch MyLogo by clicking Update> MyLogo on Next. Chapter 4 ROG RAMPAGE IV GENE 4-21 Change the BIOS boot logo of my motherboard 1. Then click on the AI Suite II main menu bar. Launching ASUS Update After installing AI Suite II from the very beginning! Under Current BIOS, click Browse and choose the desired image for your...


