
User Manual
Page 2
... of power source indicated on the label. Increase sensor/Brightness hotkey 4. AC-in port 8. USB port (Upstream) * Hotkey for 5 sound preset mode selection. ** Hotkey for 5 video preset mode selection. *** Adjusts the image automatically by touching the sensor for 2-3 seconds. 2 Quick Start Guide Microphone-output port 13. VGA port 10. If you encounter technical problems with the monitor, contact a qualified service technician or your local power standard. • To ensure satisfactory operation, use the monitor only...
... of power source indicated on the label. Increase sensor/Brightness hotkey 4. AC-in port 8. USB port (Upstream) * Hotkey for 5 sound preset mode selection. ** Hotkey for 5 video preset mode selection. *** Adjusts the image automatically by touching the sensor for 2-3 seconds. 2 Quick Start Guide Microphone-output port 13. VGA port 10. If you encounter technical problems with the monitor, contact a qualified service technician or your local power standard. • To ensure satisfactory operation, use the monitor only...
User Manual
Page 3
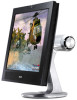
USB 2.0 ports 3. VGA cable 4. Microphone cable (red) 7. English Side view 1 2 3 4 1. Headphone port Connecting the cables Connect the cables as shown: 1 2 3 4567 1. Power cord 2. USB cable Quick Start Guide 3 Woofer cable 6. Audio cable (gray) 5. Microphone port 4. SRS On/Off button 2. DVI cable 3.
USB 2.0 ports 3. VGA cable 4. Microphone cable (red) 7. English Side view 1 2 3 4 1. Headphone port Connecting the cables Connect the cables as shown: 1 2 3 4567 1. Power cord 2. USB cable Quick Start Guide 3 Woofer cable 6. Audio cable (gray) 5. Microphone port 4. SRS On/Off button 2. DVI cable 3.

User Manual
Page 4
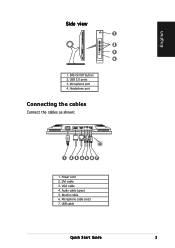
...; 4 Quick Start Guide c. Adjusting the monitor 1. English • To connect the USB cable: connect one end of the USB cable to the monitor's USB port (as the above drawing shows), the other end to the computer's. • To connect the microphone/audio cables: connect one end of the VGA/DVI cables to the monitor's woofer port. Plug the VGA/DVI connectors to the computer's microphone-in ports, the other end to a power outlet. • T o c o n n e c t t h e w o o f e r c a b l e : connect the woofer cable to your computer's VGA/DVI ports. Connect the...
...; 4 Quick Start Guide c. Adjusting the monitor 1. English • To connect the USB cable: connect one end of the USB cable to the monitor's USB port (as the above drawing shows), the other end to the computer's. • To connect the microphone/audio cables: connect one end of the VGA/DVI cables to the monitor's woofer port. Plug the VGA/DVI connectors to the computer's microphone-in ports, the other end to a power outlet. • T o c o n n e c t t h e w o o f e r c a b l e : connect the woofer cable to your computer's VGA/DVI ports. Connect the...
User Manual
Page 5
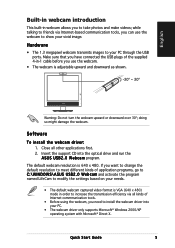
... show your vivid image. The default webcam resolution is adjustable upward and downward as shown. -30º ~ 30º Warning: Do not turn the webcam upward or downward over 30º; Quick Start Guide 5 Close all kinds of the supplied 4-in webcam allows you to take photos and make videos; Hardware • The 1.3 megapixel webcam transmits images to your PC through the USB ports.
... show your vivid image. The default webcam resolution is adjustable upward and downward as shown. -30º ~ 30º Warning: Do not turn the webcam upward or downward over 30º; Quick Start Guide 5 Close all kinds of the supplied 4-in webcam allows you to take photos and make videos; Hardware • The 1.3 megapixel webcam transmits images to your PC through the USB ports.

User Manual
Page 6
... be activated. 6 Quick Start Guide Microsoft® Windows® 2000/XP operating systems 3. Insert the support CD into your PC. • The LifeFrame software is bundled in the PG191 support CD. Close all other applications. 2. English LifeFrame software Introduction and installation instructions To capture snapshots or video clips, ASUS PG191provides an easy-to-use LifeFrame that you connect the USB plug of the supplied 4-in-1 cable to the USB port at the...
... be activated. 6 Quick Start Guide Microsoft® Windows® 2000/XP operating systems 3. Insert the support CD into your PC. • The LifeFrame software is bundled in the PG191 support CD. Close all other applications. 2. English LifeFrame software Introduction and installation instructions To capture snapshots or video clips, ASUS PG191provides an easy-to-use LifeFrame that you connect the USB plug of the supplied 4-in-1 cable to the USB port at the...


