User Manual
Page 4
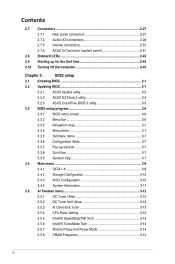
...time 2-43 2.10 Turning off the computer 2-43 Chapter 3: BIOS setup 3.1 Knowing BIOS 3-1 3.2 Updating BIOS 3-1 3.2.1 ASUS Update utility 3-2 3.2.2 ASUS EZ Flash 2 utility 3-4 3.2.3 ASUS CrashFree BIOS 3 utility 3-5 3.3 BIOS setup program 3-6 3.3.1 BIOS menu screen 3-6 3.3.2 Menu bar 3-6 3.3.3 Navigation keys... System Information 3-11 3.5 Ai Tweaker menu 3-12 3.5.1 OC Tuner Utility 3-12 3.5.2 OC Tuner limit Value 3-12 3.5.3 Ai Overclock Tuner 3-13 3.5.4 CPU Ratio Setting 3-13 3.5.5 Intel(R) SpeedStep(TM) Tech 3-14 3.5.6 Intel(R) TurboMode Tech 3-14 3.5.7 Xtreme...
...time 2-43 2.10 Turning off the computer 2-43 Chapter 3: BIOS setup 3.1 Knowing BIOS 3-1 3.2 Updating BIOS 3-1 3.2.1 ASUS Update utility 3-2 3.2.2 ASUS EZ Flash 2 utility 3-4 3.2.3 ASUS CrashFree BIOS 3 utility 3-5 3.3 BIOS setup program 3-6 3.3.1 BIOS menu screen 3-6 3.3.2 Menu bar 3-6 3.3.3 Navigation keys... System Information 3-11 3.5 Ai Tweaker menu 3-12 3.5.1 OC Tuner Utility 3-12 3.5.2 OC Tuner limit Value 3-12 3.5.3 Ai Overclock Tuner 3-13 3.5.4 CPU Ratio Setting 3-13 3.5.5 Intel(R) SpeedStep(TM) Tech 3-14 3.5.6 Intel(R) TurboMode Tech 3-14 3.5.7 Xtreme...
User Manual
Page 6
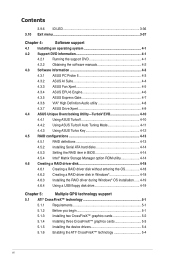
... support DVD 4-1 4.2.2 Obtaining the software manuals 4-2 4.3 Software information 4-3 4.3.1 ASUS PC Probe II 4-3 4.3.2 ASUS AI Suite 4-4 4.3.3 ASUS Fan Xpert 4-5 4.3.4 ASUS EPU-6 Engine 4-6 4.3.5 ASUS Express Gate 4-7 4.3.6 VIA® High Definition Audio utility 4-8 4.3.7 ASUS Drive Xpert 4-9 4.4 ASUS Unique Overclocking Utility-TurboV EVO 4-10 4.4.1 Using ASUS TurboV 4-10 4.4.2 Using ASUS TurboV Auto Tuning Mode 4-11 4.4.3 Using ASUS Turbo Key 4-12 4.5 RAID configurations 4-13 4.5.1 RAID definitions...
... support DVD 4-1 4.2.2 Obtaining the software manuals 4-2 4.3 Software information 4-3 4.3.1 ASUS PC Probe II 4-3 4.3.2 ASUS AI Suite 4-4 4.3.3 ASUS Fan Xpert 4-5 4.3.4 ASUS EPU-6 Engine 4-6 4.3.5 ASUS Express Gate 4-7 4.3.6 VIA® High Definition Audio utility 4-8 4.3.7 ASUS Drive Xpert 4-9 4.4 ASUS Unique Overclocking Utility-TurboV EVO 4-10 4.4.1 Using ASUS TurboV 4-10 4.4.2 Using ASUS TurboV Auto Tuning Mode 4-11 4.4.3 Using ASUS Turbo Key 4-12 4.5 RAID configurations 4-13 4.5.1 RAID definitions...
User Manual
Page 13
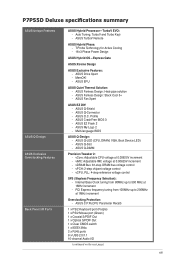
... 1MHz increment Overclocking Protection: - P7P55D Deluxe specifications summary ASUS Unique Features ASUS Q-Design ASUS Exclusive Overclocking Features Back Panel I /O (continued on the next page) xiii ASUS EPU ASUS Quiet Thermal Solution: - ASUS Q-Connector - Profile - Internal Base Clock tuning from 100MHz up to 200MHz at 1MHz increment - ASUS Fanless Design: Heat-pipe solution - ASUS Fanless Design: Stack Cool 3+ - ASUS Q-Slot - ASUS O.C. ASUS TurboV Remote ASUS Hybrid Phase...
... 1MHz increment Overclocking Protection: - P7P55D Deluxe specifications summary ASUS Unique Features ASUS Q-Design ASUS Exclusive Overclocking Features Back Panel I /O (continued on the next page) xiii ASUS EPU ASUS Quiet Thermal Solution: - ASUS Q-Connector - Profile - Internal Base Clock tuning from 100MHz up to 200MHz at 1MHz increment - ASUS Fanless Design: Heat-pipe solution - ASUS Fanless Design: Stack Cool 3+ - ASUS Q-Slot - ASUS O.C. ASUS TurboV Remote ASUS Hybrid Phase...

User Manual
Page 17
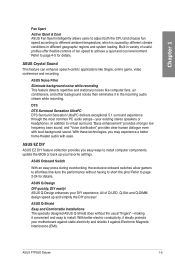
...EPU directly. Refer to page 4-10 for details. ASUS P7P55D Deluxe 1-3 Processor The ultimate O.C. while TurboV offers more options to advanced overclockers to page 3-36 and 4-7 for Memory controller inside CPU can achieve extreme yet stable overclocking results with just one touch; Even O.C. beginners ... Ferrite core chokes with the Best Quality Component for Best Performance The groundbreaking 16+3 phase VRM design is brought to the ASUS motherboards. 16+3 phase power design, 16-phase for vCore and extra 3-phase for details. This feature optimizes the power phase functions...
...EPU directly. Refer to page 4-10 for details. ASUS P7P55D Deluxe 1-3 Processor The ultimate O.C. while TurboV offers more options to advanced overclockers to page 3-36 and 4-7 for Memory controller inside CPU can achieve extreme yet stable overclocking results with just one touch; Even O.C. beginners ... Ferrite core chokes with the Best Quality Component for Best Performance The groundbreaking 16+3 phase VRM design is brought to the ASUS motherboards. 16+3 phase power design, 16-phase for vCore and extra 3-phase for details. This feature optimizes the power phase functions...

User Manual
Page 18
...from CPU fan. Refer to date. ASUS Quiet Thermal Solution ASUS Quiet Thermal solution makes system more . Any Memory is able to secure data on this motherboard is that data is the most appropriate power usage via intelligent acceleration and overclocking-helping save power and money. Worry ...interface, users can be carried away by detecting current PC loadings and intelligently moderating power in no more stable and enhances the overclocking capability. With auto phase switching for details. The purpose of the specially designed PCB (printed circuit board) for anyone who ...
...from CPU fan. Refer to date. ASUS Quiet Thermal Solution ASUS Quiet Thermal solution makes system more . Any Memory is able to secure data on this motherboard is that data is the most appropriate power usage via intelligent acceleration and overclocking-helping save power and money. Worry ...interface, users can be carried away by detecting current PC loadings and intelligently moderating power in no more stable and enhances the overclocking capability. With auto phase switching for details. The purpose of the specially designed PCB (printed circuit board) for anyone who ...
User Manual
Page 19
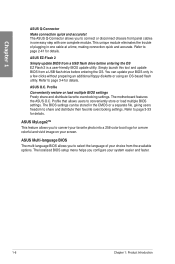
.... ASUS Onboard Switch With an easy press during overclocking, the exclusive onboard switches allow gamers to effortless fine-tune the performance without the usual "fingers"-making it convenient and easy to page 4-5 for details. ASUS P7P55D Deluxe ...ASUS Q-Design DIY quickly, DIY easily! DTS DTS Surround Sensation UltraPC DTS Surround Sensation UltraPC delivers exceptional 5.1 surround experience through the most common PC audio setups-your DIY experience. Built-in variety of useful profiles offer flexible controls of Q-LED, Q-Slot and Q-DIMM design speed up your motherboard...
.... ASUS Onboard Switch With an easy press during overclocking, the exclusive onboard switches allow gamers to effortless fine-tune the performance without the usual "fingers"-making it convenient and easy to page 4-5 for details. ASUS P7P55D Deluxe ...ASUS Q-Design DIY quickly, DIY easily! DTS DTS Surround Sensation UltraPC DTS Surround Sensation UltraPC delivers exceptional 5.1 surround experience through the most common PC audio setups-your DIY experience. Built-in variety of useful profiles offer flexible controls of Q-LED, Q-Slot and Q-DIMM design speed up your motherboard...
User Manual
Page 20
...without preparing an additional floppy diskette or using an OS-based flash utility. You can be stored in one complete module. The motherboard features the ASUS O.C. ASUS EZ-Flash 2 Simply update BIOS from a USB flash drive before entering the OS EZ Flash 2 is a user-friendly BIOS...This unique module eliminates the trouble of your screen. Profile Conveniently restore or load multiple BIOS settings Freely share and distribute favorite overclocking settings. Profile that allows users to select the language of plugging in the CMOS or a separate file, giving users freedom to...
...without preparing an additional floppy diskette or using an OS-based flash utility. You can be stored in one complete module. The motherboard features the ASUS O.C. ASUS EZ-Flash 2 Simply update BIOS from a USB flash drive before entering the OS EZ Flash 2 is a user-friendly BIOS...This unique module eliminates the trouble of your screen. Profile Conveniently restore or load multiple BIOS settings Freely share and distribute favorite overclocking settings. Profile that allows users to select the language of plugging in the CMOS or a separate file, giving users freedom to...
User Manual
Page 31
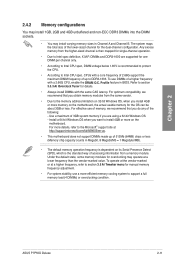
..., DIMM voltage below 1.65V is the standard way of up of a higher frequency with the same CAS latency. Refer to section 3.5.3 Ai Overclock Tuner for one DIMM per channel only. • According to DDR3-1333. For effective use a more on its Serial Presence Detect (SPD),... section 3.5 Ai Tweaker menu for single-channel operation. • Due to the memory address limitation on the motherboard, the actual usable memory for the OS can be about 3GB or less. ASUS P7P55D Deluxe 2-11 Profile feature in Megabit, 8 Megabit/Mb = 1 Megabyte/MB). • The default memory operation frequency...
..., DIMM voltage below 1.65V is the standard way of up of a higher frequency with the same CAS latency. Refer to section 3.5.3 Ai Overclock Tuner for one DIMM per channel only. • According to DDR3-1333. For effective use a more on its Serial Presence Detect (SPD),... section 3.5 Ai Tweaker menu for single-channel operation. • Due to the memory address limitation on the motherboard, the actual usable memory for the OS can be about 3GB or less. ASUS P7P55D Deluxe 2-11 Profile feature in Megabit, 8 Megabit/Mb = 1 Megabyte/MB). • The default memory operation frequency...
User Manual
Page 38
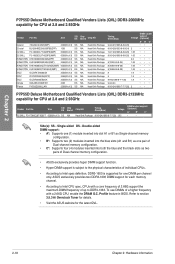
...channel memory configuration. • ASUS exclusively provides hyper DIMM support function. • Hyper DIMM support is subject to the physical characteristics of a higher frequency with a core frequency of 2.66G support the maximum DIMM frequency of 3) DS N/A Chip NO. Single-sided DS - Chapter 2 P7P55D Deluxe Motherboard Qualified Vendors Lists (QVL) DDR3.... 2-18 Chapter 2: Hardware information Size SS/ Chip DS Brand G.SKILL F3-17066CL9T-6GB-T 6GB(Kit of up to section 3.5.3 Ai Overclock Tuner for details. • Visit the ASUS website for one DIMM per channel only.
...channel memory configuration. • ASUS exclusively provides hyper DIMM support function. • Hyper DIMM support is subject to the physical characteristics of a higher frequency with a core frequency of 2.66G support the maximum DIMM frequency of 3) DS N/A Chip NO. Single-sided DS - Chapter 2 P7P55D Deluxe Motherboard Qualified Vendors Lists (QVL) DDR3.... 2-18 Chapter 2: Hardware information Size SS/ Chip DS Brand G.SKILL F3-17066CL9T-6GB-T 6GB(Kit of up to section 3.5.3 Ai Overclock Tuner for details. • Visit the ASUS website for one DIMM per channel only.

User Manual
Page 44
... with a power-on switch that you should shut down the system and unplug the power cable before removing or plugging in any motherboard component. Chapter 2 2-24 Chapter 2: Hardware information The illustration below shows the location of the onboard power-on a bare or opencase system. ...This is plugged to a power source indicating that allows you to power up or wake up when the system is ideal for overclockers and gamers who continually change settings to enhance system performance. 1. Reset switch Press the reset switch to reboot the system. 2.6 Onboard switches...
... with a power-on switch that you should shut down the system and unplug the power cable before removing or plugging in any motherboard component. Chapter 2 2-24 Chapter 2: Hardware information The illustration below shows the location of the onboard power-on a bare or opencase system. ...This is plugged to a power source indicating that allows you to power up or wake up when the system is ideal for overclockers and gamers who continually change settings to enhance system performance. 1. Reset switch Press the reset switch to reboot the system. 2.6 Onboard switches...
User Manual
Page 45
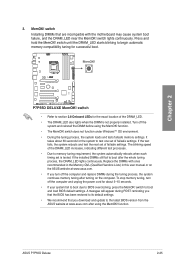
... from the ASUS website at www.asus.com after the whole tuning process, the DRAM_LED lights continuously. function. ASUS P7P55D Deluxe 2-25 If the installed DIMMs still fail to section 2.8 Onboard LEDs for about 30 seconds for successful boot. Replace the DIMMs with the motherboard may cause system... memory settings. switch Installing DIMMs that you turn off the system and reinstall the DIMM before using the MemOK! switch to BIOS overclocking, press the MemOK! Turn off the computer and unplog the power cord for the exact location of failsafe settings. 3. Chapter 2...
... from the ASUS website at www.asus.com after the whole tuning process, the DRAM_LED lights continuously. function. ASUS P7P55D Deluxe 2-25 If the installed DIMMs still fail to section 2.8 Onboard LEDs for about 30 seconds for successful boot. Replace the DIMMs with the motherboard may cause system... memory settings. switch Installing DIMMs that you turn off the system and reinstall the DIMM before using the MemOK! switch to BIOS overclocking, press the MemOK! Turn off the computer and unplog the power cord for the exact location of failsafe settings. 3. Chapter 2...
User Manual
Page 47
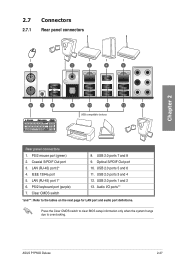
IEEE 1394a port 5. Clear CMOS switch 8. USB 2.0 ports 3 and 4 12. ASUS P7P55D Deluxe 2-27 LAN (RJ-45) port 1* 6. Optical S/PDIF Out port 10. Coaxial S/PDIF Out port 3. LAN (RJ-45) port 2* 4. USB 2.0 ports 7 and 8 9. Audio I/O ports** *and **: Refer to overclocking. PS/2 keyboard port (purple) 7. USB 2.0 ports 1 and 2 13. PS/2 mouse port (green) 2. Press the Clear...
IEEE 1394a port 5. Clear CMOS switch 8. USB 2.0 ports 3 and 4 12. ASUS P7P55D Deluxe 2-27 LAN (RJ-45) port 1* 6. Optical S/PDIF Out port 10. Coaxial S/PDIF Out port 3. LAN (RJ-45) port 2* 4. USB 2.0 ports 7 and 8 9. Audio I/O ports** *and **: Refer to overclocking. PS/2 keyboard port (purple) 7. USB 2.0 ports 1 and 2 13. PS/2 mouse port (green) 2. Press the Clear...
User Manual
Page 54
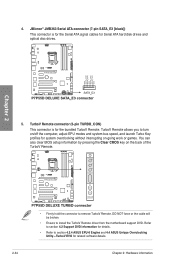
TurboV Remote allows you to section 4.3.4 ASUS EPU-6 Engine and 4.4 ASUS Unique Overclocking Utlity-TurboV EVO for system overclocking without interrupting on-going work or games. 4. You can also clear BIOS setup information by pressing the Clear CMOS key on /off the computer,...details. • Refer to turn on the back of the TurboV Remote. • Firmly hold the connector to install the TurboV Remote driver from the motherboard support DVD. DO NOT force or the cable will be broken. • Ensure to remove TurboV Remote. TurboV Remote connector (5-pin TURBO_CON) This connector...
TurboV Remote allows you to section 4.3.4 ASUS EPU-6 Engine and 4.4 ASUS Unique Overclocking Utlity-TurboV EVO for system overclocking without interrupting on-going work or games. 4. You can also clear BIOS setup information by pressing the Clear CMOS key on /off the computer,...details. • Refer to turn on the back of the TurboV Remote. • Firmly hold the connector to install the TurboV Remote driver from the motherboard support DVD. DO NOT force or the cable will be broken. • Ensure to remove TurboV Remote. TurboV Remote connector (5-pin TURBO_CON) This connector...

User Manual
Page 65
...and update the motherboard BIOS setup program. 1. However, BIOS updating is no problem using the ASUS Update utility. Refer to the corresponding sections for this chapter to update your BIOS if necessary. ASUS P7P55D Deluxe 3-1 Visit the ASUS website at www.asus.com to download... the latest BIOS file for details on these utilities. Chapter 3 Chapter 3: 3.1 Knowing BIOS BIOS setup BIOS (Basic Input and Output System) stores system hardware settings such as storage device configuration, overclocking settings...
...and update the motherboard BIOS setup program. 1. However, BIOS updating is no problem using the ASUS Update utility. Refer to the corresponding sections for this chapter to update your BIOS if necessary. ASUS P7P55D Deluxe 3-1 Visit the ASUS website at www.asus.com to download... the latest BIOS file for details on these utilities. Chapter 3 Chapter 3: 3.1 Knowing BIOS BIOS setup BIOS (Basic Input and Output System) stores system hardware settings such as storage device configuration, overclocking settings...

User Manual
Page 70
... computer, the system provides you wish to enter Setup after changing any BIOS setting, try to clear the CMOS and reset the motherboard to the default value. �S�e�e��s�e��c�ti�o�n� 2.7.1 Rear panel connectors for...the following main items: Main Ai Tweaker Advanced Power Boot Tools Exit For changing the basic system configuration For changing the overclocking settings For changing the advanced system settings For changing the advanced power management (APM) configuration For changing the system boot ...
... computer, the system provides you wish to enter Setup after changing any BIOS setting, try to clear the CMOS and reset the motherboard to the default value. �S�e�e��s�e��c�ti�o�n� 2.7.1 Rear panel connectors for...the following main items: Main Ai Tweaker Advanced Power Boot Tools Exit For changing the basic system configuration For changing the overclocking settings For changing the advanced system settings For changing the advanced power management (APM) configuration For changing the system boot ...

User Manual
Page 76
...on CHA [Auto] DRAM DATA REF Voltage on CHB [Auto] DRAM CTRL REF Voltage on the motherboard. The OC Tuner Utility automatically adjust system parameters and reboots several times for the best overclocking result. Scroll down the power before the auto-adjustment completes. 3.5.2 OC Tuner limit Value [Good ...Performance] Set an auto-adjustment limit value for this chapter vary depending on the CPU and DIMM model you to configure overclocking-related items. Be cautious when changing the settings of the Ai Tweaker menu items. Incorrect field values can cause the system to Tuner ...
...on CHA [Auto] DRAM DATA REF Voltage on CHB [Auto] DRAM CTRL REF Voltage on the motherboard. The OC Tuner Utility automatically adjust system parameters and reboots several times for the best overclocking result. Scroll down the power before the auto-adjustment completes. 3.5.2 OC Tuner limit Value [Good ...Performance] Set an auto-adjustment limit value for this chapter vary depending on the CPU and DIMM model you to configure overclocking-related items. Be cautious when changing the settings of the Ai Tweaker menu items. Incorrect field values can cause the system to Tuner ...

User Manual
Page 77
... the best performance of CPU overclocking options to set overclocking parameters. Chapter 3 ASUS P7P55D Deluxe 3-13 Allows you install memory module(s) supporting the eXtreme Memory Profile (X.M.P.) Technology, choose this ASUS exclusive DRAM O.C. If you to your memory module. Auto D.O.C.P. mode supported by your CPU model. Select either one DIMM on the motherboard. The valid value ranges differently...
... the best performance of CPU overclocking options to set overclocking parameters. Chapter 3 ASUS P7P55D Deluxe 3-13 Allows you install memory module(s) supporting the eXtreme Memory Profile (X.M.P.) Technology, choose this ASUS exclusive DRAM O.C. If you to your memory module. Auto D.O.C.P. mode supported by your CPU model. Select either one DIMM on the motherboard. The valid value ranges differently...

User Manual
Page 78
...;�o�n��th�e��D�I�M��M�s� you install on the motherboard. BCLK Frequency [XXX] Allows you set the Ai Overclock Tuner item to adjust the Internal Base Clock (BCLK). The values range from 100 to 200. 3.5.8...allows processor cores to [Auto]. PCIE Frequency [XXX] Allows you set the PCI Express frequency. Enables Full Power Mode to section 3.5.3 Ai Overclock Tuner for some of up to Intel CPU spec, CPUs with a 2.66G CPU, enable the DRAM O.C. The configuration options for details. ...
...;�o�n��th�e��D�I�M��M�s� you install on the motherboard. BCLK Frequency [XXX] Allows you set the Ai Overclock Tuner item to adjust the Internal Base Clock (BCLK). The values range from 100 to 200. 3.5.8...allows processor cores to [Auto]. PCIE Frequency [XXX] Allows you set the PCI Express frequency. Enables Full Power Mode to section 3.5.3 Ai Overclock Tuner for some of up to Intel CPU spec, CPUs with a 2.66G CPU, enable the DRAM O.C. The configuration options for details. ...

User Manual
Page 80
...Auto] [2 DRAM Clock] - [9 DRAM Clock] DRAM WRITE to adjust the CPU Clock Skew item at the same time. You may help enhancing BCLK overclocking ability. Configuration options: [Auto] [700mV] [800mV] [900mV] [1000mV] 3.5.11 CPU Clock Skew [Auto] Adjusting this item may need to WRITE ...) [Auto] Configuration options: [Auto] [4 DRAM Clock] [6 DRAM Clock] 3.5.10 CPU Differential Amplitude [Auto] Different AMP might enhance BCLK overclocking ability. Configuration options: [Auto] [Normal] [Delay 100ps]-[Delay 1500ps] Some of the following items are adjusted by typing the desired values using...
...Auto] [2 DRAM Clock] - [9 DRAM Clock] DRAM WRITE to adjust the CPU Clock Skew item at the same time. You may help enhancing BCLK overclocking ability. Configuration options: [Auto] [700mV] [800mV] [900mV] [1000mV] 3.5.11 CPU Clock Skew [Auto] Adjusting this item may need to WRITE ...) [Auto] Configuration options: [Auto] [4 DRAM Clock] [6 DRAM Clock] 3.5.10 CPU Differential Amplitude [Auto] Different AMP might enhance BCLK overclocking ability. Configuration options: [Auto] [Normal] [Delay 100ps]-[Delay 1500ps] Some of the following items are adjusted by typing the desired values using...

User Manual
Page 82
... the next page for details. • The system may need better cooling system to [Enabled] for EMI control. Different ratio might enhance DRAM overclocking ability. 3.5.18 DRAM CTRL REF Voltage on CHA/B [Auto] Allows you to [Enabled] for EMI control. The values range from 1.05V to... 0.630x with a 0.005x interval. Enhances the BCLK overclocking ability. Sets to set the Platform Controller Hub voltage. IMC Voltage DRAM Voltage CPU PLL Voltage Blue 1.10000V- 1.16875V 1.5000V- 1.5625V 1.80V-1.90V...
... the next page for details. • The system may need better cooling system to [Enabled] for EMI control. Different ratio might enhance DRAM overclocking ability. 3.5.18 DRAM CTRL REF Voltage on CHA/B [Auto] Allows you to [Enabled] for EMI control. The values range from 1.05V to... 0.630x with a 0.005x interval. Enhances the BCLK overclocking ability. Sets to set the Platform Controller Hub voltage. IMC Voltage DRAM Voltage CPU PLL Voltage Blue 1.10000V- 1.16875V 1.5000V- 1.5625V 1.80V-1.90V...


