
User Guide
Page 1
Motherboard P6T WS Professional
Motherboard P6T WS Professional
User Guide
Page 3
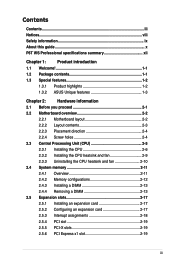
Contents Contents...iii Notices...viii Safety information ix About this guide x P6T WS Professional specifications summary xii Chapter 1: Product introduction 1.1 Welcome 1-1 1.2 Package contents 1-1 1.3 Special features 1-2 1.3.1 Product highlights 1-2 1.3.2 ASUS Unique features 1-3 Chapter 2: Hardware information 2.1 Before you proceed 2-1 2.2 Motherboard overview 2-2 2.2.1 Motherboard layout 2-2 2.2.2 Layout contents 2-3 2.2.3 Placement direction 2-4 2.2.4 Screw holes 2-4 2.3 Central Processing Unit (CPU 2-5 2.3.1 Installing the CPU 2-6 2.3.2 Installing ...
Contents Contents...iii Notices...viii Safety information ix About this guide x P6T WS Professional specifications summary xii Chapter 1: Product introduction 1.1 Welcome 1-1 1.2 Package contents 1-1 1.3 Special features 1-2 1.3.1 Product highlights 1-2 1.3.2 ASUS Unique features 1-3 Chapter 2: Hardware information 2.1 Before you proceed 2-1 2.2 Motherboard overview 2-2 2.2.1 Motherboard layout 2-2 2.2.2 Layout contents 2-3 2.2.3 Placement direction 2-4 2.2.4 Screw holes 2-4 2.3 Central Processing Unit (CPU 2-5 2.3.1 Installing the CPU 2-6 2.3.2 Installing ...

User Guide
Page 9
...in any damage, contact your dealer immediately. • To avoid short circuits, keep paper clips, screws, and staples away from the motherboard, ensure that came with the product, contact a qualified service technician or your retailer. Contact a qualified service technician or your retailer. .... • Before using the product, make sure all cables are correctly connected and the power cables are unplugged. • Seek professional assistance before using , contact your area. Do not place the product in municipal waste. ix Safety information Electrical safety • To...
...in any damage, contact your dealer immediately. • To avoid short circuits, keep paper clips, screws, and staples away from the motherboard, ensure that came with the product, contact a qualified service technician or your retailer. Contact a qualified service technician or your retailer. .... • Before using the product, make sure all cables are correctly connected and the power cables are unplugged. • Seek professional assistance before using , contact your area. Do not place the product in municipal waste. ix Safety information Electrical safety • To...

User Guide
Page 10
... the hardware setup procedures that may include optional documentation, such as warranty flyers, that you need when installing and configuring the motherboard. ASUS websites The ASUS website provides updated information on the motherboard. • Chapter 3: BIOS setup This chapter tells how to change system settings through the BIOS Setup menus. How this guide This...
... the hardware setup procedures that may include optional documentation, such as warranty flyers, that you need when installing and configuring the motherboard. ASUS websites The ASUS website provides updated information on the motherboard. • Chapter 3: BIOS setup This chapter tells how to change system settings through the BIOS Setup menus. How this guide This...

User Guide
Page 15
Chapter 1: 1Product introduction This chapter describes the motherboard features and the new technologies it supports.
Chapter 1: 1Product introduction This chapter describes the motherboard features and the new technologies it supports.

User Guide
Page 17
... version only) 1 x G.P. Diagnosis Card (Retail version only) 1 x ASUS SLI bridge ASUS motherboard support DVD User guide If any of ASUS quality motherboards! Thank you start installing the motherboard, and hardware devices on it another standout in your package with the list below. 1.2 Package contents Check your retailer. ASUS P6T WS Professional 1-1 The motherboard delivers a host of new features and latest technologies...
... version only) 1 x G.P. Diagnosis Card (Retail version only) 1 x ASUS SLI bridge ASUS motherboard support DVD User guide If any of ASUS quality motherboards! Thank you start installing the motherboard, and hardware devices on it another standout in your package with the list below. 1.2 Package contents Check your retailer. ASUS P6T WS Professional 1-1 The motherboard delivers a host of new features and latest technologies...

User Guide
Page 18
... Introduction See chapter 5 for details. 1.3 Special features 1.3.1 Product highlights Green ASUS This motherboard and its packaging comply with the European Union's Restriction on Demand The P6T WS Professional breaks the boundaries to support 3-channel (6 DIMMs) DDR3 memory. Triple-Channel DDR3 1600(O.C.)/1333/1066 support The motherboard supports DDR3 memory that features data transfer rates of the...
... Introduction See chapter 5 for details. 1.3 Special features 1.3.1 Product highlights Green ASUS This motherboard and its packaging comply with the European Union's Restriction on Demand The P6T WS Professional breaks the boundaries to support 3-channel (6 DIMMs) DDR3 memory. Triple-Channel DDR3 1600(O.C.)/1333/1066 support The motherboard supports DDR3 memory that features data transfer rates of the...

User Guide
Page 19
...only extreme results to locate the root problem within a second. ASUS P6T WS Professional 1-3 With micro adjustments of the CPU PLL, NB, NB-PCIe, and DRAM voltages in sequence during motherboard booting process. SAS onboard This motherboard provides onboard SAS ports for details. This user-friendly design provides ...This extreme OC tool lets you to overclock without exiting or rebooting the OS. ASUS True 16+2 Phase Power Design The breakthrough technology of 16+2 phase VRM design is bringing to the ASUS motherboards. 16+2 phase power design (16-phase to vCore; 2-phase to vDRAM/...
...only extreme results to locate the root problem within a second. ASUS P6T WS Professional 1-3 With micro adjustments of the CPU PLL, NB, NB-PCIe, and DRAM voltages in sequence during motherboard booting process. SAS onboard This motherboard provides onboard SAS ports for details. This user-friendly design provides ...This extreme OC tool lets you to overclock without exiting or rebooting the OS. ASUS True 16+2 Phase Power Design The breakthrough technology of 16+2 phase VRM design is bringing to the ASUS motherboards. 16+2 phase power design (16-phase to vCore; 2-phase to vDRAM/...

User Guide
Page 20
... and quickly providing precise system checks right after successful booting process. See page 2-37 for details. G.P. ASUS SASsaby cards support This motherboard is fully compatible with a better choice for details. 1-4 Chapter 1: Product Introduction Faster, safer and more...ASUS EPU-the world's first power saving engine, has been upgraded to the OS environment, simply click the mouse or press a key. AI Nap With AI Nap, the system can continue running at minimum power and noise when you are temporarily away. Diagnosis card Bundled with P6T WS Professional motherboard...
... and quickly providing precise system checks right after successful booting process. See page 2-37 for details. G.P. ASUS SASsaby cards support This motherboard is fully compatible with a better choice for details. 1-4 Chapter 1: Product Introduction Faster, safer and more...ASUS EPU-the world's first power saving engine, has been upgraded to the OS environment, simply click the mouse or press a key. AI Nap With AI Nap, the system can continue running at minimum power and noise when you are temporarily away. Diagnosis card Bundled with P6T WS Professional motherboard...

User Guide
Page 21
...of fan speed to date. Doing so may bend the tubing and affect the heat dissipation performance. See page 4-21 for details. ASUS P6T WS Professional 1-5 DO NOT uninstall the heat-pipe by the chipsets to the heatsink near the back IO ports, where it provides options for users... This feature detects repetitive and stationary noises (non-voice signals) like Skype, online game, video conference and recording. The motherboard uses a special design on this motherboard is caused by existing airflow from CPU fan or bundled optional fan. See page 4-31 for details. The Heat Pipe design...
...of fan speed to date. Doing so may bend the tubing and affect the heat dissipation performance. See page 4-21 for details. ASUS P6T WS Professional 1-5 DO NOT uninstall the heat-pipe by the chipsets to the heatsink near the back IO ports, where it provides options for users... This feature detects repetitive and stationary noises (non-voice signals) like Skype, online game, video conference and recording. The motherboard uses a special design on this motherboard is caused by existing airflow from CPU fan or bundled optional fan. See page 4-31 for details. The Heat Pipe design...

User Guide
Page 22
... and ensures platform integrity. See page 4-35 for a more , the user-friendly picture manager lets you view your favorite settings. ASUS Q-Shield The specially designed ASUS Q-Shield provides conductivity to the motherboard. ASUS Q-Connector ASUS Q-Connector allows you easy ways to install computer components, update the BIOS or back up your pictures without entering Windows...
... and ensures platform integrity. See page 4-35 for a more , the user-friendly picture manager lets you view your favorite settings. ASUS Q-Shield The specially designed ASUS Q-Shield provides conductivity to the motherboard. ASUS Q-Connector ASUS Q-Connector allows you easy ways to install computer components, update the BIOS or back up your pictures without entering Windows...

User Guide
Page 23
... you configure your BIOS easily without entering the OS. Profile The motherboard features the ASUS O.C. See page 4-10 for details. See page 3-12 for details. ASUS P6T WS Professional 1-7 ASUS EZ Flash 2 EZ Flash 2 is a user-friendly BIOS update utility. ASUS O.C. Update your system easier and faster. ASUS Multi-language BIOS The multi-language BIOS allows you to conveniently...
... you configure your BIOS easily without entering the OS. Profile The motherboard features the ASUS O.C. See page 4-10 for details. See page 3-12 for details. ASUS P6T WS Professional 1-7 ASUS EZ Flash 2 EZ Flash 2 is a user-friendly BIOS update utility. ASUS O.C. Update your system easier and faster. ASUS Multi-language BIOS The multi-language BIOS allows you to conveniently...

User Guide
Page 25
It Chapter 2: includes description of the jumpers and connectors on the motherboard. 2 Hardware information This chapter lists the hardware setup procedures that you have to perform when installing system components.
It Chapter 2: includes description of the jumpers and connectors on the motherboard. 2 Hardware information This chapter lists the hardware setup procedures that you have to perform when installing system components.

User Guide
Page 26
Diagnosis card installation 2-37 2.9 Starting up for the first time 2-39 2.10 Turning off the computer 2-40 ASUS P6T WS Professional Chapter summary 2 2.1 Before you proceed 2-1 2.2 Motherboard overview 2-2 2.3 Central Processing Unit (CPU 2-5 2.4 System memory 2-11 2.5 Expansion slots 2-17 2.6 Jumpers 2-21 2.7 Connectors 2-24 2.8 G.P.
Diagnosis card installation 2-37 2.9 Starting up for the first time 2-39 2.10 Turning off the computer 2-40 ASUS P6T WS Professional Chapter summary 2 2.1 Before you proceed 2-1 2.2 Motherboard overview 2-2 2.3 Central Processing Unit (CPU 2-5 2.4 System memory 2-11 2.5 Expansion slots 2-17 2.6 Jumpers 2-21 2.7 Connectors 2-24 2.8 G.P.

User Guide
Page 27
ASUS P6T WS Professional 2-1 This is a reminder that you install or remove any motherboard component. The illustration below shows the location of the following precautions before you install motherboard components or change any motherboard settings. • Unplug the power cord from the wall socket before touching any component. • Use ...uninstall any component, place it on a grounded antistatic pad or in the bag that came with a standby power LED that the ATX power supply is switched off mode. Failure to do so may cause severe damage to indicate that the system is ON, in...
ASUS P6T WS Professional 2-1 This is a reminder that you install or remove any motherboard component. The illustration below shows the location of the following precautions before you install motherboard components or change any motherboard settings. • Unplug the power cord from the wall socket before touching any component. • Use ...uninstall any component, place it on a grounded antistatic pad or in the bag that came with a standby power LED that the ATX power supply is switched off mode. Failure to do so may cause severe damage to indicate that the system is ON, in...

User Guide
Page 28
2.2 Motherboard overview 2.2.1 Motherboard layout Refer to 2.8 Connectors for more information about rear panel connectors and internal connectors. 2-2 Chapter 2: Hardware information
2.2 Motherboard overview 2.2.1 Motherboard layout Refer to 2.8 Connectors for more information about rear panel connectors and internal connectors. 2-2 Chapter 2: Hardware information

User Guide
Page 30
Place this side towards the rear of the chassis as indicated in the image below. 2.2.4 Screw holes Place nine (9) screws into the chassis in the correct orientation. The edge with external ports goes to the chassis. Doing so can damage the motherboard. 2.2.3 Placement direction When installing the motherboard, make sure that you place it into the holes indicated by circles to secure the motherboard to the rear part of the chassis 2-4 Chapter 2: Hardware information DO NOT overtighten the screws!
Place this side towards the rear of the chassis as indicated in the image below. 2.2.4 Screw holes Place nine (9) screws into the chassis in the correct orientation. The edge with external ports goes to the chassis. Doing so can damage the motherboard. 2.2.3 Placement direction When installing the motherboard, make sure that you place it into the holes indicated by circles to secure the motherboard to the rear part of the chassis 2-4 Chapter 2: Hardware information DO NOT overtighten the screws!
User Guide
Page 31
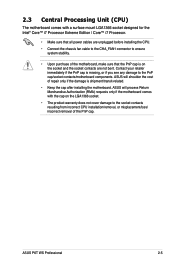
...immediately if the PnP cap is shipment/transit-related. • Keep the cap after installing the motherboard. ASUS will process Return Merchandise Authorization (RMA) requests only if the motherboard comes with a surface mount LGA1366 socket designed for the Intel® Core™ i7 Processor ... fan cable to the CHA_FAN1 connector to ensure system stability. • Upon purchase of the motherboard, make sure that the PnP cap is on the LGA1366 socket. • The product warranty does not cover damage to the PnP cap/socket contacts/motherboard components. ASUS P6T WS Professional 2-5
...immediately if the PnP cap is shipment/transit-related. • Keep the cap after installing the motherboard. ASUS will process Return Merchandise Authorization (RMA) requests only if the motherboard comes with a surface mount LGA1366 socket designed for the Intel® Core™ i7 Processor ... fan cable to the CHA_FAN1 connector to ensure system stability. • Upon purchase of the motherboard, make sure that the PnP cap is on the LGA1366 socket. • The product warranty does not cover damage to the PnP cap/socket contacts/motherboard components. ASUS P6T WS Professional 2-5

User Guide
Page 32
... sure that the cam box is facing towards you are installing a CPU. Press the load lever with your thumb (A), then move it is on the motherboard. To prevent damage to a 135º angle. 4. Load plate 4 3 2-6 Chapter 2: Hardware information
... sure that the cam box is facing towards you are installing a CPU. Press the load lever with your thumb (A), then move it is on the motherboard. To prevent damage to a 135º angle. 4. Load plate 4 3 2-6 Chapter 2: Hardware information
User Guide
Page 35
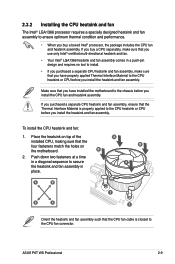
...-pin design and requires no tool to install. • If you purchased a separate CPU heatsink and fan assembly, make sure that you have installed the motherboard to the CPU heatsink or CPU before you install the CPU fan and heatsink assembly. Place the heatsink on top of the installed CPU, making... buy a boxed Intel® processor, the package includes the CPU fan and heatsink assembly. Make sure that the four fasteners match the holes on the motherboard. If you install the heatsink and fan assembly. ASUS P6T WS Professional 2-9
...-pin design and requires no tool to install. • If you purchased a separate CPU heatsink and fan assembly, make sure that you have installed the motherboard to the CPU heatsink or CPU before you install the CPU fan and heatsink assembly. Place the heatsink on top of the installed CPU, making... buy a boxed Intel® processor, the package includes the CPU fan and heatsink assembly. Make sure that the four fasteners match the holes on the motherboard. If you install the heatsink and fan assembly. ASUS P6T WS Professional 2-9


