
User Manual
Page 7
5. 從 CPU PnP 6. 請確認 CPU CPU CPU PnP 保護蓋 CPU CPU CPU CPU 7 A B A B
5. 從 CPU PnP 6. 請確認 CPU CPU CPU PnP 保護蓋 CPU CPU CPU CPU 7 A B A B

User Manual
Page 3
... information...viii About this guide...ix P6T SE specifications summary xi Chapter 1: Product introduction 1.1 Welcome!...1-1 1.2 Package contents 1-1 1.3 Special features 1-2 1.3.1 Product highlights 1-2 1.3.2 ASUS Unique features 1-2 Chapter 2: Hardware information 2.1 Before you proceed 2-1 2.2 Motherboard overview 2-2 2.2.1 Motherboard layout 2-2 2.2.2 Layout contents 2-3 2.2.3 Placement direction 2-4 2.2.4 Screw holes 2-4 2.3 Central Processing Unit (CPU 2-5 2.3.1 Installing the CPU 2-5 2.3.2 Installing the CPU heatsink and fan 2-8 2.3.3 Uninstalling the...
... information...viii About this guide...ix P6T SE specifications summary xi Chapter 1: Product introduction 1.1 Welcome!...1-1 1.2 Package contents 1-1 1.3 Special features 1-2 1.3.1 Product highlights 1-2 1.3.2 ASUS Unique features 1-2 Chapter 2: Hardware information 2.1 Before you proceed 2-1 2.2 Motherboard overview 2-2 2.2.1 Motherboard layout 2-2 2.2.2 Layout contents 2-3 2.2.3 Placement direction 2-4 2.2.4 Screw holes 2-4 2.3 Central Processing Unit (CPU 2-5 2.3.1 Installing the CPU 2-5 2.3.2 Installing the CPU heatsink and fan 2-8 2.3.3 Uninstalling the...

User Manual
Page 4
... 3-2 3.2.2 ASUS EZ Flash 2 utility 3-4 3.2.3 ASUS CrashFree BIOS 3 utility 3-5 3.3 BIOS setup program 3-6 3.3.1 BIOS menu screen 3-6 3.3.2 Menu bar 3-6 3.3.3 Navigation keys 3-7 3.3.4 Menu items 3-7 3.3.5 Submenu items 3-7 3.3.6 Configuration fields 3-7 3.3.7 Pop-up window 3-7 3.3.8 Scroll bar 3-7 3.3.9 General help 3-7 3.4 Main menu 3-8 3.4.1 SATA 1-6 3-8 3.4.2 Storage Configuration 3-10 3.4.3 AHCI Configuration 3-10 3.4.4 System Information 3-11 3.5 Ai Tweaker menu 3-12 3.5.1 Ai Overclock Tuner 3-12 3.5.2 CPU Ratio...
... 3-2 3.2.2 ASUS EZ Flash 2 utility 3-4 3.2.3 ASUS CrashFree BIOS 3 utility 3-5 3.3 BIOS setup program 3-6 3.3.1 BIOS menu screen 3-6 3.3.2 Menu bar 3-6 3.3.3 Navigation keys 3-7 3.3.4 Menu items 3-7 3.3.5 Submenu items 3-7 3.3.6 Configuration fields 3-7 3.3.7 Pop-up window 3-7 3.3.8 Scroll bar 3-7 3.3.9 General help 3-7 3.4 Main menu 3-8 3.4.1 SATA 1-6 3-8 3.4.2 Storage Configuration 3-10 3.4.3 AHCI Configuration 3-10 3.4.4 System Information 3-11 3.5 Ai Tweaker menu 3-12 3.5.1 Ai Overclock Tuner 3-12 3.5.2 CPU Ratio...

User Manual
Page 5
... Bus Voltage 3-17 3.5.15 DRAM DATA REF Voltage on CHA/B/C 3-17 3.5.16 DRAM CTRL REF Voltage on CHA/B/C 3-18 3.5.17 Load-Line Calibration 3-18 3.5.18 CPU Differential Amplitude 3-18 3.5.19 CPU Clock Skew 3-18 3.5.20 CPU Spread Spectrum 3-18 3.5.21 IOH Clock Skew 3-18 3.5.22 PCIE Spread Spectrum 3-18 3.6 Advanced menu 3-19... APIC Support 3-25 3.7.5 APM Configuration 3-25 3.7.6 Hardware Monitor 3-26 3.8 Boot menu 3-27 3.8.1 Boot Device Priority 3-27 3.8.2 Boot Settings Configuration 3-28 3.8.3 Security 3-28 3.9 Tools menu 3-30 3.9.1 ASUS EZ Flash 2 3-31 3.9.2 Express Gate 3-31...
... Bus Voltage 3-17 3.5.15 DRAM DATA REF Voltage on CHA/B/C 3-17 3.5.16 DRAM CTRL REF Voltage on CHA/B/C 3-18 3.5.17 Load-Line Calibration 3-18 3.5.18 CPU Differential Amplitude 3-18 3.5.19 CPU Clock Skew 3-18 3.5.20 CPU Spread Spectrum 3-18 3.5.21 IOH Clock Skew 3-18 3.5.22 PCIE Spread Spectrum 3-18 3.6 Advanced menu 3-19... APIC Support 3-25 3.7.5 APM Configuration 3-25 3.7.6 Hardware Monitor 3-26 3.8 Boot menu 3-27 3.8.1 Boot Device Priority 3-27 3.8.2 Boot Settings Configuration 3-28 3.8.3 Security 3-28 3.9 Tools menu 3-30 3.9.1 ASUS EZ Flash 2 3-31 3.9.2 Express Gate 3-31...

User Manual
Page 11
... x SATA 3.0 Gb/s ports - Coaxial / Optical S/PDIF out ports at back panel) Realtek® ALC1200 8-channel High Definition Audio CODEC - ASUS Noise Filter (continued on the next page) xi Supports Jack-Detection, Multi-streaming, and Front Panel Jack-Retasking technology - Intel® Matrix Storage ... mid-board, 6 ports at back panel) VIA® VT6315N controller supports 2 x IEEE 1394a ports (one at back I/O - P6T SE specifications summary CPU Chipset System Bus Memory Expansion Slots Multi-GPU Support Storage LAN USB IEEE 1394 Audio LGA1366 socket for Intel® Core™ i7 ...
... x SATA 3.0 Gb/s ports - Coaxial / Optical S/PDIF out ports at back panel) Realtek® ALC1200 8-channel High Definition Audio CODEC - ASUS Noise Filter (continued on the next page) xi Supports Jack-Detection, Multi-streaming, and Front Panel Jack-Retasking technology - Intel® Matrix Storage ... mid-board, 6 ports at back panel) VIA® VT6315N controller supports 2 x IEEE 1394a ports (one at back I/O - P6T SE specifications summary CPU Chipset System Bus Memory Expansion Slots Multi-GPU Support Storage LAN USB IEEE 1394 Audio LGA1366 socket for Intel® Core™ i7 ...

User Manual
Page 12
...: 36-step reference voltage control - PCI Express frequency tuning from 100MHz up to 500 MHz at 0.00625V increment - ASUS CrashFree BIOS 3 - ASUS TurboV - P6T SE specifications summary ASUS Unique Features ASUS Stylish Features ASUS Exclusive Overclocking Features Back Panel I /O (continued on the next page) xii ASUS Q-Connector - ASUS Fanless Design: Heat-pipe solution - vCore: Adjustable CPU voltage at 1MHz increment -
...: 36-step reference voltage control - PCI Express frequency tuning from 100MHz up to 500 MHz at 0.00625V increment - ASUS CrashFree BIOS 3 - ASUS TurboV - P6T SE specifications summary ASUS Unique Features ASUS Stylish Features ASUS Exclusive Overclocking Features Back Panel I /O (continued on the next page) xii ASUS Q-Connector - ASUS Fanless Design: Heat-pipe solution - vCore: Adjustable CPU voltage at 1MHz increment -

User Manual
Page 13
P6T SE specifications summary Internal I/O Connectors BIOS Features Manageability Support DVD Contents Form Factor 3 x USB connectors support additional 6 USB ports 1 x IDE connector 6 x SATA connectors 1 x CPU Fan connector 2 x Chassis Fan connectors 1 x Power Fan connector 1 x IEEE1394a connector Front panel audio connector 1 x S/PDIF Out Header Chassis Intrusion connector CD audio in 24-pin ATX...2.0, DMI 2.0, WOL by PME, WOR by PME, PXE Drivers ASUS PC Probe II ASUS Update ASUS AI Suite Image-Editing Suite Anti-virus software (OEM version) ATX Form Factor, 12"x 9.6" (30.5cm x 24.4cm) *...
P6T SE specifications summary Internal I/O Connectors BIOS Features Manageability Support DVD Contents Form Factor 3 x USB connectors support additional 6 USB ports 1 x IDE connector 6 x SATA connectors 1 x CPU Fan connector 2 x Chassis Fan connectors 1 x Power Fan connector 1 x IEEE1394a connector Front panel audio connector 1 x S/PDIF Out Header Chassis Intrusion connector CD audio in 24-pin ATX...2.0, DMI 2.0, WOL by PME, WOR by PME, PXE Drivers ASUS PC Probe II ASUS Update ASUS AI Suite Image-Editing Suite Anti-virus software (OEM version) ATX Form Factor, 12"x 9.6" (30.5cm x 24.4cm) *...
User Manual
Page 16
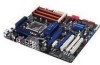
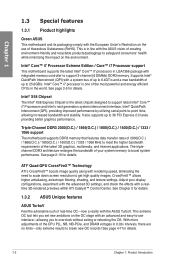
...the OS. This extreme OC tool lets you to get high quality images. Chapter 1 1.3 Special features 1.3.1 Product highlights Green ASUS This motherboard and its packaging comply with the European Union's Restriction on the use interface-allowing you set new ambitions on the environment. ... 1: Product Introduction Supports Intel® QuickPath Interconnect (QPI) with a system bus of up to 6.4GT/s and a max bandwidth of the CPU PLL, NB, NB-PCIe, and DRAM voltages in LGA1366 package with integrated memory controller to -point links, allowing increased bandwidth and stability. Intel...
...the OS. This extreme OC tool lets you to get high quality images. Chapter 1 1.3 Special features 1.3.1 Product highlights Green ASUS This motherboard and its packaging comply with the European Union's Restriction on the use interface-allowing you set new ambitions on the environment. ... 1: Product Introduction Supports Intel® QuickPath Interconnect (QPI) with a system bus of up to 6.4GT/s and a max bandwidth of the CPU PLL, NB, NB-PCIe, and DRAM voltages in LGA1366 package with integrated memory controller to -point links, allowing increased bandwidth and stability. Intel...
User Manual
Page 17
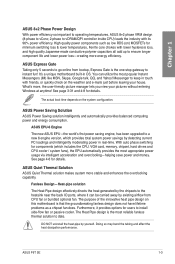
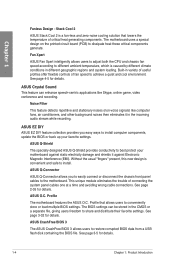
...more stable and enhances the overclocking capability. ASUS Express Gate Taking only 5 seconds to go online from CPU fan or bundled optional fan. ASUS Power Saving Solution ASUS Power Saving solution intelligently and automatically provides ...CPU) leads the industry with lower hysteresis loss, and high quality Japanese-made conductive polymer capacitors all add up to instant fun! DO NOT uninstall the heat-pipe by detecting current PC loadings and intelligently moderating power in OS. ASUS P6T SE 1-3 It's a unique motherboard built-in real-time. ASUS EPU-6 Engine The new ASUS...
...more stable and enhances the overclocking capability. ASUS Express Gate Taking only 5 seconds to go online from CPU fan or bundled optional fan. ASUS Power Saving Solution ASUS Power Saving solution intelligently and automatically provides ...CPU) leads the industry with lower hysteresis loss, and high quality Japanese-made conductive polymer capacitors all add up to instant fun! DO NOT uninstall the heat-pipe by detecting current PC loadings and intelligently moderating power in OS. ASUS P6T SE 1-3 It's a unique motherboard built-in real-time. ASUS EPU-6 Engine The new ASUS...
User Manual
Page 18
Fan Xpert ASUS Fan Xpert intelligently allows users to adjust both the CPU and chassis fan speed according to different ambient temperature, which is convenient and safe to install. Noise Filter This feature detects repetitive ...recording. This unique module eliminates the trouble of fan speed to share and distribute their favorite settings. Profile The motherboard features the ASUS O.C. See page 3-32 for details. 1-4 Chapter 1: Product Introduction ASUS Crystal Sound This feature can be stored in different geographic regions and system loading. Without the usual "fingers" present...
Fan Xpert ASUS Fan Xpert intelligently allows users to adjust both the CPU and chassis fan speed according to different ambient temperature, which is convenient and safe to install. Noise Filter This feature detects repetitive ...recording. This unique module eliminates the trouble of fan speed to share and distribute their favorite settings. Profile The motherboard features the ASUS O.C. See page 3-32 for details. 1-4 Chapter 1: Product Introduction ASUS Crystal Sound This feature can be stored in different geographic regions and system loading. Without the usual "fingers" present...

User Manual
Page 23
...2-33 2-5 2-10 2-22 2-1 2-32 2-29 2-28 2-21 2-34 2-31 2-30 2-31 2-30 2-27 2-27 Chapter 2 ASUS P6T SE 2-3 IDE connector (40-1 pin PRI_EIDE) 9. CPU, chassis, and power fan connectors (4-pin CPU_FAN, 3-pin CHA_FAN1-2, 3-pin PWR_FAN) 7. IEEE 1394a port connector (10-1 pin IE1394_2)... 14. ICH10R Serial ATA connectors (7-pin SATA1-6) 8. ATX power connectors (24-pin EATXPWR, 8-pin EATX12V) 2. 2.2.2...
...2-33 2-5 2-10 2-22 2-1 2-32 2-29 2-28 2-21 2-34 2-31 2-30 2-31 2-30 2-27 2-27 Chapter 2 ASUS P6T SE 2-3 IDE connector (40-1 pin PRI_EIDE) 9. CPU, chassis, and power fan connectors (4-pin CPU_FAN, 3-pin CHA_FAN1-2, 3-pin PWR_FAN) 7. IEEE 1394a port connector (10-1 pin IE1394_2)... 14. ICH10R Serial ATA connectors (7-pin SATA1-6) 8. ATX power connectors (24-pin EATXPWR, 8-pin EATX12V) 2. 2.2.2...
User Manual
Page 25
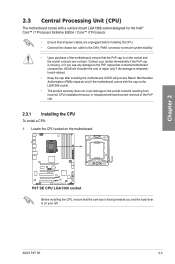
... cap is missing, or if you and the load lever is facing towards you see any damage to the PnP cap/socket contacts/motherboard components. ASUS P6T SE 2-5 2.3 Central Processing Unit (CPU) The motherboard comes with the cap on the LGA1366 socket. • The product warranty does not cover damage to ensure system stability. • Upon...
... cap is missing, or if you and the load lever is facing towards you see any damage to the PnP cap/socket contacts/motherboard components. ASUS P6T SE 2-5 2.3 Central Processing Unit (CPU) The motherboard comes with the cap on the LGA1366 socket. • The product warranty does not cover damage to ensure system stability. • Upon...

User Manual
Page 26
Load plate 4 3 5. PnP cap 2-6 Chapter 2: Hardware information B Load lever 3. Press the load lever with your thumb (A), then move it to a 100º angle. Lift the load lever in the direction of the arrow to the socket pins, do not remove the PnP cap unless you are installing a CPU. Remove the PnP cap from the retention tab. Chapter 2 2. Lift the load plate with your thumb and forefinger to the left (B) until it is released from the CPU socket. Retention tab A To prevent damage to a 135º angle. 4.
Load plate 4 3 5. PnP cap 2-6 Chapter 2: Hardware information B Load lever 3. Press the load lever with your thumb (A), then move it to a 100º angle. Lift the load lever in the direction of the arrow to the socket pins, do not remove the PnP cap unless you are installing a CPU. Remove the PnP cap from the retention tab. Chapter 2 2. Lift the load plate with your thumb and forefinger to the left (B) until it is released from the CPU socket. Retention tab A To prevent damage to a 135º angle. 4.

User Manual
Page 27
...Gold triangle mark 7. If it off immediately and seek professional medical help. 8. A ASUS P6T SE B 2-7 Apply some Thermal Interface Material to the exposed area of the socket, and then fit the socket alignment key into the CPU notch. Some heatsinks come with , ensuring that the gold triangle is spread in only... one correct orientation. DO NOT force the CPU into the retention tab. DO NOT eat is toxic. The Thermal Interface Material is . Close the load plate (A), and then push the load...
...Gold triangle mark 7. If it off immediately and seek professional medical help. 8. A ASUS P6T SE B 2-7 Apply some Thermal Interface Material to the exposed area of the socket, and then fit the socket alignment key into the CPU notch. Some heatsinks come with , ensuring that the gold triangle is spread in only... one correct orientation. DO NOT force the CPU into the retention tab. DO NOT eat is toxic. The Thermal Interface Material is . Close the load plate (A), and then push the load...
User Manual
Page 28
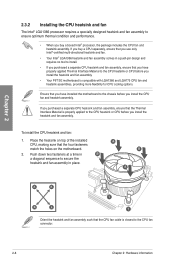
... assembly. Ensure that you have properly applied Thermal Interface Material to the CPU heatsink or CPU before you install the heatsink and fan assembly. • Your P6T SE motherboard is compatible with LGA1366 and LGA775 CPU fan and heatsink assemblies, providing more flexibility for CPU cooling options. Push down two fasteners at a time in B a diagonal sequence to...
... assembly. Ensure that you have properly applied Thermal Interface Material to the CPU heatsink or CPU before you install the heatsink and fan assembly. • Your P6T SE motherboard is compatible with LGA1366 and LGA775 CPU fan and heatsink assemblies, providing more flexibility for CPU cooling options. Push down two fasteners at a time in B a diagonal sequence to...

User Manual
Page 29
... and fan assembly from the motherboard. ASUS P6T SE 2-9 Hardware monitoring errors can occur if you fail to the connector on the motherboard. 2. Disconnect the CPU fan cable from the connector on the motherboard labeled CPU_FAN. Connect the CPU fan cable to plug this connector. 2.3.3 Uninstalling the CPU heatsink and fan To uninstall the CPU heatsink and fan: 1. A B A A B B A 4. Chapter 2 DO...
... and fan assembly from the motherboard. ASUS P6T SE 2-9 Hardware monitoring errors can occur if you fail to the connector on the motherboard. 2. Disconnect the CPU fan cable from the connector on the motherboard labeled CPU_FAN. Connect the CPU fan cable to plug this connector. 2.3.3 Uninstalling the CPU heatsink and fan To uninstall the CPU heatsink and fan: 1. A B A A B B A 4. Chapter 2 DO...

User Manual
Page 30
... table above for better performance with six Double Data Rate 3 (DDR3) Dual Inline Memory Modules (DIMM) sockets. 2.4 System memory 2.4.1 Overview The motherboard comes with less power consumption. The figure illustrates the location of the DDR3 DIMM sockets: Chapter 2 Channel Channel A Channel B Channel C Sockets DIMM_A1...prevent installation on a DDR2 DIMM socket. A DDR3 module has the same physical dimensions as a DDR2 DIMM but is notched differently to Intel CPU spec definition, the system will not boot if only one DIMM is installed in DIMM slot A2, B2, or C2. DDR3 modules are...
... table above for better performance with six Double Data Rate 3 (DDR3) Dual Inline Memory Modules (DIMM) sockets. 2.4 System memory 2.4.1 Overview The motherboard comes with less power consumption. The figure illustrates the location of the DDR3 DIMM sockets: Chapter 2 Channel Channel A Channel B Channel C Sockets DIMM_A1...prevent installation on a DDR2 DIMM socket. A DDR3 module has the same physical dimensions as a DDR2 DIMM but is notched differently to Intel CPU spec definition, the system will not boot if only one DIMM is installed in DIMM slot A2, B2, or C2. DDR3 modules are...
User Manual
Page 31
...8226; ASUS P6T SE 2-11 Under the default state, some memory modules for overclocking may operate at a lower frequency than the vendor-marked value. • For system stability, use of memory, we recommend that you install a 64-bit Windows OS when having 4GB or more memory installed on the motherboard, the...configurations You may install 1GB, 2GB and 4GB unbuffered and non‑ECC DDR3 DIMMs into the DIMM sockets. • You may damage the CPU permanently. The system maps the total size of 256 megabit (Mb) chips or less. • The default memory operation frequency is then ...
...8226; ASUS P6T SE 2-11 Under the default state, some memory modules for overclocking may operate at a lower frequency than the vendor-marked value. • For system stability, use of memory, we recommend that you install a 64-bit Windows OS when having 4GB or more memory installed on the motherboard, the...configurations You may install 1GB, 2GB and 4GB unbuffered and non‑ECC DDR3 DIMMs into the DIMM sockets. • You may damage the CPU permanently. The system maps the total size of 256 megabit (Mb) chips or less. • The default memory operation frequency is then ...

User Manual
Page 41
... clearing the RTC RAM, never remove the cap on CLRTC jumper default position. For system failure due to pins 2-3. ASUS P6T SE 2-21 Move the jumper cap from pins 1-2 (default) to overclocking, use the C.P.R. (CPU Parameter Recall) feature. Removing the cap will cause system boot failure! • If the steps above do not need...
... clearing the RTC RAM, never remove the cap on CLRTC jumper default position. For system failure due to pins 2-3. ASUS P6T SE 2-21 Move the jumper cap from pins 1-2 (default) to overclocking, use the C.P.R. (CPU Parameter Recall) feature. Removing the cap will cause system boot failure! • If the steps above do not need...

User Manual
Page 42
... before you change the setting of the OV_CPU jumper, shut down the computer and move the cap back to pins 1-2. • According to Intel CPU spec, DIMMs with the voltage requirement below 1.65V. • The system may need a better cooling system (for extra-high overvoltage ability, use ...the OV_CPU jumper to pins 2-3 when you install the DIMMs with voltage requirement over 1.65V may cause the system to enable or disable the advanced CPU, DRAM Bus, and QPI DRAM overvoltage settings in BIOS. Make sure your system functions well under high voltage settings. 2-22 Chapter 2: Hardware ...
... before you change the setting of the OV_CPU jumper, shut down the computer and move the cap back to pins 1-2. • According to Intel CPU spec, DIMMs with the voltage requirement below 1.65V. • The system may need a better cooling system (for extra-high overvoltage ability, use ...the OV_CPU jumper to pins 2-3 when you install the DIMMs with voltage requirement over 1.65V may cause the system to enable or disable the advanced CPU, DRAM Bus, and QPI DRAM overvoltage settings in BIOS. Make sure your system functions well under high voltage settings. 2-22 Chapter 2: Hardware ...


