
User Manual
Page 1
Motherboard
Motherboard

User Manual
Page 1
P6T SE Motherboard
P6T SE Motherboard

User Manual
Page 3
Contents Contents...iii Notices ...vii Safety information...viii About this guide...ix P6T SE specifications summary xi Chapter 1: Product introduction 1.1 Welcome!...1-1 1.2 Package contents 1-1 1.3 Special features 1-2 1.3.1 Product highlights 1-2 1.3.2 ASUS Unique features 1-2 Chapter 2: Hardware information 2.1 Before you proceed 2-1 2.2 Motherboard overview 2-2 2.2.1 Motherboard layout 2-2 2.2.2 Layout contents 2-3 2.2.3 Placement direction 2-4 2.2.4 Screw holes 2-4 2.3 Central Processing Unit (CPU 2-5 2.3.1 Installing the CPU 2-5 2.3.2 Installing the CPU...
Contents Contents...iii Notices ...vii Safety information...viii About this guide...ix P6T SE specifications summary xi Chapter 1: Product introduction 1.1 Welcome!...1-1 1.2 Package contents 1-1 1.3 Special features 1-2 1.3.1 Product highlights 1-2 1.3.2 ASUS Unique features 1-2 Chapter 2: Hardware information 2.1 Before you proceed 2-1 2.2 Motherboard overview 2-2 2.2.1 Motherboard layout 2-2 2.2.2 Layout contents 2-3 2.2.3 Placement direction 2-4 2.2.4 Screw holes 2-4 2.3 Central Processing Unit (CPU 2-5 2.3.1 Installing the CPU 2-5 2.3.2 Installing the CPU...
User Manual
Page 8
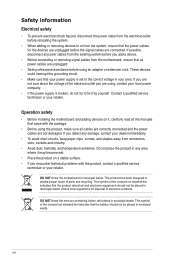
...contact your local power company. • If the power supply is set to the correct voltage in municipal waste. DO NOT throw the motherboard in municipal waste. This symbol of the crossed out wheeled bin indicates that the product (electrical and electronic equipment) should not be placed... extremes. Contact a qualified service technician or your area. If you add a device. • Before connecting or removing signal cables from the motherboard, ensure that all power cables from the existing system before you detect any area where it by yourself. Do not place the product in municipal...
...contact your local power company. • If the power supply is set to the correct voltage in municipal waste. DO NOT throw the motherboard in municipal waste. This symbol of the crossed out wheeled bin indicates that the product (electrical and electronic equipment) should not be placed... extremes. Contact a qualified service technician or your area. If you add a device. • Before connecting or removing signal cables from the motherboard, ensure that all power cables from the existing system before you detect any area where it by yourself. Do not place the product in municipal...

User Manual
Page 9
... includes description of the standard package. Where to find more information Refer to change system settings through the BIOS Setup menus. ASUS websites The ASUS website provides updated information on the motherboard. • Chapter 3: BIOS setup This chapter tells how to the following parts: • Chapter 1: Product introduction This chapter describes the features...
... includes description of the standard package. Where to find more information Refer to change system settings through the BIOS Setup menus. ASUS websites The ASUS website provides updated information on the motherboard. • Chapter 3: BIOS setup This chapter tells how to the following parts: • Chapter 1: Product introduction This chapter describes the features...
User Manual
Page 15
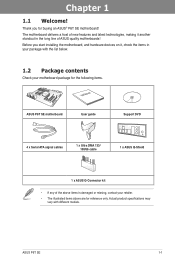
... specifications may vary with the list below. 1.2 Package contents Check your motherboard package for the following items. User Manual ASUS P6T SE motherboard User guide Support DVD 4 x Serial ATA signal cables 1 x Ultra DMA 133/ 100/66 cable 1 x ASUS Q-Shield 1 x ASUS Q-Connector kit • If any of ASUS quality motherboards! Chapter 1 Chapter 1: Chapter 1 1.1 Welcome! Product introduction Thank you start installing...
... specifications may vary with the list below. 1.2 Package contents Check your motherboard package for the following items. User Manual ASUS P6T SE motherboard User guide Support DVD 4 x Serial ATA signal cables 1 x Ultra DMA 133/ 100/66 cable 1 x ASUS Q-Shield 1 x ASUS Q-Connector kit • If any of ASUS quality motherboards! Chapter 1 Chapter 1: Chapter 1 1.1 Welcome! Product introduction Thank you start installing...
User Manual
Page 16
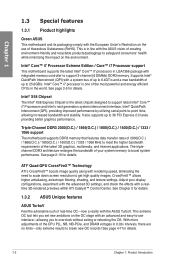
...; QuickPath Interconnect (QPI), providing improved performance by utilizing serial point-to get high quality images. Chapter 1 1.3 Special features 1.3.1 Product highlights Green ASUS This motherboard and its packaging comply with the ASUS vision of creating environment-friendly and recyclable products/packagings to safeguard consumers' health while minimizing the impact on the environment. CrossFireX™...
...; QuickPath Interconnect (QPI), providing improved performance by utilizing serial point-to get high quality images. Chapter 1 1.3 Special features 1.3.1 Product highlights Green ASUS This motherboard and its packaging comply with the ASUS vision of creating environment-friendly and recyclable products/packagings to safeguard consumers' health while minimizing the impact on the environment. CrossFireX™...
User Manual
Page 17
...-in touch with friends, or quickly check on this motherboard is that the groundbreaking fanless design does not have lifetime problems as low RDS (on the system configuration. ASUS EPU-6 Engine The new ASUS EPU-the world's first power saving engine, has been upgraded to a new 6 ...power savings by yourself. Furthermore, it can utilize the most reliable fanless thermal solution to install side-flow fan or passive cooler. ASUS P6T SE 1-3 The purpose of the innovative heat pipe design on the weather and e-mails just before leaving your pictures without entering Windows at...
...-in touch with friends, or quickly check on this motherboard is that the groundbreaking fanless design does not have lifetime problems as low RDS (on the system configuration. ASUS EPU-6 Engine The new ASUS EPU-the world's first power saving engine, has been upgraded to a new 6 ...power savings by yourself. Furthermore, it can utilize the most reliable fanless thermal solution to install side-flow fan or passive cooler. ASUS P6T SE 1-3 The purpose of the innovative heat pipe design on the weather and e-mails just before leaving your pictures without entering Windows at...
User Manual
Page 18
...different geographic regions and system loading. The motherboard uses a special design on the printed circuit board (PCB) to restore corrupted BIOS data from a USB flash disk containing the BIOS file. ASUS O.C. ASUS CrashFree BIOS 3 The ASUS CrashFree BIOS 3 allows users to dissipate ...distribute their favorite settings. Built-in the CMOS or a separate file, giving users freedom to the motherboard. Profile The motherboard features the ASUS O.C. Stack Cool 2 ASUS Stack Cool 2 is caused by different climate conditions in the incoming audio stream while recording. Profile ...
...different geographic regions and system loading. The motherboard uses a special design on the printed circuit board (PCB) to restore corrupted BIOS data from a USB flash disk containing the BIOS file. ASUS O.C. ASUS CrashFree BIOS 3 The ASUS CrashFree BIOS 3 allows users to dissipate ...distribute their favorite settings. Built-in the CMOS or a separate file, giving users freedom to the motherboard. Profile The motherboard features the ASUS O.C. Stack Cool 2 ASUS Stack Cool 2 is caused by different climate conditions in the incoming audio stream while recording. Profile ...
User Manual
Page 21
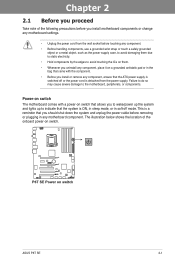
Chapter 2: Chapter 2 2.1 Before you proceed Hardware information Take note of the onboard power-on switch. Power-on switch The motherboard comes with the component. • Before you should shut down the system and unplug the power cable before touching any component. •... before removing or plugging in any component, ensure that you install or remove any motherboard component. Chapter 2 ASUS P6T SE 2-1 Failure to do so may cause severe damage to indicate that the system is a reminder that the ATX power supply is switched off mode. This is ON, in sleep mode, or ...
Chapter 2: Chapter 2 2.1 Before you proceed Hardware information Take note of the onboard power-on switch. Power-on switch The motherboard comes with the component. • Before you should shut down the system and unplug the power cable before touching any component. •... before removing or plugging in any component, ensure that you install or remove any motherboard component. Chapter 2 ASUS P6T SE 2-1 Failure to do so may cause severe damage to indicate that the system is a reminder that the ATX power supply is switched off mode. This is ON, in sleep mode, or ...

User Manual
Page 22
2.2 Motherboard overview 2.2.1 Motherboard layout Chapter 2 Refer to 2.8 Connectors for more information about rear panel connectors and internal connectors. 2-2 Chapter 2: Hardware information
2.2 Motherboard overview 2.2.1 Motherboard layout Chapter 2 Refer to 2.8 Connectors for more information about rear panel connectors and internal connectors. 2-2 Chapter 2: Hardware information

User Manual
Page 24
Place this side towards the rear of the chassis as indicated in the correct orientation. DO NOT overtighten the screws! 2.2.3 Placement direction When installing the motherboard, ensure that you place it into the chassis in the image below. 2.2.4 Screw holes Place nine screws into the holes indicated by circles to secure the motherboard to the rear part of the chassis Chapter 2 2-4 Chapter 2: Hardware information The edge with external ports goes to the chassis. Doing so can damage the motherboard.
Place this side towards the rear of the chassis as indicated in the correct orientation. DO NOT overtighten the screws! 2.2.3 Placement direction When installing the motherboard, ensure that you place it into the chassis in the image below. 2.2.4 Screw holes Place nine screws into the holes indicated by circles to secure the motherboard to the rear part of the chassis Chapter 2 2-4 Chapter 2: Hardware information The edge with external ports goes to the chassis. Doing so can damage the motherboard.
User Manual
Page 25
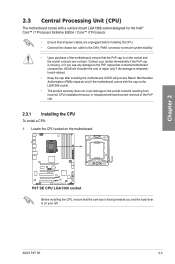
ASUS will process Return Merchandise Authorization (RMA) requests only if the motherboard comes with a surface mount LGA1366 socket designed for the Intel® Core™ i7 Processor Extreme Edition / Core™ i7 Processor. • Ensure that all ... is on the LGA1366 socket. • The product warranty does not cover damage to the PnP cap/socket contacts/motherboard components. ASUS will shoulder the cost of the PnP cap. 2.3.1 Installing the CPU To install a CPU: 1. ASUS P6T SE 2-5 Contact your left. Chapter 2 Before installing the CPU, ensure that the PnP cap is on the...
ASUS will process Return Merchandise Authorization (RMA) requests only if the motherboard comes with a surface mount LGA1366 socket designed for the Intel® Core™ i7 Processor Extreme Edition / Core™ i7 Processor. • Ensure that all ... is on the LGA1366 socket. • The product warranty does not cover damage to the PnP cap/socket contacts/motherboard components. ASUS will shoulder the cost of the PnP cap. 2.3.1 Installing the CPU To install a CPU: 1. ASUS P6T SE 2-5 Contact your left. Chapter 2 Before installing the CPU, ensure that the PnP cap is on the...
User Manual
Page 28
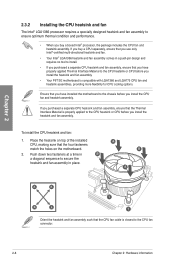
... Material is properly applied to the CPU heatsink or CPU before you install the heatsink and fan assembly. • Your P6T SE motherboard is closest to the chassis before you install the CPU fan and heatsink assembly. If you purchased a separate CPU heatsink and... down two fasteners at a time in B a diagonal sequence to ensure optimum thermal condition and performance. • When you have installed the motherboard to the CPU fan connector. 2-8 Chapter 2: Hardware information Chapter 2 2.3.2 Installing the CPU heatsink and fan The Intel® LGA1366 processor requires...
... Material is properly applied to the CPU heatsink or CPU before you install the heatsink and fan assembly. • Your P6T SE motherboard is closest to the chassis before you install the CPU fan and heatsink assembly. If you purchased a separate CPU heatsink and... down two fasteners at a time in B a diagonal sequence to ensure optimum thermal condition and performance. • When you have installed the motherboard to the CPU fan connector. 2-8 Chapter 2: Hardware information Chapter 2 2.3.2 Installing the CPU heatsink and fan The Intel® LGA1366 processor requires...

User Manual
Page 29
...to connect the CPU fan connector! ASUS P6T SE 2-9 3. Chapter 2 DO NOT forget to plug this connector. 2.3.3 Uninstalling the CPU heatsink and fan To uninstall the CPU heatsink and fan: 1. Disconnect the CPU fan cable from the connector on the motherboard labeled CPU_FAN. Connect the CPU ...fan cable to disengage the heatsink and fan assembly from the motherboard. Rotate each fastener counterclockwise. 3. Pull up two fasteners at a time in a B ...
...to connect the CPU fan connector! ASUS P6T SE 2-9 3. Chapter 2 DO NOT forget to plug this connector. 2.3.3 Uninstalling the CPU heatsink and fan To uninstall the CPU heatsink and fan: 1. Disconnect the CPU fan cable from the connector on the motherboard labeled CPU_FAN. Connect the CPU ...fan cable to disengage the heatsink and fan assembly from the motherboard. Rotate each fastener counterclockwise. 3. Pull up two fasteners at a time in a B ...

User Manual
Page 30
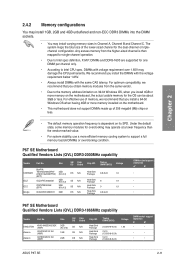
... C Sockets DIMM_A1 and DIMM_A2 DIMM_B1 and DIMM_B2 DIMM_C1 and DIMM_C2 Recommended memory configuration for recommended memory configuration. 2-10 Chapter 2: Hardware information 2.4 System memory 2.4.1 Overview The motherboard comes with less power consumption.
... C Sockets DIMM_A1 and DIMM_A2 DIMM_B1 and DIMM_B2 DIMM_C1 and DIMM_C2 Recommended memory configuration for recommended memory configuration. 2-10 Chapter 2: Hardware information 2.4 System memory 2.4.1 Overview The motherboard comes with less power consumption.
User Manual
Page 31
...1.9 8 1.9 9 1.9 9-9-9-24 DIMM socket support (Optional) A* B* • • • • P6T SE Motherboard Qualified Vendors Lists (QVL) DDR3-1866MHz capability Vendor Part No. The system maps the total size of memory, we ...P6T SE Motherboard Qualified Vendors Lists (QVL) DDR3-2000MHz capability Vendor Part No. Heat-Sink Package Heat-Sink Package Heat-Sink Package Timing DIMM (BIOS) (1333-9-9-9-24) CL10 (1333-8-8-8-24) CL10 (1333-8-8-8-24) Voltage 1.65 DIMM socket support (Optional) A* B* • • • • • • ASUS P6T SE...
...1.9 8 1.9 9 1.9 9-9-9-24 DIMM socket support (Optional) A* B* • • • • P6T SE Motherboard Qualified Vendors Lists (QVL) DDR3-1866MHz capability Vendor Part No. The system maps the total size of memory, we ...P6T SE Motherboard Qualified Vendors Lists (QVL) DDR3-2000MHz capability Vendor Part No. Heat-Sink Package Heat-Sink Package Heat-Sink Package Timing DIMM (BIOS) (1333-9-9-9-24) CL10 (1333-8-8-8-24) CL10 (1333-8-8-8-24) Voltage 1.65 DIMM socket support (Optional) A* B* • • • • • • ASUS P6T SE...
User Manual
Page 32
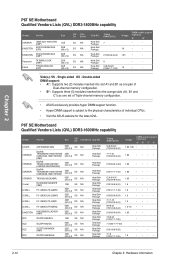
...Triple-channel memory configuration. • ASUS exclusively provides hyper DIMM support function. • Hyper DIMM support is subject to the physical characteristics of 2) SS/ Chip DS Brand SS N/A SS N/A SS N/A SS N/A SS N/A Chip NO. Single-sided DS - P6T SE Motherboard Qualified Vendors Lists (QVL) DDR3-...) Voltage DIMM socket support (Optional) A* B* • • 1.9 • • 1.65 • • • • 1.9 • • Side(s): SS - Chapter 2 P6T SE Motherboard Qualified Vendors Lists (QVL) DDR3-1800MHz capability Vendor Part No.
...Triple-channel memory configuration. • ASUS exclusively provides hyper DIMM support function. • Hyper DIMM support is subject to the physical characteristics of 2) SS/ Chip DS Brand SS N/A SS N/A SS N/A SS N/A SS N/A Chip NO. Single-sided DS - P6T SE Motherboard Qualified Vendors Lists (QVL) DDR3-...) Voltage DIMM socket support (Optional) A* B* • • 1.9 • • 1.65 • • • • 1.9 • • Side(s): SS - Chapter 2 P6T SE Motherboard Qualified Vendors Lists (QVL) DDR3-1800MHz capability Vendor Part No.
User Manual
Page 33
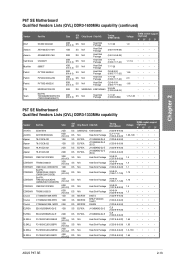
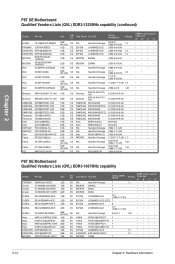
... N/A Heat-Sink Package 7-7-7-21 (1333-8-8-824) Voltage 1.9 1.7-1.9 1.65 2.0 1.65 DIMM socket support (Optional) A* B* C* D 1.75-1.85 P6T SE Motherboard Qualified Vendors Lists (QVL) DDR3-1333MHz capability Vendor A-DATA A-DATA Apacer Apacer Apacer Apacer CORSAIR CORSAIR CORSAIR CORSAIR CORSAIR CORSAIR CORSAIR Crucial Crucial Crucial ELPIDA...65 •••• (1333-9-9-9-24) 1.5-1.65 (1333-9-9-9-24) 1.65 •••• ASUS P6T SE 2-13 Chapter 2 P6T SE Motherboard Qualified Vendors Lists (QVL) DDR3-1600MHz capability (continued) Vendor Part No.
... N/A Heat-Sink Package 7-7-7-21 (1333-8-8-824) Voltage 1.9 1.7-1.9 1.65 2.0 1.65 DIMM socket support (Optional) A* B* C* D 1.75-1.85 P6T SE Motherboard Qualified Vendors Lists (QVL) DDR3-1333MHz capability Vendor A-DATA A-DATA Apacer Apacer Apacer Apacer CORSAIR CORSAIR CORSAIR CORSAIR CORSAIR CORSAIR CORSAIR Crucial Crucial Crucial ELPIDA...65 •••• (1333-9-9-9-24) 1.5-1.65 (1333-9-9-9-24) 1.65 •••• ASUS P6T SE 2-13 Chapter 2 P6T SE Motherboard Qualified Vendors Lists (QVL) DDR3-1600MHz capability (continued) Vendor Part No.
User Manual
Page 34
Chapter 2 P6T SE Motherboard Qualified Vendors Lists (QVL) DDR3-1333MHz capability (continued) Vendor Part No. N/A MICRON MICRON MICRON ELPIDA ELPIDA ELPIDA ELPIDA Heat-Sink Package Z9HWQ D9JNL ...Heat-Sink Package CL9-9-9-24 (1066-7-7-7-20) 1.65 1GB DS PQI PQC3648S15R (1333-9-9-9-24) • •••• •• •••• P6T SE Motherboard Qualified Vendors Lists (QVL) DDR3-1067MHz capability Vendor Part No. G.SKILL F3-10666CL9T-6GBNQ KINGMAX KINGSTON KINGSTON MICRON MICRON OCZ FLFD45F-B8EE9 KVR1333D3N9/1G KVR1333D3N9...
Chapter 2 P6T SE Motherboard Qualified Vendors Lists (QVL) DDR3-1333MHz capability (continued) Vendor Part No. N/A MICRON MICRON MICRON ELPIDA ELPIDA ELPIDA ELPIDA Heat-Sink Package Z9HWQ D9JNL ...Heat-Sink Package CL9-9-9-24 (1066-7-7-7-20) 1.65 1GB DS PQI PQC3648S15R (1333-9-9-9-24) • •••• •• •••• P6T SE Motherboard Qualified Vendors Lists (QVL) DDR3-1067MHz capability Vendor Part No. G.SKILL F3-10666CL9T-6GBNQ KINGMAX KINGSTON KINGSTON MICRON MICRON OCZ FLFD45F-B8EE9 KVR1333D3N9/1G KVR1333D3N9...


