
User Guide
Page 67
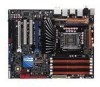
... b. System power 6. If your retailer for the first time 1. Check the jumper settings and connections or call your monitor complies with ATX power supplies, the system LED lights up when you turned on the power, the system may light up or switch between orange and green...screen. Connect the power cord to enter the BIOS Setup. After applying power, the system power LED on self tests or POST. Follow the instructions in the following order: a. ASUS P6T Deluxe V2 2-41 2.10 Starting up for assistance. If you do not see BIOS beep codes table below) or additional messages ...
... b. System power 6. If your retailer for the first time 1. Check the jumper settings and connections or call your monitor complies with ATX power supplies, the system LED lights up when you turned on the power, the system may light up or switch between orange and green...screen. Connect the power cord to enter the BIOS Setup. After applying power, the system power LED on self tests or POST. Follow the instructions in the following order: a. ASUS P6T Deluxe V2 2-41 2.10 Starting up for assistance. If you do not see BIOS beep codes table below) or additional messages ...

User Guide
Page 74
...Flash 2 1. Visit the ASUS website (www.asus.com) to a floppy disk or a USB flash disk, then restart the system. 3. You can launch the EZ Flash 2 by pressing + during POST to display the following. Save the BIOS file to download the latest BIOS file for the motherboard. 2. Go to the ... pressing before the correct file is found . Then press . 4. ASUSTek EZ Flash 2 BIOS ROM Utility V3.30 FLASH TYPE: MXIC 25L1605A Current ROM BOARD: P6T Deluxe V2 VER: 0309 DATE: 09/15/2008 Update ROM BOARD: Unknown VER: Unknown DATE: Unknown PATH: A:\ A: Note [Enter] Select or Load [Tab]...
...Flash 2 1. Visit the ASUS website (www.asus.com) to a floppy disk or a USB flash disk, then restart the system. 3. You can launch the EZ Flash 2 by pressing + during POST to display the following. Save the BIOS file to download the latest BIOS file for the motherboard. 2. Go to the ... pressing before the correct file is found . Then press . 4. ASUSTek EZ Flash 2 BIOS ROM Utility V3.30 FLASH TYPE: MXIC 25L1605A Current ROM BOARD: P6T Deluxe V2 VER: 0309 DATE: 09/15/2008 Update ROM BOARD: Unknown VER: Unknown DATE: Unknown PATH: A:\ A: Note [Enter] Select or Load [Tab]...
User Guide
Page 79
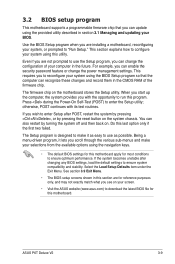
... for this motherboard apply for most conditions to ensure optimum performance. otherwise, POST continues with the opportunity to run this program. For example, you can enable the security password feature or change the configuration of the firmware chip. Do this motherboard. ASUS P6T Deluxe V2 3-9... Being a menu-driven program, it as easy to use the Setup program, you can change the power management settings. 3.2 BIOS setup program This motherboard supports a programmable firmware chip that the...
... for this motherboard apply for most conditions to ensure optimum performance. otherwise, POST continues with the opportunity to run this program. For example, you can enable the security password feature or change the configuration of the firmware chip. Do this motherboard. ASUS P6T Deluxe V2 3-9... Being a menu-driven program, it as easy to use the Setup program, you can change the power management settings. 3.2 BIOS setup program This motherboard supports a programmable firmware chip that the...
User Guide
Page 102
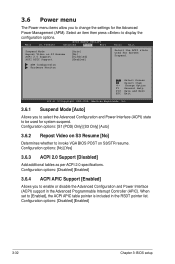
... state used for system suspend. Configuration options: [Disabled] [Enabled] 3-32 Chapter 3: BIOS setup 3.6 Power menu The Power menu items allow you to invoke VGA BIOS POST on S3/STR resume. Configuration options: [S1 (POS) Only] [S3 Only] [Auto] 3.6.2 Repost Video on S3 Resume [No] Determines whether to change the settings for...
... state used for system suspend. Configuration options: [Disabled] [Enabled] 3-32 Chapter 3: BIOS setup 3.6 Power menu The Power menu items allow you to invoke VGA BIOS POST on S3/STR resume. Configuration options: [S1 (POS) Only] [S3 Only] [Auto] 3.6.2 Repost Video on S3 Resume [No] Determines whether to change the settings for...

User Guide
Page 107
...F1' if Error [Enabled] Hit 'DEL' Message Display [Enabled] Allows BIOS to skip certain tests while booting. Configuration options: [Disabled] [Enabled] ASUS P6T Deluxe V2 3-37 Configuration options: [Disabled] [Enabled] Set this item allows the BIOS to skip some power on state for option ROM. 3.7.2 Boot ...system. Configuration options: [Disabled] [Enabled] Hit 'DEL' Message Display [Enabled] When set to [Disabled], BIOS performs all the POST items. Configuration options: [Disabled] [Enabled] Full Screen Logo [Enabled] This allows you to select the power-on self tests...
...F1' if Error [Enabled] Hit 'DEL' Message Display [Enabled] Allows BIOS to skip certain tests while booting. Configuration options: [Disabled] [Enabled] ASUS P6T Deluxe V2 3-37 Configuration options: [Disabled] [Enabled] Set this item allows the BIOS to skip some power on state for option ROM. 3.7.2 Boot ...system. Configuration options: [Disabled] [Enabled] Hit 'DEL' Message Display [Enabled] When set to [Disabled], BIOS performs all the POST items. Configuration options: [Disabled] [Enabled] Full Screen Logo [Enabled] This allows you to select the power-on self tests...

User Guide
Page 113
3.8.4 Ai Net 2 AI NET 2 Pair Status Length Check Marvell LAN cable BIOS SETUP UTILITY Tools Check Marvell LAN cable during the Power-On Self‑Test (POST). Configuration options: [Disabled] [Enabled] ASUS P6T Deluxe V2 3-43 Check Marvell LAN Cable [Disabled] Enables or disables checking of the Marvell LAN cable during POST. [Disabled] v02.61 (C)Copyright 1985-2008, American Megatrends, Inc.
3.8.4 Ai Net 2 AI NET 2 Pair Status Length Check Marvell LAN cable BIOS SETUP UTILITY Tools Check Marvell LAN cable during the Power-On Self‑Test (POST). Configuration options: [Disabled] [Enabled] ASUS P6T Deluxe V2 3-43 Check Marvell LAN Cable [Disabled] Enables or disables checking of the Marvell LAN cable during POST. [Disabled] v02.61 (C)Copyright 1985-2008, American Megatrends, Inc.
User Guide
Page 125
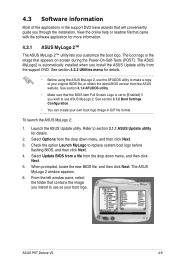
... pane, select the folder that appears on screen during the Power‑On‑Self-Tests (POST). See section 4.2.3 Utilities menu for details. • Before using the ASUS MyLogo 2, use ASUS MyLogo 2. See section 3.7.2 Boot Settings Configuration. • You can create your original BIOS file... you wish to use the AFUDOS utility to use as your boot logo. Launch the ASUS Update utility. Select Update BIOS from a file from the support DVD. ASUS P6T Deluxe V2 4-9 Select Options from the ASUS website. Refer to replace system boot logo before flashing BIOS, and then click Next....
... pane, select the folder that appears on screen during the Power‑On‑Self-Tests (POST). See section 4.2.3 Utilities menu for details. • Before using the ASUS MyLogo 2, use ASUS MyLogo 2. See section 3.7.2 Boot Settings Configuration. • You can create your original BIOS file... you wish to use the AFUDOS utility to use as your boot logo. Launch the ASUS Update utility. Select Update BIOS from a file from the support DVD. ASUS P6T Deluxe V2 4-9 Select Options from the ASUS website. Refer to replace system boot logo before flashing BIOS, and then click Next....

User Guide
Page 126
When the logo images appear on the right window pane, select an image to load the new boot logo. 10. When the screen returns to the ASUS Update utility, flash the original BIOS to enlarge by selecting a value on it. 8. 7. After flashing the BIOS, restart the computer to your desired size by clicking on the Ratio box. 9. Adjust the boot image to display the new boot logo during POST. 4-10 Chapter 4: Software support
When the logo images appear on the right window pane, select an image to load the new boot logo. 10. When the screen returns to the ASUS Update utility, flash the original BIOS to enlarge by selecting a value on it. 8. 7. After flashing the BIOS, restart the computer to your desired size by clicking on the Ratio box. 9. Adjust the boot image to display the new boot logo during POST. 4-10 Chapter 4: Software support
User Guide
Page 127
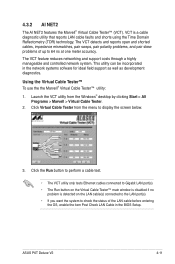
..., impedance mismatches, pair swaps, pair polarity problems, and pair skew problems of the LAN cable before entering the OS, enable the item Post Check LAN Cable in the network systems sofware for ideal field support as well as development diagnostics. The VCT feature reduces networking and support ...If you want the system to check the status of up to display the screen below. 3. This utility can be incorporated in the BIOS Setup. ASUS P6T Deluxe V2 4-11 Using the Virtual Cable Tester™ To use the the Marvell® Virtual Cable Tester™ utility: 1. 4.3.2 AI NET2 The AI...
..., impedance mismatches, pair swaps, pair polarity problems, and pair skew problems of the LAN cable before entering the OS, enable the item Post Check LAN Cable in the network systems sofware for ideal field support as well as development diagnostics. The VCT feature reduces networking and support ...If you want the system to check the status of up to display the screen below. 3. This utility can be incorporated in the BIOS Setup. ASUS P6T Deluxe V2 4-11 Using the Virtual Cable Tester™ To use the the Marvell® Virtual Cable Tester™ utility: 1. 4.3.2 AI NET2 The AI...
User Guide
Page 161
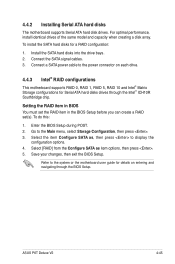
... cables. 3. Select [RAID] from the Configure SATA as , then press to the system or the motherboard user guide for details on each drive. 4.4.3 Intel® RAID configurations This motherboard supports RAID 0, RAID 1, RAID 5, RAID 10 and Intel® Matrix Storage configurations for a RAID ... this: 1. Select the item Configure SATA as item options, then press . 5. Enter the BIOS Setup during POST. 2. To install the SATA hard disks for Serial ATA hard disks drives through the BIOS Setup. ASUS P6T Deluxe V2 4-45 Refer to display the configuration options. 4.
... cables. 3. Select [RAID] from the Configure SATA as , then press to the system or the motherboard user guide for details on each drive. 4.4.3 Intel® RAID configurations This motherboard supports RAID 0, RAID 1, RAID 5, RAID 10 and Intel® Matrix Storage configurations for a RAID ... this: 1. Select the item Configure SATA as item options, then press . 5. Enter the BIOS Setup during POST. 2. To install the SATA hard disks for Serial ATA hard disks drives through the BIOS Setup. ASUS P6T Deluxe V2 4-45 Refer to display the configuration options. 4.
User Guide
Page 162
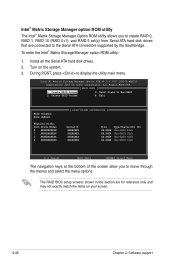
... screens shown in this section are connected to the Serial ATA connectors supported by the Southbridge. Turn on your screen. 4-46 Chapter 4: Software support During POST, press to Non-RAID 2. All Rights Reserved. [ MAIN MENU ] 1. Delete RAID Volume 4. Exit RAID Volumes: None defined. [ DISK/VOLUME INFORMATION ] Physical Disks: Port Drive Model...
... screens shown in this section are connected to the Serial ATA connectors supported by the Southbridge. Turn on your screen. 4-46 Chapter 4: Software support During POST, press to Non-RAID 2. All Rights Reserved. [ MAIN MENU ] 1. Delete RAID Volume 4. Exit RAID Volumes: None defined. [ DISK/VOLUME INFORMATION ] Physical Disks: Port Drive Model...

User Guide
Page 169
...ASUS P6T Deluxe V2 4-53 For Windows Vista user, you are using Windows Vista OS. 5. Boot your computer. 2. Set the optical drive as the primary boot device. 4. When the menu appears, press to create an Intel® ICH10R RAID driver disk. 4. Insert a formatted floppy disk into the optical drive. 3. Place the motherboard...the OS: 1. Press any key when the system prompts "Press any key to enter the BIOS setup utility. 3. Press during POST to boot from the optical drive." 7. Write-protect the floppy disk to complete the process. Follow succeeding screen instructions to avoid computer...
...ASUS P6T Deluxe V2 4-53 For Windows Vista user, you are using Windows Vista OS. 5. Boot your computer. 2. Set the optical drive as the primary boot device. 4. When the menu appears, press to create an Intel® ICH10R RAID driver disk. 4. Insert a formatted floppy disk into the optical drive. 3. Place the motherboard...the OS: 1. Press any key when the system prompts "Press any key to enter the BIOS setup utility. 3. Press during POST to boot from the optical drive." 7. Write-protect the floppy disk to complete the process. Follow succeeding screen instructions to avoid computer...


