User Guide
Page 6
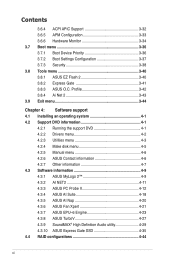
... Boot Settings Configuration 3-37 3.7.3 Security 3-38 3.8 Tools menu 3-40 3.8.1 ASUS EZ Flash 2 3-40 3.8.2 Express Gate 3-41 3.8.3 ASUS O.C. Profile 3-42 3.8.4 Ai Net 2 3-43 3.9 Exit menu 3-44 ...ASUS Contact information 4-6 4.2.7 Other information 4-7 4.3 Software information 4-9 4.3.1 ASUS MyLogo 2 4-9 4.3.2 AI NET2 4-11 4.3.3 ASUS PC Probe II 4-12 4.3.4 ASUS AI Suite 4-18 4.3.5 ASUS AI Nap 4-20 4.3.6 ASUS Fan Xpert 4-21 4.3.7 ASUS EPU-6 Engine 4-23 4.3.8 ASUS TurboV 4-27 4.3.9 SoundMAX® High Definition Audio utility 4-29 4.3.10 ASUS Express Gate SSD 4-35 4.4 RAID...
... Boot Settings Configuration 3-37 3.7.3 Security 3-38 3.8 Tools menu 3-40 3.8.1 ASUS EZ Flash 2 3-40 3.8.2 Express Gate 3-41 3.8.3 ASUS O.C. Profile 3-42 3.8.4 Ai Net 2 3-43 3.9 Exit menu 3-44 ...ASUS Contact information 4-6 4.2.7 Other information 4-7 4.3 Software information 4-9 4.3.1 ASUS MyLogo 2 4-9 4.3.2 AI NET2 4-11 4.3.3 ASUS PC Probe II 4-12 4.3.4 ASUS AI Suite 4-18 4.3.5 ASUS AI Nap 4-20 4.3.6 ASUS Fan Xpert 4-21 4.3.7 ASUS EPU-6 Engine 4-23 4.3.8 ASUS TurboV 4-27 4.3.9 SoundMAX® High Definition Audio utility 4-29 4.3.10 ASUS Express Gate SSD 4-35 4.4 RAID...

User Guide
Page 7
... 4-44 4.4.2 Installing Serial ATA hard disks 4-45 4.4.3 Intel® RAID configurations 4-45 4.5 Creating a RAID driver disk 4-53 4.5.1 Creating a RAID driver disk without entering the OS.... 4-53 4.5.2 Creating a RAID driver disk in Windows 4-53 Chapter 5: Multiple GPU technology support 5.1 ATI® CrossFireX™ technology 5-1 5.1.1 Requirements 5-1 5.1.2 Before you begin 5-1 5.2 Installing CrossFireX™ graphics cards 5-2 5.2.1 Dual ...
... 4-44 4.4.2 Installing Serial ATA hard disks 4-45 4.4.3 Intel® RAID configurations 4-45 4.5 Creating a RAID driver disk 4-53 4.5.1 Creating a RAID driver disk without entering the OS.... 4-53 4.5.2 Creating a RAID driver disk in Windows 4-53 Chapter 5: Multiple GPU technology support 5.1 ATI® CrossFireX™ technology 5-1 5.1.1 Requirements 5-1 5.1.2 Before you begin 5-1 5.2 Installing CrossFireX™ graphics cards 5-2 5.2.1 Dual ...
User Guide
Page 12
...; Supports Jack-Detection, Multi-streaming, and Front Panel Jack-Retasking technology - ASUS Noise Filter (continued on the next page) xii Intel® Matrix Storage supporting SATA RAID 0,1, 5, and 10 Marvell 88SE6111 controller: - 1 x Ultra DMA 133/100/66 for up to 6.4GT/s; P6T Deluxe V2 specifications summary CPU Chipset System Bus Memory Expansion Slots Multi...
...; Supports Jack-Detection, Multi-streaming, and Front Panel Jack-Retasking technology - ASUS Noise Filter (continued on the next page) xii Intel® Matrix Storage supporting SATA RAID 0,1, 5, and 10 Marvell 88SE6111 controller: - 1 x Ultra DMA 133/100/66 for up to 6.4GT/s; P6T Deluxe V2 specifications summary CPU Chipset System Bus Memory Expansion Slots Multi...

User Guide
Page 57
See section 3.3.6 Storage Configuration for Serial ATA hard disk drives and optical disc drives. ASUS P6T Deluxe V2 2-31 If you installed Serial ATA hard disk drives, you are using Windows® XP or later version. • When using these connectors. ICH10R... [red]) These connectors are set the Configure SATA as item in the BIOS to these connectors, set , refer to section 4.4.3 Intel RAID configurations or the manual bundled in the motherboard support DVD. • You must install the Windows® XP Service Pack 1 before using Serial ATA hard disk drives. The Serial ATA...
See section 3.3.6 Storage Configuration for Serial ATA hard disk drives and optical disc drives. ASUS P6T Deluxe V2 2-31 If you installed Serial ATA hard disk drives, you are using Windows® XP or later version. • When using these connectors. ICH10R... [red]) These connectors are set the Configure SATA as item in the BIOS to these connectors, set , refer to section 4.4.3 Intel RAID configurations or the manual bundled in the motherboard support DVD. • You must install the Windows® XP Service Pack 1 before using Serial ATA hard disk drives. The Serial ATA...

User Guide
Page 84
... [MWDMA2] [UDMA0] [UDMA1] [UDMA2] [UDMA3] [UDMA4] [UDMA5] SMART Monitoring [Auto] Sets the Self-Monitoring, Analysis, and Reporting Technology. Configuration options: [IDE] [RAID] [AHCI] • If you want to use the Serial ATA hard disk drives as [IDE] Sets the configuration for the SATA devices installed in this...] [Enhanced] Configure SATA as Parallel ATA physical storage devices, keep the default setting [IDE]. • If you want to [RAID]. 3-14 Chapter 3: BIOS setup DMA Mode [Auto] Selects the DMA mode. The AHCI allows the onboard storage driver to [AHCI].
... [MWDMA2] [UDMA0] [UDMA1] [UDMA2] [UDMA3] [UDMA4] [UDMA5] SMART Monitoring [Auto] Sets the Self-Monitoring, Analysis, and Reporting Technology. Configuration options: [IDE] [RAID] [AHCI] • If you want to use the Serial ATA hard disk drives as [IDE] Sets the configuration for the SATA devices installed in this...] [Enhanced] Configure SATA as Parallel ATA physical storage devices, keep the default setting [IDE]. • If you want to [RAID]. 3-14 Chapter 3: BIOS setup DMA Mode [Auto] Selects the DMA mode. The AHCI allows the onboard storage driver to [AHCI].
User Guide
Page 116
Chapter summary 4 4.1 Installing an operating system 4-1 4.2 Support DVD information 4-1 4.3 Software information 4-9 4.4 RAID configurations 4-44 4.5 Creating a RAID driver disk 4-53 ASUS P6T Deluxe V2
Chapter summary 4 4.1 Installing an operating system 4-1 4.2 Support DVD information 4-1 4.3 Software information 4-9 4.4 RAID configurations 4-44 4.5 Creating a RAID driver disk 4-53 ASUS P6T Deluxe V2
User Guide
Page 119
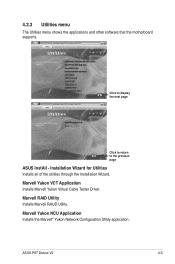
Click to display the next page WinZip 11 Click to return to the previous page ASUS InstAll - Marvell Yukon NCU Application Installs the Marvell® Yukon Network Configuration Utility application. ASUS P6T Deluxe V2 4-3 Marvell Yukon VCT Application Installs Marvell Yukon Virtual Cable Tester Driver. Marvell RAID Utility Installs Marvell RAUD Utility. 4.2.3 Utilities menu The Utilities menu shows the applications and other software that the motherboard supports. Installation Wizard for Utilities Installs all of the utilities through the Installation Wizard.
Click to display the next page WinZip 11 Click to return to the previous page ASUS InstAll - Marvell Yukon NCU Application Installs the Marvell® Yukon Network Configuration Utility application. ASUS P6T Deluxe V2 4-3 Marvell Yukon VCT Application Installs Marvell Yukon Virtual Cable Tester Driver. Marvell RAID Utility Installs Marvell RAUD Utility. 4.2.3 Utilities menu The Utilities menu shows the applications and other software that the motherboard supports. Installation Wizard for Utilities Installs all of the utilities through the Installation Wizard.

User Guide
Page 121
4.2.4 Make disk menu The Make disk menu contains items to create an ICH10R 32/64bit RAID/AHCI driver disk. Intel ICH10R 32/64 bit RAID/AHCI Driver Disk Allows you to create the Intel ICH10R or Marvell® 61xx driver disk. ASUS P6T Deluxe V2 4-5
4.2.4 Make disk menu The Make disk menu contains items to create an ICH10R 32/64bit RAID/AHCI driver disk. Intel ICH10R 32/64 bit RAID/AHCI Driver Disk Allows you to create the Intel ICH10R or Marvell® 61xx driver disk. ASUS P6T Deluxe V2 4-5

User Guide
Page 160
.... Use four new hard disk drives or use an existing drive and a new drive for six independent Serial ATA channels. 4.4.1 RAID definitions RAID 0 (Data striping) optimizes two identical hard disk drives to the surviving drive as a single drive but at a sustained data transfer... support The Intel® Matrix Storage technology supported by using only two identical hard disk drives. Intel® Matrix Storage. 4.4 RAID configurations The motherboard comes with the Intel® ICH10R Southbridge controller that of a single disk alone, thus improving data access and storage. You can...
.... Use four new hard disk drives or use an existing drive and a new drive for six independent Serial ATA channels. 4.4.1 RAID definitions RAID 0 (Data striping) optimizes two identical hard disk drives to the surviving drive as a single drive but at a sustained data transfer... support The Intel® Matrix Storage technology supported by using only two identical hard disk drives. Intel® Matrix Storage. 4.4 RAID configurations The motherboard comes with the Intel® ICH10R Southbridge controller that of a single disk alone, thus improving data access and storage. You can...
User Guide
Page 161
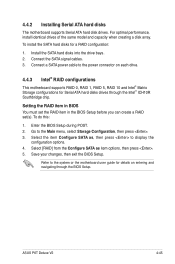
... power connector on entering and navigating through the Intel® ICH10R Southbridge chip. Connect the SATA signal cables. 3. Go to the system or the motherboard user guide for a RAID configuration: 1. Select the item Configure SATA as item options, then press . 5. For optimal performance, install identical drives of the same model and capacity... configuration options. 4. Save your changes, then exit the BIOS Setup. Enter the BIOS Setup during POST. 2. Install the SATA hard disks into the drive bays. 2. ASUS P6T Deluxe V2 4-45
... power connector on entering and navigating through the Intel® ICH10R Southbridge chip. Connect the SATA signal cables. 3. Go to the system or the motherboard user guide for a RAID configuration: 1. Select the item Configure SATA as item options, then press . 5. For optimal performance, install identical drives of the same model and capacity... configuration options. 4. Save your changes, then exit the BIOS Setup. Enter the BIOS Setup during POST. 2. Install the SATA hard disks into the drive bays. 2. ASUS P6T Deluxe V2 4-45
User Guide
Page 162
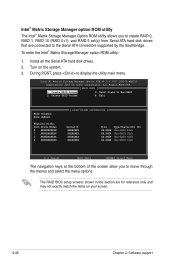
... Matrix Storage Manager Option ROM utility allows you to move through the menus and select the menu options. Exit RAID Volumes: None defined. [ DISK/VOLUME INFORMATION ] Physical Disks: Port Drive Model Serial Size Type/Status(Vol ID) 0 XXXXXXXXXXX XXXXXXXX... XX.XXGB Non-RAID Disk 1 XXXXXXXXXXX XXXXXXXX XX.XXGB Non-RAID Disk 2 XXXXXXXXXXX XXXXXXXX XX.XXGB Non-RAID Disk 3 XXXXXXXXXXX XXXXXXXX XX.XXGB Non-RAID Disk Select [ESC]-Exit [ENTER]-Select Menu The navigation keys at the bottom...
... Matrix Storage Manager Option ROM utility allows you to move through the menus and select the menu options. Exit RAID Volumes: None defined. [ DISK/VOLUME INFORMATION ] Physical Disks: Port Drive Model Serial Size Type/Status(Vol ID) 0 XXXXXXXXXXX XXXXXXXX... XX.XXGB Non-RAID Disk 1 XXXXXXXXXXX XXXXXXXX XX.XXGB Non-RAID Disk 2 XXXXXXXXXXX XXXXXXXX XX.XXGB Non-RAID Disk 3 XXXXXXXXXXX XXXXXXXX XX.XXGB Non-RAID Disk Select [ESC]-Exit [ENTER]-Select Menu The navigation keys at the bottom...

User Guide
Page 163
... characters and is highlighted, press to select the hard disk drives to select RAID 0(Stripe), and then press . 4. Intel(R) Matrix Storage Manager option ROM v8.0.0.1027 ICH10R wRAID5 Copyright(C) 2003-08 Intel Corporation. A small triangle marks the selected drive. ASUS P6T Deluxe V2 4-47 When the Disks item is 16 characters or less. [↑...
... characters and is highlighted, press to select the hard disk drives to select RAID 0(Stripe), and then press . 4. Intel(R) Matrix Storage Manager option ROM v8.0.0.1027 ICH10R wRAID5 Copyright(C) 2003-08 Intel Corporation. A small triangle marks the selected drive. ASUS P6T Deluxe V2 4-47 When the Disks item is 16 characters or less. [↑...

User Guide
Page 164
... to create this volume? (Y/N): 9. We recommend a lower stripe size for server systems, and a higher stripe size for multimedia computer systems used mainly for the RAID 0 array, and then press . Enter the RAID volume capacity that you want and press . WARNING: ALL DATA ON SELECTED DISKS WILL BE LOST. Press to create the... RAID volume and return to the main menu, or to go back to 128 KB. The available stripe size values range from 4 KB to the Create ...
... to create this volume? (Y/N): 9. We recommend a lower stripe size for server systems, and a higher stripe size for multimedia computer systems used mainly for the RAID 0 array, and then press . Enter the RAID volume capacity that you want and press . WARNING: ALL DATA ON SELECTED DISKS WILL BE LOST. Press to create the... RAID volume and return to the main menu, or to go back to 128 KB. The available stripe size values range from 4 KB to the Create ...

User Guide
Page 165
... the up/down arrow key to Create Volume menu. WARNING: ALL DATA ON SELECTED DISKS WILL BE LOST. Create RAID Volume and press . Intel(R) Matrix Storage Manager option ROM v8.0.0.1027 ICH10R wRAID5 Copyright(C) 2003-08 Intel Corporation. Enter a name ... that you want , and then press . Are you sure you want to create this volume? (Y/N): 6. When the RAID Level item is highlighted. From the utility main menu, select 1. The default value indicates the maximum capacity allowed. 5. Creating a RAID 1 set (mirrored) To create a RAID 1 set and press . 3. ASUS P6T Deluxe V2 4-49
... the up/down arrow key to Create Volume menu. WARNING: ALL DATA ON SELECTED DISKS WILL BE LOST. Create RAID Volume and press . Intel(R) Matrix Storage Manager option ROM v8.0.0.1027 ICH10R wRAID5 Copyright(C) 2003-08 Intel Corporation. Enter a name ... that you want , and then press . Are you sure you want to create this volume? (Y/N): 6. When the RAID Level item is highlighted. From the utility main menu, select 1. The default value indicates the maximum capacity allowed. 5. Creating a RAID 1 set (mirrored) To create a RAID 1 set and press . 3. ASUS P6T Deluxe V2 4-49

User Guide
Page 166
... support The following screen appears. The available stripe size values range from 4 KB to select RAID 10 (RAID 0+1), and then press . 4. Create RAID Volume and press . All Rights Reserved. [ CREATE VOLUME MENU ] Name: RAID Level: Disks: Strip Size: Capacity: Volume10 RAID10(RAID0+1) Select Disks 64KB XXX GB Create... a lower stripe size for server systems, and a higher stripe size for multimedia computer systems used mainly for the RAID 10 set : 1. The default stripe size is 16 characters or less. [↑↓]-Change [TAB]-Next [ESC]-Previous Menu [Enter]-...
... support The following screen appears. The available stripe size values range from 4 KB to select RAID 10 (RAID 0+1), and then press . 4. Create RAID Volume and press . All Rights Reserved. [ CREATE VOLUME MENU ] Name: RAID Level: Disks: Strip Size: Capacity: Volume10 RAID10(RAID0+1) Select Disks 64KB XXX GB Create... a lower stripe size for server systems, and a higher stripe size for multimedia computer systems used mainly for the RAID 10 set : 1. The default stripe size is 16 characters or less. [↑↓]-Change [TAB]-Next [ESC]-Previous Menu [Enter]-...

User Guide
Page 167
...DISKS WILL BE LOST. From the utility main menu, select 1. Enter a name for the RAID 5 set : 1. 6. When the RAID Level item is highlighted. ASUS P6T Deluxe V2 4-51 The following screen appears. Creating a RAID 5 set (parity) To create a RAID 5 set and press . 3. Are you sure you want to the Create Volume menu....-08 Intel Corporation. Press when the Create Volume item is highlighted, press the up/down arrow key to select RAID 5(Parity), and then press . Press to create the RAID volume and return to the main menu or to go back to create this volume? (Y/N): 7. Create...
...DISKS WILL BE LOST. From the utility main menu, select 1. Enter a name for the RAID 5 set : 1. 6. When the RAID Level item is highlighted. ASUS P6T Deluxe V2 4-51 The following screen appears. Creating a RAID 5 set (parity) To create a RAID 5 set and press . 3. Are you sure you want to the Create Volume menu....-08 Intel Corporation. Press when the Create Volume item is highlighted, press the up/down arrow key to select RAID 5(Parity), and then press . Press to create the RAID volume and return to the main menu or to go back to create this volume? (Y/N): 7. Create...

User Guide
Page 168
...press to select the hard disk drives to the Create Volume menu. 4-52 Chapter 4: Software support Press after completing your selection. 6. Enter the RAID volume capacity that you want and then press . WARNING: ALL DATA ON SELECTED DISKS WILL BE LOST. We recommend a lower stripe size for server... systems, and a higher stripe size for multimedia computer systems used mainly for the RAID 5 array, and then press . The default stripe size is highlighted. Press when the Create Volume item is 64 KB. Press to create the...
...press to select the hard disk drives to the Create Volume menu. 4-52 Chapter 4: Software support Press after completing your selection. 6. Enter the RAID volume capacity that you want and then press . WARNING: ALL DATA ON SELECTED DISKS WILL BE LOST. We recommend a lower stripe size for server... systems, and a higher stripe size for multimedia computer systems used mainly for the RAID 5 array, and then press . The default stripe size is highlighted. Press when the Create Volume item is 64 KB. Press to create the...

User Guide
Page 169
...BIOS setup utility. 3. Insert a formatted floppy disk into the optical drive. 3. Place the motherboard support DVD into the floppy drive then press . 9. Write-protect the floppy disk to complete the process. 4.5 Creating a RAID driver disk A floppy disk with a floppy disk drive or a USB flash disk drive.... avoid computer virus infection. Go to the Make disk menu, and then click Intel ICH10R 32/64 bit RAID Driver Disk to create a RAID driver disk. 8. Boot your computer. 2. ASUS P6T Deluxe V2 4-53 Set the optical drive as the primary boot device. 4. Save changes and exit BIOS. 6....
...BIOS setup utility. 3. Insert a formatted floppy disk into the optical drive. 3. Place the motherboard support DVD into the floppy drive then press . 9. Write-protect the floppy disk to complete the process. 4.5 Creating a RAID driver disk A floppy disk with a floppy disk drive or a USB flash disk drive.... avoid computer virus infection. Go to the Make disk menu, and then click Intel ICH10R 32/64 bit RAID Driver Disk to create a RAID driver disk. 8. Boot your computer. 2. ASUS P6T Deluxe V2 4-53 Set the optical drive as the primary boot device. 4. Save changes and exit BIOS. 6....
User Guide
Page 170
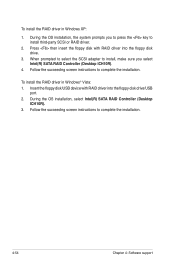
... to select the SCSI adapter to install, make sure you to press the key to install third-party SCSI or RAID driver. 2. To install the RAID driver in Windows XP: 1. Follow the succeeding screen instructions to complete the installation. 4-54 Chapter 4: Software support ...Follow the succeeding screen instructions to complete the installation. To install the RAID driver in Windows® Vista: 1. Press then insert the floppy disk with RAID driver into the floppy disk drive. 3. During the OS installation, select Intel(R) SATA...
... to select the SCSI adapter to install, make sure you to press the key to install third-party SCSI or RAID driver. 2. To install the RAID driver in Windows XP: 1. Follow the succeeding screen instructions to complete the installation. 4-54 Chapter 4: Software support ...Follow the succeeding screen instructions to complete the installation. To install the RAID driver in Windows® Vista: 1. Press then insert the floppy disk with RAID driver into the floppy disk drive. 3. During the OS installation, select Intel(R) SATA...


