Motherboard Installation Guide
Page 4
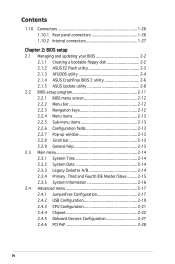
Contents 1.10 Connectors 1-26 1.10.1 Rear panel connectors 1-26 1.10.2 Internal connectors 1-27 Chapter 2: BIOS setup 2.1 Managing and updating your BIOS 2-2 2.1.1 Creating a bootable floppy disk 2-2 2.1.2 ASUS EZ Flash utility 2-3 2.1.3 AFUDOS utility 2-4 2.1.4 ASUS CrashFree BIOS 2 utility 2-6 2.1.5 ASUS Update utility 2-8 2.2 BIOS setup program 2-11 2.2.1 BIOS menu screen 2-12 2.2.2 Menu bar 2-12 2.2.3 Navigation keys 2-12 2.2.4 Menu items 2-13 2.2.5 Sub-menu items...
Contents 1.10 Connectors 1-26 1.10.1 Rear panel connectors 1-26 1.10.2 Internal connectors 1-27 Chapter 2: BIOS setup 2.1 Managing and updating your BIOS 2-2 2.1.1 Creating a bootable floppy disk 2-2 2.1.2 ASUS EZ Flash utility 2-3 2.1.3 AFUDOS utility 2-4 2.1.4 ASUS CrashFree BIOS 2 utility 2-6 2.1.5 ASUS Update utility 2-8 2.2 BIOS setup program 2-11 2.2.1 BIOS menu screen 2-12 2.2.2 Menu bar 2-12 2.2.3 Navigation keys 2-12 2.2.4 Menu items 2-13 2.2.5 Sub-menu items...

Motherboard Installation Guide
Page 8
... description of the support CD that you need when installing and configuring the motherboard. Detailed descriptions of the BIOS parameters are not part of the motherboard and the new technology it supports. About this guide is organized This manual ... may include optional documentation, such as warranty flyers, that may have to the ASUS contact information. 2. ASUS websites The ASUS website provides updated information on the motherboard. • Chapter 2: BIOS setup This chapter tells how to the following parts: • Chapter 1: Product introduction This...
... description of the support CD that you need when installing and configuring the motherboard. Detailed descriptions of the BIOS parameters are not part of the motherboard and the new technology it supports. About this guide is organized This manual ... may include optional documentation, such as warranty flyers, that may have to the ASUS contact information. 2. ASUS websites The ASUS website provides updated information on the motherboard. • Chapter 2: BIOS setup This chapter tells how to the following parts: • Chapter 1: Product introduction This...

Motherboard Installation Guide
Page 16
... Serial Bus (USB) 2.0 specification, dramatically increasing the connection speed from a floppy disk. See page 2-3 for details. ASUS CrashFree BIOS 2 This feature allows you to buy a replacement ROM chip. See details on the rear panel. The S/PDIF technology turns your system with... customizable boot logos. See pages 1-25, 1-27 and 1-31 for details. 1.3.2 Innovative ASUS features ASUS EZ Flash BIOS With the ASUS EZ Flash, you to personalize and add style to a fast 480 Mbps on USB 2.0. USB 2.0 is backward compatible with USB ...
... Serial Bus (USB) 2.0 specification, dramatically increasing the connection speed from a floppy disk. See page 2-3 for details. ASUS CrashFree BIOS 2 This feature allows you to buy a replacement ROM chip. See details on the rear panel. The S/PDIF technology turns your system with... customizable boot logos. See pages 1-25, 1-27 and 1-31 for details. 1.3.2 Innovative ASUS features ASUS EZ Flash BIOS With the ASUS EZ Flash, you to personalize and add style to a fast 480 Mbps on USB 2.0. USB 2.0 is backward compatible with USB ...
Motherboard Installation Guide
Page 22
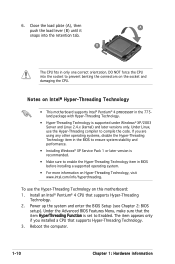
...Install an Intel® Pentium® 4 CPU that supports Hyper-Threading Technology. 3. Power up the system and enter the BIOS Setup (see Chapter 2: BIOS setup). To use the Hyper-Threading compiler to prevent benting the connectors on Hyper-Threading Technology, visit www.intel.com/info/... Installing Windows® XP Service Pack 1 or later version is recommended. • Make sure to Enabled. B The CPU fits in BIOS before installing a supported operating system. • For more information on the socket and damaging the CPU. If you installed a CPU that supports ...
...Install an Intel® Pentium® 4 CPU that supports Hyper-Threading Technology. 3. Power up the system and enter the BIOS Setup (see Chapter 2: BIOS setup). To use the Hyper-Threading compiler to prevent benting the connectors on Hyper-Threading Technology, visit www.intel.com/info/... Installing Windows® XP Service Pack 1 or later version is recommended. • Make sure to Enabled. B The CPU fits in BIOS before installing a supported operating system. • For more information on the socket and damaging the CPU. If you installed a CPU that supports ...
Motherboard Installation Guide
Page 32
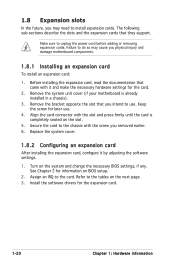
...settings. 1. Align the card connector with the screw you may cause you intend to the tables on the system and change the necessary BIOS settings, if any. Assign an IRQ to unplug the power cord before adding or removing expansion cards. Failure to do so may ... screw for information on the slot. 5. See Chapter 2 for later use . Remove the system unit cover (if your motherboard is completely seated on BIOS setup. 2. Remove the bracket opposite the slot that they support. Replace the system cover. 1.8.2 Configuring an expansion card After installing the expansion card, con...
...settings. 1. Align the card connector with the screw you may cause you intend to the tables on the system and change the necessary BIOS settings, if any. Assign an IRQ to unplug the power cord before adding or removing expansion cards. Failure to do so may ... screw for information on the slot. 5. See Chapter 2 for later use . Remove the system unit cover (if your motherboard is completely seated on BIOS setup. 2. Remove the bracket opposite the slot that they support. Replace the system cover. 1.8.2 Configuring an expansion card After installing the expansion card, con...

Motherboard Installation Guide
Page 36
Keep the cap on CLRTC jumper default position. Top:Line In Center:Line Out Below:Mic In P5VDC-X R P5VDC-X Clear RTC RAM CLRTC 12 23 Normal (Default) Clear CMOS You do not need to clear the RTC when the system hangs due to clear ... Time Clock (RTC) RAM in CMOS, which include system setup information such as system passwords. Shut down the key during the boot process and enter BIOS setup to default values. 1-24 Chapter 1: Hardware information Clear RTC RAM (CLRTC) This jumper allows you to overclocking. Remove the onboard battery. 3. Except when clearing...
Keep the cap on CLRTC jumper default position. Top:Line In Center:Line Out Below:Mic In P5VDC-X R P5VDC-X Clear RTC RAM CLRTC 12 23 Normal (Default) Clear CMOS You do not need to clear the RTC when the system hangs due to clear ... Time Clock (RTC) RAM in CMOS, which include system setup information such as system passwords. Shut down the key during the boot process and enter BIOS setup to default values. 1-24 Chapter 1: Hardware information Clear RTC RAM (CLRTC) This jumper allows you to overclocking. Remove the onboard battery. 3. Except when clearing...

Motherboard Installation Guide
Page 45
... • Reset button (Blue 2-pin RESET) This 2-pin connector is color-coded for the system power button. ASUS P5VDC-X 1-33 PWR Ground Reset Ground R IDE_LED P5VDC-X System Panel Connector Reset PWRSW The sytem panel connector is for the chassis-mounted reset button for the HDD Activity ... system warning speaker. Top:Line In Center:Line Out Below:Mic In P5VDC-X PLED SPEAKER PLED+ PLED+5V Ground Ground Speaker PANEL IDE_LED+ IDE_LED- Pressing the power button turns the system on the BIOS settings. System panel connector (20-1 pin PANEL) This connector supports several...
... • Reset button (Blue 2-pin RESET) This 2-pin connector is color-coded for the system power button. ASUS P5VDC-X 1-33 PWR Ground Reset Ground R IDE_LED P5VDC-X System Panel Connector Reset PWRSW The sytem panel connector is for the chassis-mounted reset button for the HDD Activity ... system warning speaker. Top:Line In Center:Line Out Below:Mic In P5VDC-X PLED SPEAKER PLED+ PLED+5V Ground Ground Speaker PANEL IDE_LED+ IDE_LED- Pressing the power button turns the system on the BIOS settings. System panel connector (20-1 pin PANEL) This connector supports several...
Motherboard Installation Guide
Page 47
This chapter tells how to change the system settings through the BIOS Setup menus. Detailed descriptions of the BIOS parameters are also provided. 2 BIOS setup ASUS P5VDC-X 2-1
This chapter tells how to change the system settings through the BIOS Setup menus. Detailed descriptions of the BIOS parameters are also provided. 2 BIOS setup ASUS P5VDC-X 2-1
Motherboard Installation Guide
Page 48
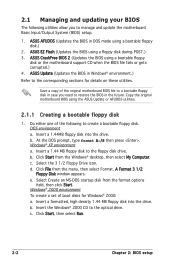
... the Windows® 2000 CD to the floppy disk drive. c. b. ASUS CrashFree BIOS 2 (Updates the BIOS using the ASUS Update or AFUDOS utilities. 2.1.1 Creating a bootable floppy disk 1. ASUS Update (Updates the BIOS in Windows® environment.) Refer to create a bootable floppy disk. Click... prompt, type format A:/S then press . A Format 3 1/2 Floppy Disk window appears. ASUS AFUDOS (Updates the BIOS in case you to restore the BIOS in the future. Do either one of the original motherboard BIOS file to a bootable floppy disk in DOS mode using a floppy...
... the Windows® 2000 CD to the floppy disk drive. c. b. ASUS CrashFree BIOS 2 (Updates the BIOS using the ASUS Update or AFUDOS utilities. 2.1.1 Creating a bootable floppy disk 1. ASUS Update (Updates the BIOS in Windows® environment.) Refer to create a bootable floppy disk. Click... prompt, type format A:/S then press . A Format 3 1/2 Floppy Disk window appears. ASUS AFUDOS (Updates the BIOS in case you to restore the BIOS in the future. Do either one of the original motherboard BIOS file to a bootable floppy disk in DOS mode using a floppy...
Motherboard Installation Guide
Page 49
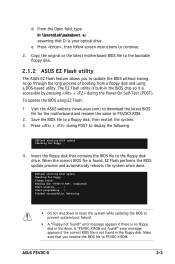
... Checking for floppy... Floppy found !" Completed. Make sure that you to update the BIOS without having to P5VDC-X.ROM. ASUS P5VDC-X 2-3 From the Open field, type D:\bootdisk\makeboot a: assuming that contains the BIOS file to P5VDCX.ROM. 2. Press , then follow screen instructions to a floppy disk, then restart the system. 3. error message...
... Checking for floppy... Floppy found !" Completed. Make sure that you to update the BIOS without having to P5VDC-X.ROM. ASUS P5VDC-X 2-3 From the Open field, type D:\bootdisk\makeboot a: assuming that contains the BIOS file to P5VDCX.ROM. 2. Press , then follow screen instructions to a floppy disk, then restart the system. 3. error message...

Motherboard Installation Guide
Page 50
... environment using the AFUDOS utility: • Make sure that you created earlier. 2. Reading flash ..... This utility also allows you to update the BIOS file in DOS mode, then at least 600 KB free space to the bootable floppy disk you can use as shown. 1. 2.1.3 AFUDOS... utility The AFUDOS utility allows you to copy the current BIOS file that the floppy disk is not write-protected and has at the prompt type: afudos /o[filename] where the [filename...
... environment using the AFUDOS utility: • Make sure that you created earlier. 2. Reading flash ..... This utility also allows you to update the BIOS file in DOS mode, then at least 600 KB free space to the bootable floppy disk you can use as shown. 1. 2.1.3 AFUDOS... utility The AFUDOS utility allows you to copy the current BIOS file that the floppy disk is not write-protected and has at the prompt type: afudos /o[filename] where the [filename...
Motherboard Installation Guide
Page 51
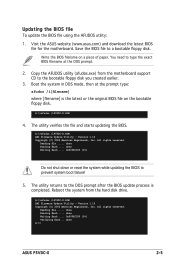
...0x0008CC00 (9%) Verifying flash .. done A:\> ASUS P5VDC-X 2-5 The utility verifies the file and starts updating the BIOS. A:\>afudos /iP5VDC-X.ROM AMI Firmware Update Utility - Reading file ..... Updating the BIOS file To update the BIOS file using the AFUDOS utility: 1. ... Megatrends, Inc. Reading file ..... Visit the ASUS website (www.asus.com) and download the latest BIOS file for the motherboard. Save the BIOS file to prevent system boot failure! 5. Write the BIOS filename on the bootable floppy disk. ...
...0x0008CC00 (9%) Verifying flash .. done A:\> ASUS P5VDC-X 2-5 The utility verifies the file and starts updating the BIOS. A:\>afudos /iP5VDC-X.ROM AMI Firmware Update Utility - Reading file ..... Updating the BIOS file To update the BIOS file using the AFUDOS utility: 1. ... Megatrends, Inc. Reading file ..... Visit the ASUS website (www.asus.com) and download the latest BIOS file for the motherboard. Save the BIOS file to prevent system boot failure! 5. Write the BIOS filename on the bootable floppy disk. ...

Motherboard Installation Guide
Page 52
.... DO NOT shut down or reset the system while updating the BIOS! 2.1.4 ASUS CrashFree BIOS 2 utility The ASUS CrashFree BIOS 2 is an auto recovery tool that you to P5VDC-X.ROM. Completed. You can cause system boot failure! 4. Starting BIOS recovery... Doing so can update a corrupted BIOS file using the motherboard support CD or the floppy disk...
.... DO NOT shut down or reset the system while updating the BIOS! 2.1.4 ASUS CrashFree BIOS 2 utility The ASUS CrashFree BIOS 2 is an auto recovery tool that you to P5VDC-X.ROM. Completed. You can cause system boot failure! 4. Starting BIOS recovery... Doing so can update a corrupted BIOS file using the motherboard support CD or the floppy disk...

Motherboard Installation Guide
Page 53
...;le. Checking for floppy... ASUS P5VDC-X 2-7 Insert the support CD to download the latest BIOS file. Bad BIOS checksum. Reading file "P5VDC-X.ROM". Starting BIOS recovery... Checking for this motherboard. DO NOT shut down or reset the system while updating the BIOS! The recovered BIOS may not be the latest BIOS version for floppy... The...
...;le. Checking for floppy... ASUS P5VDC-X 2-7 Insert the support CD to download the latest BIOS file. Bad BIOS checksum. Reading file "P5VDC-X.ROM". Starting BIOS recovery... Checking for this motherboard. DO NOT shut down or reset the system while updating the BIOS! The recovered BIOS may not be the latest BIOS version for floppy... The...
Motherboard Installation Guide
Page 54
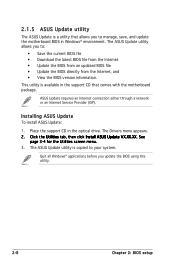
... and update the motherboard BIOS in Windows® environment. ASUS Update requires an Internet connection either through a network or an Internet Service Provider (ISP). Quit all Windows® applications before you to: • Save the current BIOS file • Download the latest BIOS file from the Internet ... CD that allows you to your system. Click the Utilities tab, then click Install ASUS Update VX.XX.XX. The ASUS Update utility allows you update the BIOS using this utility. 2-8 Chapter 2: BIOS setup This utility is available in the optical drive. See page 3-4 for the Utilities...
... and update the motherboard BIOS in Windows® environment. ASUS Update requires an Internet connection either through a network or an Internet Service Provider (ISP). Quit all Windows® applications before you to: • Save the current BIOS file • Download the latest BIOS file from the Internet ... CD that allows you to your system. Click the Utilities tab, then click Install ASUS Update VX.XX.XX. The ASUS Update utility allows you update the BIOS using this utility. 2-8 Chapter 2: BIOS setup This utility is available in the optical drive. See page 3-4 for the Utilities...
Motherboard Installation Guide
Page 55
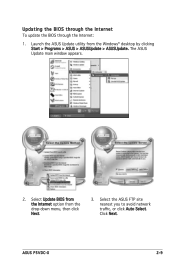
Select Update BIOS from the Internet option from the Windows® desktop by clicking Start > Programs > ASUS > ASUSUpdate > ASUSUpdate. Launch the ASUS Update utility from the drop-down menu, then click Next. 3. The ASUS Update main window appears. 2. Select the ASUS FTP site nearest you to avoid network traffic, or click Auto Select. Updating the BIOS through the Internet To update the BIOS through the Internet: 1. Click Next. ASUS P5VDC-X 2-9
Select Update BIOS from the Internet option from the Windows® desktop by clicking Start > Programs > ASUS > ASUSUpdate > ASUSUpdate. Launch the ASUS Update utility from the drop-down menu, then click Next. 3. The ASUS Update main window appears. 2. Select the ASUS FTP site nearest you to avoid network traffic, or click Auto Select. Updating the BIOS through the Internet To update the BIOS through the Internet: 1. Click Next. ASUS P5VDC-X 2-9

Motherboard Installation Guide
Page 56
...® desktop by clicking Start > Programs > ASUS > ASUSUpdate > ASUSUpdate. 4. The ASUS Update utility is capable of updating itself through a BIOS file: 1. Updating the BIOS through a BIOS file To update the BIOS through the Internet. Launch the ASUS Update utility from the drop-down menu, then click Next. 3. Locate the BIOS file from the Open window, then...
...® desktop by clicking Start > Programs > ASUS > ASUSUpdate > ASUSUpdate. 4. The ASUS Update utility is capable of updating itself through a BIOS file: 1. Updating the BIOS through a BIOS file To update the BIOS through the Internet. Launch the ASUS Update utility from the drop-down menu, then click Next. 3. Locate the BIOS file from the Open window, then...

Motherboard Installation Guide
Page 57
... so that the computer can recognize these changes and record them in the CMOS RAM of your screen. • Visit the ASUS website (www.asus.com) to download the latest BIOS file for this motherboard. For example, you are installing a motherboard, reconfiguring your system, or prompted to ..., you are for reference purposes only, and may not exactly match what you wish to enter Setup after changing any BIOS settings, load the default settings to "Run Setup". ASUS P5VDC-X 2-11 The Setup program is designed to run this last option only if the first two failed. If ...
... so that the computer can recognize these changes and record them in the CMOS RAM of your screen. • Visit the ASUS website (www.asus.com) to download the latest BIOS file for this motherboard. For example, you are installing a motherboard, reconfiguring your system, or prompted to ..., you are for reference purposes only, and may not exactly match what you wish to enter Setup after changing any BIOS settings, load the default settings to "Run Setup". ASUS P5VDC-X 2-11 The Setup program is designed to run this last option only if the first two failed. If ...

Motherboard Installation Guide
Page 58
...the desired item is highlighted. 2.2.3 Navigation keys At the bottom right corner of the navigation keys differ from one screen to another. 2-12 Chapter 2: BIOS setup Use the navigation keys to select items in ] :[ST320413A] :[Not Detected] :[Not Detected] :[Not Detected] :[Not Detected] :[Not Detected]... Some of a menu screen are the navigation keys for that particular menu. Use [+] or [-] to select a field. 2.2.1 BIOS menu screen Menu items Menu bar Configuration fields General help System Time System Date Legacy Diskette A Primary IDE Master Primary IDE Slave Secondary IDE...
...the desired item is highlighted. 2.2.3 Navigation keys At the bottom right corner of the navigation keys differ from one screen to another. 2-12 Chapter 2: BIOS setup Use the navigation keys to select items in ] :[ST320413A] :[Not Detected] :[Not Detected] :[Not Detected] :[Not Detected] :[Not Detected]... Some of a menu screen are the navigation keys for that particular menu. Use [+] or [-] to select a field. 2.2.1 BIOS menu screen Menu items Menu bar Configuration fields General help System Time System Date Legacy Diskette A Primary IDE Master Primary IDE Slave Secondary IDE...

Motherboard Installation Guide
Page 60
... Slave Secondary IDE Master Secondary IDE Slave Third IDE Master Fourth IDE Master System Information [11:51:19] [Thu 3/21/2006] [1.44M, 3.5 in .] 2-14 Chapter 2: BIOS setup Refer to section "2.2.1 BIOS menu screen" for information on the menu screen items and how to navigate through them. 2.3 Main menu When you enter the...
... Slave Secondary IDE Master Secondary IDE Slave Third IDE Master Fourth IDE Master System Information [11:51:19] [Thu 3/21/2006] [1.44M, 3.5 in .] 2-14 Chapter 2: BIOS setup Refer to section "2.2.1 BIOS menu screen" for information on the menu screen items and how to navigate through them. 2.3 Main menu When you enter the...


