Motherboard Installation Guide
Page 14
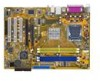
...® 4 processor with a 775-pin surface mount Land Grid Array (LGA) socket designed for the following items. Motherboard ASUS P5VDC-X motherboard Cables 1 x Serial ATA cable 1 x Serial ATA power cable 1 x Ultra DMA 133/100/66 cable 1 x Floppy disk drive cable Accessories I/O shield Application CD ASUS motherboard support CD Documentation User guide If any of ASUS quality motherboards! The motherboard delivers a host of new features and latest technologies, making it , check the items in your package with the list below...
...® 4 processor with a 775-pin surface mount Land Grid Array (LGA) socket designed for the following items. Motherboard ASUS P5VDC-X motherboard Cables 1 x Serial ATA cable 1 x Serial ATA power cable 1 x Ultra DMA 133/100/66 cable 1 x Floppy disk drive cable Accessories I/O shield Application CD ASUS motherboard support CD Documentation User guide If any of ASUS quality motherboards! The motherboard delivers a host of new features and latest technologies, making it , check the items in your package with the list below...

Motherboard Installation Guide
Page 16
... computer into the audio I/O jacks. The S/PDIF technology turns your system with customizable boot logos. USB 2.0 technology The motherboard implements the Universal Serial Bus (USB) 2.0 specification, dramatically increasing the connection speed from a floppy disk. ASUS CrashFree BIOS 2 This feature allows you to restore the original BIOS data from the support CD in the motherboard allows you can easily update the system BIOS even before loading the operating system...
... computer into the audio I/O jacks. The S/PDIF technology turns your system with customizable boot logos. USB 2.0 technology The motherboard implements the Universal Serial Bus (USB) 2.0 specification, dramatically increasing the connection speed from a floppy disk. ASUS CrashFree BIOS 2 This feature allows you to restore the original BIOS data from the support CD in the motherboard allows you can easily update the system BIOS even before loading the operating system...
Motherboard Installation Guide
Page 32
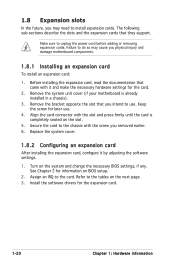
... cover (if your motherboard is completely seated on BIOS setup. 2. Remove the bracket opposite the slot that you intend to the tables on the system and change the necessary BIOS settings, if any. Refer to use . 4. Before installing the expansion card, read the documentation that they support. Turn on the next page. 3. Failure to do so may need to the chassis with the screw you...
... cover (if your motherboard is completely seated on BIOS setup. 2. Remove the bracket opposite the slot that you intend to the tables on the system and change the necessary BIOS settings, if any. Refer to use . 4. Before installing the expansion card, read the documentation that they support. Turn on the next page. 3. Failure to do so may need to the chassis with the screw you...
Motherboard Installation Guide
Page 34
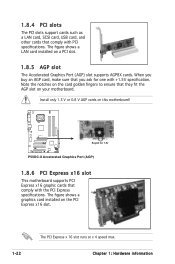
... PCI slots support cards such as a LAN card, SCSI card, USB card, and other cards that they fit the AGP slot on your motherboard. Chapter 1: Hardware information The figure shows a graphics card installed on this motherboard! Install only 1.5 V or 0.8 V AGP cards on the PCI Express x16 slot. 1-22 The PCI Express x 16 slot runs at x 4 speed max. Note the notches on a PCI slot. 1.8.5 AGP slot The Accelerated Graphics Port (AGP) slot supports AGP8X cards. Top:Line In Center:Line Out Below:Mic In P5VDC-X R Keyed...
... PCI slots support cards such as a LAN card, SCSI card, USB card, and other cards that they fit the AGP slot on your motherboard. Chapter 1: Hardware information The figure shows a graphics card installed on this motherboard! Install only 1.5 V or 0.8 V AGP cards on the PCI Express x16 slot. 1-22 The PCI Express x 16 slot runs at x 4 speed max. Note the notches on a PCI slot. 1.8.5 AGP slot The Accelerated Graphics Port (AGP) slot supports AGP8X cards. Top:Line In Center:Line Out Below:Mic In P5VDC-X R Keyed...
Motherboard Installation Guide
Page 41
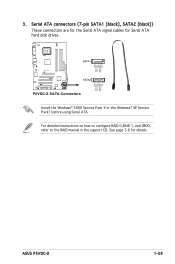
... Serial ATA hard disk drives. GND RSATA_TXP1 RSATA_TXN1 GND RSATA_RXP1 RSATA_RXN1 GND Top:Line In Center:Line Out Below:Mic In P5VDC-X R SATA1 SATA2 GND RSATA_RXN2 RSATA_RXP2 GND RSATA_TXN2 RSATA_TXN2 GND P5VDC-X SATA Connectors Install the Windows® 2000 Service Pack 4 or the Windows® XP Service Pack1 before using Serial ATA. Serial ATA connectors (7-pin SATA1 [black], SATA2 [black]) These connectors are for the Serial ATA signal cables for details. 3. ASUS P5VDC...
... Serial ATA hard disk drives. GND RSATA_TXP1 RSATA_TXN1 GND RSATA_RXP1 RSATA_RXN1 GND Top:Line In Center:Line Out Below:Mic In P5VDC-X R SATA1 SATA2 GND RSATA_RXN2 RSATA_RXP2 GND RSATA_TXN2 RSATA_TXN2 GND P5VDC-X SATA Connectors Install the Windows® 2000 Service Pack 4 or the Windows® XP Service Pack1 before using Serial ATA. Serial ATA connectors (7-pin SATA1 [black], SATA2 [black]) These connectors are for the Serial ATA signal cables for details. 3. ASUS P5VDC...
Motherboard Installation Guide
Page 48
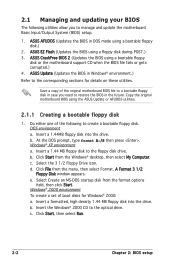
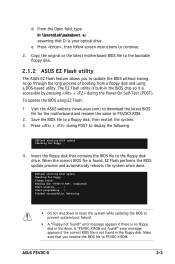
... create a set of the original motherboard BIOS file to a bootable floppy disk in case you to restore the BIOS in the future. A Format 3 1/2 Floppy Disk window appears. Click Start, then select Run. 2-2 Chapter 2: BIOS setup Save a copy of boot disks for details on these utilities. ASUS EZ Flash (Updates the BIOS using the ASUS Update or AFUDOS utilities. 2.1.1 Creating a bootable floppy disk 1. Click Start from the Windows® desktop, then select My Computer. d. ASUS CrashFree BIOS 2 (Updates the BIOS using a bootable...
... create a set of the original motherboard BIOS file to a bootable floppy disk in case you to restore the BIOS in the future. A Format 3 1/2 Floppy Disk window appears. Click Start, then select Run. 2-2 Chapter 2: BIOS setup Save a copy of boot disks for details on these utilities. ASUS EZ Flash (Updates the BIOS using the ASUS Update or AFUDOS utilities. 2.1.1 Creating a bootable floppy disk 1. Click Start from the Windows® desktop, then select My Computer. d. ASUS CrashFree BIOS 2 (Updates the BIOS using a bootable...
Motherboard Installation Guide
Page 49
... download the latest BIOS file for floppy... Press + during the Power-On Self-Test (POST). Reading file "P5VDC-X.ROM". d. Insert the floppy disk that D: is accessible by pressing + during POST to prevent system boot failure! • A "Floppy not found ! EZFlash starting BIOS update Checking for floppy... 4. Start erasing.......| Start programming...| Flashed successfully. Rebooting. • Do not shutdown or reset the system while updating the BIOS to display...
... download the latest BIOS file for floppy... Press + during the Power-On Self-Test (POST). Reading file "P5VDC-X.ROM". d. Insert the floppy disk that D: is accessible by pressing + during POST to prevent system boot failure! • A "Floppy not found ! EZFlash starting BIOS update Checking for floppy... 4. Start erasing.......| Start programming...| Flashed successfully. Rebooting. • Do not shutdown or reset the system while updating the BIOS to display...
Motherboard Installation Guide
Page 54
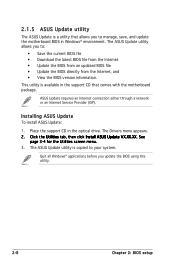
... BIOS file from the Internet • Update the BIOS from an updated BIOS file • Update the BIOS directly from the Internet, and • View the BIOS version information. The Drivers menu appears. 2. See page 3-4 for the Utilities screen menu. 3. Installing ASUS Update To install ASUS Update: 1. Quit all Windows® applications before you to your system. ASUS Update requires an Internet connection either through a network or an Internet Service Provider (ISP). The ASUS Update utility allows you update the BIOS using this utility. 2-8 Chapter 2: BIOS setup...
... BIOS file from the Internet • Update the BIOS from an updated BIOS file • Update the BIOS directly from the Internet, and • View the BIOS version information. The Drivers menu appears. 2. See page 3-4 for the Utilities screen menu. 3. Installing ASUS Update To install ASUS Update: 1. Quit all Windows® applications before you to your system. ASUS Update requires an Internet connection either through a network or an Internet Service Provider (ISP). The ASUS Update utility allows you update the BIOS using this utility. 2-8 Chapter 2: BIOS setup...
Motherboard Installation Guide
Page 59
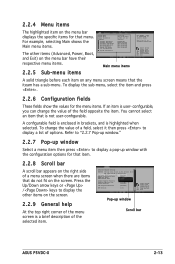
... system to display a list of the field opposite the item. Press the Up/Down arrow keys or / keys to display the other items (Advanced, Power, Boot, and Exit) on any menu screen means that menu. Configure DRAM Timing by SPD Memory Acceleration Mode DRAM Idle Timer DRAm Refresh Rate [Enabled] [Auto] [Auto] [Auto] Graphic Adapter Priority Graphics Aperture Size Spread Spectrum [AGP/PCI] [ 64 MB] [Enabled] ICH Delayed Transaction [Enabled] MPS Revision [1.4] Select Screen Select Item...
... system to display a list of the field opposite the item. Press the Up/Down arrow keys or / keys to display the other items (Advanced, Power, Boot, and Exit) on any menu screen means that menu. Configure DRAM Timing by SPD Memory Acceleration Mode DRAM Idle Timer DRAm Refresh Rate [Enabled] [Auto] [Auto] [Auto] Graphic Adapter Priority Graphics Aperture Size Spread Spectrum [AGP/PCI] [ 64 MB] [Enabled] ICH Delayed Transaction [Enabled] MPS Revision [1.4] Select Screen Select Item...
Motherboard Installation Guide
Page 61
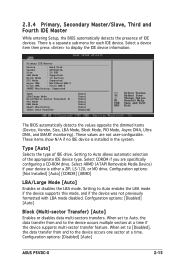
...options: [Disabled] [Auto] ASUS P5VDC-X 2-15 Setting to the device occurs one sector at a time if the device supports multi-sector transfer feature. Setting to display the IDE device information. Configuration options: [Disabled] [Auto] Block (Multi-sector Transfer) [Auto] Enables or disables data multi-sectors transfers. Primary IDE Master Device : Hard Disk Vendor : ST320413A Size : 20.0GB LBA Mode : Supported Block Mode : 16 Sectors PIO Mode : Supported Async DMA : MultiWord DMA-2 Ultra DMA : Ultra DMA-5 SMART Monitoring: Supported Type LBA/Large Mode...
...options: [Disabled] [Auto] ASUS P5VDC-X 2-15 Setting to the device occurs one sector at a time if the device supports multi-sector transfer feature. Setting to display the IDE device information. Configuration options: [Disabled] [Auto] Block (Multi-sector Transfer) [Auto] Enables or disables data multi-sectors transfers. Primary IDE Master Device : Hard Disk Vendor : ST320413A Size : 20.0GB LBA Mode : Supported Block Mode : 16 Sectors PIO Mode : Supported Async DMA : MultiWord DMA-2 Ultra DMA : Ultra DMA-5 SMART Monitoring: Supported Type LBA/Large Mode...
Motherboard Installation Guide
Page 62
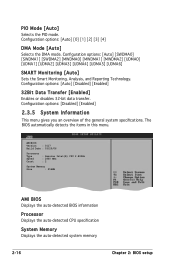
...] [UDMA2] [UDMA3] [UDMA4] [UDMA5] [UDMA6] SMART Monitoring [Auto] Sets the Smart Monitoring, Analysis, and Reporting Technology. AMIBIOS Version : 0117 Build Date : 03/20/06 Processor Type : Genuine Intel(R) CPU 2.80GHz Speed : 2800 MHz Count : 2 System Memory Size : 256MB AMI BIOS Displays the auto-detected BIOS information Processor Displays the auto-detected CPU specification System Memory Displays the auto-detected system memory 2-16 Chapter 2: BIOS setup Configuration options: [Disabled] [Enabled] 2.3.5 System Information This menu gives you an overview of...
...] [UDMA2] [UDMA3] [UDMA4] [UDMA5] [UDMA6] SMART Monitoring [Auto] Sets the Smart Monitoring, Analysis, and Reporting Technology. AMIBIOS Version : 0117 Build Date : 03/20/06 Processor Type : Genuine Intel(R) CPU 2.80GHz Speed : 2800 MHz Count : 2 System Memory Size : 256MB AMI BIOS Displays the auto-detected BIOS information Processor Displays the auto-detected CPU specification System Memory Displays the auto-detected system memory 2-16 Chapter 2: BIOS setup Configuration options: [Disabled] [Enabled] 2.3.5 System Information This menu gives you an overview of...
Motherboard Installation Guide
Page 65
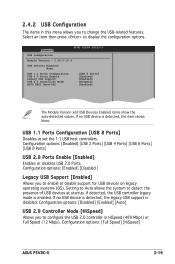
...24.0-10.4 USB Devices Enabled: None USB 1.1 Ports Configuration USB 2.0 Ports Enable Legacy USB Support USB 2.0 Controller Mode BIOS EHCI Hand-Off [USB 8 Ports] [Enabled] [Enabled] [HiSpeed] [Enabled] The Module Version and USB Devices Enabled items show the auto-detected values. USB 1.1 Ports Configuration [USB 8 Ports] Disables or set the 1.1 USB host controllers. If no USB device is detected, the legacy USB support is detected, the item shows None. If detected, the USB controller legacy mode is enabled. Configuration options: [Full Speed] [HiSpeed] ASUS P5VDC...
...24.0-10.4 USB Devices Enabled: None USB 1.1 Ports Configuration USB 2.0 Ports Enable Legacy USB Support USB 2.0 Controller Mode BIOS EHCI Hand-Off [USB 8 Ports] [Enabled] [Enabled] [HiSpeed] [Enabled] The Module Version and USB Devices Enabled items show the auto-detected values. USB 1.1 Ports Configuration [USB 8 Ports] Disables or set the 1.1 USB host controllers. If no USB device is detected, the legacy USB support is detected, the item shows None. If detected, the USB controller legacy mode is enabled. Configuration options: [Full Speed] [HiSpeed] ASUS P5VDC...
Motherboard Installation Guide
Page 67
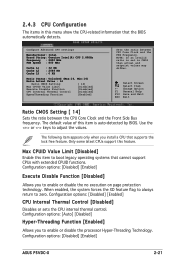
...(R) CPU 2.80GHz Frequency : 2800 MHz FSB Speed : 800 MHz Cache L1 Cache L2 Cache L3 : 32 KB : 2048 KB : 0 KB Ratio Status: Unlocked (Max:14, Min:14) Ratio Actual Value : 14 Ratio CMOS Setting: [ 14] Max CPUID Value Limit [Disabled] Execute Disable Function [Disabled] CPU Internal Thermal Control [Disabled] HyperThreading Function [Enabled] Sets the ratio between the CPU Core Clock and the Front Side Bus frequency. The default value of this feature. Use...
...(R) CPU 2.80GHz Frequency : 2800 MHz FSB Speed : 800 MHz Cache L1 Cache L2 Cache L3 : 32 KB : 2048 KB : 0 KB Ratio Status: Unlocked (Max:14, Min:14) Ratio Actual Value : 14 Ratio CMOS Setting: [ 14] Max CPUID Value Limit [Disabled] Execute Disable Function [Disabled] CPU Internal Thermal Control [Disabled] HyperThreading Function [Enabled] Sets the ratio between the CPU Core Clock and the Front Side Bus frequency. The default value of this feature. Use...
Motherboard Installation Guide
Page 72
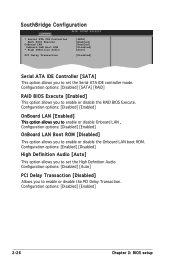
...64257;guration options: [Disabled] [SATA] [RAID] RAID BIOS Execute [Enabled] This option allows you to enable or disable Onboard LAN . SouthBridge Configuration * Serial ATA IDE Controller RAID BIOS Execute OnBoard LAN OnBoard LAN Boot ROM * High Definition Audio PCI Delay Transaction [SATA] [Enabled] [Enabled] [Disabled] [Auto] [Disabled] Serial ATA IDE Controller [SATA] This option allows you to set the High Definition Audio. Configuration options: [Disabled] [Enabled] OnBoard LAN [Enabled] This option allows you to enable or disable the Onboard LAN boot ROM. Con...
...64257;guration options: [Disabled] [SATA] [RAID] RAID BIOS Execute [Enabled] This option allows you to enable or disable Onboard LAN . SouthBridge Configuration * Serial ATA IDE Controller RAID BIOS Execute OnBoard LAN OnBoard LAN Boot ROM * High Definition Audio PCI Delay Transaction [SATA] [Enabled] [Enabled] [Disabled] [Auto] [Disabled] Serial ATA IDE Controller [SATA] This option allows you to set the High Definition Audio. Configuration options: [Disabled] [Enabled] OnBoard LAN [Enabled] This option allows you to enable or disable the Onboard LAN boot ROM. Con...
Motherboard Installation Guide
Page 75
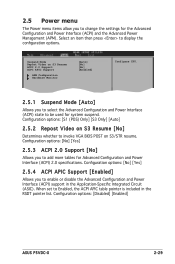
... invoke VGA BIOS POST on S3 Resume ACPI 2.0 Support ACPI APIC Support APM Configuration Hardware Monitor [Auto] [No] [No] [Enabled] Configure CPU. 2.5.1 Suspend Mode [Auto] Select Screen Select Item Enter Go to Sub-screen F1 General Help F10 Save and Exit ESC Exit Allows you to enable or disable the Advanced Configuration and Power Interface (ACPI) support in the RSDT pointer list. Configuration options: [No] [Yes] 2.5.4 ACPI APIC Support [Enabled] Allows...
... invoke VGA BIOS POST on S3 Resume ACPI 2.0 Support ACPI APIC Support APM Configuration Hardware Monitor [Auto] [No] [No] [Enabled] Configure CPU. 2.5.1 Suspend Mode [Auto] Select Screen Select Item Enter Go to Sub-screen F1 General Help F10 Save and Exit ESC Exit Allows you to enable or disable the Advanced Configuration and Power Interface (ACPI) support in the RSDT pointer list. Configuration options: [No] [Yes] 2.5.4 ACPI APIC Support [Enabled] Allows...
Motherboard Installation Guide
Page 76
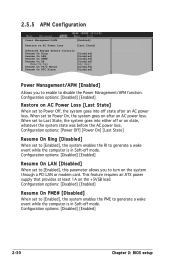
... system through a PCI LAN or modem card. When set to Power On, the system goes on after an AC power loss. Advanced Resume Events Controls Resume On Ring [Disabled] Resume On LAN [Disabled] Resume On PME# [Disabled] Resume On KB [Disabled] Wake-Up Key [Any Key] Resume On PS/2 Mouse [Disabled] Resume On RTC Alarm [Disabled] Power Management/APM [Enabled] Select Screen Select Item Enter Go to Sub-screen F1 General Help...
... system through a PCI LAN or modem card. When set to Power On, the system goes on after an AC power loss. Advanced Resume Events Controls Resume On Ring [Disabled] Resume On LAN [Disabled] Resume On PME# [Disabled] Resume On KB [Disabled] Wake-Up Key [Any Key] Resume On PS/2 Mouse [Disabled] Resume On RTC Alarm [Disabled] Power Management/APM [Enabled] Select Screen Select Item Enter Go to Sub-screen F1 General Help...
Motherboard Installation Guide
Page 81
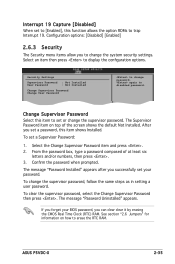
To set your BIOS password, you can clear clear it by erasing the CMOS Real Time Clock (RTC) RAM. The message "Password Installed" appears after you forget your password. See section "2.6 Jumpers" for information on top of at least six letters and/or numbers, then press . 3. ASUS P5VDC-X 2-35 Select the Change Supervisor Password item and press . 2. If you successfully set a Supervisor Password: 1. Confirm the password when prompted...
To set your BIOS password, you can clear clear it by erasing the CMOS Real Time Clock (RTC) RAM. The message "Password Installed" appears after you forget your password. See section "2.6 Jumpers" for information on top of at least six letters and/or numbers, then press . 3. ASUS P5VDC-X 2-35 Select the Change Supervisor Password item and press . 2. If you successfully set a Supervisor Password: 1. Confirm the password when prompted...
Motherboard Installation Guide
Page 86
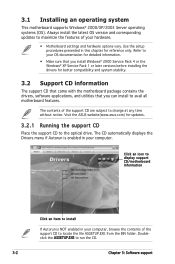
The contents of the support CD to run the CD. 3-2 Chapter 3: Software support The CD automatically displays the Drivers menu if Autorun is NOT enabled in your hardware. • Motherboard settings and hardware options vary. Visit the ASUS website(www.asus.com) for updates. 3.2.1 Running the support CD Place the support CD to change at any time without notice. Doubleclick the ASSETUP.EXE to locate the file...
The contents of the support CD to run the CD. 3-2 Chapter 3: Software support The CD automatically displays the Drivers menu if Autorun is NOT enabled in your hardware. • Motherboard settings and hardware options vary. Visit the ASUS website(www.asus.com) for updates. 3.2.1 Running the support CD Place the support CD to change at any time without notice. Doubleclick the ASSETUP.EXE to locate the file...
Motherboard Installation Guide
Page 88
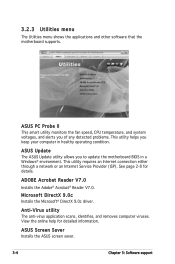
... This smart utility monitors the fan speed, CPU temperature, and system voltages, and alerts you of any detected problems. This utility helps you to update the motherboard BIOS in healthy operating condition. See page 2-8 for detailed information. Microsoft DirectX 9.0c Installs the Microsoft® DirectX 9.0c driver. ASUS Screen Saver Installs the ASUS screen saver. 3-4 Chapter 3: Software support View the online help for details. ASUS Update The ASUS Update utility allows you keep your computer in a Windows®...
... This smart utility monitors the fan speed, CPU temperature, and system voltages, and alerts you of any detected problems. This utility helps you to update the motherboard BIOS in healthy operating condition. See page 2-8 for detailed information. Microsoft DirectX 9.0c Installs the Microsoft® DirectX 9.0c driver. ASUS Screen Saver Installs the ASUS screen saver. 3-4 Chapter 3: Software support View the online help for details. ASUS Update The ASUS Update utility allows you keep your computer in a Windows®...
Motherboard Installation Guide
Page 90
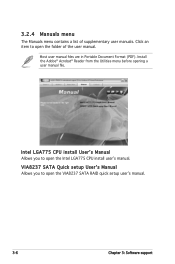
VIA8237 SATA Quick setup Userʼs Manual Allows you to open the Intel LGA775 CPU install userʼs manual. Intel LGA775 CPU install Userʼs Manual Allows you to open the VIA8237 SATA RAID quick setup userʼs manual. 3-6 Chapter 3: Software support Click an item to open the folder of supplementary user manuals. Install the Adobe® Acrobat® Reader from the Utilities menu before opening a user manual file. 3.2.4 Manuals menu The Manuals menu contains a list of the user manual. Most user manual files are in Portable Document Format (PDF).
VIA8237 SATA Quick setup Userʼs Manual Allows you to open the Intel LGA775 CPU install userʼs manual. Intel LGA775 CPU install Userʼs Manual Allows you to open the VIA8237 SATA RAID quick setup userʼs manual. 3-6 Chapter 3: Software support Click an item to open the folder of supplementary user manuals. Install the Adobe® Acrobat® Reader from the Utilities menu before opening a user manual file. 3.2.4 Manuals menu The Manuals menu contains a list of the user manual. Most user manual files are in Portable Document Format (PDF).


