
Motherboard Installation Guide
Page 43
P5VD1-X ® SATA1 SATA2 GND RSATA_TXP1 RSATA_TXN1 GND RSATA_RXP1 RSATA_RXN1 GND GND RSATA_TXP2 RSATA_TXN2 GND RSATA_RXP2 RSATA_RXN2 GND P5VD1-X SATA connectors • • 2-23
P5VD1-X ® SATA1 SATA2 GND RSATA_TXP1 RSATA_TXN1 GND RSATA_RXP1 RSATA_RXN1 GND GND RSATA_TXP2 RSATA_TXN2 GND RSATA_RXP2 RSATA_RXN2 GND P5VD1-X SATA connectors • • 2-23

Motherboard Installation Guide
Page 76
PCI Delay Transaction OnBoard SATA-IDE RAID BIOS Execute Onboard AC'97 [Disabled] [RAID] [Enabled] [Enabled] Options for DRAM Select Screen Select Item +- Change Option F1 General Help F10 Save and Exit ESC Exit 4-22
PCI Delay Transaction OnBoard SATA-IDE RAID BIOS Execute Onboard AC'97 [Disabled] [RAID] [Enabled] [Enabled] Options for DRAM Select Screen Select Item +- Change Option F1 General Help F10 Save and Exit ESC Exit 4-22

Motherboard Installation Guide
Page 100
RAID BIOS Ver 1.xx Auto Setup For Data Security Array Mode RAID 1 (Mirroring) Select Disk Drives Start Create Process Create a RAID array with the hard disks attached to VIA RAID controller F1 : View Array/Disk Status ↑,↓ : Move to next item Enter : Confirm the selection ESC : Exit Channel Drive Name Array Name Mode Size(GB) Status Serial_Ch0 Master XXXXXXXXXXX ARRAY 0 SATA 999.99 XXXXXXX Serial_Ch1 Master XXXXXXXXXXX ARRAY 0 SATA 999.99 XXXXXXX 5-10 VIA Tech.
RAID BIOS Ver 1.xx Auto Setup For Data Security Array Mode RAID 1 (Mirroring) Select Disk Drives Start Create Process Create a RAID array with the hard disks attached to VIA RAID controller F1 : View Array/Disk Status ↑,↓ : Move to next item Enter : Confirm the selection ESC : Exit Channel Drive Name Array Name Mode Size(GB) Status Serial_Ch0 Master XXXXXXXXXXX ARRAY 0 SATA 999.99 XXXXXXX Serial_Ch1 Master XXXXXXXXXXX ARRAY 0 SATA 999.99 XXXXXXX 5-10 VIA Tech.
P5VD1-X User's Manual for English Edition
Page 11
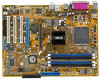
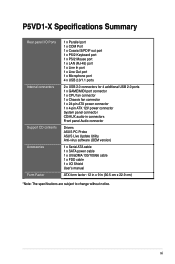
P5VD1-X Specifications Summary Rear panel I/O Ports Internal connectors Support CD contents Accessories Form Factor 1 x Parallel port 1 x COM Port 1 x Coaxial S/PDIF out port 1 x PS/2 Keyboard ... connector 1 x 4-pin ATX 12V power connector System panel connector CD/AUX audio-in connectors Front panel Audio connector Drivers ASUS PC Probe ASUS Live Update Utility Anti-virus software (OEM version) 1 x Serial ATA cable 1 x SATA power cable 1 x UltraDMA 133/100/66 cable 1 x FDD cable 1 x I/O Shield Userʼs manual ATX form factor: 12 in...
P5VD1-X Specifications Summary Rear panel I/O Ports Internal connectors Support CD contents Accessories Form Factor 1 x Parallel port 1 x COM Port 1 x Coaxial S/PDIF out port 1 x PS/2 Keyboard ... connector 1 x 4-pin ATX 12V power connector System panel connector CD/AUX audio-in connectors Front panel Audio connector Drivers ASUS PC Probe ASUS Live Update Utility Anti-virus software (OEM version) 1 x Serial ATA cable 1 x SATA power cable 1 x UltraDMA 133/100/66 cable 1 x FDD cable 1 x I/O Shield Userʼs manual ATX form factor: 12 in...
P5VD1-X User's Manual for English Edition
Page 16
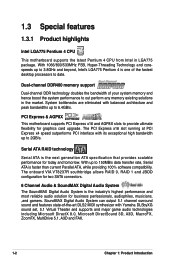
... to out perform any memory existing solutions in LGA775 package. The onboard VIA VT8237R southbridge allows RAID 0, RAID 1 and JBOD configuration for two SATA connectors. 6 Channel Audio & SoundMAX Digital Audio System The SoundMAX Digital Audio System is the next generation ATA specification that provides scalable performance for graphics card...
... to out perform any memory existing solutions in LGA775 package. The onboard VIA VT8237R southbridge allows RAID 0, RAID 1 and JBOD configuration for two SATA connectors. 6 Channel Audio & SoundMAX Digital Audio System The SoundMAX Digital Audio System is the next generation ATA specification that provides scalable performance for graphics card...
P5VD1-X User's Manual for English Edition
Page 43
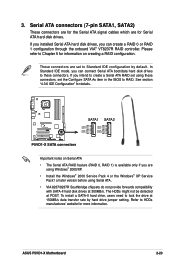
...• VIA 8237/8237R Southbridge chipsets do not provide forwards compatibility with SATA-II hard disk drives at POST. Refer to Standard IDE configuration by hard drive jumper setting. ASUS P5VD1-X Motherboard 2-23 These connectors are for Serial ATA hard disk drives. ...SATA1 SATA2 GND RSATA_TXP1 RSATA_TXN1 GND RSATA_RXP1 RSATA_RXN1 GND GND RSATA_TXP2 RSATA_TXN2 GND RSATA_RXP2 RSATA_RXN2 GND P5VD1-X SATA connectors Important notes on creating a RAID configuration. To install a SATA-II hard drive, users need to RAID. See section "4.3.6 IDE Configuration" for...
...• VIA 8237/8237R Southbridge chipsets do not provide forwards compatibility with SATA-II hard disk drives at POST. Refer to Standard IDE configuration by hard drive jumper setting. ASUS P5VD1-X Motherboard 2-23 These connectors are for Serial ATA hard disk drives. ...SATA1 SATA2 GND RSATA_TXP1 RSATA_TXN1 GND RSATA_RXP1 RSATA_RXN1 GND GND RSATA_TXP2 RSATA_TXN2 GND RSATA_RXP2 RSATA_RXN2 GND P5VD1-X SATA connectors Important notes on creating a RAID configuration. To install a SATA-II hard drive, users need to RAID. See section "4.3.6 IDE Configuration" for...
P5VD1-X User's Manual for English Edition
Page 45
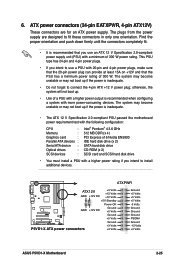
... : SCSI devices : Intel® Pentium® 4 3.6 GHz 512 MB DDR (x 4) PCI Express x16 Nvidia EN5900 IDE hard disk drive (x 2) SATA hard disk drive CD-ROM (x 2) SCSI card and SCSI hard disk drive • You must install a PSU with a higher power rating if you ...ATX12V GND +12V DC +3 Volts +12 Volts +12 Volts +5V Standby Power OK P5VD1-X GND +12V DC Ground +5 Volts ® Ground +5 Volts Ground P5VD1-X ATX power connectors +3 Volts +3 Volts Ground +5 Volts +5 Volts +5 Volts -5 Volts Ground Ground Ground PSON# Ground -12 Volts +3 Volts ASUS P5VD1-X Motherboard 2-25
... : SCSI devices : Intel® Pentium® 4 3.6 GHz 512 MB DDR (x 4) PCI Express x16 Nvidia EN5900 IDE hard disk drive (x 2) SATA hard disk drive CD-ROM (x 2) SCSI card and SCSI hard disk drive • You must install a PSU with a higher power rating if you ...ATX12V GND +12V DC +3 Volts +12 Volts +12 Volts +5V Standby Power OK P5VD1-X GND +12V DC Ground +5 Volts ® Ground +5 Volts Ground P5VD1-X ATX power connectors +3 Volts +3 Volts Ground +5 Volts +5 Volts +5 Volts -5 Volts Ground Ground Ground PSON# Ground -12 Volts +3 Volts ASUS P5VD1-X Motherboard 2-25

P5VD1-X User's Manual for English Edition
Page 76
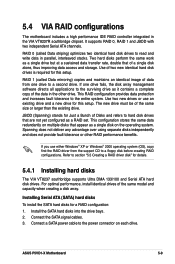
PCI Delay Transaction [Disabled] Configuration options: [Disabled] [Enabled] OnBoard SATA-IDE [RAID] Configuration options: [Disabled] [SATA] [RAID] RAID BIOS Execute [Enabled] Configuration options: [Disabled] [Enabled] OnBoard ACʼ97 Audio [Enabled] Confi...guration options: [Enabled] [Disabled] 4-22 Chapter 4: BIOS Setup SouthBridge VIA VT8237R Configuration PCI Delay Transaction OnBoard SATA-IDE RAID BIOS Execute Onboard AC'97 [Disabled] [RAID] [Enabled] [Enabled] Selet Enable Or Disable To Set PCI Delayed Transaction. ←...
PCI Delay Transaction [Disabled] Configuration options: [Disabled] [Enabled] OnBoard SATA-IDE [RAID] Configuration options: [Disabled] [SATA] [RAID] RAID BIOS Execute [Enabled] Configuration options: [Disabled] [Enabled] OnBoard ACʼ97 Audio [Enabled] Confi...guration options: [Enabled] [Disabled] 4-22 Chapter 4: BIOS Setup SouthBridge VIA VT8237R Configuration PCI Delay Transaction OnBoard SATA-IDE RAID BIOS Execute Onboard AC'97 [Disabled] [RAID] [Enabled] [Enabled] Selet Enable Or Disable To Set PCI Delayed Transaction. ←...
P5VD1-X User's Manual for English Edition
Page 99
.... Refer to a second drive. If you use an existing drive and a new drive for this setup. Install the SATA hard disks into the drive bays. 2. Connect the SATA signal cables. 3. RAID 0 (called Data mirroring) copies and maintains an identical image of two new identical hard disk... and does not provide fault tolerance or other drive. Installing Serial ATA (SATA) hard disks To install the SATA hard disks for Just a Bunch of Disks and refers to the surviving drive as a single disk on each drive. Connect a SATA power cable to the entire system. ASUS P5VD1-X Motherboard 5-9
.... Refer to a second drive. If you use an existing drive and a new drive for this setup. Install the SATA hard disks into the drive bays. 2. Connect the SATA signal cables. 3. RAID 0 (called Data mirroring) copies and maintains an identical image of two new identical hard disk... and does not provide fault tolerance or other drive. Installing Serial ATA (SATA) hard disks To install the SATA hard disks for Just a Bunch of Disks and refers to the surviving drive as a single disk on each drive. Connect a SATA power cable to the entire system. ASUS P5VD1-X Motherboard 5-9

P5VD1-X User's Manual for English Edition
Page 100
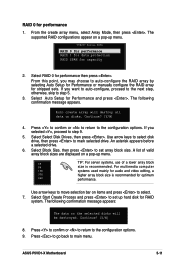
...64257;rm the selection ESC : Exit Channel Drive Name Array Name Mode Size(GB) Status Serial_Ch0 Master XXXXXXXXXXX ARRAY 0 SATA 999.99 XXXXXXX Serial_Ch1 Master XXXXXXXXXXX ARRAY 0 SATA 999.99 XXXXXXX 5-10 Chapter 5: Software Support To set the necessary RAID items in this section are for reference only,... corner of the screen are replaced with two independent Serial ATA channels. Boot up your changes and exit Setup. VIA Tech. VT8237 Series SATA RAID BIOS Ver x.xx Auto Setup For Data Security Array Mode RAID 1 (Mirroring) Select Disk Drives Start Create Process Create a RAID ...
...64257;rm the selection ESC : Exit Channel Drive Name Array Name Mode Size(GB) Status Serial_Ch0 Master XXXXXXXXXXX ARRAY 0 SATA 999.99 XXXXXXX Serial_Ch1 Master XXXXXXXXXXX ARRAY 0 SATA 999.99 XXXXXXX 5-10 Chapter 5: Software Support To set the necessary RAID items in this section are for reference only,... corner of the screen are replaced with two independent Serial ATA channels. Boot up your changes and exit Setup. VIA Tech. VT8237 Series SATA RAID BIOS Ver x.xx Auto Setup For Data Security Array Mode RAID 1 (Mirroring) Select Disk Drives Start Create Process Create a RAID ...
P5VD1-X User's Manual for English Edition
Page 101
...of valid array block sizes are displayed on disks, Continue? (Y/N) 4. From the create array menu, select Array Mode, then press . VT8237 Series SATA RAID 0 for performance RAID 1 for data protection RAID SPAN for Performance and press . Use arrow keys to select disk drive, then press to...choose to step 9. 5. Auto create array will be destroyed. Select Block Size, then press to set array block size. Continue? (Y/N) 8. ASUS P5VD1-X Motherboard 5-11 The supported RAID configurations appear on items and press to mark selected drive. Press to confirm or to ...
...of valid array block sizes are displayed on disks, Continue? (Y/N) 4. From the create array menu, select Array Mode, then press . VT8237 Series SATA RAID 0 for performance RAID 1 for data protection RAID SPAN for Performance and press . Use arrow keys to select disk drive, then press to...choose to step 9. 5. Auto create array will be destroyed. Select Block Size, then press to set array block size. Continue? (Y/N) 8. ASUS P5VD1-X Motherboard 5-11 The supported RAID configurations appear on items and press to mark selected drive. Press to confirm or to ...


