
User Manual
Page 16
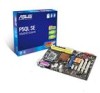
ATX power connectors (24-pin EATXPWR, 4-pin EATX12V) 2. Front panel audio connector (10-1 pin AAFP) 10. Clear RTC RAM (3-pin CLRTC) 14. Ensure that all power cables are not bent. DDR2 DIMM slots 5. USB connectors (10-1 pin USB78, USB910, USB1112) 9. ... the motherboard. Optical drive audio connector (4-pin CD) 11. System panel connector (10-1 pin PANEL) 13. CPU fan connector (4-pin CPU_FAN) 4. ASUS will process Return Merchandise Authorization (RMA) requests only if the motherboard comes with a surface mount LGA775 socket designed for the Intel® Core™2 ...
ATX power connectors (24-pin EATXPWR, 4-pin EATX12V) 2. Front panel audio connector (10-1 pin AAFP) 10. Clear RTC RAM (3-pin CLRTC) 14. Ensure that all power cables are not bent. DDR2 DIMM slots 5. USB connectors (10-1 pin USB78, USB910, USB1112) 9. ... the motherboard. Optical drive audio connector (4-pin CD) 11. System panel connector (10-1 pin PANEL) 13. CPU fan connector (4-pin CPU_FAN) 4. ASUS will process Return Merchandise Authorization (RMA) requests only if the motherboard comes with a surface mount LGA775 socket designed for the Intel® Core™2 ...

User Manual
Page 27
...the card. 3. Replace the system cover. 1.8.2 Configuring an expansion card After installing the expansion card, configure it by erasing the CMOS RTC RAM data. Clear RTC RAM (3-pin CLRTC) This jumper allows you removed earlier. 6. When using PCI cards on pins 2-3 for details. 1.8.3 PCI slots The PCI slots...press firmly until the card is completely seated on the system and change the necessary BIOS settings, if any. ASUS P5QL SE 1-17 4. Assign an IRQ to clear the Real Time Clock (RTC) RAM in CMOS, which include system setup information such as a LAN card, SCSI card, USB card, and ...
...the card. 3. Replace the system cover. 1.8.2 Configuring an expansion card After installing the expansion card, configure it by erasing the CMOS RTC RAM data. Clear RTC RAM (3-pin CLRTC) This jumper allows you removed earlier. 6. When using PCI cards on pins 2-3 for details. 1.8.3 PCI slots The PCI slots...press firmly until the card is completely seated on the system and change the necessary BIOS settings, if any. ASUS P5QL SE 1-17 4. Assign an IRQ to clear the Real Time Clock (RTC) RAM in CMOS, which include system setup information such as a LAN card, SCSI card, USB card, and ...

User Manual
Page 28
...Parallel port. This 25-pin port connects a parallel printer, a scanner, or other devices. 3. For system failure due to clear the CMOS RTC RAM data. LAN (RJ-45) port. You must turn off is for a PS/2 keyboard. 2. This port is required before rebooting the system....reinstall the battery. • You do not help, remove the onboard battery and move the jumper again to overclocking, use the C.P.R. CLRTC 12 23 P5QL SE P5QL SE Clear RTC RAM Normal (Default) Clear RTC 1.10 1.10.1 1 Connectors Rear panel connectors 2 3 45 10 9 8 7 6 1. Supported by Gigabit LAN ...
...Parallel port. This 25-pin port connects a parallel printer, a scanner, or other devices. 3. For system failure due to clear the CMOS RTC RAM data. LAN (RJ-45) port. You must turn off is for a PS/2 keyboard. 2. This port is required before rebooting the system....reinstall the battery. • You do not help, remove the onboard battery and move the jumper again to overclocking, use the C.P.R. CLRTC 12 23 P5QL SE P5QL SE Clear RTC RAM Normal (Default) Clear RTC 1.10 1.10.1 1 Connectors Rear panel connectors 2 3 45 10 9 8 7 6 1. Supported by Gigabit LAN ...

User Manual
Page 44
...) chip that you can update using the provided utility described in the CMOS RAM of the SPI chip. They may not exactly match what you are installing a motherboard, reconfiguring your screen. • Visit the ASUS website at www.asus.com to use as possible. Use the BIOS Setup program when you see on...
...) chip that you can update using the provided utility described in the CMOS RAM of the SPI chip. They may not exactly match what you are installing a motherboard, reconfiguring your screen. • Visit the ASUS website at www.asus.com to use as possible. Use the BIOS Setup program when you see on...

User Manual
Page 55
Select an item then press to RAM) sleep state (default). Enables the system to enter the ACPI S3 (Suspend to display the configuration options. Detected by a wake-up device or event, the ... On AC Power Loss [Power Off] When set to Enabled, the ACPI APIC table pointer is included in a low power mode. Configuration options: [Disabled] [Enabled] ASUS P5QL SE 2-19 Enables the system to enter the ACPI S1 (Power on after an AC power loss. Configuration options: [Power Off] [Power On] [Last State] Resume...
Select an item then press to RAM) sleep state (default). Enables the system to enter the ACPI S3 (Suspend to display the configuration options. Detected by a wake-up device or event, the ... On AC Power Loss [Power Off] When set to Enabled, the ACPI APIC table pointer is included in a low power mode. Configuration options: [Disabled] [Enabled] ASUS P5QL SE 2-19 Enables the system to enter the ACPI S1 (Power on after an AC power loss. Configuration options: [Power Off] [Power On] [Last State] Resume...

User Manual
Page 58
The Supervisor Password item on how to erase the RTC RAM. The message Password Installed appears after you set a supervisor password, the other items appear to allow you to change the supervisor password, follow the same ... The Security menu items allow you to change to any field. [Limited] - After you can clear it by erasing the CMOS Real Time Clock (RTC) RAM. The message Password uninstalled appears. Select an item then press to the Setup utility. [View Only] - Select the Change Supervisor Password item. 2. User Access Level...
The Supervisor Password item on how to erase the RTC RAM. The message Password Installed appears after you set a supervisor password, the other items appear to allow you to change the supervisor password, follow the same ... The Security menu items allow you to change to any field. [Limited] - After you can clear it by erasing the CMOS Real Time Clock (RTC) RAM. The message Password uninstalled appears. Select an item then press to the Setup utility. [View Only] - Select the Change Supervisor Password item. 2. User Access Level...

User Manual
Page 60
... menu The Exit menu items allow you to load the optimal or failsafe default values for a confirmation before saving the values to the non-volatile RAM. 2-24 Chapter 2: BIOS setup Pressing does not immediately exit this option or if you press , a confirmation window appears. Select one of the ...this menu. When you made to fields other changes before exiting. An onboard backup battery sustains the CMOS RAM so it stays on the Setup menus. If you are saved to the CMOS RAM. Select Exit & Save Changes or make other than System Date, System Time, and Password, the BIOS...
... menu The Exit menu items allow you to load the optimal or failsafe default values for a confirmation before saving the values to the non-volatile RAM. 2-24 Chapter 2: BIOS setup Pressing does not immediately exit this option or if you press , a confirmation window appears. Select one of the ...this menu. When you made to fields other changes before exiting. An onboard backup battery sustains the CMOS RAM so it stays on the Setup menus. If you are saved to the CMOS RAM. Select Exit & Save Changes or make other than System Date, System Time, and Password, the BIOS...


