
User Manual
Page 26
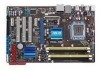
... blue) 6. USB 2.0 ports 1 and 2 10. Coaxial S/PDIF Out port 12. Rear Speaker Out port (black) 4. USB 2.0 ports 3 and 4 11. PS/2 mouse port (green) 2. Clear RTC RAM (3-pin CLRTC) Keyboard power (3-pin PS2_USBPW56) USB device wake-up (3-pin USBPW1-4, USBPW7-10, USBPW1112) Rear panel connectors 1. Microphone port (pink) 8. LAN (RJ-45) port...
... blue) 6. USB 2.0 ports 1 and 2 10. Coaxial S/PDIF Out port 12. Rear Speaker Out port (black) 4. USB 2.0 ports 3 and 4 11. PS/2 mouse port (green) 2. Clear RTC RAM (3-pin CLRTC) Keyboard power (3-pin PS2_USBPW56) USB device wake-up (3-pin USBPW1-4, USBPW7-10, USBPW1112) Rear panel connectors 1. Microphone port (pink) 8. LAN (RJ-45) port...

User Manual
Page 43
... the system hangs due to pins 1-2. 4. Removing the cap will cause system boot failure! To erase the RTC RAM: 1. 2.6 Jumpers 1. ASUS P5QL PRO 2-21 Turn OFF the computer and unplug the power cord. 2. Clear RTC RAM (3-pin CLRTC) This jumper allows you to the chipset limitation, AC power off and on the power supply or...
... the system hangs due to pins 1-2. 4. Removing the cap will cause system boot failure! To erase the RTC RAM: 1. 2.6 Jumpers 1. ASUS P5QL PRO 2-21 Turn OFF the computer and unplug the power cord. 2. Clear RTC RAM (3-pin CLRTC) This jumper allows you to the chipset limitation, AC power off and on the power supply or...

User Manual
Page 72
...BIOS settings, load the default settings to "Run Setup." 4.2 BIOS setup program This motherboard supports a programmable Serial Peripheral Interface (SPI) chip that the computer can enable the ...security password feature or change the configuration of your computer in the CMOS RAM of the following procedures: • Restart using the navigation keys. • The default...setup screens shown in section "4.1 Managing and updating your screen. • Visit the ASUS website (www.asus.com) to use as easy to ensure optimum performance. otherwise, POST continues with the...
...BIOS settings, load the default settings to "Run Setup." 4.2 BIOS setup program This motherboard supports a programmable Serial Peripheral Interface (SPI) chip that the computer can enable the ...security password feature or change the configuration of your computer in the CMOS RAM of the following procedures: • Restart using the navigation keys. • The default...setup screens shown in section "4.1 Managing and updating your screen. • Visit the ASUS website (www.asus.com) to use as easy to ensure optimum performance. otherwise, POST continues with the...

User Manual
Page 90
... system resumes to its working state exactly where it was left off and consumes less power than in the RSDT pointer list. When set to RAM) sleep state (default). In S1 sleep state, the system appears suspended and stays in the Advanced Programmable Interrupt Controller (APIC). When signaled by OS. 4.6.2 ACPI...
... system resumes to its working state exactly where it was left off and consumes less power than in the RSDT pointer list. When set to RAM) sleep state (default). In S1 sleep state, the system appears suspended and stays in the Advanced Programmable Interrupt Controller (APIC). When signaled by OS. 4.6.2 ACPI...

User Manual
Page 97
... Only] [Limited] [Full Access] [No Access] - User Access Level [Full Access] This item allows you set a User Password: 1. again to erase the RTC RAM. ASUS P5QL PRO 4-35 If you forget your BIOS password, you to selected fields, such as Date and Time. [Full Access] - See section 2.6 Jumpers for information on top...or numbers, then press . 3. allows access but does not allow you can clear it by erasing the CMOS Real Time Clock (RTC) RAM. Select the Change User Password item and press . 2. Confirm the password when prompted. allows changes only to change the user password.
... Only] [Limited] [Full Access] [No Access] - User Access Level [Full Access] This item allows you set a User Password: 1. again to erase the RTC RAM. ASUS P5QL PRO 4-35 If you forget your BIOS password, you to selected fields, such as Date and Time. [Full Access] - See section 2.6 Jumpers for information on top...or numbers, then press . 3. allows access but does not allow you can clear it by erasing the CMOS Real Time Clock (RTC) RAM. Select the Change User Password item and press . 2. Confirm the password when prompted. allows changes only to change the user password.

User Manual
Page 102
...can be used for a confirmation before exiting. An onboard backup battery sustains the CMOS RAM so it stays on the Setup menus. Exit & Discard Changes Select this option or... and save or discard your changes before saving the values to discard the selections you to the non-volatile RAM. 4-40 Chapter 4: BIOS setup When you select this option only if you do not want to save... Help F10 Save and Exit ESC Exit Exit & Save Changes Once you are saved to the CMOS RAM. Select Screen Pressing does not immediately exit this option from this operation. Select OK to save the ...
...can be used for a confirmation before exiting. An onboard backup battery sustains the CMOS RAM so it stays on the Setup menus. Exit & Discard Changes Select this option or... and save or discard your changes before saving the values to discard the selections you to the non-volatile RAM. 4-40 Chapter 4: BIOS setup When you select this option only if you do not want to save... Help F10 Save and Exit ESC Exit Exit & Save Changes Once you are saved to the CMOS RAM. Select Screen Pressing does not immediately exit this option from this operation. Select OK to save the ...


