User Manual
Page 4
... 2-42 2.10.1 Using the OS shut down function 2-42 2.10.2 Using the dual function power switch 2-42 Chapter 3: BIOS setup 3.1 Managing and updating your BIOS 3-1 3.1.1 ASUS Update utility 3-1 3.1.2 ASUS EZ Flash 2 utility 3-4 3.1.3 AFUDOS utility 3-5 3.2 BIOS setup program 3-7 3.2.1 BIOS menu screen 3-8 3.2.2 Menu bar 3-8 3.2.3 Navigation keys 3-8 3.2.4 Menu items 3-9 3.2.5 Sub-menu items 3-9 3.2.6 Configuration fields 3-9 3.2.7 Pop-up window 3-9 3.2.8 Scroll bar...
... 2-42 2.10.1 Using the OS shut down function 2-42 2.10.2 Using the dual function power switch 2-42 Chapter 3: BIOS setup 3.1 Managing and updating your BIOS 3-1 3.1.1 ASUS Update utility 3-1 3.1.2 ASUS EZ Flash 2 utility 3-4 3.1.3 AFUDOS utility 3-5 3.2 BIOS setup program 3-7 3.2.1 BIOS menu screen 3-8 3.2.2 Menu bar 3-8 3.2.3 Navigation keys 3-8 3.2.4 Menu items 3-9 3.2.5 Sub-menu items 3-9 3.2.6 Configuration fields 3-9 3.2.7 Pop-up window 3-9 3.2.8 Scroll bar...

User Manual
Page 10
...information you have been added by your dealer. ASUS websites The ASUS website provides updated information on the motherboard. • Chapter 3: BIOS setup This chapter tells how to the ASUS contact information. 2. Detailed descriptions of the BIOS parameters are not part of the motherboard and ...the following sources for additional information and for product and software updates. 1. Refer to change system settings through the BIOS Setup menus. These documents are also provided. • Chapter 4: Software support This chapter describes the contents of the switches, jumpers...
...information you have been added by your dealer. ASUS websites The ASUS website provides updated information on the motherboard. • Chapter 3: BIOS setup This chapter tells how to the ASUS contact information. 2. Detailed descriptions of the BIOS parameters are not part of the motherboard and ...the following sources for additional information and for product and software updates. 1. Refer to change system settings through the BIOS Setup menus. These documents are also provided. • Chapter 4: Software support This chapter describes the contents of the switches, jumpers...

User Manual
Page 13
... panel) ADI® AD2000B 8-channel High Definition Audio CODEC - ASUS Noise-Filtering 12 (10) x USB 2.0 ports (6 ports at mid-board, 6 ports at back I/O - ASUS 8-Phase Power Design - ASUS EPU-6 Engine - AI Nap ASUS Quiet Thermal Solution: - ASUS Q-Connector - ASUS DieHard BIOS - ASUS O.C. vChipset (N.B.): 55-step chipset voltage control - ASUS C.P.R.(CPU Parameter Recall) (continued on the next page) xiii Coaxial...
... panel) ADI® AD2000B 8-channel High Definition Audio CODEC - ASUS Noise-Filtering 12 (10) x USB 2.0 ports (6 ports at mid-board, 6 ports at back I/O - ASUS 8-Phase Power Design - ASUS EPU-6 Engine - AI Nap ASUS Quiet Thermal Solution: - ASUS Q-Connector - ASUS DieHard BIOS - ASUS O.C. vChipset (N.B.): 55-step chipset voltage control - ASUS C.P.R.(CPU Parameter Recall) (continued on the next page) xiii Coaxial...
User Manual
Page 14
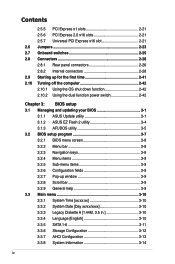
xiv P5Q-E specifications summary Back Panel I/O ports Internal I/O connectors BIOS features Manageability Support DVD contents Form factor 1 x PS/2 Keyboard / Mouse combo port 1 x S/PDIF Out (Coaxial + Optical) port 1 x External SATA port 1 x IEEE1394a port 2 x RJ45 ports 6 ...Connector) 1 x TPM connector 1 x Power on switch 1 x Reset switch 16 Mb AMI BIOS, PnP, DMI 2.0, WfM 2.0, SM BIOS 2.4 WOL by PME, WOR by PME, WOR by Ring, PXE, Chassis Intrusion Drivers ASUS Express Gate ASUS PC Probe II ASUS Update ASUS AI Suite Image-Editing Suite Anti-virus software (OEM version) ATX Form Factor, 12...
xiv P5Q-E specifications summary Back Panel I/O ports Internal I/O connectors BIOS features Manageability Support DVD contents Form factor 1 x PS/2 Keyboard / Mouse combo port 1 x S/PDIF Out (Coaxial + Optical) port 1 x External SATA port 1 x IEEE1394a port 2 x RJ45 ports 6 ...Connector) 1 x TPM connector 1 x Power on switch 1 x Reset switch 16 Mb AMI BIOS, PnP, DMI 2.0, WfM 2.0, SM BIOS 2.4 WOL by PME, WOR by PME, WOR by Ring, PXE, Chassis Intrusion Drivers ASUS Express Gate ASUS PC Probe II ASUS Update ASUS AI Suite Image-Editing Suite Anti-virus software (OEM version) ATX Form Factor, 12...
User Manual
Page 21
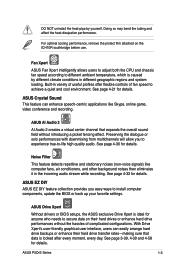
... downmixing from multichannels will allow you easy ways to install computer components, update the BIOS or back up your favorite settings. ASUS Drive Xpert Without drivers or BIOS setups, the ASUS exclusive Drive Xpert is ideal for anyone who needs to different ambient temperature, which ...details. Doing so may bend the tubing and affect the heat dissipation performance. ASUS EZ DIY ASUS EZ DIY feature collection provides you to experience true-to achieve a quiet and cool environment. ASUS P5Q-E Series 1-5 DO NOT uninstall the heat-pipe by different climate conditions in ...
... downmixing from multichannels will allow you easy ways to install computer components, update the BIOS or back up your favorite settings. ASUS Drive Xpert Without drivers or BIOS setups, the ASUS exclusive Drive Xpert is ideal for anyone who needs to different ambient temperature, which ...details. Doing so may bend the tubing and affect the heat dissipation performance. ASUS EZ DIY ASUS EZ DIY feature collection provides you to experience true-to achieve a quiet and cool environment. ASUS P5Q-E Series 1-5 DO NOT uninstall the heat-pipe by different climate conditions in ...
User Manual
Page 22
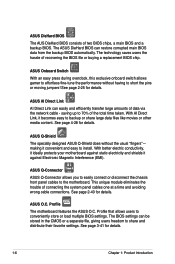
... eliminates the trouble of two BIOS chips, a main BIOS and a backup BIOS. See page 2-40 for details. The BIOS settings can restore corrupted main BIOS data from the backup BIOS automatically. Profile The motherboard features the ASUS O.C. ASUS DieHard BIOS The AUS DieHard BIOS consists of connecting the system ... CMOS or a separate file, giving users freedom to 70% of recovering the BIOS file or buying a replacement BIOS chip. See page 2-25 for details. 1-6 Chapter 1: Product Introduction ASUS AI Direct Link AI Direct Link can easily and efficiently transfer large amounts of...
... eliminates the trouble of two BIOS chips, a main BIOS and a backup BIOS. See page 2-40 for details. The BIOS settings can restore corrupted main BIOS data from the backup BIOS automatically. Profile The motherboard features the ASUS O.C. ASUS DieHard BIOS The AUS DieHard BIOS consists of connecting the system ... CMOS or a separate file, giving users freedom to 70% of recovering the BIOS file or buying a replacement BIOS chip. See page 2-25 for details. 1-6 Chapter 1: Product Introduction ASUS AI Direct Link AI Direct Link can easily and efficiently transfer large amounts of...

User Manual
Page 23
See page 4-23 for a more colorful and vivid image on your screen. feature of booting the BIOS. eliminates the need to overclocking, C.P.R. ASUS P5Q-E Series 1-7 ASUS MyLogo3™ This feature allows you to overclock the CPU speed in Windows environment without entering the OS. ... (CPU Parameter Recall) The C.P.R. ASUS EZ Flash 2 EZ Flash 2 is a user-friendly BIOS update utility. Simply press the predefined hotkey to launch the utility and update the BIOS without the hassle of the motherboard BIOS allows automatic re-setting to the BIOS default settings in case the system ...
See page 4-23 for a more colorful and vivid image on your screen. feature of booting the BIOS. eliminates the need to overclocking, C.P.R. ASUS P5Q-E Series 1-7 ASUS MyLogo3™ This feature allows you to overclock the CPU speed in Windows environment without entering the OS. ... (CPU Parameter Recall) The C.P.R. ASUS EZ Flash 2 EZ Flash 2 is a user-friendly BIOS update utility. Simply press the predefined hotkey to launch the utility and update the BIOS without the hassle of the motherboard BIOS allows automatic re-setting to the BIOS default settings in case the system ...
User Manual
Page 45
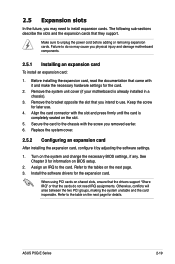
... the system unstable and the card inoperable. Refer to do not need to the card. Install the software drivers for the card. 2. ASUS P5Q-E Series 2-19 Remove the bracket opposite the slot that the cards do so may need IRQ assignments. Assign an IRQ to install expansion ...use . Remove the system unit cover (if your motherboard is completely seated on the next page. 3. Secure the card to use . 4. Turn on BIOS setup. 2. 2.5 Expansion slots In the future, you may cause you physical injury and damage motherboard components. 2.5.1 Installing an expansion card To install an...
... the system unstable and the card inoperable. Refer to do not need to the card. Install the software drivers for the card. 2. ASUS P5Q-E Series 2-19 Remove the bracket opposite the slot that the cards do so may need IRQ assignments. Assign an IRQ to install expansion ...use . Remove the system unit cover (if your motherboard is completely seated on the next page. 3. Secure the card to use . 4. Turn on BIOS setup. 2. 2.5 Expansion slots In the future, you may cause you physical injury and damage motherboard components. 2.5.1 Installing an expansion card To install an...
User Manual
Page 49
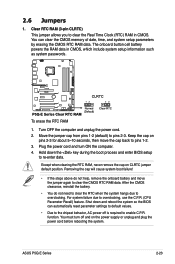
... cap on CLRTC jumper default position. Turn OFF the computer and unplug the power cord. 2. Shut down the key during the boot process and enter BIOS setup to clear the Real Time Clock (RTC) RAM in CMOS, which include system setup information such as system passwords. To erase the RTC RAM... C.P.R. You must turn ON the computer. 4. The onboard button cell battery powers the RAM data in CMOS. Hold down and reboot the system so the BIOS can clear the CMOS memory of date, time, and system setup parameters by erasing the CMOS RTC RAM data. function. ASUS P5Q-E Series 2-23
... cap on CLRTC jumper default position. Turn OFF the computer and unplug the power cord. 2. Shut down the key during the boot process and enter BIOS setup to clear the Real Time Clock (RTC) RAM in CMOS, which include system setup information such as system passwords. To erase the RTC RAM... C.P.R. You must turn ON the computer. 4. The onboard button cell battery powers the RAM data in CMOS. Hold down and reboot the system so the BIOS can clear the CMOS memory of date, time, and system setup parameters by erasing the CMOS RTC RAM data. function. ASUS P5Q-E Series 2-23
User Manual
Page 50
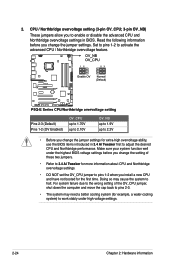
...1.9V up to 2.2V • Before you install a new CPU and have not booted for extra-high overvoltage ability, use the BIOS items introduced in BIOS. Set to pins 1-2 to adjust the desired CPU and Northbridge performance. CPU / Northbridge overvoltage setting (3-pin OV_CPU; 3-pin OV_NB) ...setting of these two jumpers. • Refer to 3.4 Ai Tweaker for example, a water-cooling system) to work stably under the highest BIOS voltage settings before you change the jumper settings. Doing so may need a better cooling system (for more information about CPU and Northbridge overvoltage ...
...1.9V up to 2.2V • Before you install a new CPU and have not booted for extra-high overvoltage ability, use the BIOS items introduced in BIOS. Set to pins 1-2 to adjust the desired CPU and Northbridge performance. CPU / Northbridge overvoltage setting (3-pin OV_CPU; 3-pin OV_NB) ...setting of these two jumpers. • Refer to 3.4 Ai Tweaker for example, a water-cooling system) to work stably under the highest BIOS voltage settings before you change the jumper settings. Doing so may need a better cooling system (for more information about CPU and Northbridge overvoltage ...
User Manual
Page 56
...hard disk drives, you can connect Serial ATA boot/data hard disk drives to these connectors, set the Configure SATA as item in the BIOS to avoid mechanical conflict with the Intel® Matrix Storage Technology through the onboard Intel® ICH10R RAID controller. •• These ... these connectors. Or you intend to create a Serial ATA RAID set , refer to 4.4.3 Intel RAID configurations or the manual bundled in the BIOS to SATA device. See section 3.3.6 Storage Configuration for details. If you may connect the right-angle side of SATA signal cable to [AHCI].
...hard disk drives, you can connect Serial ATA boot/data hard disk drives to these connectors, set the Configure SATA as item in the BIOS to avoid mechanical conflict with the Intel® Matrix Storage Technology through the onboard Intel® ICH10R RAID controller. •• These ... these connectors. Or you intend to create a Serial ATA RAID set , refer to 4.4.3 Intel RAID configurations or the manual bundled in the BIOS to SATA device. See section 3.3.6 Storage Configuration for details. If you may connect the right-angle side of SATA signal cable to [AHCI].
User Manual
Page 62
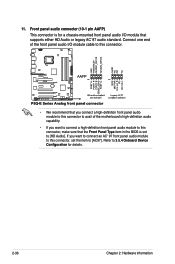
...) This connector is set the item to this connector to avail of the front panel audio I /O module that the Front Panel Type item in the BIOS is for details. 2-36 Chapter 2: Hardware information
...) This connector is set the item to this connector to avail of the front panel audio I /O module that the Front Panel Type item in the BIOS is for details. 2-36 Chapter 2: Hardware information
User Manual
Page 65
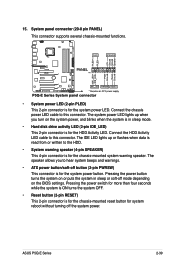
... for system reboot without turning off button (2-pin PWRSW) This connector is for the chassis-mounted reset button for the system power LED. ASUS P5Q-E Series 2-39 15. The speaker allows you turn on the BIOS settings. The system power LED lights up or flashes when data is for the system power button.
... for system reboot without turning off button (2-pin PWRSW) This connector is for the chassis-mounted reset button for the system power LED. ASUS P5Q-E Series 2-39 15. The speaker allows you turn on the BIOS settings. The system power LED lights up or flashes when data is for the system power button.
User Manual
Page 67
... detected Hardware component failure 7. After applying power, the system power LED on the system front panel case lights up or switch between orange and green after the system LED turns on. While the tests are off. 3. At power on, hold down the key to the power connector at ... the system case cover. 2. After making all switches are running, the BIOS beeps (see anything within 30 seconds from the time you press the ATX power button. Turn on self tests or POST. ASUS P5Q-E Series 2-41 For systems with "green" standards or if it has a "power standby" feature, the monitor LED...
... detected Hardware component failure 7. After applying power, the system power LED on the system front panel case lights up or switch between orange and green after the system LED turns on. While the tests are off. 3. At power on, hold down the key to the power connector at ... the system case cover. 2. After making all switches are running, the BIOS beeps (see anything within 30 seconds from the time you press the ATX power button. Turn on self tests or POST. ASUS P5Q-E Series 2-41 For systems with "green" standards or if it has a "power standby" feature, the monitor LED...
User Manual
Page 68
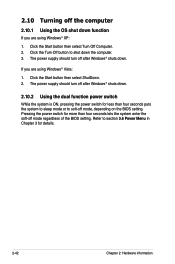
... the computer. 3. Pressing the power switch for more than four seconds puts the system to sleep mode or to soft-off mode, depending on the BIOS setting. 2.10 Turning off the computer 2.10.1 Using the OS shut down . If you are using Windows® XP: 1. Click the Turn Off button to... for details. 2-42 Chapter 2: Hardware information Click the Start button then select Turn Off Computer. 2. The power supply should turn off mode regardless of the BIOS setting. Click the Start button then select ShutDown. 2.
... the computer. 3. Pressing the power switch for more than four seconds puts the system to sleep mode or to soft-off mode, depending on the BIOS setting. 2.10 Turning off the computer 2.10.1 Using the OS shut down . If you are using Windows® XP: 1. Click the Turn Off button to... for details. 2-42 Chapter 2: Hardware information Click the Start button then select Turn Off Computer. 2. The power supply should turn off mode regardless of the BIOS setting. Click the Start button then select ShutDown. 2.

User Manual
Page 69
This chapter tells how to change the BIOS se3tup system settings through the BIOS Setup menus. Detailed descriptions of the BIOS parameters are also provided.
This chapter tells how to change the BIOS se3tup system settings through the BIOS Setup menus. Detailed descriptions of the BIOS parameters are also provided.

User Manual
Page 70
Chapter summary 3 3.1 Managing and updating your BIOS 3-1 3.2 BIOS setup program 3-7 3.3 Main menu 3-10 3.4 Ai Tweaker 3-15 3.5 Advanced menu 3-23 3.6 Power menu 3-30 3.7 Boot menu 3-34 3.8 Tools menu 3-38 3.9 Exit menu 3-43 ASUS P5Q-E Series
Chapter summary 3 3.1 Managing and updating your BIOS 3-1 3.2 BIOS setup program 3-7 3.3 Main menu 3-10 3.4 Ai Tweaker 3-15 3.5 Advanced menu 3-23 3.6 Power menu 3-30 3.7 Boot menu 3-34 3.8 Tools menu 3-38 3.9 Exit menu 3-43 ASUS P5Q-E Series

User Manual
Page 71
.... Copy the original motherboard BIOS using the ASUS Update or AFUDOS utilities. 3.1.1 ASUS Update utility The ASUS Update is a utility that comes with the motherboard package. Installing ASUS Update To install ASUS Update: 1. The Drivers menu appears. 2. ASUS P5Q-E Series 3-1 ASUS EZ Flash 2 (Updates the BIOS using a bootable floppy disk) Refer to : • Save the current BIOS file • Download the...
.... Copy the original motherboard BIOS using the ASUS Update or AFUDOS utilities. 3.1.1 ASUS Update utility The ASUS Update is a utility that comes with the motherboard package. Installing ASUS Update To install ASUS Update: 1. The Drivers menu appears. 2. ASUS P5Q-E Series 3-1 ASUS EZ Flash 2 (Updates the BIOS using a bootable floppy disk) Refer to : • Save the current BIOS file • Download the...
User Manual
Page 72
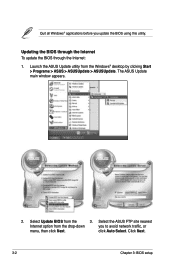
Select the ASUS FTP site nearest Internet option from the 3. click Auto Select. Click Next. 3-2 Chapter 3: BIOS setup Select Update BIOS from the drop‑down you update the BIOS using this utility. Launch the ASUS Update utility from the Windows® desktop by clicking Start > Programs > ASUS > ASUSUpdate > ASUSUpdate. Quit all Windows® applications before you to avoid network traffic, or menu, then click Next. Updating the BIOS through the Internet To update the BIOS through the Internet: 1. The ASUS Update main window appears. 2.
Select the ASUS FTP site nearest Internet option from the 3. click Auto Select. Click Next. 3-2 Chapter 3: BIOS setup Select Update BIOS from the drop‑down you update the BIOS using this utility. Launch the ASUS Update utility from the Windows® desktop by clicking Start > Programs > ASUS > ASUSUpdate > ASUSUpdate. Quit all Windows® applications before you to avoid network traffic, or menu, then click Next. Updating the BIOS through the Internet To update the BIOS through the Internet: 1. The ASUS Update main window appears. 2.
User Manual
Page 73
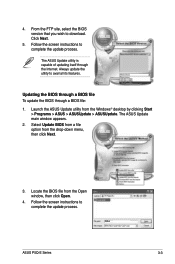
... from the Windows® desktop by clicking Start > Programs > ASUS > ASUSUpdate > ASUSUpdate. Updating the BIOS through a BIOS file To update the BIOS through the Internet. Locate the BIOS file from the Open window, then click Open. 4. The ASUS Update main window appears. 2. Always update the utility to download. 4. P5Q-E.ROM P5Q-E ASUS P5Q-E Series 3-3 From the FTP site, select the...
... from the Windows® desktop by clicking Start > Programs > ASUS > ASUSUpdate > ASUSUpdate. Updating the BIOS through a BIOS file To update the BIOS through the Internet. Locate the BIOS file from the Open window, then click Open. 4. The ASUS Update main window appears. 2. Always update the utility to download. 4. P5Q-E.ROM P5Q-E ASUS P5Q-E Series 3-3 From the FTP site, select the...


